background image

WiFi drivers

 – The Galileo supports all Intel-chipset WiFi cards with these drivers. Plug them

in, and they should be recognized immediately.

Python

 – Python is our favorite when it comes to scripting languages. With Python you can

easily 

post to Twitter

check for unread emails

, and perform all sorts of other nifty tricks.

Node.js

 – Node.js is a popular JavaScript-based scripting language. A good alternative to

Python, if you’re more comfortable with JS.

SSH

 – Secure Shell (SSH) is an incredibly useful network tool that allows you to log into and

control a device remotely. With SSH running on your network-connected Galileo, you can skip
both of the terminal methods described on the last page, and remotely control the board from
any device on the network.

openCV

 – OpenCV is an open-source 

computer vision

 application. You can plug a USB

webcam into the Galileo’s USB host port, and use OpenCV to track and recognize objects.

ALSA

 – 

Advanced Linux Sound Architectures (ALSA)

 can equip your Galileo (and an

attached sound card) with the ability to play and record MIDI files.

V4L2

 – 

Video4Linux2

 is a video record and play utility for Linux. You’ll need a USB webcam

attached to your Galileo to make use of this.

Installing the Bigger Image

To boot the Galileo off the bigger Linux image, you’ll need an 

SD card

 that is at least 1GB (and less

than 32GB). You’ll also need to 

download the bigger image

 from 

Intel’s Drivers page

 (find the most

current file there). The file is about 37 MB.

The download comes as a 

7z

 file, which means you may need extra software to extract it. Windows

and Linux users can use 

7Zip

, Mac users can use 

The Unarchiver

.

Extract the contents of the 

7z

 file to the 

top level of your SD card

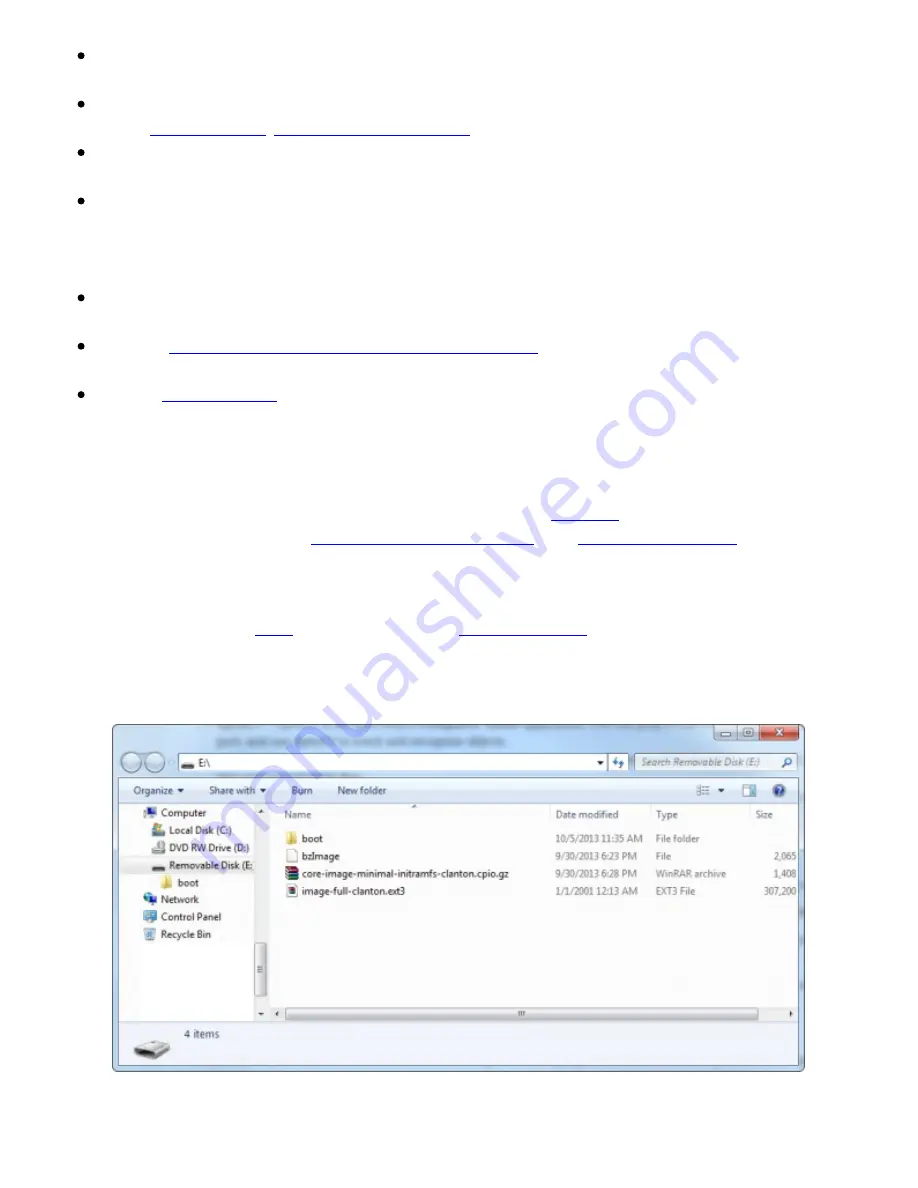
. Once unzipped, this is what your

SD directory structure should look like.

Power down your Galileo (remove both USB and 5V power), and 

plug in the µSD card

. Then

power it back up.

Page 18 of 20

Summary of Contents for Quark SoC X1000

Page 1: ...k Using the Terminal Bigger Linux Image Resources and Going Further Introduction The Galileo is Intel s toe dip into the Arduino waters It features their Quark SoC X1000 processor a relatively new x86 based low power embedded system on a chip The 32 bit processor can run at up to 400MHz and it has 512 KB SRAM built in The Galileo board supports the Quark with a wide range of external peripherals P...

Page 2: ...ully operational Linux operating system Most sketches written for Arduino Unos Leonardos and other boards can be ported directly over to the Galileo You still have access to popular Arduino libraries like SD Ethernet WiFi EEPROM SPI and Wire but you can also access the Linux side of the board with system calls The Linux half of the board supports stuff like Python Node js SSH Telnet and all sorts ...

Page 3: ...ow to install it Required Materials Galileo Board The star of the show The Galileo product should include both a 5V 3A power supply and a micro B USB cable µSD card This is required if you want to use the bigger Linux image The card should be bigger than 1GB and no larger than 32GB Suggested Reading Before delving into this tutorial there are a few concepts you should be familiar with including Wh...

Page 4: ...includes UART on pins 0 1 PWM on pins 3 5 and 6 10 pin digital I O header D8 SCL which includes I2C pins and PWM on pins 9 10 and 11 2x3 pin ICSP header breaks out SPI pins Reboot Button Pressing this button will reboot the entire Galileo Linux included Boot time is about 30 seconds so don t press this accidentally Pin 13 LED As with most Arduinos the Galileo ties a small on board LED to pin 13 Gr...

Page 5: ...alileo Powering the Galileo The Galileo can supposedly be powered via USB on the Client port but Intel recommends against that Instead the board should be powered through the barrel jack using a regulated 5V DC power supply The Galileo includes a universal wall adapter which should work for just about anyone If you re using your own supply make sure it can supply up to 3A And remember that 5V is t...

Page 6: ...t ARM is a RISC Reduced Instruction Set Computing a smaller simpler instruction set architecture and x86 processors are CISC Complex Instruction Set Computing a more complex and powerful set Something that takes an x86 one clock cycle might take an ARM processor three A large instruction set requires more hardware which requires more power to run Intel s Atom and Quark products try to combat the h...

Page 7: ... where and how you unzip it Windows Install Windows users should unzip the file to the top directory of your drive e g C You can leave the unzipped directory as named arduino 1 5 3 or rename it to something descriptive just make sure there are no spaces in the name of the directory Examples Windows directory structure The Arduino Galileo 1 5 3 software is installed at the top level C of the drive ...

Page 8: ...ns to enable uploading to the board This will vary by distro but something like sudo apt get remove modemmanager will work Once installed run the arduino file in the extracted directory From a terminal you can enter arduino to run it Driver Installation Once you ve downloaded and installed the software the next step is to connect the board and install drivers This process differs on each operation...

Page 9: ...the Device Manager Either Start Run devmgmt msc or go to the Control Panel select System and click Device Manager 5 Locate the Gadget Serial v2 4 device under the Other devices tree Right click that and select Update Driver Software 6 On the first window that pops up click Browse my computer for driver software And on the next page select Browse and navigate to the hardware arduino x86 tools folde...

Page 10: ...he next step updating firmware Mac OS X Driver Install Mac has built in driver support for the Galileo so this setup should be easy Follow the steps below to install the board on your machine 1 Begin by connecting 5V power to the Galileo 2 Then connect a micro B USB cable from the USB Client port on the Galileo to an available USB socket on your computer 3 Wait a few seconds while the Galileo boot...

Page 11: ... of the port number that the Galileo is assigned to you ll need that when you upload code to the board Updating Firmware Updating the Galileo firmware is a good first step to take after driver installation It helps to prove that your software and drivers are set up correctly and it prepares your Galileo board with the most up to date firmware available Follow the steps below to update your Galileo...

Page 12: ...le of the Window has Arduino 1 5 3 at the top Then the first step is to select the serial port Go to the Tools menu then hover over Serial Port On a Windows machine select the COM port you saw earlier in the Device Manager On a Mac machine select the dev cu usbmodemXXXX make sure it s the cu option that matched what you found in the System Information panel Board Selection Under the Tools Board me...

Page 13: ...re you don t unplug either power or USB from the Galileo As the pop up says the update procedure will take about five minutes A Target Firmware Upgraded Successfully pop up will appear after the update completes Uploading Blink As always the first program to be uploaded to a board is the Hello world of microcontrollers Blink To open the Blink example go to the File Examples 01 Basics Blink languag...

Page 14: ...ng on and off every second This LED is connected to pin 13 of the Galileo Troubleshooting If you re having any trouble uploading code or even updating the firmware here are a few of the hiccups we encountered and how we fixed them In general if you re having any trouble try rebooting your Galileo unplug everything wait a few seconds plug back in wait for the boot up to complete to see if it fixes ...

Page 15: ... as good a place as any to start learning There are two different ways to connect to the Linux terminal over the 3 5mm stereo jack RS 232 port or over USB The former requires a special cable or two and the latter requires you to upload a special Arduino sketch We ll cover both on this page there are pros and cons to each approach Both of these methods require that you have a terminal emulator inst...

Page 16: ... grst with grst s to comment that line out system sed i s grst grst g etc inittab Replace all clld with clld s to comment that line out system sed i s clld clld g etc inittab system kill SIGHUP 1 void loop Once that s uploaded you ll need to open up a separate serial terminal program not the Serial Monitor Set the serial port to the same as your Galileo and set the baud rate to 115200 See the belo...

Page 17: ...ut these resources If you re feeling handicapped by some of the Linux commands that may be missing check over to the next page where we ll install the bigger Linux image The bigger Linux image boots the Galileo off an SD card and provides access to useful tools like SSH Python node js and OpenCV Bigger Linux Image With the on board flash memory the Galileo has a limited amount of space to store it...

Page 18: ...nto the Galileo s USB host port and use OpenCV to track and recognize objects ALSA Advanced Linux Sound Architectures ALSA can equip your Galileo and an attached sound card with the ability to play and record MIDI files V4L2 Video4Linux2 is a video record and play utility for Linux You ll need a USB webcam attached to your Galileo to make use of this Installing the Bigger Image To boot the Galileo...

Page 19: ...you ve gotten this far you should be prepared enough to start designing your own Arduino Intel Galileo project If you need a bit more here are some of the resources we ve found handy in experimenting with the board Galileo Community Forum Intel s Galileo Getting Started Guide Galileo Software Downloads Nifty Galileo Arduino Examples Galileo Schematics Galileo Board Design Files Going Further If yo...

Page 20: ... the Galileo a Python running Twitter reading LED blinker Getting Started with Raspberry Pi Setting Up Raspbian If you want to continue on your Getting Started Guide bender check out this tutorial on getting the Raspberry Pi running the most popular distro out there pcDuino Crowdsource Kiosk How to make a crowdsource kiosk with the pcDuino another popular single board computer alternative learn sp...

Reviews: