background image

Galaxy Manual 1/7/15 


Page 14 of 33 

WEEKLY MAINTENANCE


At least once a week, inspect the internal 
components, solution fittings and electrical 
connections.  Check for signs of 

fluid leakage

 and 

tighten or replace fittings as necessary.  Make sure 
all 

electrical connections

 and 

cables

 are in place. 

 
Solution Lines and Fittings 

Flush the machine with a solution of 1 part water 
with 20 parts B109 Fibre & Fabric Rinse in order to 
neutralise the alkaline residue left by the cleaning 
solution. 

 
Quick connect coupler 

Spray with WD-40 or equivalent lubricant to prevent 
coupler from sticking. 

 
Drain Valve 

Apply light oil on gate seals. If machine has to be 
stored, leave the gate valve open. 
 

SOLUTION PUMP 

 
!! CAUTION - ONLY QUALIFIED MAINTENANCE 
PERSONNEL SHOULD ATTEMPT THE 
FOLLOWING REPAIRS


A diaphragm type pump is fitted to the Galaxy 
models and requires little maintenance other than 
occasional inspection of the pump head to check for 
any fluid leakage.  The following components 
should be inspected and cleaned, or replaced as 
necessary. See parts illustration in this manual for 
further reference. 
 

-


CHECK VALVE ASSEMBLY 

-


DIAPHRAGM 

-


CAM DRIVE BEARING 

-


MOTOR BRUSHES.


Models fitted with continuous running pumps (no 
pressure switch fitted) should be checked for brush 
wear every 6 months for normal usage and every 3 
months for heavy usage. In the event of a reduction 
in operating pressure, leakage or pump failure, refer 
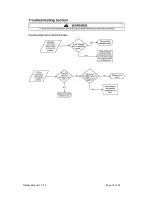
to the 

'Fault Finding Guide'

 and contact your 

Prochem

 Distributor. 


VACUUM MOTOR 

 
!! CAUTION - ONLY QUALIFIED MAINTENANCE 
PERSONNEL SHOULD ATTEMPT THE 
FOLLOWING REPAIRS


The vacuum motor is lubricated for life - no 
additional lubrication is required.   The only other 
maintenance that may be required is changing the 
motor brushes.   

This should only be carried out 

by an individual with THOROUGH knowledge of 
electric motors


The brushes should be changed before the 
brush wears to within 3/8" of the brass holder. 
 
With heavy usage we recommend that the 
brushes be checked every 3 months. The 
recommended inspection period for normal 
usage is at least every 6 months. The estimated 
brush life is approximately 400 to 450 hours, but 
inspection and replacement should take place at 
least every 350 hours to prevent the possibility 
that brush wear may cause damage to the 
vacuum motor. 

 
On re-assembly, the lead wires must be kept away 
from the rotating parts and the motor frame.  Always 
ensure that the green earth wire is re-connected to 
the vacuum motor body to ensure safe operation. 
To achieve maximum life, the brushes should be 
seated on the commutator before full voltage is 
applied.   Do this by applying 50% of the rated 
voltage for thirty minutes

.

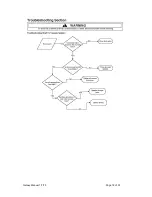
   In the event of electrical 

or mechanical failure, refer to the General Fault 
Finding Guide page in this manual and contact your 
Prochem Distributor.   Although some service parts 
are available, we recommend that defective 
vacuums be replaced.


Summary of Contents for AX500

Page 1: ...Galaxy Manual 1 7 15 Page 1 of 33 Galaxy CARPET SOIL EXTRACTOR SAFETY OPERATION MAINTENANCE INSTRUCTIONS MODELS AX500 GALAXY CAUTION READ THE INSTRUCTION MANUAL BEFORE USING THE APPLIANCE...

Page 2: ...prochem co uk Website www prochem co uk All information and specifications in this manual are current at the date of issue However because of Prochem Europe policy of continual product improvement we...

Page 3: ...TIONS 8 UNDERSTANDING YOUR SOIL EXTRACTOR 9 ACCESSORIES CHEMICALS 10 CONDENSED OPERATING INSTRUCTIONS 11 PRACTICAL CARPET CLEANING 12 GENERAL MAINTENANCE 13 TROUBLESHOOTING SECTION 15 DISASSEMBLY SECT...

Page 4: ...r information regarding the disposal treatment recycling and recovery of this product please contact Prochem Europe Sales Department Telephone 44 0 20 8974 1515 Prochem Europe Ltd EEE Producer Registr...

Page 5: ...if the warranty is approved but DISTRIBUTORS will be responsible for fitting service labour and related charges including travel if applicable and the cost of returning the machine or parts to Prochem...

Page 6: ...manufacturer or its service agent During operation a hazard may occur when running the machine over the power supply cord The power supply cord should be regularly inspected for signs of damage If th...

Page 7: ...ution tank Do not overfill the solution tank AFTER USE flush solution system and rinse the waste tank with clean water and remove loose fibres from the vacuum filter ALWAYS observe directions and safe...

Page 8: ...chine connected to an electrical outlet when unattended Do not immerse or use this machine in standing water Such use may cause electric shock This equipment is not designed to handle or use combustib...

Page 9: ...refill with clean hot solution using a separate bucket By using this technique the solution tank is kept topped up and the recovery tank is always below warning level all in one journey The filter in...

Page 10: ...09 MULTI PRO A concentrated pre spotter and traffic lane cleaner for treating spots stains and heavily soiled traffic areas prior to extraction cleaning Dilute with warm water at 1 4 to 1 8 and apply...

Page 11: ...ket under the drain elbow and pull up the drain valve T handle Dirty solution will pour out until the tank is empty Close the drain valve Use a clean bucket when you refill the solution tank 5 When th...

Page 12: ...the base of the skirting board 3 Operate solution trigger to apply spray cleaning solution whilst simultaneously drawing back the wand toward the operator thus allowing the vacuum nozzle to extract th...

Page 13: ...onductor of the wire coloured blue shall be connected to the terminal marked N and the conductor of the wire coloured green and yellow shall be connected to the terminal marked with the Earth symbol t...

Page 14: ...f a reduction in operating pressure leakage or pump failure refer to the Fault Finding Guide and contact your Prochem Distributor VACUUM MOTOR CAUTION ONLY QUALIFIED MAINTENANCE PERSONNEL SHOULD ATTEM...

Page 15: ...Galaxy Manual 1 7 15 Page 15 of 33...

Page 16: ...Galaxy Manual 1 7 15 Page 16 of 33...

Page 17: ...Galaxy Manual 1 7 15 Page 17 of 33...

Page 18: ...Galaxy Manual 1 7 15 Page 18 of 33...

Page 19: ...Galaxy Manual 1 7 15 Page 19 of 33...

Page 20: ...Galaxy Manual 1 7 15 Page 20 of 33...

Page 21: ...Galaxy Manual 1 7 15 Page 21 of 33...

Page 22: ...Galaxy Manual 1 7 15 Page 22 of 33...

Page 23: ...116213 00 G90007 1 VACUUM 2 STAGE 5 7 220 240V VACUUM 2 STAGE 5 7 REVERSE FAN 220 240V 1 1 10 J00639 SCREW CLAMP 1 63 X 2 43 1 11 E00618 J00618 VAC HOSE 2 GREY WIRE 1 12 E11969 F11969 HANDLE 1 13 E118...

Page 24: ...E11692 D11692 LATCH 2 33 E11529 C11529 SCREW 10 32 X 0 375 4 34 E12013 C12013 SCREW 3 8 16 X 1 5SS 2 35 D12121 LATCH BUTTON BLACK 2 36 C00254 LOCK WASHER 2 37 E02294 C02294 SCREW 20 X 1 25 SS 2 38 D00...

Page 25: ...CREEN c w K11965 ELBOW 1 7 E00919 K00672 PVC PIPE 1 5 X 6 75 SCH 40 WHT 1 8 E11961 K11961 ADAPTOR PVC 1 5 1 9 E00665 1 K00665 1 HOSE ADAPTOR 1 5 BLACK 2 9A BS5201 FALL OUT TUBE AND ELBOW NOT SHOWN 1 1...

Page 26: ...CORE 13A 220 240V 1 11 E02211 1 B02211 1 SWITCH ROCKER GREEN LIGHT 2 12 E02576 H02576 LABEL VACUUM 1 13 E02574 H02574 LABEL PUMP 1 14 E02714 K02714 PLUG 0 5 1 15 E00565 13 H00565 13 LABEL SERIAL NUMBE...

Page 27: ...A00053 45 DEG ELBOW 0 25MP X 0 25FP 1 33 C00284 SCREW 10 32 X 0 375 EARTH 1 34 E00095 1 A00168 18 BUSHING 0 25M X 0 125F 1 35 E11876 11876 2A 0 125 HIGH PRESSURE HOSE ASSY 2FT 1 PF00616 G VAC38ZC VACU...

Page 28: ...Galaxy Manual 1 7 15 Page 28 of 33 AC1030 WAND PARTS LIST...

Page 29: ...LHA DIAPHRAGM AND DRIVE BEARING ASSY 1 5 MOTOR 230V AC 1 6 E11764EBK G11764 1 EBK CARBON BRUSH KIT 1 REF STOCK CODE PART NO DESCRIPTION QTY 1 E11162 G11162 150PSI PUMP HEAD PLEASE REQUEST WHEN PURCHAS...

Page 30: ...Galaxy Manual 1 7 15 Page 30 of 33 PM2501 HAND TOOL PARTS LIST...

Page 31: ...Galaxy Manual 1 7 15 Page 31 of 33 AC1039 HAND TOOL PARTS LIST...

Page 32: ...Galaxy Manual 1 7 15 Page 32 of 33 WIRING DIAGRAM MODEL AX500 220 240V 50Hz...

Page 33: ...60335 1 BS EN 60335 2 68 EN 55014 1 EN 55014 2 BS EN 61000 3 2 BS EN 61000 3 3 BS EN 50366 And comply with the requirements of as amended 2006 95 EC Low Voltage LVD Directive 2004 108 EC Electromagnet...

Reviews: