background image


INSTALLATION GUIDE 


GROUNDING INSTRUCTIONS 

This  appliance  must  be  grounded.  In  the  event  of  an  electrical  short  circuit,  grounding  reduces  risk  of 
electric shock by providing an escape wire for the electric current.   

WARNING Improper use of the grounding plug can result in a risk of electric shock. 


Consult a qualified electrician or serviceman if the grounding instructions are not completely understood, 
or if doubt exists as to whether the appliance is properly grounded, and either: 

1)  If  it  is  necessary  to  use  an  extension  cord,  use  only  a  3-wire  extension  cord  that  has  a  3-blade 
grounding plug and a 3-slot receptacle that will accept the plug on the appliance. The marked rating of 
the  extension  cord  shall  be  equal  to  or  greater  than  the electrical  rating  of  the  appliance,  or  2) Do  not 
use an extension cord. If the power supply cord is too short, have a qualified electrician or serviceman 
install an outlet near the appliance. 

ELECTRICAL REQUIREMENTS 

The electrical requirements are a 120 volt 60 Hz, AC only, 20 amp. It is recommended that a separate 

1. 

Make sure that all the packing materials 
are removed from the inside of the door. 

2. 

Check  the  oven  for  any  damage,  such 
as  misaligned  or  bent  door,  damaged 
door  seals  and  sealing  surface,  broken 
or  loose  door  hinges  and  latches  and 
dents inside the cavity or on the door. If 
there is any damage, do not operate the 
oven  but  contact  qualified  service 
personnel. 

3. 

This  microwave  oven  must  be  placed 
on  a  flat,  stable  surface  to  hold  its 
weight and the heaviest food likely to be 
cooked in the oven.   

4. 

Do  not  place  the  oven  where  heat, 
moisture, 

or 

high 

humidity 

are 

generated, 

or 

near 

combustible 

materials. 

5. 

For  correct  operation,  the  oven  must 
have  sufficient  airflow.  Allow  20cm  of 
space  above  the  oven,  10cm  at  back 
and 5cm at both sides. Do not cover or 
block  any  openings  on  the  appliance. 
Do  not  remove  feet  on  which  oven 
stands. 

6. 

Do  not  operate  the  oven  without  glass 
tray,  roller  support,  and  shaft  in  their 
proper positions. 

7. 

Make sure that the power supply cord is 
undamaged and does not run under the 
oven or over any hot or sharp surface. 

8. 

The  socket  must  be  readily  accessible 
so that it can be easily unplugged in an 
emergency. 

Summary of Contents for 11030002

Page 1: ... 关业红 图 样 标 记 数量 重量 比例 校 对 审 定 李丰 S A 1 1 广东格兰仕微波生活电器制造有限公司 审 核 杨瑞其 工 艺 日 期 2020 5 13 共 14 页 第 1 页 Model SEJ301F1B PA0C0A Microwave Oven User s manual 技术要求 1 欧盟 ROHS2 0 指令要求规定的 10 种有害物质的含量符合 ROHS2 0 指令要求 Please read these instructions carefully before installing and operating the oven ...

Page 2: ...the Door bent Hinges and latches broken or loosened Door seals and sealing surfaces 4 The oven should not be adjusted or repaired by anyone except properly qualified service personnel CONTENT PRECAUTIONS TO AVOID POSSIBLE EXPOSURE TO EXCESSIVE MICROWAVE ENERGY 1 CONTENT 1 IMPORTANT SAFETY INSTRUCTIONS 2 INSTALLATION GUIDE 4 GROUNDING INSTRUCTIONS 4 UTENSILS GUIDE 5 COOKING TECHNIQUES 6 SPECIFICATI...

Page 3: ...ully attend appliance when paper plastic or other combustible materials are placed inside the oven to facilitate cooking b Remove wire twist ties from paper or plastic bags before placing bag in oven c If materials inside the oven should ignite keep oven door closed turn oven off and disconnect the power cord or shut off power at the fuse or circuit breaker panel d Do not use the cavity for storag...

Page 4: ...r or adjustment 22 When cleaning surfaces of door and oven that comes together on closing the door use only mild nonabrasive soaps or detergents applied with a sponge or soft cloth 23 This equipment has been tested and found to comply with Part 18 of the FCC Rules Operation is subject to the following two conditions 1 This device may not cause harmful interference and 2 this device must accept any...

Page 5: ...20 volt 60 Hz AC only 20 amp It is recommended that a separate 1 Make sure that all the packing materials are removed from the inside of the door 2 Check the oven for any damage such as misaligned or bent door damaged door seals and sealing surface broken or loose door hinges and latches and dents inside the cavity or on the door If there is any damage do not operate the oven but contact qualified...

Page 6: ...re be any interference caused by the microwave oven to your radio or TV check that the microwave oven is on a different circuit relocated the radio or TV as far away from the oven as feasible or check position and signal of receiving antenna UTENSILS GUIDE This section lists which utensils can be used in the microwave which ones have limited use for short periods and which ones should not be used ...

Page 7: ...ng place the empty dish in the oven and microwave on HIGH for 30 seconds A dish which becomes very hot should not be used COOKING TECHNIQUES Your microwave makes cooking easier than conventional cooking provided you keep these considerations in mind STIRRING Stir foods such as casseroles and vegetables while cooking to distribute heat evenly Food at the outside of the dish absorbs more energy and ...

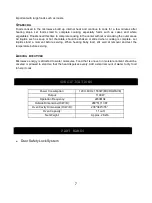
Page 8: ... complete Let liquids stand a moment before serving When heating baby food stir well at removal and test the temperature before serving ADDING MOISTURE Microwave energy is attracted to water molecules Food that is uneven in moisture content should be covered or allowed to stand so that the heat disperses evenly Add a small amount of water to dry food to help it cook SPECIFICATIONS Power Consumptio...

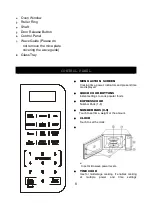
Page 9: ... SCREEN Cooking time power indicators and present time are displayed QUICK COOK BUTTONS Instant settings to cook popular foods EXPRESS COOK Number Pads 1 6 NUMBER PADS 0 9 Touch to set time weight or the amount CLOCK Touch to set the clock P O W E R L E V E L U s e to set microwave power levels TIME COOK Use for multi stage cooking It enables cooking at multiple power and time settings ...

Page 10: ...T 30SEC pad to resume but if press STOP CLEAR pad again the program will be canceled After ending cooking the system will sound beeps to remind user every two minutes until user press STOP CLEAR pad or open the door In standby mode press the number pads 7 8 and START 30SEC pad at the same time to check the version date and the model of PCB SETTING THE CLOCK FOR EXAMPLE Suppose you want to set the ...

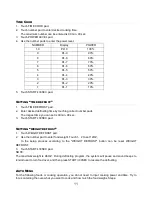
Page 11: ...ay shows the time the function is cancelled EXPRESS Program can be started immediately after touching the number pad from 1 6 Suppose you want to set the quick cooking in 6 minutes 1 Touch number pad 6 2 6 00 can be seen on display 3 The program starts automatically Touch number pad Time Minutes Touch number pad Time Minutes 1 1 Minute 4 4 Minutes 2 2 Minutes 5 5 Minutes 3 3 Minutes 6 6 Minutes AD...

Page 12: ...e longest time you can set is 99 min 99 sec 3 Touch START 30SEC pad SETTING WEIGHT DEFROST 1 Touch WEIGHT DEFROST pad 2 Use the number pad to enter food weight Touch 1 2 to set 12OZ In the setup process according to the WEIGHT DEFROST button can be reset WEIGHT DEFROST 3 Touch START 30SEC pad NOTE The maximum weight is 96 OZ During defrosting program the system will pause and sound beeps to remind...

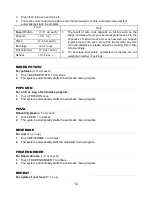
Page 13: ...ERAGE 1 to 4 times 2 The system automatically start the automatic menu program FROZEN DINNER For frozen dinners 7 9 oz each 1 Touch FROZEN DINNER 1 to 2 times 2 The system automatically starts the automatic menu program REHEAT For a plate of cool food 10 14 oz Food Note Baked Potato 7 11 oz each 1 The result of auto cook depends on factors such as the shape and size of food your personal preferenc...

Page 14: ... Avoid the use of spray and other harsh cleaners as they may stain streak or dull the door surface 3 The outside surfaces should be cleaned with a damp cloth To prevent damage to the operating parts inside the oven water should not be allowed to seep into the ventilation openings 4 Wipe the window on both sides with a damp cloth to remove any spills or spatters 5 Do not allow the control panel to ...

Page 15: ... should be cleaned regularly and any food deposits removed Failure to maintain the oven in a clean condition could lead to deterioration of the surface that could adversely affect the life of the appliance and possibly result in a hazardous situation 12 Please do not dispose this appliance into the domestic rubbish bin it should be disposed to the particular disposal center provided by the municip...

Reviews: