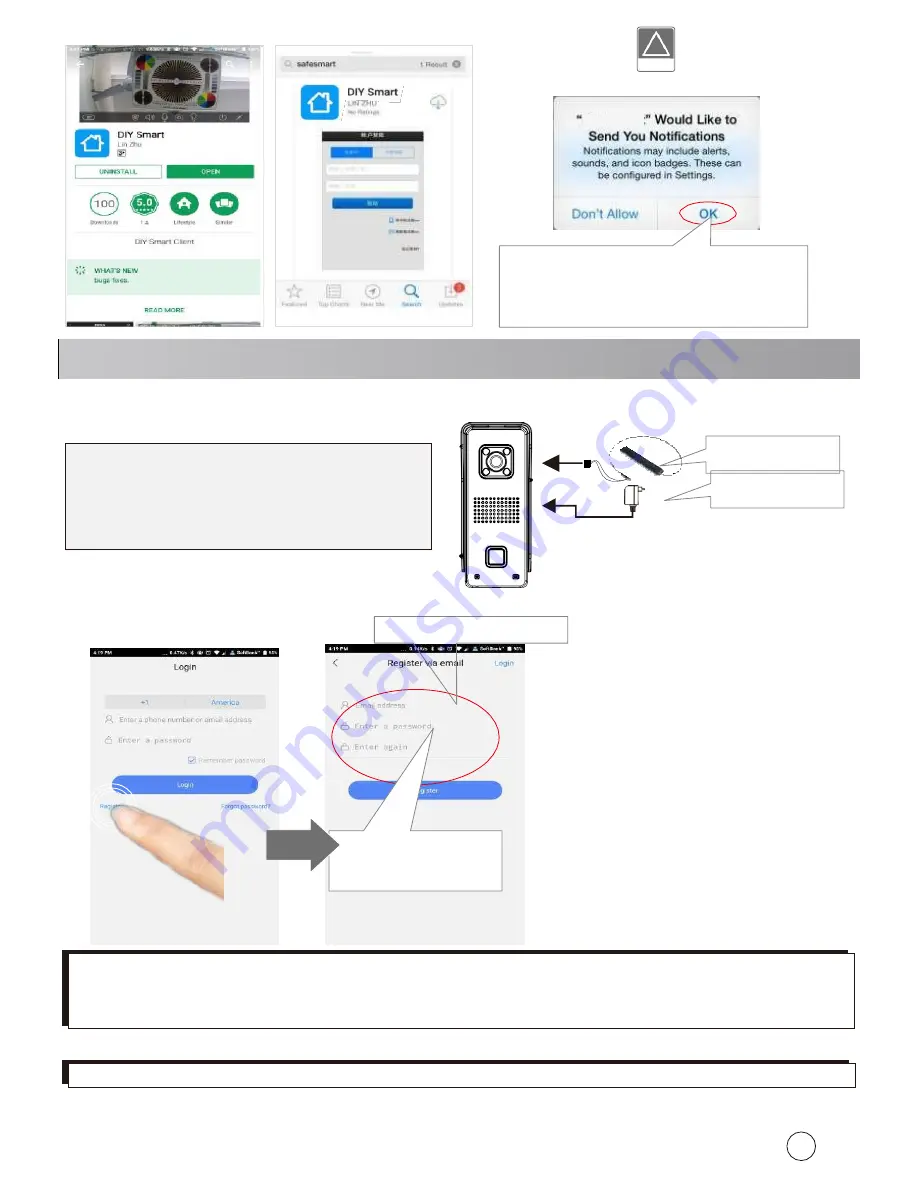
Gainwise TH-601W Quick Manual Download Page 2

2


Android


iOS


notice:


Step 1:


Insert TF memory card and fix antenna, 
  connect


power supply. 

 It takes 30 seconds to start device. 


Step 2: 

Connect your mobile phone to your router to register a user ID.


Step 3: 

Connect your mobile phone to your router.


Special Notice: 

If 2 mobile phones use the same account ID to login at the same time, only 1 mobile 

phone can receive the push notification alarm ring. So, if use 2 mobile phones to connect the device, 
user should register 2 different account IDs for the 2 mobile phones.


Power adaptor


Special Notice: 

Do not connect the 

network cable, otherwise, the device 
cannot set the Wi-Fi by scanning QR 
code. 

 DIY Smart  

For


the


first


time  installation,


please tap ‘OK’. 

Otherwise you 

can’t receive any notification.


!


notice:


3. Connect the Device


Register by E-mail:


1. Input your e-mail


2. Input your ID 
password


Special Notice: 

Device don’t support 5Ghz WIFI,user should use 2.4GHz WIFI to connect.


Antenna


Summary of Contents for TH-601W

Page 1: ...network Delay or can t work 1 Reduce the computers smartphones quantity connected in the same network 2 Change to use a bigger bandwidth network Antenna Door phone power supply DC12V 500mA Power in DC...

Page 2: ...he push notification alarm ring So if use 2 mobile phones to connect the device user should register 2 different account IDs for the 2 mobile phones Power adaptor Special Notice Do not connect the net...

Page 3: ...t Step button 9 You will hear a sound DING from the device Special Notice If device have no Di Di Di Di sound means the device has scanned before User should press the reset button for 5 seconds until...

Page 4: ...n the device list to enter Add Devices interface press Manual button and input device ID and password to adddevice 1 Slide down to refresh and find device 2 3 Input your device name 1 2 Click to add d...

Page 5: ...den UTC 1 UK Portugal Ireland UTC 0 Turkey Romania Finland UTC 2 Mexico UTC 6 Colombia Ecuador Peru UTC 5 Venezuela Chile Manaus UTC 4 Argentina Uruguay UTC 3 In order to receive the push notification...

Page 6: ...rd setting Click Format SD Card to format SD card In Device list Device Setting Record settings choose Record type and Record Time Audio Snapshot Hang up Hear Talk Button Slide to view notice notice U...

Page 7: ...video file to view playback Device List Setting Security Settings choose Admin password to modify device s password 9 Modify device s password 1 Choose Alarm Recording to record when visitor press rin...

Page 8: ...ter Step 2 Add device In device list slide down to find device 10 Reset the device Press and hold the reset button for 5 seconds and you will hear a voice of KING wait 30 seconds to restart the device...

Page 9: ...he router or the antenna direction to receive the good Wi Fi signal If the Wi Fi signal is still not strong enough please add the Wi Fi repeater or use the network cable Make a mounting hole similar s...

Page 10: ...stick the ring cover on the wall Step 2 Fix the back housing on the wall with two screws Step 3 Lead the wires through the hole in the wall and put the device into the back housing Tighten the screw...

Page 11: ...hz WIFI device don t support 5Ghz WIFI user should use 2 4GHz WIFI to connect Q2 Why Wi Fi video intercom is still not working when all settings are correct and router can also connect to the internet...

Page 12: ...alarm ring So if use 2 mobile phones to connect the device user should register 2 different account IDs for the 2 mobile phones Q4 A Why some times after I received push notification ring on mobile p...

Page 13: ...ause the mobile phone is too closed to the device move the phone far away and try Q9 Why I can t open the lock A 1 Possibly you haven t hold pressing the unlock button enough time pls hold pressing it...

Reviews: