background image

IMPORTANT SAFEGUARDS

When using electrical appliances, basic safety precautions should always be 
followed, including the following:

1. 

Read all instructions.

2. 

Do not touch hot surfaces. Use handles or knobs.

3. 

To protect against fire, electric shock and injury to persons do not immerse 
cord, plugs, or appliance in water or other liquid.

4. 

Close supervision is necessary when the appliance is used by or near 
children.

5. 

Unplug from outlet when not in use and before cleaning. Allow to cool 
before putting on or taking off parts, and before cleaning the appliance.

6. 

Do not operate any appliance with a damaged cord or plug or after the 
appliance malfunctions, or has been damaged in any manner. Return 
appliance to the nearest authorized service facility for examination, repair 
or adjustment.

7. 

The use of accessory attachments not recommended by the appliance 
manufacturer may result in fire, electric shock or injury to persons.

8. 

Do not use outdoors.

9. 

Do not let cord hang over edge of table or counter, or touch hot surfaces.

10. 

Do not place on or near a hot gas or electric burner, or in a heated oven.

11. 

Always attach plug to appliance first, then plug cord into wall outlet. To 
disconnect, turn any control to “off”, then remove plug from wall outlet.

12. 

Do not use appliance for other than intended use.

13. 

Save these instructions. 

SAVE THESE INSTRUCTIONS

Summary of Contents for NAVIGLIO DELUXE HD8749

Page 1: ...Type HD8749 GAGGIA NAVIGLIO DELUXE User manual ...

Page 2: ...te any appliance with a damaged cord or plug or after the appliance malfunctions or has been damaged in any manner Return appliance to the nearest authorized service facility for examination repair or adjustment 7 The use of accessory attachments not recommended by the appliance manufacturer may result in fire electric shock or injury to persons 8 Do not use outdoors 9 Do not let cord hang over ed...

Page 3: ...l taste of your coffee use purified or bottled water Periodic descaling is still recommended every 2 3 months 6 Do not use caramelized or flavored coffee beans INSTRUCTIONS FOR THE POWER SUPPLY CORD A A short power supply cord or detachable power supply cord is to be provided to reduce risks resulting from becoming entangled in or tripping over a longer cord B Longer detachable power supply cords ...

Page 4: ...luxe fully automatic coffee machine This user manual applies to HD8749 This espresso machine is suitable for preparing espresso coffee using whole coffee beans In this user manual you will find all the information you need to install use clean and descale your machine ...

Page 5: ...spensing Spout 19 Adjusting the Coffee Length 20 ESPRESSO AND COFFEE BREWING 21 Espresso and Coffee Brewing Using Coffee Beans 21 CAPPUCCINO BREWING 22 HOT WATER DISPENSING 25 CLEANING AND MAINTENANCE 27 Daily Cleaning of the Machine 27 Daily Cleaning of theWaterTank 28 Daily cleaning of the Automatic Milk Frother 28 Weekly Cleaning of the Machine 29 Weekly Cleaning of the Brew Group 30 Monthly Cl...

Page 6: ...on warn against slight injuries and or damage to the machine Warnings Connect the machine to a wall socket with a voltage matching the technical specifications of the machine Connect the machine to an earthed wall socket Do not let the power cord hang over the edge of a table or counter or touch hot surfaces Never immerse the machine the mains plug or power cord in water Danger of electrical shock...

Page 7: ...younger than 8 years old Themachinecanbeusedbychildrenof8yearsandupwards iftheyhavepreviouslybeeninstructedonthecorrectuseof themachineandmadeawareoftheassociateddangersorif theyaresupervisedbyanadult Cleaning and maintenance should not be carried out by children unless they are more than 8 years old and super vised by an adult Keep the machine and its power cord out of reach of chil dren under 8 ...

Page 8: ...o the coffee bean hopper If ground coffee instant coffee raw coffee or any other substance is put in the coffee bean hopper it may damage the machine Let the machine cool down before inserting or removing any parts The heating surfaces may retain residual heat after use Never use warm or hot water to fill the water tank Use only cold non sparkling drinking water Never clean with scrubbing powders ...

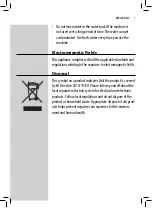
Page 9: ... and regulations relating to the exposure to electromagnetic fields Disposal This symbol on a product indicates that the product is covered by EU Directive 2012 19 EU Please inform yourself about the local separate collection system for electrical and electronic products Follow local regulations and do not dispose of the product as household waste Appropriate disposal of old prod ucts helps preven...

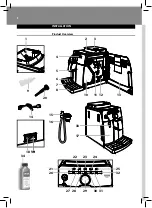
Page 10: ...8 INSTALLATION Product Overview 34 18 9 14 20 19 19 27 30 28 31 29 1 2 10 11 13 3 4 5 6 7 8 21 25 26 32 17 33 12 24 23 22 15 16 ...

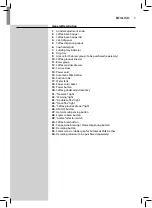
Page 11: ...or 14 Power cord 15 Automatic Milk Frother 16 Suction tube 17 Water tank 18 Power cord socket 19 Power button 20 Coffee grinder adjustment key 21 No water light 22 Warning light 23 Double coffee light 24 No coffee light 25 Coffee grounds drawer light 26 ON OFF button 27 Hot water dispensing button 28 Espresso brew button 29 Aroma selector switch 30 Coffee brew button 31 Cappuccino brewing Steam di...

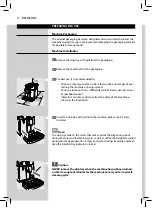
Page 12: ... location that is sufficiently well lit clean and near an eas ily reachable socket Allow for a minimum distance from the sides of the machine as shown in the illustration 4 Insert the drip tray with grill into the machine Make sure it is fully inserted Note The drip tray collects the water that comes out of the dispensing spout during each rinse self cleaning cycle as well as coffee that might be ...

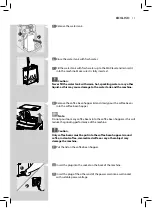
Page 13: ... hopper lid and slowly pour the coffee beans into the coffee bean hopper Note Do not pour too many coffee beans into the coffee bean hopper as this will reduce the grinding performance of the machine Caution Only coffee beans must be put into the coffee bean hopper Ground coffee instant coffee caramelized coffee or any other object may damage the machine 9 Put the lid on the coffee bean hopper 10 ...

Page 14: ... primed USING THE MACHINE FOR THE FIRST TIME When using the machine for the first time the following activities need to happen 1 You need to prime the circuit 2 The machine will perform an automatic rinse self cleaning cycle 3 You need to initiate a manual rinse cycle Circuit Priming During this process fresh water flows through the internal circuit of the machine and the machine warms up This tak...

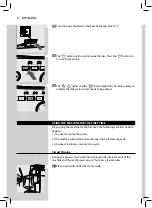
Page 15: ... is completed the machine automatically performs a rinse self cleaning cycle of the internal circuits with fresh water This takes less than a minute 4 Place a container under the dispensing spout to catch the small amount of dispensed water 5 The and buttons flash during the entire process 6 Wait for the cycle to finish automatically Note You can stop the dispensing process by pressing either the ...

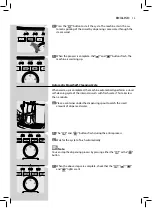
Page 16: ...the coffee dispensing spout 2 Check that the and lights are permanently on 3 Press the button The machine will start brewing a coffee 4 When dispensing has finished empty the container Repeat steps 1 to 3 then continue with step 5 5 Place a container under the steam wand 6 Press the button to start dispensing hot water 7 Dispense water until the no water light is permanently on ...

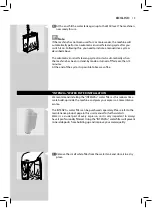
Page 17: ...inutes At the end of the cycle it is possible to brew a coffee INTENZA WATER FILTER INSTALLATION We recommend installing the INTENZA water filter as this reduces lime scale build up inside the machine and gives your espresso a more intense aroma The INTENZA water filter can be purchased separately Please refer to the maintenance product page in this user manual for further details Water is a cruci...

Page 18: ... settings can be found on the filter packaging A Soft water B Hard water standard C Very hard water 4 Insert the filter into the empty water tank Press it down until it cannot move any further 5 Fill the water tank with fresh water and reinsert it into the machine Write down the date of the next water filter replacement 2 months 6 Dispense all the water in the tank by using the hot water function ...

Page 19: ...der Ceramic coffee grinders always guarantee accurate and perfect grinding and coarseness for every coffee speciality This technology provides for full aroma preservation delivering the truly Italian taste in every cup Warning The ceramic coffee grinder contains moving parts that may be danger ous Do not insert fingers or other objects Only adjust the ceramic coffee grinder using the grinder adjus...

Page 20: ... fine grind bolder taste When you adjust the ceramic coffee grinder to a finer setting your coffee will taste stronger For a milder coffee taste adjust the ceramic coffee grinder to a coarser setting Adjusting the Aroma Coffee Strength Choose your favourite coffee blend and adjust the amount of coffee to be ground according to your personal taste Note Selection must be made prior to selecting coff...

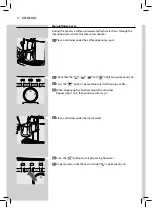
Page 21: ...n sions of the espresso cups that you wish to use Move the dispensing spout up or down with your fingers to adjust its height as shown in the image The recommended positions are For the use of small cups For the use of large cups Two cups can be placed under the dispensing spout to brew two coffees at the same time ...

Page 22: ...utton 1 Place a cup under the dispensing spout 2 Press and hold the button The button and the light flash during this phase Release the button the machine is now in programming mode The machine starts brewing coffee 3 When the desired quantity of coffee is in the cup press the but ton again Now the button is programmed each time it is pressed the machine will brew the same amount of espresso that ...

Page 23: ... the dispensing spout 3 Press the button for an espresso and the button for a coffee 4 To brew 1 cup of espresso or coffee press the desired button once 5 To brew 2 cups of espresso or coffee press the desired button twice consecutively The light turns on Note In this operating mode the machine automatically grinds and doses the proper amount of coffee Brewing two cups of espresso requires two gri...

Page 24: ...ch high temperatures Never touch it with bare hands Use the appropriate protective handle only 1 Fill 1 3 of a container with cold milk Note Use cold 5 C 41 F milk with a protein content of at least 3 to ensure optimum results when preparing a cappuccino Whole milk or skimmed milk may be used depending on individual taste Notes When you plan to dispense steam right after switching on the machine o...

Page 25: ...am wand seat 4 Insert the suction tube into the milk container Caution For hygienic reasons make sure that the suction tube is clean on the outside 5 Place a cup under the Automatic Milk Frother 6 Press the button 7 The machine warms up and the and buttons flash The button turns off ...

Page 26: ...aving pressed the button it will take a few seconds before the machine stops dispensing steam completely Caution After frothing the milk a small quantity of hot water must be dis pensed into a container See the Daily cleaning of the Automatic Milk Frother chapter for detailed cleaning instructions Note After dispensing steam it is possible to brew an espresso or dispense hot water immediately ...

Page 27: ...ch high temperatures Never touch it with bare hands Use the appropriate protective handle only Before dispensing hot water check that the and lights are permanently on and that the water tank is full 1 Remove the Automatic Milk Frother as shown in the figure 2 Place a container under the steam wand 3 Press the button to start dispensing hot water ...

Page 28: ...hine warms up and the and buttons flash The button turns off 5 When the button turns on again the machine starts dispensing hot water 6 Dispense the desired amount of hot water Press the button to stop hot water dispensing ...

Page 29: ... This repair is NOT covered by your warranty Note Use a soft dampened cloth to clean the machine Do not wash any removable part in the dishwasher Do not immerse the machine in water Do not use alcohol solvents and or abrasive objects to clean the machine Do not dry the machine and or its components using a microwave and or standard oven 1 Empty and clean the coffee grounds drawer daily with the ma...

Page 30: ... white filter back or the INTENZA water filter if installed in its housing by gently pressing and turning it at the same time 3 Fill the water tank with fresh water Daily cleaning of the Automatic Milk Frother For hygienic reasons and to ensure a perfect milk froth consistency it is im portant that the Automatic Milk Frother is cleaned daily and after each use After frothing milk you always need t...

Page 31: ... 5 When the button turns on again the machine starts dispensing water to be used for cleaning 6 When the water dispensed by the Automatic Milk Frother is clean press the button to stop dispensing 7 Clean the suction tube with a damp cloth Weekly Cleaning of the Machine Clean the seat of the drip tray ...

Page 32: ...an hopper is filled or at least once a week 1 Turn off the machine by pressing the button and remove the plug from the socket 2 Remove the coffee grounds drawer Open the service door 3 Remove and clean the coffee residues drawer 4 To remove the brew group press the PUSH button and pull it by the handle ...

Page 33: ...f the machine using a soft dampened cloth 5 Thoroughly clean the coffee outlet duct with the handle of a spoon or with another rounded kitchen utensil 9 Make sure the brew group is in the off position the two reference signs must match If they do not match proceed as described in steps 10 11 10 Gently pull down the lever until it is in contact with the brew group base and the two reference signs o...

Page 34: ...rmly pressing the PUSH button until it locks into place Check if the hook is at the top end position If it is not try again 12 Insert the brew group in its seat again until it locks into place without pressing the PUSH button 13 Insert the coffee residues drawer and close the service door ...

Page 35: ... Milk Circuit Cleaner The Gaggia Milk Circuit Cleaner can be purchased separately For further details please refer to the maintenance products page in this manual 1 Make sure that the Automatic Milk Frother is correctly installed 2 Pour the milk circuit cleaner into a container Add litre of lukewarm water and wait for the product to dissolve completely 3 Insert the suction tube into the container ...

Page 36: ...h The button turns off 7 When the button turns on again the machine starts dispensing the cleaning solution 8 When the solution is finished press the button to stop dispens ing Warning Never drink the solution dispensed during the procedure 9 Rinse the container thoroughly and fill it with litre of fresh water to be used for the rinse cycle ...

Page 37: ... on again the machine starts dispensing water to be used for rinsing 15 When the water is finished press the button to stop dispensing 16 Wash all the Automatic Milk Frother components by following the instructions below 17 Remove the Automatic Milk Frother from the machine 18 Remove the rubber grip from the steam wand Caution The steam wand may be hot if the same has been recently used 10 Insert ...

Page 38: ...t by applying light lateral movements as shown in the figure 21 Remove the rubber lid as shown in the figure 22 Wash all the components with lukewarm water Note These components can also be put into the dishwasher for cleaning 23 Attach the lid by pressing in the middle and ensure that it is firmly in place ...

Page 39: ...the suction tube 26 Insert the rubber grip back on the steam wand 27 Insert the Automatic Milk Frother on the rubber grip until it locks into place Caution Do not insert the rubber grip further than the seat shown In this case the Automatic Milk Frother would not function correctly as it would not be able to draw up milk ...

Page 40: ...ia grease used to lubricate the brew group separately Please refer to the maintenance product page in this user manual for further details Caution Before lubricating the brew group clean it with fresh water and let it dry as described in the Weekly Cleaning of the Brew Group chapter 1 Apply the grease evenly on both side guides 2 Also lubricate the shaft ...

Page 41: ... of the Brew Group chapter Insert the coffee resi dues drawer 4 Insert the coffee grounds drawer and close the service door Monthly Cleaning of the Coffee Bean Hopper Clean the coffee bean hopper once a month when it is empty with a damp cloth to remove coffee oil Then refill it with coffee beans ...

Page 42: ...age the machine and leave residues in the water The Gaggia descaling solution can be purchased separately For further details please refer to the maintenance products page in this manual Warning Never drink the descaling solution or any products dispensed until the cycle has been carried out to the end Never use vinegar as a descaling solution Note Do not remove the brew group during the descaling...

Page 43: ... water up to the MAX level Put the water tank back into the machine 3 Remove and wash the water tank Pour the entire content of the Gag gia descaling solution in it 2 Remove the Automatic Milk Frother from the steam hot water wand 5 Place a large container 1 5 l under both the steam hot water wand and the dispensing spout ...

Page 44: ...d button steady on and the dispensing spout button steady on start dispensing the descaling solution 8 When the descaling solution is finished the light turns on and the button flashes 9 Empty the container and place it back under both the steam hot water wand and the dispensing spout 10 Remove the water tank rinse it and fill it up to the MAX level with fresh water Put it back into machine ...

Page 45: ...spensing spout button steady on start dispensing the descaling solution 14 At the end of the rinse cycle the light turns off The descaling cycle is completed Note If the water tank is not filled up to the MAX level for the rinse cycle the light keeps flashing and the light turns on The machine requires another rinse cycle repeat from step 9 to step 13 15 Remove and empty the container ...

Page 46: ... rinse it thoroughly Reinsert the Intenza water filter if any Fill the tank with fresh drinking water up to the MAX level and then put it back into the machine 18 Remove and rinse the brew group see the Weekly Cleaning of the Brew Group chapter 19 The machine is ready for use ...

Page 47: ...wer failure or accidental disconnection of the power cord follow the steps below 1 Empty the drip tray and place it back 2 Empty and rinse carefully the water tank then fill it with fresh water up to the MAX level Put it back into machine 3 Turn on the machine The machine will start the automatic rinse cycle 4 Place a container under the steam hot water wand and the coffee dispensing spout ...

Page 48: ...n and dispense 300 ml of water 6 Press the button to brew a long coffee 7 Empty the container The machine is ready for use Note If the orange light does not turn off you have to perform another descaling cycle as soon as possible ...

Page 49: ...tomatically Press the or button to stop the cycle before the end FLASHING SLOWLY The machine is warming up to brew espresso and dis pense hot water or steam STEADY ON The machine is ready for use Hot water dispensing button Coffee brew button Espresso brew button Cappuccino brewing steam dispensing button Aroma selector switch No water light Coffee grounds drawer light ON OFF button Descaling butt...

Page 50: ... one cup of espresso STEADY ON The machine is brewing two cups of espresso STEADY ON The machine is brewing one cup of coffee STEADY ON The machine is brewing two cups of coffee FLASHING SLOWLY The machine is program ming the amount of espresso to brew FLASHING SLOWLY The machine is program ming the amount of coffee to be brewed ...

Page 51: ...ess the button to stop the cycle FLASHING QUICKLY Machine PAUSED during the descaling cycle Press the button to start the cycle FLASHING SLOWLY Prime the circuit Fill the water tank with fresh water and prime the water circuit as described in the Using the Machine for the First Time chapter FLASHING SLOWLY Close the service door Insert the brew group Make sure that all components have been cor rec...

Page 52: ... coffee grounds drawer is emptied with the machine turned off or when the indicator light is not on the coffee cycle counter is not reset In this case the indicator light indicating to empty the coffee grounds drawer may flash even when it is not full STEADY ON The water tank is empty Fill the water tank with fresh water FLASHING SLOWLY A fault has occurred in the machine and hot water and steam c...

Page 53: ...sed The hole of the steam wand is clogged Clean the hole of the steam wand using a pin Caution make sure that the machine is off and has cooled down before performing this operation The Automatic Milk Frother is dirty if supplied Clean the Automatic Milk Frother Coffee does not have enough crema See note The blend is unsuitable coffee is not freshly roasted or the grind is too coarse Change coffee...

Page 54: ...ing System chapter The dispensing spout is dirty Clean the dispensing spout Coffee is too weak See note This might occur when the ma chine is automatically adjusting the dose Brew a few cups of coffee as described in the Gaggia Adapting System chapter Coffee is brewed slowly See note The coffee grind is too fine Change coffee blend or adjust the grind as explained in the Adjusting the Ceramic Coff...

Page 55: ...e performs a rinse cycle TECHNICAL SPECIFICATIONS The manufacturer reserves the right to make changes to the technical specifications of the product Nominal Voltage Power Rating Power Supply See label on the inside of the service door Housing material Thermoplastic material Size w x h x d 256 x 340 x 440 mm Weight 9 kg Power cord length 800 1200 mm Control panel Front panel Automatic Milk Frother ...

Page 56: ...necessary modification GAGGIA S p A Sede Legale Registered Office Piazza Eleonora Duse 2 20122 MILANO Sede Amministrativa Administrative Office ViaTorretta 240 40041 Gaggio Montano BO 39 0534 771111 www gaggia com COD 421946026291 Rev 00 15 04 15 ...

Reviews: