background image

5

Before you begin

Before you begin

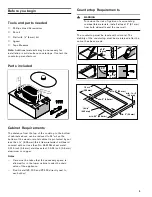
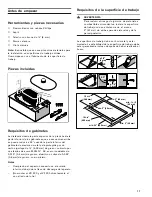
Tools and parts needed

Phillips Head Screwdriver

Pencil

Drill with ¼" (6 mm) bit

Jigsaw

Tape Measure

Note: 

Additional materials may be necessary for 

installation in solid surface countertops. Contact the 
countertop manufacturer.

Parts included

Cabinet Requirements

The distance from the top of the cooktop to the bottom 
of cabinets above can be reduced to 24" when the 
bottom of the wood or metal cabinet is protected by not 
less than ¼" (6.35 mm)-thick flame-retardant millboard 
covered with not less than No. 28 MSG sheet metal, 
0.015 inch (0.4 mm) stainless steel, 0.024 inch (0.6 mm) 
aluminium or copper.

Notes

Care must be taken that the necessary space is 
allowed for in the lower cabinet under the drain 
valve of the appliance.

Don't install VK 230 and VF 230 directly next to 
each other!

Countertop Requirements

9

WARNING

To reduce the risk of ignition of surrounding 
combustible materials, install at least 2" (51 mm) 
from both sidewalls and the rear wall.

The countertop must be level and horizontal. The 
stability of the countertop must be maintained after the 
cut-out has been made.

[

ƒ


¡

PP

¡

PP

PLQ

PP

PLQPP

PLQPP

PLQPP

PP

PP

PLQPP

Summary of Contents for VF 230 614

Page 1: ...Gaggenau Installation instructions 2 Notice de montage 8 Instrucciones de instalaci n 14 VF 230 614 Deep Fryer Friteuse Freidora...

Page 2: ...repare Installation Space 6 Install Appliance 6 Connect Electrical Supply 6 Check the Installation 7 Removing appliance 7 Customer Service 7 9 Safety DefinitionsSafetyDefinitions 9 WARNING This indica...

Page 3: ...Before you plug in an electrical cord or turn on power supply make sure all controls are in the OFF position If required by the National Electrical Code or Canadian Electrical Code this appliance must...

Page 4: ...top over a single oven be sure to follow both the oven s and cooktop s installation manuals Ventilation Recommendations We strongly recommend the installation of a ventilation hood above this applianc...

Page 5: ...flame retardant millboard covered with not less than No 28 MSG sheet metal 0 015 inch 0 4 mm stainless steel 0 024 inch 0 6 mm aluminium or copper Notes Care must be taken that the necessary space is...

Page 6: ...t and rear edge of the cut out The leading edges of the mounting rails must lie upon the countertop The center marking of the mounting rails must correspond precisely with the center marking of the cu...

Page 7: ...p solve problems quickly and without unnecessary service calls getting your appliance back up and running correctly in the least amount of time possible When you call please indicate the product numbe...

Page 8: ...Pr paration des meubles 12 Pose de l appareil 12 Brancher l alimentation lectrique 12 V rification de l installation 13 D pose de l appareil 13 Service apr s vente 13 9 D finitions de s curit D finit...

Page 9: ...A C22 2 No 61 M89 Cuisini res pour usage m nager Il incombe au propri taire et l installateur de d terminer si des exigences additionnelles et ou normes s appliquent pour des installations sp cifiques...

Page 10: ...risque peut tre r duit en installant une hotte aspirante qui d passe horizontalement d au moins 5 po 127 mm la base du placard V rifiez que la profondeur des armoires situ es au dessus de la table de...

Page 11: ...moins po 6 35 mm couvert par pas moins d une t le d acier MSG n 28 d acier inoxydable de 0 015 po 0 4 mm d paisseur d aluminium ou de cuivre de 0 024 po 0 6 mm d paisseur Remarques Tenez compte de la...

Page 12: ...upe Fixer les rails de fixation sur les bords avant et arri re de la d coupe Les nez des rails de fixation doivent reposer sur le plan de travail Le milieu marqu sur les rails de fixation doit co ncid...

Page 13: ...l appareil hors tension Faire sortir l appareil en le poussant par le bas 9 ATTENTION Risque de d t rioration Ne pas extraire l appareil par le haut en faisant levier Service apr s venteServiceapr s...

Page 14: ...dimiento de instalaci n 18 Preparaci n de los muebles de montaje 18 Montaje del aparato 18 Conexi n de la alimentaci n el ctrica 18 Pruebe la instalaci n 19 Desmontaje del aparato 19 Servicio de atenc...

Page 15: ...as para cocinar de uso dom stico American National Standard for Household Cooking Gas Appliances CAN CSA C22 2 N 113 M1984 Ventiladores Fans and Ventilators CAN CSA C22 2 N 61 M89 Estufas de uso dom s...

Page 16: ...las unidades de la superficie En el caso de que haya almacenamiento en gabinetes se puede reducir el riesgo instalando una campana que se proyecte horizontalmente 5 pulgadas 127 mm como m nimo de la...

Page 17: ...6 35 mm de grosor cubierto por una l mina de acero MSG N 28 acero inoxidable de 0 015 0 4 mm de grosor aluminio o cobre de 0 024 0 6 mm de grosor como m nimo Notas Compruebe el espacio necesario en e...

Page 18: ...n el centro del recorte Fijar los carriles de fijaci n al borde delantero y trasero del recorte Las pesta as de los carriles de fijaci n deben apoyarse en la encimera La marca en el centro de los carr...

Page 19: ...No intente extraer el aparato haciendo palanca desde arriba Servicio de atenci n al clienteServiciodeatenci nal cliente Si su aparato necesita una reparaci n nuestro servicio de atenci n al cliente es...

Page 20: ......

Page 21: ......

Page 22: ......

Page 23: ......

Page 24: ...Corporation 1901 Main Street Suite 600 Irvine CA 92614 1 877 442 4436 www gaggenau com us 2018 BSH Home Appliances Gaggenau Hausger te GmbH Carl Wery Stra e 34 81739 M nchen GERMANY 9000576966 9000576...

Reviews: