Installing the Cooker
Please note:
if you want to convert the appliance
to a different type of gas, change the nozzles
before installing the appliance (see pages 27 - 29).
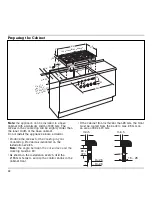
• Before installation, remove all styrofoam
packaging from the control knobs and peel off
the protective film.
• Hold the support plate from the rear against the
cabinet front (make sure the angled edge of the
support plate is on the bottom), insert control
knobs into the holes, secure from the rear with the
nuts. Take care to install control knobs in the
correct order.
• Undo trough securing nuts and carefully detach
the trough.
Note:
if a flexible gas connection is being used,
you can connect the appliance before installing it
into the worktop.
• Turn the clamping screws to the side. Insert the
hob into the cut-out and align it.
Note:
do not stick the hob onto the worktop with
silicone.
• Turn the clamping screws under the countertop
and tighten them evenly from above (turn left to
tighten). Do not tighten the clamping screws too
tightly, as a uniform sealing gap should be left all
round.
23
Summary of Contents for KG491110
Page 1: ...Operation Maintenance and Installation Manual KG 491 Gas Cooker...
Page 2: ......
Page 27: ...25...


