background image

Remove the packaging from the appliance and 
dispose of it according to local regulations. 
Be careful to remove all accessories from the 
packaging. Keep packaging elements and plastic
bags away from children.

Check the cooktop for transport  damage after
unpacking it. Do not connect the cooktop if it has
been damaged.

The cooktop must be installed and connected by an
authorised specialist. No warranty claims can be
lodged for any damage resulting from incorrect
connection. Observe the installation instructions.

This appliance is labelled in accordance
with the European Directive 2002/96/EG
concerning used electrical and electronic
appliances (waste electrical and electronic
equipment – WEEE). The guideline

determines the framework for the return and
recycling of used appliances as applicable.

Thoroughly clean the appliance before using it for
the first time. This will eliminate any ‘newness’
smells and soiling. 

Pots and pans

Rough pan bases scratch the glass ceramic. 

Avoid cooking on the cooktop with an empty pan,
especially with enamel or aluminium pans. This
could cause damage to the pan base and the glass
ceramic.

Do not place hot pots or pans on the control panel,
display area or the frame. This could cause
damage. 

Never heat food in aluminium foil or plastic
containers. The material can melt and damage your
cooktop.

Iridiscent discoloration can be caused by the bases
of some pans. These do not interfere with the
operation of the glass ceramic cooktop. Remove the
discoloration with glass ceramic cleaner.

Food spills

Milk, sugar and food with a high sugar content
(e.g. jam) damage the glass ceramic surface.
Remove food spills immediately with the glass
scraper. 

CAUTION! The glass scraper has a sharp blade.

Scratches on the glass ceramic

Always keep the cooktop dry and clean. Salt, sugar
and sand cause scratches on the glass ceramic. Do
not use the cooktop as a work surface or storage
space.

Hard and pointed objects

Damage can occur if hard or pointed objects fall on
the cooktop. Do not store such objects above the
cooktop.

Removable twist knob

Do not place the magnetic knob on the cooking
zones. It could be damaged.

Metal parts attached to the underside of the
magnetic knob could scratch the glass ceramic
surface. Always keep the knob clean.

7

Operating for the first time

Causes of damage

Summary of Contents for CE 490 612

Page 1: ...Electronic Cooktop CE 490 612 Gaggenau Use and Care Manual...

Page 2: ......

Page 3: ...etting the cooking level 11 Changing the cooking level 11 Switching off a cooking zone 11 Main switch with memory function 12 Residual heat display 12 Safety deactivation 12 Tips on saving energy 13 C...

Page 4: ...t be stored in an appliance in cabinets above an appliance or in the backsplash Children climbing on an appliance to reach items could be seriously injured Cooking safety Do not allow aluminium foil p...

Page 5: ...the cooktop Condition of unit WARNING Do not cook on a broken cooktop Cleaning solutions and spillovers may create a risk of electric shock Switch off the circuit breaker in the fuse box if the cerami...

Page 6: ...e on fan or filter d Use proper pan size Always use cookware appropriate for the size of the surface element WARNING TO REDUCE THE RISK OF INJURY TO PERSONS IN THE EVENT OF A GREASE FIRE OBSERVE THE F...

Page 7: ...um pans This could cause damage to the pan base and the glass ceramic Do not place hot pots or pans on the control panel display area or the frame This could cause damage Never heat food in aluminium...

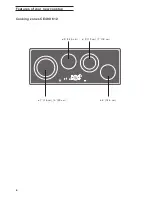
Page 8: ...8 Features of your new cooktop Cooking zones CE 490 612 4 3 9 5 1 7 6 14 5 cm 5 12 cm 7 18 cm 7 18 cm 9 23 cm 6 14 5 cm...

Page 9: ...k options menu c Control panel 4 3 9 5 1 7 Display for heat setting 1 9 stand by 0 residual heat cooking zone combination timer Touch keys for main switch quick boil timer options menu cooking zone co...

Page 10: ...boosted for several minutes This ensures that the continued cooking temperature of the food is reached faster Twist pad with magnetic twist knob The twist pad is the area in which you select the cook...

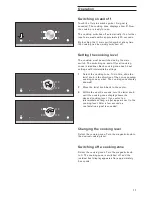
Page 11: ...the cooking zone To do this slide the twist knob in the direction of the corresponding cooking zone symbol The cooking zone display shows 0 2 Move the twist knob back to the center 3 Within the next 5...

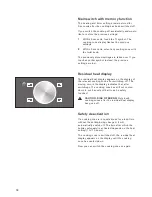
Page 12: ...at display appears on the display of the relevant cooking zone after switching off The moving zero in the display indicates that after switching off a cooking zone has still not cooled down to such an...

Page 13: ...er of the base of the saucepan Use a small saucepan for small quantities A larger less full saucepan requires more energy Saucepans and pots should always be covered with a suitable lid to shorten coo...

Page 14: ...n the display 4 Within the next 5 seconds touch the symbol d combination The combination symbol lights up beside the cooking zone display After a few seconds a confirmation signal is sounded Deactivat...

Page 15: ...olled beef steaks roasts vegetables 3 2 Braising Goulash 4 3 Boiling with closed lid Soup sauces 3 2 Thawing Frozen foods 3 2 Slow cooking Rice pulses Thickening Egg dishes 2 1 Reheating keeping warm...

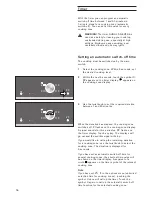
Page 16: ...tion between 1 and 90 minutes When the duration has elapsed the cooking zone switches off 0 flashes on the cooking zone display A signal sounds for three minutes 00 flashes on the timer display Touch...

Page 17: ...mer can also be used when all cooking zones are switched off Setting the timer The cooktop must be switched on by the main switch No cooking zone should be selected 1 Touch the q symbol 00 flashes on...

Page 18: ...Move the twist knob back to the center 3 Within 5 seconds turn the twist knob until the desired cooking level appears on the display 4 Within the next 5 seconds touch the symbol A The display shows a...

Page 19: ...Switch on the cooktop using the main switch Do not select a cooking zone or the timer After approximately 10 seconds the symbol appears above the symbol d 2 Touch the d symbol A signal is sounded Keep...

Page 20: ...d keep it pressed A signal is sounded Keep A pressed until a second signal is sounded 3 Now you can customize the settings To move up or down the options menu touch the A symbol until a signal is soun...

Page 21: ...eters are different to the factory setting Reset all parameters move the twist knob to d A spot appears next to d Note The parameters will only be reset if you exit the options menu and store the sett...

Page 22: ...t selecting the cooking zone again c5 t selection time 5 seconds for cooking zones c5 t unlimited selection time for cooking zones Note To exit the options menu and store the settings touch the A symb...

Page 23: ...llent film This will help to preserve the attractive appearance of your cooktop over a long period of time and make it easier to clean as well Do not use scouring abrasive or chemically aggressive cle...

Page 24: ...rectly check the household fuses first If the power supply is functioning correctly please contact your dealer or the Gaggenau after sales service Please quote the E number product number and the FD n...

Page 25: ...ne It can be switched on again immediately Er display and numbers If an Er and numbers appear on the display there is a fault with the electronics Switch the cooktop off and after a few minutes on aga...

Page 26: ......

Page 27: ......
Page 28: ...Gaggenau 5551 McFadden Ave Huntington Beach CA 92649 Telephone 877 4GAGGENAU USA www gaggenau usa com 9000396838 TRT 8911 enUS...

Reviews: