background image

!

WARNING:  When properly cared for, your
new appliance has been designed to be safe
and reliable. Read all instructions carefully
before use. These precautions will reduce the
risk of burns, electric shock, fire and injury to
persons. When using kitchen appliances,
basic safety precautions must be followed,
including those in the following pages.

Installation

This appliance must be properly installed and
grounded by a qualified technician. Connect only to
properly grounded outlet.

Have the installer show you the location of the
circuit breaker or fuse. Mark it for easy reference.
Refer to Installation Instructions for detail.

Intended use

This appliance is intended for normal household use
only. It is not approved for outdoor use. See the
Warranty. If you have any questions, contact the
manufacturer.

!

WARNING:  Use this appliance only for its
intended use as described in this manual.
Never use this appliance as a space heater to
heat or warm the room. Doing so may result in
overheating the appliance. Never use the
appliance for storage.

Child safety

Do not allow children to use this appliance unless
closely supervised by an adult. Children and pets
should not be left alone or unattended in the area
where the appliance is in use. They should never be
allowed to play in its vicinity, whether or not the
appliance is in use.

When children become old enough to use the
appliance, it is the legal responsibility of the
parents or legal guardians to ensure that they are
instructed in safe practices by qualified persons.

Do not allow anyone to climb, stand, lean, sit or
hang on any part of an appliance. This can damage
the appliance, potentially causing severe injury.

!

CAUTION: Items of interest to children
should not be stored in an appliance, in
cabinets above an appliance or in the
backsplash. Children climbing on an
appliance to reach items could be seriously
injured.

Cooking safety

Do not allow aluminium foil, plastic, paper or cloth
to come in contact with a hot surface element. Do
not allow pans to boil dry.

Secure all garments, etc. before beginning. Tie
long hair so that it does not hang loose and do not
wear loose fitting clothing or hanging garments
such as ties, scarves, jewelry or dangling sleeves.

DO NOT TOUCH SURFACE UNITS OR AREAS
NEAR UNITS. 
Surface units may be hot even though
they are dark in color. Areas near surface units may
become hot enough to cause burns. During and
after use, do not touch, or let clothing, potholders
or other flammable materials contact surface units
or areas near units until they have had sufficent time
to cool. Among these areas are the cooktop and
areas facing the cooktop.

Always use dry potholders. Moist or damp
potholders on hot surfaces may result in burns from
steam. Do not let potholder touch hot heating
elements. Do not use a towel or other bulky cloth.

Never move a pan of hot oil, especially a deep fat
fryer. Wait until it is cool.

!

WARNING: Never leave the cooktop
unattended at high temperature settings.Keep
an eye on the cooktop and do not allow
anything to boil over or burn. Boilovers can
cause smoke and some foods and oils may
catch on fire if left on high temperature
settings.

Do not heat or warm unopened food containers.
Build-up of pressure may cause the container to
burst and cause injury.

Always keep the cooktop and bases of pots dry.
Liquid between the pot base and the cooktop may
build up steam pressure, causing the pot to jump
suddenly and causing injury.

Never operate the cooktop with spillover or liquid
around the control area. Always switch off the
cooktop and dry the control area.

!

Important Safety Instructions

READ AND SAVE THESE INSTRUCTIONS

4

Summary of Contents for CE 490 612

Page 1: ...Electronic Cooktop CE 490 612 Gaggenau Use and Care Manual...

Page 2: ......

Page 3: ...etting the cooking level 11 Changing the cooking level 11 Switching off a cooking zone 11 Main switch with memory function 12 Residual heat display 12 Safety deactivation 12 Tips on saving energy 13 C...

Page 4: ...t be stored in an appliance in cabinets above an appliance or in the backsplash Children climbing on an appliance to reach items could be seriously injured Cooking safety Do not allow aluminium foil p...

Page 5: ...the cooktop Condition of unit WARNING Do not cook on a broken cooktop Cleaning solutions and spillovers may create a risk of electric shock Switch off the circuit breaker in the fuse box if the cerami...

Page 6: ...e on fan or filter d Use proper pan size Always use cookware appropriate for the size of the surface element WARNING TO REDUCE THE RISK OF INJURY TO PERSONS IN THE EVENT OF A GREASE FIRE OBSERVE THE F...

Page 7: ...um pans This could cause damage to the pan base and the glass ceramic Do not place hot pots or pans on the control panel display area or the frame This could cause damage Never heat food in aluminium...

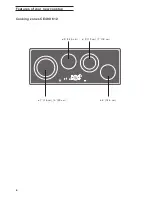
Page 8: ...8 Features of your new cooktop Cooking zones CE 490 612 4 3 9 5 1 7 6 14 5 cm 5 12 cm 7 18 cm 7 18 cm 9 23 cm 6 14 5 cm...

Page 9: ...k options menu c Control panel 4 3 9 5 1 7 Display for heat setting 1 9 stand by 0 residual heat cooking zone combination timer Touch keys for main switch quick boil timer options menu cooking zone co...

Page 10: ...boosted for several minutes This ensures that the continued cooking temperature of the food is reached faster Twist pad with magnetic twist knob The twist pad is the area in which you select the cook...

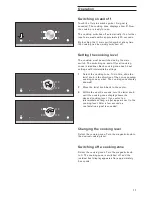
Page 11: ...the cooking zone To do this slide the twist knob in the direction of the corresponding cooking zone symbol The cooking zone display shows 0 2 Move the twist knob back to the center 3 Within the next 5...

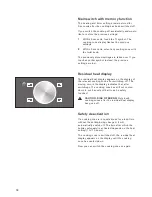
Page 12: ...at display appears on the display of the relevant cooking zone after switching off The moving zero in the display indicates that after switching off a cooking zone has still not cooled down to such an...

Page 13: ...er of the base of the saucepan Use a small saucepan for small quantities A larger less full saucepan requires more energy Saucepans and pots should always be covered with a suitable lid to shorten coo...

Page 14: ...n the display 4 Within the next 5 seconds touch the symbol d combination The combination symbol lights up beside the cooking zone display After a few seconds a confirmation signal is sounded Deactivat...

Page 15: ...olled beef steaks roasts vegetables 3 2 Braising Goulash 4 3 Boiling with closed lid Soup sauces 3 2 Thawing Frozen foods 3 2 Slow cooking Rice pulses Thickening Egg dishes 2 1 Reheating keeping warm...

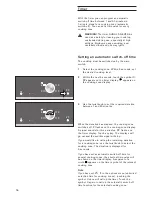
Page 16: ...tion between 1 and 90 minutes When the duration has elapsed the cooking zone switches off 0 flashes on the cooking zone display A signal sounds for three minutes 00 flashes on the timer display Touch...

Page 17: ...mer can also be used when all cooking zones are switched off Setting the timer The cooktop must be switched on by the main switch No cooking zone should be selected 1 Touch the q symbol 00 flashes on...

Page 18: ...Move the twist knob back to the center 3 Within 5 seconds turn the twist knob until the desired cooking level appears on the display 4 Within the next 5 seconds touch the symbol A The display shows a...

Page 19: ...Switch on the cooktop using the main switch Do not select a cooking zone or the timer After approximately 10 seconds the symbol appears above the symbol d 2 Touch the d symbol A signal is sounded Keep...

Page 20: ...d keep it pressed A signal is sounded Keep A pressed until a second signal is sounded 3 Now you can customize the settings To move up or down the options menu touch the A symbol until a signal is soun...

Page 21: ...eters are different to the factory setting Reset all parameters move the twist knob to d A spot appears next to d Note The parameters will only be reset if you exit the options menu and store the sett...

Page 22: ...t selecting the cooking zone again c5 t selection time 5 seconds for cooking zones c5 t unlimited selection time for cooking zones Note To exit the options menu and store the settings touch the A symb...

Page 23: ...llent film This will help to preserve the attractive appearance of your cooktop over a long period of time and make it easier to clean as well Do not use scouring abrasive or chemically aggressive cle...

Page 24: ...rectly check the household fuses first If the power supply is functioning correctly please contact your dealer or the Gaggenau after sales service Please quote the E number product number and the FD n...

Page 25: ...ne It can be switched on again immediately Er display and numbers If an Er and numbers appear on the display there is a fault with the electronics Switch the cooktop off and after a few minutes on aga...

Page 26: ......

Page 27: ......
Page 28: ...Gaggenau 5551 McFadden Ave Huntington Beach CA 92649 Telephone 877 4GAGGENAU USA www gaggenau usa com 9000396838 TRT 8911 enUS...

Reviews: