background image

13

Connect Electrical Supply

9

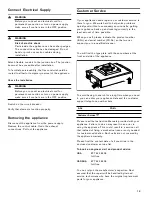
WARNING

Before you connect an electrical cord for 
permanent connection or turn on power supply, 
make sure all controls are in the OFF position.

9

WARNING

Risk of electric shock

Parts inside the appliance can have sharp edges. 
The connection cable can be damaged. Do not 
bend or pinch connection cables during 
installation.

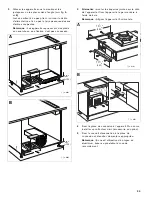
Attach flexible conduit to the junction box. The junction 
box must be accessible after installation.

To facilitate serviceability, the flex conduit should be 
routed to allow for temporary removal of the appliance.

Check the Installation

9

WARNING

Before you connect an electrical cord for 
permanent connection or turn on power supply, 
make sure all controls are in the OFF position.

Switch on the circuit breaker.

Verify that elements function properly.

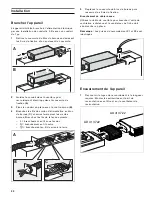
Removing the appliance

Disconnect the appliance from the power supply. 
Remove the control cable. Undo the exhaust 
connections. Pull out the appliance.

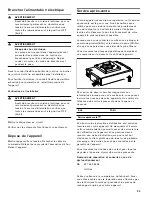
Customer Service

If your appliance needs repairs, our customer service is 
there for you. We work hard to help solve problems 
quickly and without unnecessary service calls, getting 
your appliance back up and running correctly in the 
least amount of time possible.

When you call, please indicate the product number 
(E-Nr.) and serial number (FD-Nr.) so that we can 
support you in a qualified manner. 

You will find the type plate with these numbers at the 
front and side of the appliance. 

To avoid having to search for a long time when you need 
it, you can enter your appliance data and the customer 
support telephone number here.

Please read the Instruction Manuals provided with your 
appliance. Failure to do so may result in an error in 
using the appliance. This could  result in a service call 
that instead of fixing a mechanical issue is only needed 
for customer education. Such calls are not covered by 
the appliance warranty.

Please find the contact data of all countries in the 
enclosed customer service list.

To book an engineer visit and product advice

You can rely on the manufacturer’s expertise. Rest 
assured that the repair will be handled by trained 
service technicians who have the original replacement 
parts for your appliance.

E-Nr.

FD-Nr.

Customer Service 

O

USA

877 442 4436 
toll-free

CANADA

877 442 4436 
toll-free

Summary of Contents for AR 413 722

Page 1: ...Gaggenau Installation instructions 2 Notice de montage 14 Instrucciones de instalación 26 AR 413 722 Recirculation Blower Ventilateur de recirculation Ventilador de recirculación ...

Page 2: ...ng Kitchen Units 9 Installation 10 Connect appliance 10 Installing the appliance 10 Additional switching output 12 Connection for window contact switch AA 400 510 12 Networked operation 12 Connect Electrical Supply 13 Removing the appliance 13 Customer Service 13 9 Safety DefinitionsSafetyDefinitions 9 WARNING This indicates that death or serious injuries may occur as a result of non observance of...

Page 3: ...or Heating Refrigeration and Air Conditioning Engineers ASHRAE and the local code authorities When cutting or drilling into wall or ceiling do not damage electrical wiring and other hidden utilities Ducted fans must always be vented to the outdoors WARNING The applicable regulations of the energy supply companies and the regional construction regulations must be observed when installing the hood W...

Page 4: ... state speed control device Installer show the owner the location of the circuit breaker or fuse Mark it for easy reference Before installing turn power OFF at the service panel Lock service panel to prevent power from being turned ON accidentally WARNING TO REDUCE THE RISK OF FIRE ELECTRIC SHOCK OR INJURY TO PERSONS OBSERVE THE FOLLOWING Use this unit only in the manner intended by the manufactur...

Page 5: ...e with these installation instructions The manufacturer is not responsible for any damage resulting from incorrect installation Never modify or alter the construction of the appliance For example do not remove leveling legs panels wire covers or anti tip brackets screws State of California Proposition 65 Warnings WARNING This product can expose you to chemicals including vinyl chloride which is kn...

Page 6: ...cal installation must be in accordance with the current CSA C22 1 Canadian Electrical Codes Part1 and or local codes The range must be connected to the proper electrical voltage and frequency as specified on the rating plate For wall mounting Checking the wall The wall must be level vertical and adequately load bearing Use suitable fasteners depending on the type of construction e g massive brickw...

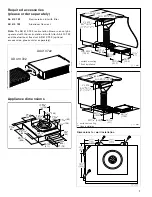
Page 7: ...cessories please order separately Appliance dimensions Dimensions for wall installation AA 413 722 Recirculation kit with filter AD 413 722 Aluminum flex duct èæ ʓʘ èʌ ʓʘ èç ʓʘ ç ʓʘ é ʌ ʚ ç ʓʘ ç ʓʘ ë ç ʓʘ èʌ ʓʘ èʌ ʓʘ è ʓʘ ʦ ʎ ʚ ʦ è ʓʘ VXUIDFH PRXQWLQJ IOXVK LQVWDOODWLRQ PLQ Ȣ Ȳ PP PLQ é èȢ ȫȰ ç ȫȰ ç ȫȰ è Ȳ èç ȫȰ ë Ȥ Ȳ 9 PLQ ê ë Ȥ Ȳ 9 PLQ Ȣ Ȳ PLQ ê VXUIDFH PRXQWLQJ IOXVK LQVWDOODWLRQ PP ç ȫȰ èȢ ȫȰ ...

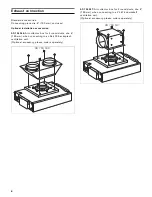
Page 8: ...AD 704 048 Air collector box for 2 round ducts dia 6 150 mm when connecting to an AL 400 backsplash ventilation unit Optional accessory please order separately AD 704 047 Air collector box for 2 round ducts dia 6 150 mm when connecting to a VL 414 downdraft ventilation unit Optional accessory please order separately ...

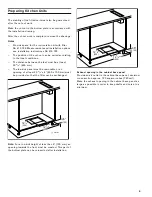
Page 9: ...ording to the local conditions The distance between the feet must be at least 23 5 8 600 mm The toe kick panel must be removable or an opening of at least 23 5 8 x 4 600 x 100 mm must be provided so that the filter can be exchanged Note For a toe kick height of less than 5 130 mm an opening towards the front must be created This part of the bottom plate can be reinserted after installation Exhaust...

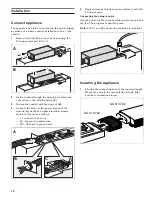
Page 10: ...he wires of the power cord with the terminal block C and tighten terminal screws securely Connect as follows L connect to hot wire N connect to neutral wire Connect to ground wire 5 Replace terminal block cover and fasten it with the 3 fixing screws Connecting the network cable Use the control cable to connect the remote fan unit and the fan The plug must snap into place Note The X1 and X2 connect...

Page 11: ...ve Mount the supplied bracket to the side of the appliance and then secure the appliance to the back wall using 4 screws Note Align the appliance horizontally 4 Mount the connecting piece to the appliance Alternatively connect an air collector box special accessory 5 Secure the exhaust air duct to the connecting piece and seal appropriately Note If an aluminum duct is used smooth the connection ar...

Page 12: ...switch on the ventilation system with the window closed the button for the ventilation setting you have selected will flash and the ventilation system will not switch on If you close the window while the ventilation system is on the appliance will switch the ventilation system off within 5 seconds The button for the ventilation setting you have selected will flash The entire ventilation network an...

Page 13: ...r you We work hard to help solve problems quickly and without unnecessary service calls getting your appliance back up and running correctly in the least amount of time possible When you call please indicate the product number E Nr and serial number FD Nr so that we can support you in a qualified manner You will find the type plate with these numbers at the front and side of the appliance To avoid...

Page 14: ...e 20 Préparation des meubles 21 Installation 22 Brancher l appareil 22 Encastrement de l appareil 22 Sortie de commutation supplémentaire 24 Raccord pour le contacteur de fenêtre AA 400 510 24 Utilisation en réseau 24 Brancher l alimentation électrique 25 Dépose de l appareil 25 Service après vente 25 9 Définitions de sécuritéDéfinitionsdesécurité 9 AVERTISSEMENT Ceci indique que le non respect de...

Page 15: ...nt aux codes et standards de construction y compris ceux concernant le feu Assurez vous que l aération est suffisante pour permettre la combustion et l évacuation des gaz par le conduit de cheminée d un appareil à combustible afin de prévenir le refoulement d air Respectez les instructions du fabricant de l appareil de chauffage et les normes de sécurité comme celles publiées par la National Fire ...

Page 16: ...erre au neutre par le conducteur de terre La mise à la terre par le conducteur neutre est interdite pour les nouvelles installations de circuit terminal NEC 1996 les maisons mobiles et les véhicules de plaisance ou dans les endroits où les codes locaux interdisent la mise à la terre par un conducteur neutre Pour les installations où la mise à la terre par le conducteur neutre est interdite a débra...

Page 17: ...tion en étendant le bras derrière l appareil ou en dessous Codes et normes de sécurité Cet appareil est conforme aux plus récentes versions de l une ou plus des normes suivantes UL 507 Ventilateurs électrique Electric Fans CAN CSA C22 2 No 113 Ventilateurs et soufflantes Fans and Ventilators Il incombe à l installateur de déterminer si des exigences et ou normes additionnelles s appliquent pour de...

Page 18: ...version la plus récente du Code canadien de l électricité première partie CSA C22 1 et ou les codes locaux L appareil doit être branché à une fréquence et une tension électrique appropriées conformément aux renseignements sur la plaque signalétique Pour un montage mural vérifier le mur Le mur doit être plat vertical et offrir une portance suffisante Selon le type de construction par ex maçonnerie ...

Page 19: ...z commander séparément Cotes de l appareil Cotes de l appareil pour l installation au mur AA 413 722 Kit de recirculation avec filtre AD 413 722 Conduit flexible en aluminium èæ ʓʘ èʌ ʓʘ èç ʓʘ ç ʓʘ é ʌ ʚ ç ʓʘ ç ʓʘ ë ç ʓʘ èʌ ʓʘ èʌ ʓʘ è ʓʘ ʦ ʎ ʚ ʦ è ʓʘ PRQWDJH VXU OH SODQ GH WUDYDLO HQFDVWUHPHQW DIIOHXUDQW PLQ Ȣ Ȳ PP PLQ é èȢ ȫȰ ç ȫȰ ç ȫȰ è Ȳ èç ȫȰ ë Ȥ Ȳ 9 PLQ ê ë Ȥ Ȳ 9 PLQ Ȣ Ȳ PLQ ê PRQWDJH VXU OH ...

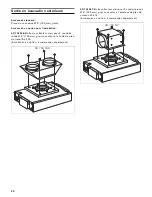
Page 20: ...n AD 704 048 Boîte de collecteur d air pour 2 conduits ronds Ø 6 150 mm pour connecter à la hotte de plan de travail AL 400 Accessoire en option à commander séparément AD 704 047 Boîte collecteur d air pour 2 conduits ronds Ø 6 150 mm pour connecter à l aérateur de plan de cuisson VL 414 Accessoire en option à commander séparément ...

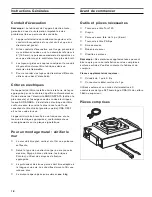
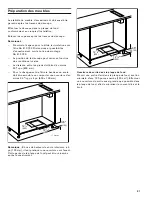
Page 21: ...ion des conditions locales La distance entre les pieds doit être d au moins 235 8 po 600 mm Pour le changement de filtre le bandeau du socle doit être amovible ou comporter une ouverture d au moins 23 5 8 po x 4 po 600 x 100 mm Remarque En cas de hauteur de socle inférieure à 5 po 130 mm il faut pratiquer une ouverture vers l avant Cette partie de la plaque de fond peut être réinsérée après l enca...

Page 22: ... de bornes C et serrez fermement les vis des bornes Branchez les fils de la façon suivante L branchement au fil sous tension N branchement au fil neutre branchement au fil de mise à la terre 5 Replacez le couvercle du bloc de bornes puis resserrez les 3 vis de fixation Branchement du câble réseau Utilisez le câble de contrôle pour brancher l unité de ventilation à distance et le ventilateur La fic...

Page 23: ...n est pas nécessaire 3 Alternative monter les équerres jointes sur le côté de l appareil et fixer l appareil à la paroi arrière à l aide de 4 vis Remarque Aligner l appareil à l horizontale 4 Fixer la pièce de connexion à l appareil Ou encore installer un collecteur d air accessoire en option 5 Fixer le conduit d évacuation à la pièce de connexion et étancher de manière appropriée Remarque En cas ...

Page 24: ...vous activez la ventilation avec la fenêtre fermée la touche de la vitesse du ventilateur sélectionnée clignote et la ventilation reste éteinte Si vous fermez la fenêtre alors que la ventilation est allumée l appareil coupe la ventilation en l espace de 5 secondes La touche de la vitesse du ventilateur sélectionnée clignote L ensemble du circuit de ventilation associé à un contacteur de fenêtre do...

Page 25: ... relâche pour vous aider à résoudre les problèmes en peu de temps tout en évitant les visites d entretien inutiles afin d assurer le bon fonctionnement de votre appareil le plus rapidement possible Lorsque vous nous contactez veuillez nous indiquer le numéro de produit E Nr et le numéro de série FD Nr afin que nous puissions vous aider de façon efficace Vous trouverez les plaques signalétiques com...

Page 26: ...de aire 32 Preparar los muebles empotrables 33 Instalación 34 Conectar el aparato a la red eléctrica 34 Instalación del aparato 35 Salida de conexión adicional 36 Conexión para interruptor de contacto de la ventana AA 400 510 36 Funcionamiento conectado 36 Conexión de la alimentación eléctrica 37 Desmontar el aparato 37 Servicio de Atención al Cliente 37 9 Definiciones de seguridadDefinicionesdese...

Page 27: ...estándares aplicables incluyendo construcción contra incendios Se requiere suficiente aire para la combustión y escape adecuado de gases por el conducto chimenea del equipo que quema combustible para evitar la contracorriente Siga la directriz y las normas de seguridad del fabricante de equipos de calefacción como las publicadas por La Asociación Nacional para la Protección contra Incendios NFPA p...

Page 28: ...a eléctrica o incendio La conexión a tierra del marco con el cable neutro debe realizarse a través de una correa de conexión a tierra Se prohíbe hacer la conexión a tierra a través del conductor neutro para instalaciones nuevas de circuito derivado 1996 NEC casas rodantes y vehículos recreativos o en un área en la que los códigos locales prohíban la conexión a tierra a través del conductor neutro ...

Page 29: ... Proceda con cuidado al intentar tomar el electrodoméstico por la parte trasera o desde abajo Códigos y normas de seguridad Este electrodoméstico cumple con la última versión de una o varias de las siguientes normas UL 507 Ventiladores eléctricos Electric Fans CAN CSA C22 2 No 113 Ventiladores Fans and Ventilators Es responsabilidad del instalador determinar si se aplican otros requisitos y o norm...

Page 30: ...ica debe cumplir el estándar actual CSA C22 1 Canadian Electrical Codes Parte 1 y o la normativa local La línea debe conectarse a la tensión eléctrica y frecuencia adecuadas según se especifica en la placa de características Para el montaje en pared comprobar la pared La pared debe ser plana vertical y tener suficiente capacidad de carga Dependiendo del tipo de construcción por ejemplo muros maciz...

Page 31: ...ir por separado Dimensiones del equipo Dimensiones para instalación a la pared AA 413 722 Kit de recirculación con filtro AD 413 722 Conducto flexible de aluminio èæ ʓʘ èʌ ʓʘ èç ʓʘ ç ʓʘ é ʌ ʚ ç ʓʘ ç ʓʘ ë ç ʓʘ èʌ ʓʘ èʌ ʓʘ è ʓʘ ʦ ʎ ʚ ʦ è ʓʘ HQFDVWUDGR VREUH HQFLPHUD LQVWDODFLyQ HQUDVDGD PLQ Ȣ Ȳ PP PLQ é èȢ ȫȰ ç ȫȰ ç ȫȰ è Ȳ èç ȫȰ ë Ȥ Ȳ 9 PLQ ê ë Ȥ Ȳ 9 PLQ Ȣ Ȳ PLQ ê HQFDVWUDGR VREUH HQFLPHUD LQVWDODFL...

Page 32: ...nstalación AD 704 048 Caja de colector de aire para 2 tubos redondos de Ø 6 150 mm para conectar al extractor de superficie AL 400 Accesorio especial solicitar por separado AD 704 047 colector de aire para 2 tubos redondos de Ø 6 150 mm para conectar al extractor de superficie VL 414 Accesorio especial solicitar por separado ...

Page 33: ... según las circunstancias locales La distancia mínima entre las patas debe ser como mínimo de 23 5 8 600 mm Para el cambio de filtro el panel del zoclo debe ser desmontable o se debe prever una abertura de 235 8 x 4 600 x 100 mm como mínimo Nota Si la altura del zoclo es inferior a 5 130 mm se deberá realizar una abertura hacia la parte delantera Esta parte de la placa inferior podrá volverse a añ...

Page 34: ...ento de sujeción A 3 Fijar el conducto con el anillo roscado B 4 Conectar los cables del cable de alimentación al bloque de terminales C y apretar bien los tornillos de los terminales Realizar las siguientes conexiones L conectar a cable de fase N conectar a cable neutro Conectar a cable de tierra 5 Sustituir la cubierta del bloque de terminales y fijarla con 3 tornillos de fijación Conectar el ca...

Page 35: ...e y acomodarlo uno junto al otro o en ángulo ver figuras A y B No doblar aprisionar ni pasar por bordes afilados el cable de conexión Nota El aparato se apoya sobre patas de hule por lo que no es necesaria una fijación 3 Alternativa montar las escuadras de fijación suministradas en los laterales del aparato y fijarlo a la pared posterior con 4 tornillos Nota Nivelar el aparato en sentido horizonta...

Page 36: ...entana Cuando el interruptor de contacto de la ventana está conectado la ventilación de la campana extractora funciona únicamente con la ventana abierta La iluminación funciona también con la ventana cerrada Si se conecta la ventilación con la ventana cerrada parpadea el pulsador del nivel de ventilación seleccionado y la ventilación permanece desconectada Si se cierra la ventana estando conectada...

Page 37: ...ión al Cliente está a su disposición Trabajamos duro para ayudar a resolver los problemas de forma rápida y sin llamadas de servicio innecesarias consiguiendo que su aparato vuelva a funcionar correctamente en el menor tiempo posible Cuando llame por favor indique el número de producto E Nr y el número de serie FD Nr de manera que lo podamos apoyar de manera calificada Encontrará las placas de car...

Page 38: ...38 ...

Page 39: ...39 ...

Page 40: ... Corporation 1901 Main Street Suite 600 Irvine CA 92614 1 877 442 4436 www gaggenau com us 2018 BSH Home Appliances Gaggenau Hausgeräte GmbH Carl Wery Straße 34 81739 München GERMANY 9000974069 9000974069 en us es mx fr ca 980605 ...

Reviews: