background image

10

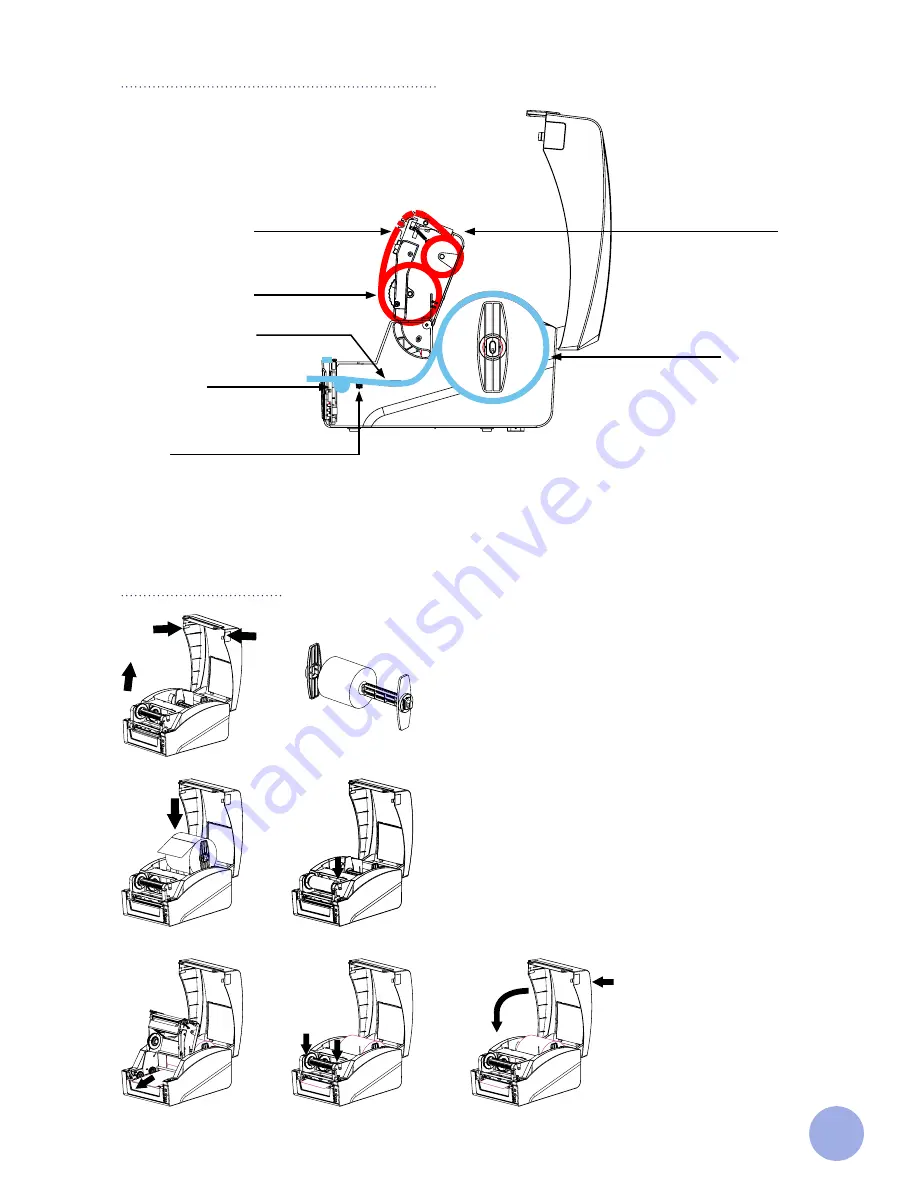
Print Head

Ribbon Take-up Core

Media

Ribbon

Media Guide

Platen Roller

Picture 7

Ribbon and Media Installation Diagram

Installing the media

1.

 Press the two buttons on left and right side to open 

  printer top cover.

2.

 Insert the media holder into the media roll.

3.

 Place the media roll into the printer and adjust the 

  position of the media roll to center it on the media 

 holder.

4.

 Press the push button to open the print head.

5.

 Install the labels per the diagram on the left.

6.

 Close the print head by pressing on the left and 

  right side of the print head as indicated by the 

  arrows until you hear a snapping sound.

7.

 Close the printer top cover.

1.

3.

5.

6.

7.

4.

2.

Gap/Black Mark Sensor

Summary of Contents for Cody-300

Page 1: ...INTERNATIONAL Thermal Transfer Direct Thermal Printer Cody 300 User Manual ...

Page 2: ...ations 5 Media size 5 Product Introduction 6 What s in the Box 6 Printer Components 7 External 7 Internal 8 The bottom 8 Installation 9 Installing the printer 9 Installing the ribbon 9 Ribbon and Media Installation Diagram 10 Installing the media 10 LED Indicator and Button Functions 11 LED Indicators 11 Button Functions 12 Start Functions 12 Troubleshooting 14 Common problems 14 Maintenance 16 ...

Page 3: ...ond this may only be performed by trained personnel or certified service technicians The printer should always be stored and operated under the recommended environment conditions Please see page 4 of this manual This product may cause radio interference and users may need to take adequate preventive measures Proper precaution must be taken by the user to avoid potential electrical shock hazards Pr...

Page 4: ...ied or traditional Chinese and Korean font for programming Can print text barcodes and pictures Supported barcodes Supported picture formats 1D Barcodes 2D Barcodes BMP PCX Code 39 Code 93 ITF EAN 128 Code 128 subsets A B C Codabar EAN 8 EAN 13 UPC A UPC E EAN and UPC 2 5 digits add on MSI MSIC PLESSEY CPOST ITF 14 EAN14 QR Code Datamatrix Specifications Model Cody 300 Printer Size 210 W x 175 H x...

Page 5: ...es Ribbon Diameter 2 64 67 mm Max Ribbon Length 984 300 m Ribbon Core Diameter 1 25 4 mm Ribbon Width Min 1 18 30 mm Max 4 3 110 mm Ribbon Winding Coated side out Maximum Media Roll Diameter 5 127 mm OD Media Type Continuous gap die cut fan folded notch Media Width Min 0 78 20 mm Max 4 72 120 mm Media Thickness Min 2 36 mil 0 06 mm Max 10 mil 0 254 mm Roll Core Diameter 1 25 4 mm 3 76 mm with exte...

Page 6: ...sfer direct thermal printer 2 Power cable 3 Power adapter 4 USB cable 5 Ribbon holder and take up spools 6 External media roll holder unwinder 7 Flash drive with software and driver installation instructions 8 Cardboard take up core 9 Media Holder 1 4 2 3 5 8 6 9 7 ...

Page 7: ...onents External LED Light Indicators ONLINE ERROR RIBBON Status Light Label Exit LED Indicators Push Button to Lift Top Cover Power ON OFF Switch Push Button to Lift Top Cover Picture 2 Picture 3 ONLINE ERROR RIBBON ...

Page 8: ... bottom Picture 4 Picture 5 Top Cover Media Holder Ribbon Take up Spool Push Button to Open Thermal Print Head Power Socket RS 232C Serial Port Ethernet Port USB Port Label Entrance from External Holder Parallel Port ...

Page 9: ...inter 5 Attach the ribbon to the empty cardboard core Next turn the blue wheel clockwise to make sure the ribbon is taut Picture 5 Picture 6 6 Close the print head by pressing on the left and right side of the print head as indicated by the arrows until you hear a snapping sound Installation Installing the printer 1 Place the printer on a stable surface 2 Make sure the power is turned off Do not p...

Page 10: ...der into the media roll 3 Place the media roll into the printer and adjust the position of the media roll to center it on the media holder 4 Press the push button to open the print head 5 Install the labels per the diagram on the left 6 Close the print head by pressing on the left and right side of the print head as indicated by the arrows until you hear a snapping sound 7 Close the printer top co...

Page 11: ...ter is paused Online indicator is off Error indicator single flashes and printer starts beeping Print head is open Online indicator is off Error indicator double flashes Label gap detection error Online indicator is off Error indicator double flashes Paper out Online indicator is off Error indicator double flashes and printer starts beeping Black mark detection error Ribbon indicator is on Ribbon ...

Page 12: ...rror indicator red are on at the same time release the PAUSE and FEED buttons The printer will go into Debugging Mode and you will find the following page printed out All label data received in this mode will be printed by machine code The right side shows ASCII character strings and the left side shows the hexadecimal value of ASCII character strings This function is for users or engineers to deb...

Page 13: ...se the PAUSE and FEED buttons All data in the printer s DRAM will be cleared and the printer settings will be restored to factory default settings The Online indicator will be on and the printer will be in ready status Factory default settings do not include ribbon settings Ribbon detection When the printer power is turned on or it is in thermal transfer printing mode the printer will automaticall...

Page 14: ...nsor detection error Adjust media specification and print again Media jammed inside printer Clear jammed media Printer not printing Ethernet cable improperly connected 1 Check if RJ 45 green orange LED indicator is on When the printer receives and process printing data the LED will be an orange color 2 Check if printer IP is assigned in DHCP mode 3 Check if the fixed IP address is correctly set in...

Page 15: ... if it is necessary to change the print head Printing not stable Wrong setting for media size Check if media size is set correctly and corresponds to the actual media size Print head is unbalanced ribbon and or media improperly installed media is not feeding smoothly Reset the label print density and ad just the media holder width to fit your media size Printer in HEX Dump mode or RS 232 setting w...

Page 16: ...nsor Perform monthly Inner side of printer Use air brush or vacuum to clean the dust Perform when necessary Maintenance To maintain high printout quality proceed with this maintenance section to keep your printer in good condi tion and to extend its lifespan Please use one of following materials to clean the printer Cotton swabs Lint free cloth Vacuum Blower brush 100 ethanol The cleaning process ...

Page 17: ... system or transmitted in any form or by any means electronic mechanical photocopying recording or otherwise without the prior written permission of GA International Inc info ga international com ga international com Labtag com USA CANADA INTERNATIONAL 1 800 518 0364 1 450 973 9420 INTERNATIONAL ...

Reviews: