G-KIT BONANZA 1m²
7
G-KIT BONANZA 1m²
INSTALLATIE-INSTRUCTIES
INSTALLATION-INSTRUCTIONS
MONTAGEANLEITUNG
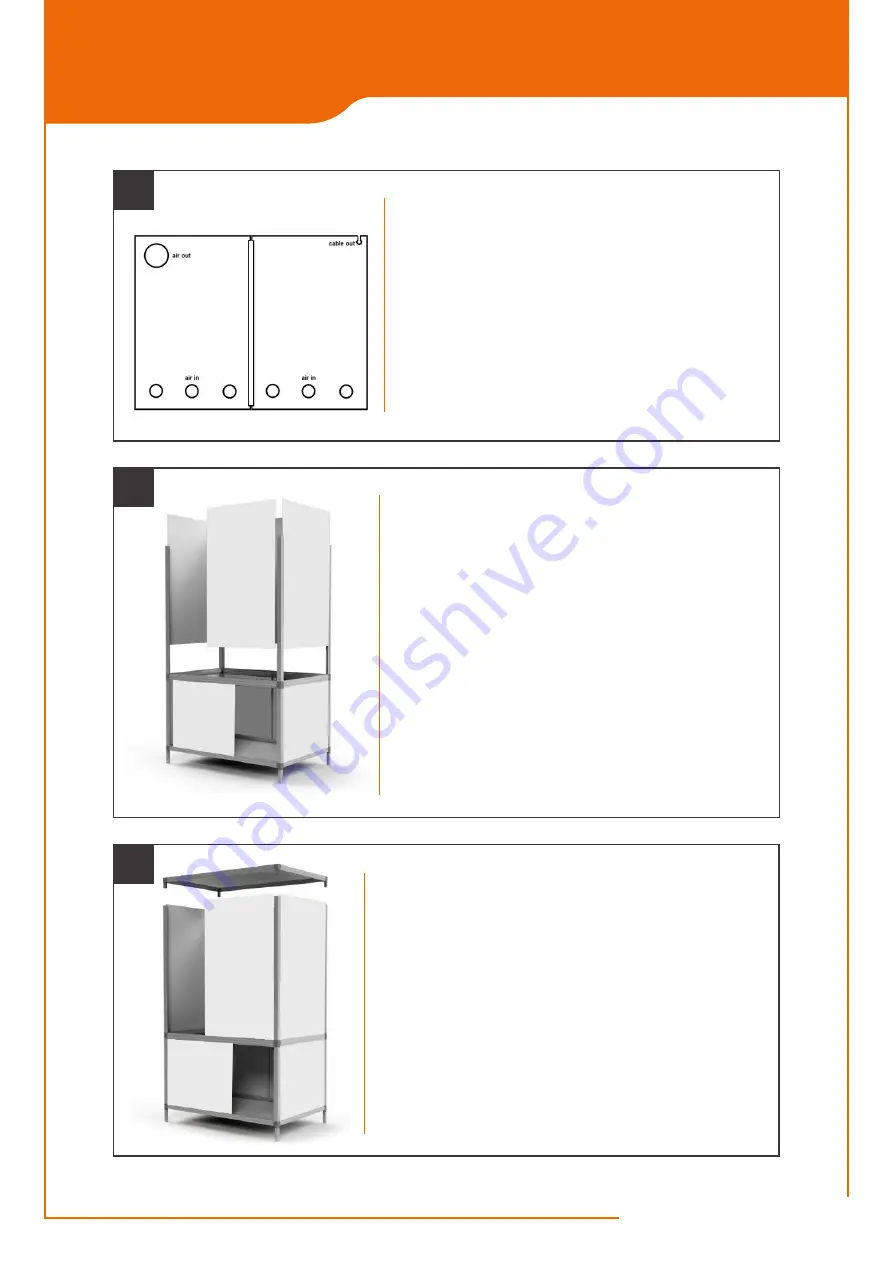
- Verwijder de muurflens uit de geluiddemper en plaats de dakplaat
(A)
op de 4 staanders. Hierbij behoort het koolstoffilter zich aan de voorzijde
en de timerbox zich aan de rechter zijde te bevinden. Het uiteinde van de
geluiddemper bevindt zich nu recht tegenover het grote gat in de linker
achterplaat
(I)
.
- Remove the wall flange from the silencer and place the roof panel
(A)
on
the 4 uprights. The carbon filter should be on the front and the timer box
on the right side. The end of the silencer is now directly opposite the large
hole in the left back panel
(I)
.
- Entfernen Sie den Wandflansch vom Schalldämpfer und platzieren Sie
die Dachplatte
(A)
auf die 4 Pfosten. Der Aktivkohlefilter sollte auf der
Vorderseite und der Timer Box auf der rechten Seite sein Das Ende des
Schalldämpfers liegt nun direkt gegenüber dem großen Loch in der linken
Rückwand
(I)
.
9
- Monteer de handgrepen
(V)
op de deuren. Plaats de 2 zijplaten
(H1 & H2)
en de twee deuren
(J & P)
. De deur met rubber afsluitband
en ondersteuningsprofiel
(P)
hoort door het achterste profiel te
schuiven en de deur met met de Mohair borstelband
(J)
door het
voorste. Let hierbij op dat de handgrepen zich aan de buitenzijde
links en rechts bevinden.
- Install the handles
(V)
on the doors. Place the 2 side panels
(H1 &
H2)
and the two doors
(J & P)
. The door with rubber seal and support
profile
(P)
should slide through the rear profile and the door with the
Mohair brush band
(J)
through the front. Please note that the handles
are located on the outside on the left and right.
- Montieren Sie die Griffe
(V)
an den Türen. Platzieren Sie die 2
Seitenplatten
(H1 & H2)
und die beiden Türen
(J & P)
. Die Tür mit
Abschlussgummi und Stützprofil
(P)
sollte durch das hintere Profil und
die Tür mit dem Mohair-Bürstenband
(J)
durch die Vorderseite gleiten.
Bitte beachten Sie, dass sich die Griffe außen links und rechts befinden.
8
- Plaats de 2 achterplaten van het bovendeel
(I & O)
en verbind deze
onderling door met het plastic H-profiel
(F)
. Let hierbij op dat de plaat
met het het grote gat
(I)
zich aan de linkerzijde bevindt. Nu kunnen ook
de 6 luchtinlaten
(W)
worden gemonteerd
( zie hoofdstuk 1)
.
- Place the 2 back panels of the top part
(I & O)
and connect them with
the plastic H-profile
(F)
. Make sure that the panel with the large hole
(I)
is on the left. Now the 6 air inlets
(W)
can be mounted
(see chapter 1)
.
- Schieben Sie die 2 Rückwände des Oberteils
(I & O)
in die Aluprofile
und verbinden Sie diese mit dem Kunststoff-H-Profil
(F)
. Achten Sie
darauf, dass sich die Platte mit dem großen Loch
(I)
links befindet. Nun
können auch die 6 Lufteinlässe
(W
) montiert werden
(siehe Kapitel 1)
.
7


