background image

Connecting to the PC   ---   61

Dialer

Click the 

Dialer

 button on the WIM start screen as 

shown in Figure 2. 

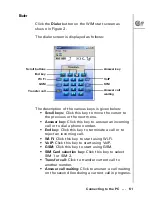
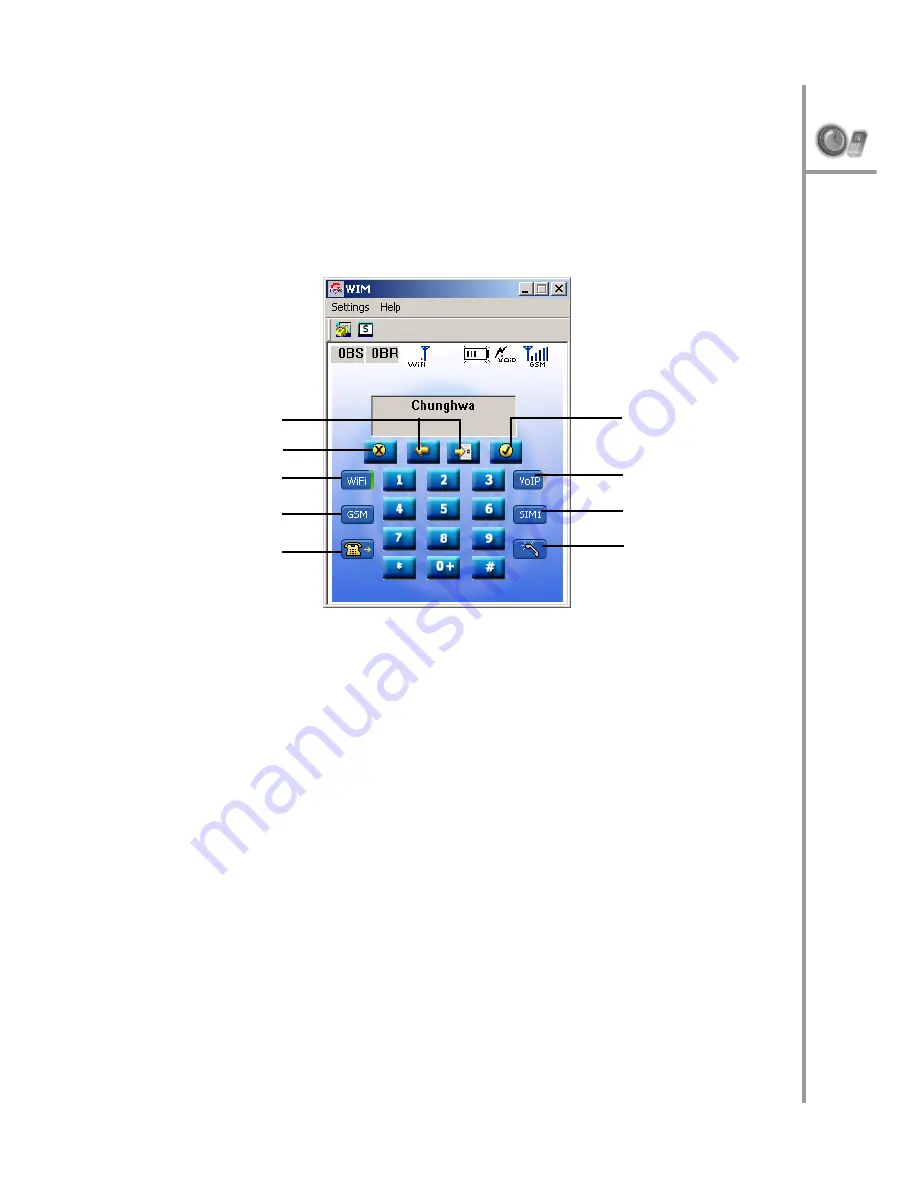
The dialer screen is displayed as follows:

The description of the various keys is given below:

Scroll keys:

 Click this key to move the cursor to 

the previous or the next menu.

Answer key:

 Click this key to answer an incoming 

call or to dial a phone number.

End key:

 Click this key to terminate a call or to 

reject an incoming call.

Wi-Fi:

 Click this key to start using Wi-Fi.

VoIP:

 Click this key to start using VoIP.

GSM:

 Click this key to start using GSM.

SIM Card selection key:

 Click this key to select 

SIM 1 or SIM 2.

Transfer call:

 Click to transfer current call to 

another number.

Answer call waiting:

 Click to answer a call waiting 

on the second line during a current call in progress.

Scroll buttons

End key

Wi Fi

GSM

Transfer call

Answer key

VoIP

SIM

Answer call 
waiting

Summary of Contents for PWG-500

Page 1: ...G Tek PWG 500 User Manual Menu Select Wi Fi On Off VoIP GSM ABC DEF JKL GHI PQRS MNO WXYZ TUV ...

Page 2: ......

Page 3: ...ing the SIM cards and battery 18 Charging the battery 21 Connecting the wired earphones 22 Turning the phone on off 22 Locking unlocking the keypad 23 Entering text 23 Making calls Making a call 25 Selecting the call type 25 Using the keypad to dial 25 Using the phone book to dial 26 Making an international call 26 Adjusting the volume 27 Answering or rejecting a call 27 Redialing a number 27 Spee...

Page 4: ...arding 33 Call barring 33 Caller ID 34 DTMF 34 Prefix dialing 34 Using the phone book Adding contacts 35 Creating a new entry 35 Storing a number 35 Searching for a contact 36 Modifying contact information 36 Assigning a speed dial number 37 Deleting contacts 37 Sending messages Writing a message 38 Reading messages 38 Replying to a message 39 Forwarding messages 39 Deleting messages 39 Viewing me...

Page 5: ...settings 45 Profiles 45 VoIP settings 48 General settings 48 Call control 48 Profiles 48 GSM settings 49 GPRS settings 50 Bluetooth settings 50 Clock settings 51 Saving settings 51 Viewing the status Using the status menu 52 Advanced features Connecting to the PC 54 Installing the USB drivers and WIM 55 Upgrading the firmware 55 Using WIM 56 Browsing the Internet from the PC 65 Connecting to a PDA...

Page 6: ...vi Table of Contents Menu Select Wi Fi On Off VoIP GSM ABC DEF JKL GHI PQRS MNO WXYZ TUV Appendix Additional Information 72 FCC Regulations 72 European regulations 73 RF exposure regulation SAR 74 ...

Page 7: ...GSM or VoIP networks Moreover you can also connect to Wi Fi Wireless Fidelity 802 11b or GPRS General Packet Radio Service networks using the PWG 500 as a modem or using Bluetooth Features Seamless voice and data communication Dual mode functionality of mobile phone GSM and personal wireless gateway Wi Fi Connectivity with various networks such as GSM GPRS VoIP Wi Fi as well as Bluetooth devices S...

Page 8: ... Select key Press to access the menu or select an option from the menu 2 Up arrow key S Press to scroll up through menu items From standby mode press to display the phone book 3 Down arrow key T Press to scroll down through menu items Menu Select Wi Fi On Off VoIP GSM ABC DEF JKL GHI PQRS MNO WXYZ TUV 1 2 3 4 5 6 12 11 10 9 8 7 ...

Page 9: ...ne calls 7 Speaker For listening to phone calls 8 Wi Fi On Off key Press to activate the Wi Fi mode 9 VoIP GSM key Press to switch between VoIP V GSM G and Auto A mode 10 Clear Delete key Press to cancel your selec tion and go to the previous menu While entering text or num bers press to erase charac ters 11 End Reject key Press to end a call Press to reject an incoming call In menu mode press to ...

Page 10: ... views Name Description 1 USB port Connect to USB port of your PC using USB cable 2 Volume up key Press to increase the volume 3 Reset button Use a small pointed object such as a pin to reset the PWG 500 if it locks up 4 Volume down key Press to decrease the volume 1 2 3 4 7 6 5 Left view Right view ...

Page 11: ... GHI PQRS MNO WXYZ TUV Overview of the PWG 500 5 5 Power button Press to turn the PWG 500 on or off 6 Earphone socket Connect the provided ear phones here 7 Power in Connect the power adapter to this socket to charge the bat tery Name Description ...

Page 12: ...tery Five bars indicate that the battery is fully charged or has 100 charge 2 GSM signal strength Displays the signal strength of GSM in the current location 3 VoIP GSM mode Displays VoIP or GSM option for outgoing calls G indicates that the current outgoing call option is GSM while V indicates that the outgoing call option is set to VoIP A indicates that the outgo ing call option is Automatic Chu...

Page 13: ...al strength Displays the signal strength for Wi Fi networks available at the current location Five bars indi cate maximum signal strength 6 GSM carrier Displays the current GSM carrier service 7 Wi Fi access point Displays the name of the Wi Fi access point 8 VoIP profile Displays the name of the current VoIP profile 9 Time Displays the current time Name Description ...

Page 14: ...DEF JKL GHI PQRS MNO WXYZ TUV Package contents G Tek PWG 500 AC adapter Desktop charger Li ion battery Wired headset Pouch Utility CD User manual Quick start guide Menu Select Wi Fi On Off VoIP GSM ABC DEF JKL GHI PQRS MNO WXYZ TUV UserManual QuickStartGuide ...

Page 15: ... 802 11b Frequency range 2 4 2 497 GHz Wireless output power Max 25 mW Operating range Outdoor up to 300m in door up to 75m Supports infrastructure public mode and Ad hoc mode optional QoS support TOS DiffServ Bluetooth characteristics Bluetooth V1 1 class II compliant Frequency range 2 402 2 480 MHz Power modes Park sniff hold and deep sleep Net capabilities Pico net and Scatter net support Profi...

Page 16: ...ation Optional password prompt at power up 40 and 128 bit static Wired Equivalent Privacy WEP Optional phone lock password Power Replaceable and rechargeable 1300 mAH Li ion battery Talk time 4 hours talk time 72 hours standby AC adapter 100 240V 50 60Hz 5V 650mA DC output Calling features Caller ID display call waiting call forward Call transfer Pre dialing before sending Call mute Redial Call ho...

Page 17: ...ery gas gauge indication Polyphonic ringer vibrator and visual display alert Pocket PC 2002 2003 Windows based WIM man agement and network configuration utility Physical specifications Dimensions H x W x D 100mm x 60mm x 22mm Weight with standard battery 128g Built in speaker MIC Built in real time clock RTC in 12 24 hour format USB 2 0 slave Jacks for headset and DC charging Certifications FCC CE...

Page 18: ...access the menu The first menu option Phone Book is displayed 2 Scroll through the main menu options using the S or T arrows keys and press the Menu Select key to view the submenu For example scroll to Mes sages and press Menu Select to view text mes sages 3 Repeat the previous step to browse through the menu items submenus and options For instance to write a text message select Messages and then ...

Page 19: ... Details Outbox Forward Delete Details Call Logs Missed Calls Received Calls Dialed Calls Recent Calls The following submenu options are available when you select a number from any of the Call Logs Call Delete Save Delete Recent Calls All Missed Calls Dialed Calls Received Calls Tones General Silent Meeting Outdoor Pager ...

Page 20: ...rsonalize Ringtone Ring Volume Alert Type Key Beep Edit Name Save to Flash Settings General Out Going Call Language Power saving Keypad Light LCD Sleep Interval Backlight On Off Alarm Clock Wi Fi General Wi Fi On Off Wi Fi Connectivity Profiles Manual Personalize Configuration Operating Mode Channel User Name Password ESSID Auth Protocol Encryption Protocol ...

Page 21: ...owing options are available for modifica tion IP Address Subnet Mask Default Gateway Primary DNS Alternate DNS Restore defaults Default Activate Personalize Edit Profile Name VoIP General VoIP On Off Stun Server Speaker Volume Microphone Volume Preferred Codec Call control Call Waiting Call Forward When Busy No Reply Unconditional Call Barring Caller ID DTMF Prefix Dial Profiles Default 0 9 ...

Page 22: ...und Proxy Mail Address Restore Defaults Edit Profile Name GSM GSM On Off SIM Switch Speaker Volume Microphone volume GPRS Access Point Name IP Address SMS settings Validity Period Message Indication Message Format Text PDU Preferred Storage Local SIM Bluetooth Headset Find Headset Pair Headset Clock Set Time Set Date Set Time Format Set Date Format ...

Page 23: ...O WXYZ TUV Menu map 17 Save to Flash Status GSM Status Wi Fi Strength Channel Transfer Rate SSID Wi Fi Home Link Quality Network Mode Encryption Status MAC Address Battery Strength Auth Status VoIP Strength Bluetooth Strength GPRS Data Account Version Number ...

Page 24: ...itles you to additional services included with your subscription Your personal address book is also stored on the SIM card The SIM card lock protects your sub scription from unauthorized use Most SIM cards are locked at the time of purchase If the SIM card lock is on you have to enter a PIN Personal Identity Number each time you turn on the PWG 500 If you enter the PIN incorrectly three times in s...

Page 25: ... SIM cards and battery do the following 1 Push down the tab on the back to remove the battery cover as shown 2 Move the SIM card slot in which you want to insert the first SIM card in the direction shown to unlock it 3 Lift up the SIM card slot 4 Slide in the SIM card in the card holder with the gold contacts facing down ...

Page 26: ...Z TUV 5 Place the SIM card holder back in place 6 Slide the SIM card holder upwards to lock the card in place 7 Repeat steps 2 through 6 to insert the second SIM card 8 Place the battery in the bat tery slot with the metal con tacts properly aligned 9 Replace the back cover as shown and snap into place ...

Page 27: ... hours standby time To charge the battery connect the battery charger to the Power in slot and insert the power connector into a power outlet Note You can also charge the battery using the desktop charger after connecting it to the power outlet Insert the PWG 500 in the charger making sure that the contacts touch those of the charger Menu Select Wi Fi On Off VoIP GSM ABC DEF JKL GHI PQRS MNO WXYZ ...

Page 28: ...o the earphone jack to enjoy handsfree operation and answer or place calls with ease Note If the G Tek PWG 500 is paired with a Bluetooth enabled headset the wired headset will not work Turning the phone on off Press the Power button on the right side of the PWG 500 to turn the device on or off Menu Select Wi Fi On Off VoIP GSM ABC DEF JKL GHI PQRS MNO WXYZ TUV ...

Page 29: ...s locked press the Menu Select key and then press to unlock the keypad Entering text The PWG 500 has an alphanumeric keypad for keying in the numbers you are dialing typing your text messages and adding contact information to your phone book Each key represents a combination of letters and num bers The following table shows the character represen tation for the alphanumeric keys Key Characters 1 1...

Page 30: ... your ref erence 2 The characters 123 ABC or abc are displayed at the bottom of the screen indicating the current mode for text entry To switch between lower case abc upper case ABC and numeric 123 char acters press the key at any time The type of text entry changes 3 Press the Menu Select button when you are done entering text Switch between lower case abc upper case ABC and numeric 123 character...

Page 31: ... the following to specify the type of the phone call you wish to make Press the VoIP GSM key to switch between VoIP GSM or Auto mode Press Menu Select to view the menu and then scroll to Settings General Out Going Call Choose an option from GSM VoIP or Auto If you select the Auto option the PWG 500 first searches for a Wi Fi hotspot in the vicinity to enable a VoIP call If Wi Fi is not available a...

Page 32: ... that correspond most closely to your search criteria is displayed Note If the current mode of text entry is set to numeric you may have to change the text entry mode See Entering text on page 23 4 Scroll through the list till you find the contact you want to call 5 Press the Send Answer key to call the number 6 Press the End Reject key to terminate the call after you finish talking Making an inte...

Page 33: ...icated by a ringing tone and a vibration if selected Choose one of the following options Press the Send Answer key to answer an incoming call Press the End Reject key to reject an incoming call The call is forwarded or transferred if you have activated call forwarding See Call forward ing on page 33 Redialing a number To quickly dial a number that you have dialed recently do the following 1 Press ...

Page 34: ...ergency call You can make an emergency call to a number that has been set in the SOS numbers setting You can save up to three emergency numbers using the WIM applica tion s configuration feature from your PC or PDA See Config Stat on page 65 To make an emergency call do the following 1 Press and hold the Volume up and Volume down keys simultaneously for three seconds 2 The first SOS number is dial...

Page 35: ...G 500 stores information about all calls made or received Your phone keeps lists of the calls you recently received and dialed even if the calls did not connect The lists are sorted from newest to oldest entries The oldest entries are deleted as new entries are added Press Menu Select and then select the Call Logs menu to view call information The following calls are listed Missed Calls Received C...

Page 36: ...l log is displayed Select the missed call and press the Send Answer key to call the number Press the Menu Select key and then select Call Logs Missed Calls Select the missed call and press the Send Answer key to call the number Deleting call logs You can delete any of the call logs that are not needed To delete call logs press Menu Select and then select Call Logs Delete Recent Calls Choose the ty...

Page 37: ...the options The speaker is enabled To disable the speaker phone either terminate the call or press Menu Select and Speaker Off Putting a call on hold You may want to put a call on hold temporarily while doing some work or attending to a second incoming or outgoing call To put a call on hold do one of the follow ing Press Menu Select and select Hold When you receive a second call press the Send Ans...

Page 38: ...follows 1 Call the first participant of the conference call as described in Making a call on page 25 2 Put the first participant on hold as described in Putting a call on hold on page 31 3 Call the second participant of the call 4 Press Menu Select and then select Conference to include all participants in the call 5 Press the End Reject key to end the call Transferring a call To transfer a call to...

Page 39: ...ture do the following 1 Press Menu Select and then select Settings VoIP Call Control and Call Forward 2 Select an option from the following options When Busy to forward calls when your phone is busy No Reply to forward calls when you do not answer the phone Unconditional to forward all incoming num bers 3 Key in the number to which the selected calls are to be forwarded Call barring You can enable...

Page 40: ...m one of the following options Inband Select this option if the person you are calling uses only PSTN networks Outband Select this option if the person you are calling links to a VoIP server Prefix dialing The prefix dial is a useful feature if you dial numbers in an international location frequently The prefix dial func tion memorizes the prefix required for dialing the calls and appends them to ...

Page 41: ...les you to store a number from a missed or received call in your phone book Creating a new entry 1 Press Menu Select and then select Phone Book Add to add a new entry to the phone book 2 Type the name of the new contact See Entering text on page 23 3 Press Menu Select to save the name 4 Enter the phone number of the new contact 5 Press Menu Select to save the number Storing a number To store a num...

Page 42: ...search crite ria are displayed For example if you key in the letters SU while searching the first phone book entry starting with SU and successive entries are displayed Press Send Answer to dial the entry or press Menu Select and select an option from Edit Delete or Call as required Modifying contact information 1 Press Menu Select and then select Phone Book to view the phone book entries 2 Scroll...

Page 43: ...enu Select Mod ify to change the speed dial key assigned to a num ber Press the new speed dial number to assign it to the phone book entry 3 Select an Empty hotkey and press Menu Select The list of contacts is displayed Select a contact and press Menu Select to assign a hotkey to that contact Press the new speed dial number to assign it to the phone book entry Note You can also select View to view...

Page 44: ...ect the contact to whom you want to send the message and press Menu Select to send the message 4 Alternatively you can key in the number of the recipient of the SMS and press Menu Select to send the message The sent messages are saved in the outbox automati cally Reading messages When you receive an SMS message a new message icon is displayed on the PWG 500 s screen To read your messages do the fo...

Page 45: ... your friends do the following 1 Select and view the message from the Inbox that you want to forward using the Messages menu 2 Press Menu Select and select Forward 3 Key in the recipient s number to whom you want to forward the message Alternately use the Search option to locate a number from the phone book See Searching for a contact on page 36 4 Press Menu Select to forward the message to the re...

Page 46: ...essages do the following 1 Using the Messages menu Select and view a mes sage from the Inbox received message or Outbox sent message 2 Press Menu Select and select Details to view details of the message The sender s phone num ber and the time at which the message was received or sent are displayed ...

Page 47: ...is displayed 2 Select the profile you want to use and press Menu Select 3 Select the Activate option and press Menu Select to set the profile for the PWG 500 Personalizing a profile Each profile has a specific ringtone ring volume and alert tone You can customize your profile and change the various sound tones according to your preferences as follows 1 Press Menu Select and select Tones to display...

Page 48: ...e or the alert type you can hear the cur rent ringtone or alert tone to help you choose a tone 5 Return to previous menu Actions and select Edit Name to change the name of the current profile Use the keypad to change the name and press Menu Select when done Saving a profile To save a profile to the PWG 500 s internal flash mem ory do the following 1 Press Menu Select and select Tones to display a ...

Page 49: ...select Settings General Outgo ing Call to specify the if you want to use GSM or VoIP for making calls See Selecting the call type on page 25 Language Use the language setting to specify the interface lan guage Press Menu Select and select Settings General Language Select the language of your choice from these options English Spanish German and Chinese Power saving mode The power saving mode preven...

Page 50: ...ec onds Backlight The LCD screen backlight can be disabled when not in use to conserve power To disable the backlight press Menu Select and select Settings General Backlight On Off and Off when Inactive Alternatively select the Always On option to always keep the backlight enabled Alarm clock The PWG 500 has a real time clock that keeps track of the time and also lets you set an alarm To set an al...

Page 51: ...s automatically Alternatively select Man ual to connect to a wireless network manually A list of hotspots is displayed Select a hotspot to connect to the corresponding wireless network Profiles The Wi Fi profiles are sets of wireless parameters that can be used for different networks You may want to create separate profiles with different security settings for use in different networks each of whi...

Page 52: ...ion while logging into a network Use the keypad to edit the name See Entering text on page 23 ESSID Extended Service Set Identification speci fies the unique ID assigned to the device for com municating with other wireless devices Auth Protocol specifies the protocol or communi cation criteria used for authentication when joining a wireless network Choose from Off Sim1 Based Sim2 Based EAP MD5 and...

Page 53: ...ing the keypad Transfer Rate specifies the rate at which data transfer takes place Select Auto to let the PWG 500 to set the transfer rate automatically Use DHCP Select this option to set the DHCP pro tocol parameters Select Yes if you want to use DHCP and a DHCP server in the network assigns IP addresses dynamically to the device Select No if there is no DHCP server or if you want to assign the I...

Page 54: ...om Level 1 through Level 10 Microphone Volume Adjusts the microphone vol ume in VoIP mode Choose from Level 1 through Level 10 Preferred Codec specifies the codec to be used for VoIP calls Select from GSM a Law H Law G726 G729 and G723 1 Call control The call control options set up the call waiting call bar ring call forwarding caller ID DTMF and prefix dialing options for the phone See Call optio...

Page 55: ...pecifies the mail address for VoIP mode Restore Default restores all settings to their fac tory default values Note For more information about VoIP settings consult your service provider GSM settings The GSM settings are used to customize the GSM parameters when making GSM phone calls Press Menu Select and select Settings GSM to configure the GSM settings The following options are available GSM On...

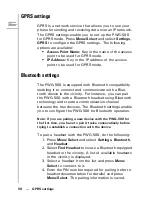
Page 56: ...an pair the PWG 500 with a Bluetooth headset using Bluetooth technology and create a communication channel between the two devices The Bluetooth settings enable you to configure the PWG 500 for Bluetooth operation Note If you are pairing a new device with the PWG 500 for the first time you have to pair it twice consecutively before trying to establish a connection with the device To pair a headset...

Page 57: ... settings The following options are available Set Time sets the time Use the arrow keys to move between the hour minute and AM PM fields Use the keypad to key in the time Set Date sets the date Use the arrow keys to move between the day month and year fields Use the keypad to key in the time Set time format specifies the time format Choose from 12 hours and 24 hours format Set date format specifie...

Page 58: ...r ent channels Transfer Rate Displays the rate of data transfer SSID Displays the SSID or identification tag of the device This is null when you are not connected to a Wi Fi network A unique SSID or tag is required for identifying the device in Wi Fi networks Wi Fi Strength Displays the strength of the Wi Fi signal Link Quality Displays the quality of the link Network Mode Displays the networking ...

Page 59: ...ticated or not VoIP Strength Displays the intensity of the avail able VoIP signal Bluetooth Strength Displays the strength of the Bluetooth network GPRS Data Count Displays number of data units sent and received Version Number Displays current firmware ver sion IMEI Number Displays the IMEI number BT Address Displays the BT address ...

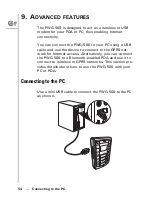
Page 60: ... use the device to connect to the GPRS net work for Internet access Alternatively you can connect the PWG 500 to a Bluetooth enabled PDA and use it to connect to wireless or GPRS networks This section pro vides details about how to use the PWG 500 with your PC or PDA Connecting to the PC Use a mini USB cable to connect the PWG 500 to the PC as shown Menu Select Wi Fi On Off VoIP GSM ABC DEF JKL GH...

Page 61: ...ate version of WIM from the utility CD and double click Setup exe Follow the instructions on the screen to install the software Refer to your PDA documentation for details about installing software on your PDA Upgrading the firmware You can upgrade the firmware of the PWG 500 if required from the PC using the USB cable The follow ing files are needed to upgrade the firmware Firmware file called bu...

Page 62: ...screen Wait till the screen shows Initializing before using the phone CAUTION Do not remove the battery turn off the device or operate the device while the firmware upgrade is in process Using WIM The WIM application is a useful interface that lets you set up and configure the PWG 500 from your PC or PDA You can select GSM VoIP GPRS and Wi Fi pro files and personalize them according to your networ...

Page 63: ...sktop application Please wait for a few seconds while the device is being located You can start using the application once the device is found If there is a problem connecting to the device the follow ing screen is displayed When the device is found the following screen is dis played ...

Page 64: ...played when you click the Manage menu Add contact Click Add contact and enter the name the office number the home number and the cell number of the contact and click Save Click DTMF for each number to specify the DTMF code while dialing the number Edit Click Edit and enter the name the office num ber the home number and the cell number of the selected contact and click Save Delete Select the conta...

Page 65: ...contact that has been copied Assign ring tone Click Assign ring tone to assign a ring tone to a selected contact Assign the ring tone from those displayed Dial Click Dial to call the selected contact Change local contacts path Click this option to change the folder or directory where the local phone book is stored on your PC Note The home cell and office number fields are available only for local ...

Page 66: ...cts Select this option to view the details of contacts saved in the PC memory SIM 1 contacts Select this option to view contacts saved on the first SIM card SIM 2 contacts Select this option to view contacts saved on the second SIM card ...

Page 67: ...o dial a phone number End key Click this key to terminate a call or to reject an incoming call Wi Fi Click this key to start using Wi Fi VoIP Click this key to start using VoIP GSM Click this key to start using GSM SIM Card selection key Click this key to select SIM 1 or SIM 2 Transfer call Click to transfer current call to another number Answer call waiting Click to answer a call waiting on the s...

Page 68: ...chose from Gain settings Select the Gain settings option to change the volume of the speaker or the micro phone for VoIP and GSM modes Call log Click the Call log submenu to view details of dialed calls missed calls and received calls Select a number and click Dial to call the number Speed dial Click the Speed dial submenu to speed dial a preset number Edit the Name Number and Hotkey fields and cl...

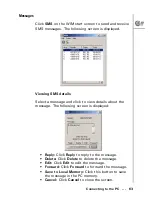
Page 69: ...essage and click to view details about the message The following screen is displayed Reply Click Reply to reply to the message Delete Click Delete to delete the message Edit Click Edit to edit the message Forward Click Forward to forward the message Save to Local Memory Click this button to save the message in the PC memory Cancel Click Cancel to close the screen ...

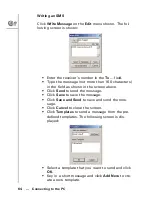
Page 70: ...n the field as shown in the screen above Click Send to send the message Click Save to save the message Click Save and Send to save and send the mes sage Click Cancel to close the screen Click Templates to send a message from the pre defined templates The following screen is dis played Select a template that you want to send and click OK Key in a short message and click Add New to cre ate a new tem...

Page 71: ... GSM GPRS option you can configure the GSM calling settings such as the default SIM SOS numbers call waiting options and GPRS configuration parameters such as access point name and IP address These options have been described under Configuring the settings on page 43 Browsing the Internet from the PC You can use the PWG 500 to browse the Internet or check e mails using a Wi Fi network or a GPRS ne...
Page 72: ... PC The COM port number appears under the Ports item Enter your User name and Password to con nect to the Dial up service Consult your local service provider for this information 3 When the dial up connection has been set up dou ble click the connection icon to dial into the net work and access the Internet Connecting to a PDA The PWG 500 can be used along with Bluetooth enabled devices like PDAs ...

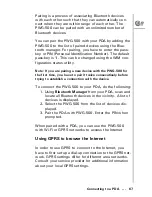
Page 73: ...00 for the first time you have to pair it twice consecutively before trying to establish a connection with the device To connect the PWG 500 to your PDA do the following 1 Using Bluetooth Manager from your PDA scan and locate all Bluetooth devices in the vicinity A list of devices is displayed 2 Select the PWG 500 from the list of devices dis played 3 Pair the PDA with PWG 500 Enter the PIN when p...

Page 74: ...ate a dial up net work click Start Pro grams Settings Connections Mod ify New 2 A Make New Connec tion screen is dis played Enter the name modem and baud rate in the corre sponding fields Spec ify the modem as Bluetooth Dialup Modem ...

Page 75: ...enter the coun try code area code and phone number to connect to the GPRS number Consult your service provider for this information Click Next Finish to com plete creating the con nection 5 Under the Internet Set tings a new item called My Connection is now displayed ...

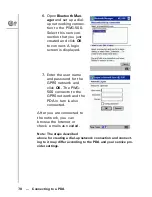
Page 76: ...yed 7 Enter the user name and password for the GPRS network and click OK The PWG 500 connects to the GPRS network and the PDA in turn is also connected After you are connected to the network you can browse the Internet or check e mails as needed Note The steps described above for creating a dial up network connection and connect ing to it may differ according to the PDA and your service pro vider ...

Page 77: ... settings and authentication parameters such as user name password and ESSID from the PWG 500 After you set up the wireless parameter connect to a wireless network manually or automatically using the PWG 500 Set up a dial up connection from the PDA to the PWG 500 as described in the previous section and connect to the PWG 500 When the connection is estab lished open Internet Explorer to start brow...

Page 78: ...any interference received including interference that may cause undesired opera tion This equipment has been tested and found to comply with the limits for a Class B digital device pursuant to Part 15 of the FCC Rules These limits are designed to provide reasonable protection against harmful interfer ence in a residential installation This equipment gener ates uses and can radiate radio frequency ...

Page 79: ...st not be co located or operating in conjunction with any other antenna or transmitter This EUT is in compliance with SAR for general popula tion uncontrolled exposure limits in ANSI IEEE C95 1 1999 and has been tested in accordance with the mea surement methods and procedures specified in OET Bul letin 65 Supplement C European regulations Products with the CE mark comply with the Radio Telecommun...

Page 80: ... of measurement known as the Specific Absorption Rate or SAR The SAR limit set by the FCC is 1 6W kg Tests for SAR are conducted using standard operating positions accepted by the FCC with the phone transmitting at its highest certified power level in all tested frequency bands Although the SAR is determined at the highest certified power level the actual SAR level of the phone while operating can...

Page 81: ... with the FCC and can be found under the Display Grant section of tap www fcc gov oet fccid after searching on FCC ID SNFG10 For body worn operation this phone has been tested and meets the FCC RF exposure guidelines for use with an accessory that contains no metal and positions the handset a minimum of 1 5 cm from the body Use of other enhancements may not ensure compliance with FCC RF exposure g...

Reviews: