G-Tek PWG-500 Quick Manual Download Page 4

Menu
Select

Wi-Fi
On/Off

VoIP
GSM

ABC

DEF

JKL

GHI

PQRS

MNO

WXYZ

TUV

Quick Guide

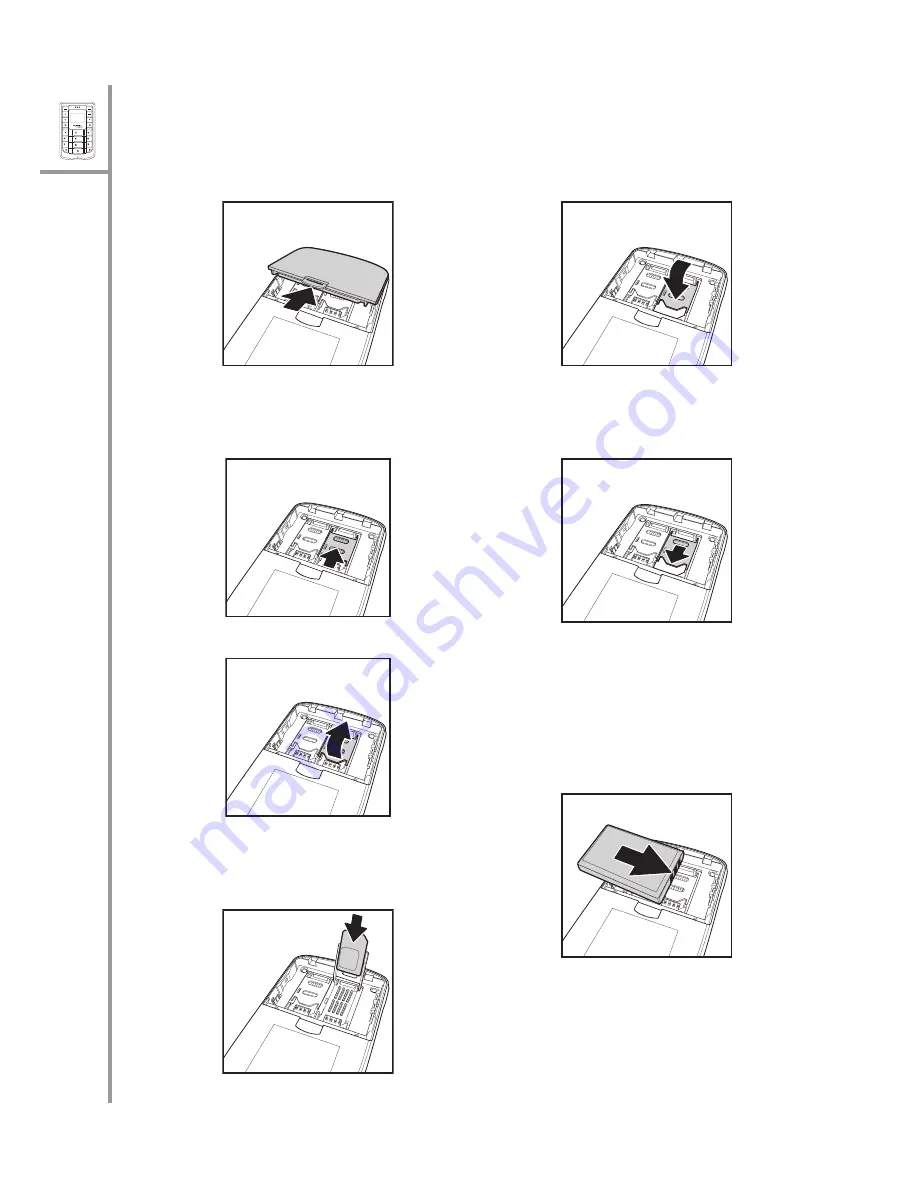
Inserting the SIM cards and battery

1. Push the tab on the back to 

remove the battery cover.

2. Move the desired SIM card 

slot in the direction shown 

to unlock it.

3. Lift up the SIM card slot.

4. Slide in the SIM card in the 

card holder with the gold 

contacts facing down.

5. Place the SIM card holder 

back in place.

6. Slide the SIM card holder 

upwards to lock the card in 

place.

7. Repeat steps 2 through 6 

to insert the second SIM 

card.

8. Place the battery in the bat-

tery slot with the metal 

contacts properly aligned.

9. Replace the back cover.

Summary of Contents for PWG-500

Page 1: ...ual carefully to understand how to operate the product and take advantage of its useful features The PWG 500 enables you to make phone calls using GSM or VoIP networks Moreover you can also connect to...

Page 2: ...y mode the PWG 500 screen displays the following icons Left view Right view Power button Earphone Power in USB port Volume up Reset button Volume down Chunghwa PTSGI AP Default0 12 33 AM Battery charg...

Page 3: ...o view text messages 3 Repeat the previous step to browse through the menu items submenus and options For instance to write a text message select Messages and then Create New 4 To choose a menu settin...

Page 4: ...the direction shown to unlock it 3 Lift up the SIM card slot 4 Slide in the SIM card in the card holder with the gold contacts facing down 5 Place the SIM card holder back in place 6 Slide the SIM ca...

Page 5: ...he earphone jack to enjoy handsfree operation and answer or place calls with ease Note If the G Tek PWG 500 is paired with a Blue tooth enabled headset the wired headset will not work Turning the phon...

Page 6: ...gs To save all the changes to the PWG 500 s internal flash memory press Menu Select and then choose Settings Save to Flash All settings are saved Locking unlocking the keypad You can lock the keypad t...

Page 7: ...the End Reject key to terminate the call after you finish talking Adjusting the volume While talking on the PWG 500 use the Volume up down keys to increase or decrease the volume according to your pre...

Page 8: ...Creating a new entry 1 Press Menu Select and then select Phone Book Add to add a new entry to the phone book 2 Type the name of the new contact 3 Press Menu Select to save the name 4 Enter the phone n...

Page 9: ...Manual to connect to a wire less network manually A list of hotspots is displayed Select a hotspot to connect to the corresponding wireless network VoIP settings These settings provide the basic setup...

Page 10: ...y in the name of the access point to be used for GPRS mode IP Address Key in the IP address of the access point to be used for GPRS mode Bluetooth settings The PWG 500 is equipped with Bluetooth compa...

Page 11: ...i cation that helps you in configuring and using the PWG 500 The utility CD contains two versions of WIM one for your PC and one for your PDA Pocket PC only Select the appropri ate version of WIM from...

Page 12: ...ss various functions and features of the application Phone book Use the Phone Book to store your address and contact details Click the Phone Book button to launch the phone book Use the Manage option...

Page 13: ...ick Edit Profile Personalize to modify the profile settings Alternatively click General to modify the general setup When you edit a profile all the options and settings relevant to the profile are dis...

Page 14: ...sure that the device drivers have been installed correctly 2 Set up a dial up network connection as follows Click the Start button on the task bar and then select Settings Net work and Dial up Connect...

Page 15: ...n range of each other The PWG 500 can be paired with an unlimited number of Bluetooth devices You can pair the PWG 500 with your PDA by adding the PWG 500 to the list of paired devices using the Bluet...

Page 16: ...nnection to the GPRS network GPRS settings differ for different area net works Consult your service provider for additional information about your local GPRS settings 1 To create a dial up network cli...

Page 17: ...4 In the My Connection screen enter the country code area code and phone number to connect to the GPRS number Consult your service provider for this information Click Next Finish to com plete creatin...

Page 18: ...ct A login screen is displayed 7 Enter the user name and password for the GPRS network and click OK The PWG 500 connects to the GPRS net work and the PDA in turn is also con nected After you are conne...

Page 19: ...wireless connection mode security settings and authen tication parameters such as user name password and ESSID from the PWG 500 After you set up the wireless parameters connect to a wireless network...

Reviews: