background image


G-RAID

3

 Product Guide 

Page 7 

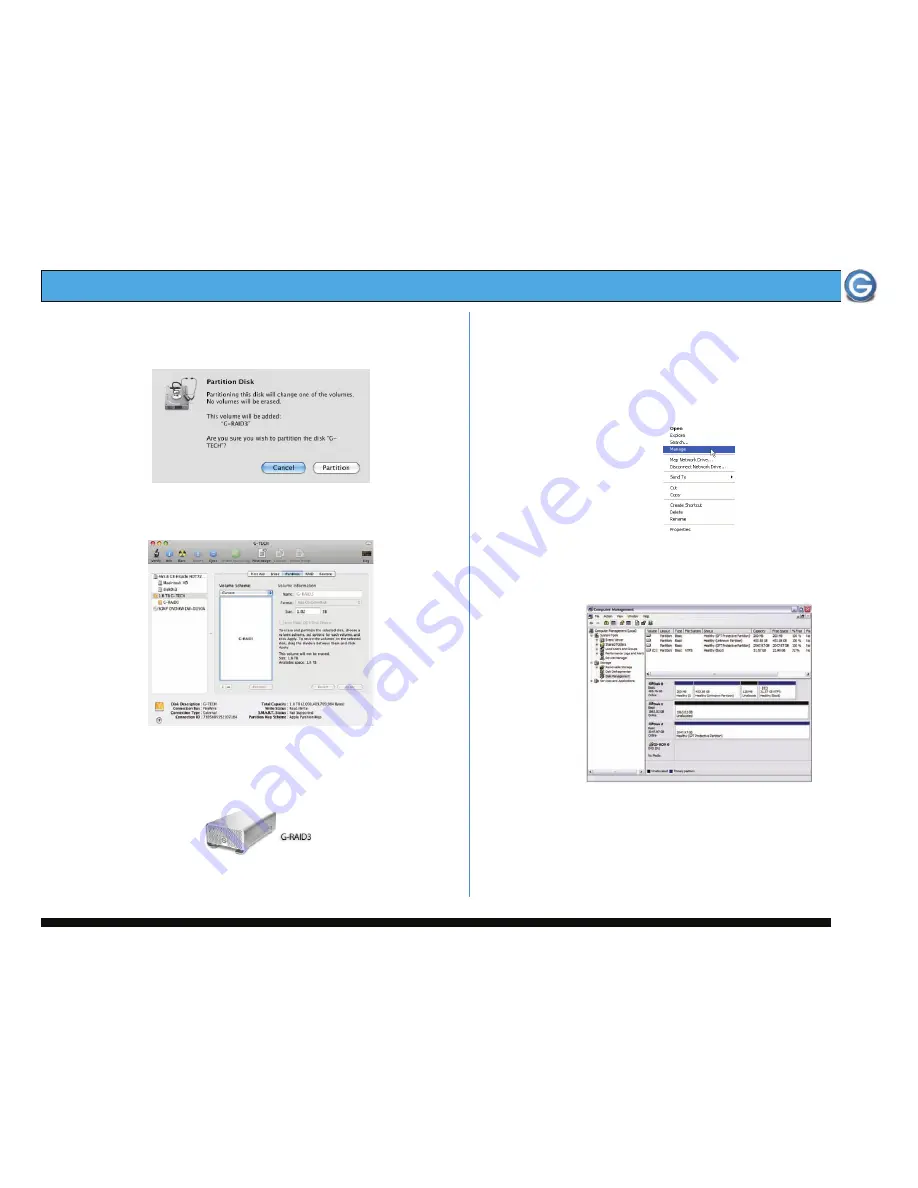
5. Click on the <Partition> button. The dialog box  
shown below will appear.  Click on the <Partition> button 

to continue. 


6. When partitioning is complete, G-RAID

will be 

displayed in the left-hand panel as shown below. 


7. Exit the Apple 

Disk Utility


8. G-RAID

will be displayed on the desktop as shown. 


G-RAID

3


is now set up for use!!


7.2


Windows 2000/XP  

1. Power on G-RAID

3

, wait 10 seconds, then power on your 

computer. 
 

2. Open the 

Disk Management 

utility by


right-clicking on 

the My Computer icon on the desktop and selecting 

Manage

” from the drop down menu as shown below. 


3. The 

Computer Management 

console will appear as shown 

below. Click on “

Disk Management

” in the left-hand panel. 

G-RAID

is identified as Disk 1 in this example.  


Right click on 

Disk 1

 and select 

Initialize Disk 

from the 

pull-down menu as shown. The window shown on the next 
page will appear. 


Summary of Contents for G-RAID3

Page 1: ...LE OF CONTENTS 1 INTRODUCTION 2 SAFETY PRECAUTIONS 3 SYSTEM REQUIREMENTS 4 WHAT S IN THE BOX 5 G RAID3 OVERVIEW 6 INSTALLING G RAID3 7 INITIALIZING G RAID3 7 1 Mac OSX 7 2 Windows 2000 XP 7 3 Cross Pl...

Page 2: ...G RAID3 Product Guide Page 2...

Page 3: ...G RAID3 Product Guide Page 3...

Page 4: ...g so will void the warranty If the product is returned with damage caused by improper handling the warranty will be void and liability will rest with the user 3 SYSTEM REQUIREMENTS eSATA FireWire 800...

Page 5: ...ive which will allow you to mount MAC formatted drives on your PC 6 INSTALLING G RAID3 1 Connect the plug from the power supply brick to the power connector on the rear of G RAID3 and plug the AC cabl...

Page 6: ...he Apple Disk Utility The Apple Disk Utility is in the Utilities Folder located in the Applications Folder on the Macintosh HD Select G RAID3 by clicking on the entry in the left hand column as shown...

Page 7: ...set up for use 7 2 Windows 2000 XP 1 Power on G RAID3 wait 10 seconds then power on your computer 2 Open the Disk Management utility by right clicking on the My Computer icon on the desktop and select...

Page 8: ...following window will appear G RAID3 Disk 1 is now identified as Basic and Online 6 Right click on the Disk 1 Unallocated bar entry and select New Partition from the pull down menu as shown below 7 T...

Page 9: ...available space on G RAID3 Note Multiple partitions can be created on G RAID3 Consult your Windows documentation for instructions on setting up multiple partitions 10 Windows will automatically assign...

Page 10: ...D3 will now be displayed as an available hard disk drive under My Computer as shown below G RAID3 is now set up for use 7 3 Cross Platform Use To setup your G RAID3 for use on both Windows and Macinto...

Page 11: ...orking with files over 4 GB you may want to choose a software option like MacDrive MacDrive is Windows software that enables the Windows OS to mount MAC formatted drives www macdrive com 8 UNMOUNTING...

Page 12: ...Support make sure to be in front of your computer and have the following information readily available Your G RAID3 serial number on bottom of unit Operating system and version Computer brand and mode...

Page 13: ...Tech at support g technology com IN THE EVENT A PRODUCT BECOMES DEFECTIVE DURING THE WARRANTY PERIOD THE PURCHASER S EXCLUSIVE REMEDY SHALL BE REPAIR OR REPLACEMENT AS PROVIDED ABOVE INCIDENTAL OR CO...

Reviews: