background image

p.20

Maintenance for Your Drive

Initialize Drive for Mac 

G-RAID mini was factory-formatted for use or ‘initialized’ for Mac OS. You can reinitial-
ize if you¹d like to quickly erase the contents of the drive, or if you reconfigure the RAID 
mode. Here are the steps.

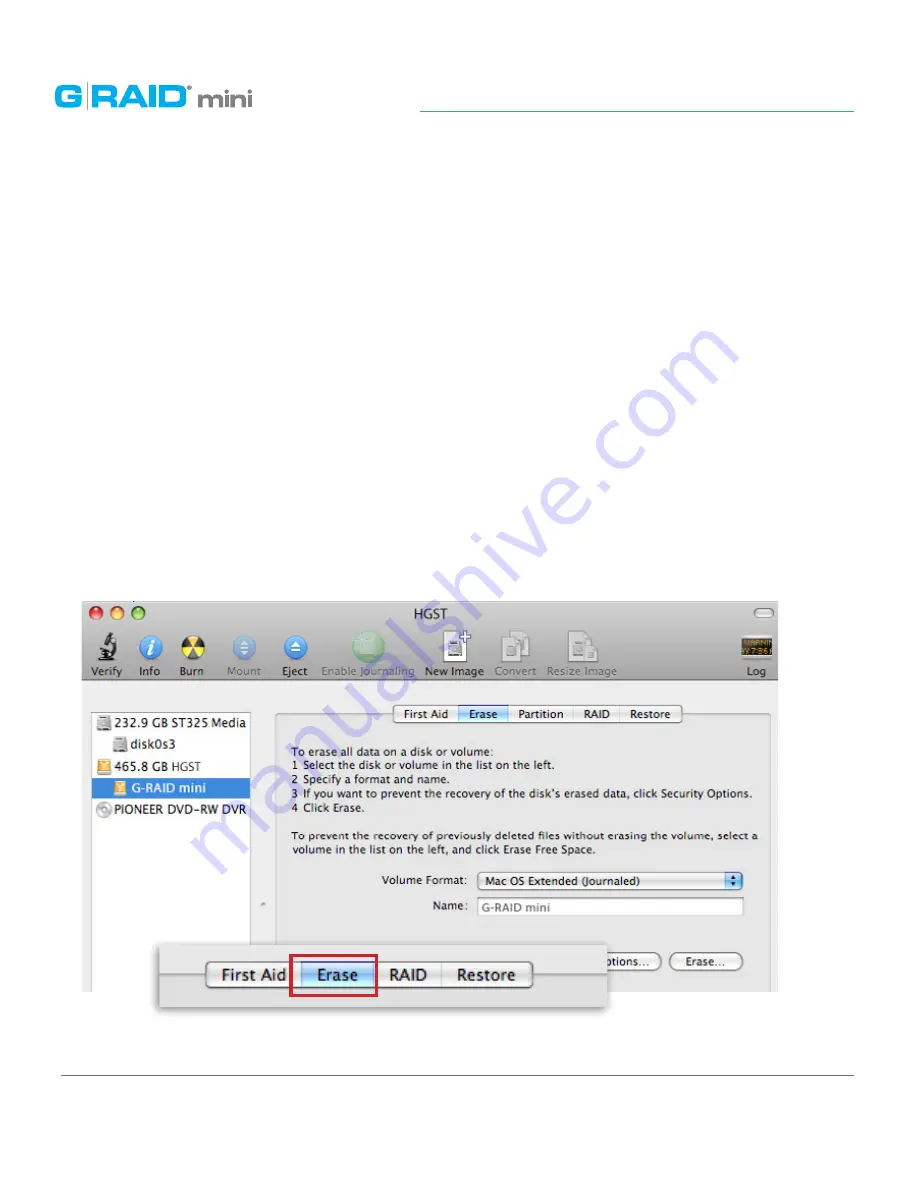
1.  First, open the Disk Utility program. This application is located on your hard drive 

under Applications/Utilities/Disk Utility. The window below will appear. Your  
G-RAID mini will be displayed in the left-hand column. 

2.  Select the G-RAID mini by clicking its drive icon in the left-side column. Information 

about the drive willl be displayed at the bottom of the window. 

3.  Select the Erase tab to view the formatting options. By default, the Format pop-up 

menu is set to the Mac OS Extended (Journaled) option. 

Summary of Contents for G RAID mini

Page 1: ...g technology com Portable Dual Drive Storage System PRODUCT MANUAL ...

Page 2: ...10 Using Your Drive on Mac Easy Installation for Mac 12 Optimize its Performance 13 Activity Failure LEDs 13 Using RAID Modes Supported RAID Modes 15 The Configurator Utility 16 Configure the RAID Mode 16 Maintenance for Your Drive Initialize Drive for Mac 20 Restore the Drive Icon 23 Reformat with Partitions 25 Using Your Drive on Windows Windows Use 30 Cross Platform Use 31 Support Warranty Tech...

Page 3: ...Safety General Use Safety Precautions p 4 Backup Your Data p 5 ...

Page 4: ...om moisture or liquids To reduce the risk of damage do not expose this drive to rain or moisture Do not use it in damp or wet conditions Never place objects containing liquids on the drive as they may spill into its openings Ventilation Place the device in a vented area The drive should never be placed near or over a radiator or heat source Temperature Do not expose this drive to temperatures outs...

Page 5: ... recovery or restoration of lost data Any loss corruption or destruction of data while using a G Technology drive is the sole responsibility of the user Make Two Backups To help prevent the loss of your data we highly recommend that you keep TWO copies of your data in separate storage locations Keep one copy on your G Technology drive Keep a second copy on your internal hard drive another G Techno...

Page 6: ...About Your G RAID mini Introduction p 7 What s in the Box p 8 Overview of the Drive p 9 System Requirements p 10 Disconnect the Drive p 10 ...

Page 7: ... G RAID mini is the ideal portable storage solution for safe guarding content transferred from professional tapeless video cameras Its compact size and tough all aluminum enclo sure makes it perfect for capturing and editing on the go or working on location G RAID mini is capable of delivering an unprecedented 170 MB second transfer rate when connected via eSATA in RAID 0 mode The drive is FireWir...

Page 8: ...tems are included in the box G RAID mini 1 USB 3 0 cable backwards compatible with USB 2 0 1 FireWire 800 cable Portable carrying case External DC Power Supply If any items are missing please contact G Technology at support g technology com or call 888 426 5214 ...

Page 9: ...i There is a Power Activ ity LED and a Yellow Drive Failure LED on the front of the unit On some models the Drive Failure LED may be RED There is a heat sink and cooling fan on the bottom Read about LEDs On the rear of the drive is a high speed USB 3 0 port two FireWire 800 ports and a DC Power In Connector ...

Page 10: ... To prevent failures and or data loss it is important to follow the steps below when disconnecting or unmounting the drive from your computer 1 Before disconnecting the drive unmount the system by simply dragging the G RAID mini icon to the trash located in the dock Keyboard shortcut Select the drive icon and hit Command E 2 It is safe to remove the drive from your system when the drive icon is no...

Page 11: ...Using Your Drive on Mac Easy Installation for Mac p 12 Optimize its Performance p 13 Activity Failure LEDs p 13 ...

Page 12: ...stem and connect G RAID mini with the matching supplied cable The unit is bus powered via FireWire so no AC power is needed However if no FireWire power is available the included power supply can be used Simply connect the power cable to the unit and plug the power supply into a surge protector or wall outlet The drive will automatically mount on the desktop if you are running Mac OS ...

Page 13: ...g table explains the meaning of each combination of LEDs on the drive The Activity light will glow when power is applied via the FireWire ports It will flash brighter as data is transferred to or from the hard drive The Failure light will warn you in the event of a disk drive failure In the event of a disk drive failure the yellow Drive Failure LED located behind the front panel will illuminate If...

Page 14: ...Using RAID Modes Supported RAID Modes p 15 The Configurator Utility p 16 Configure the RAID Mode p 16 ...

Page 15: ...the G RAID mini follow the steps in Configure the RAID Mode RAID 0 Performance G RAID mini ships in RAID 0 Performance mode This RAID mode has 100 storage capacity and is ideal for video editing In RAID 0 data is split between the the two drives for increased performance RAID 1 Protected RAID 1 is great for protection and security of data making it ideal for sensitive data rather than large amount...

Page 16: ...onfigurator you should launch it directly from the mounted Disk Image Configure the RAID Mode It is easy to configure the RAID mode with the following steps NOTE Changing the RAID level will erase all data on the drive Be sure all the material you want to save is backed up to a separate disk 1 Launch the G Technology Configurator utility A dialog window will ask you to dis connect all other extern...

Page 17: ...ID mini 3 Once the utility finds your G RAID mini the following window will appear Select the RAID 1 Protected or RAID 0 Performance radio button Then click the Config ure button to continue 4 Two Warning windows will appear letting you know that the following step will erase all of your data Click the OK Yes buttons to continue ...

Page 18: ... re initialize the disk with the Disk Utility application The Disk Insertion dialog below should appear Click the Initialize button to launch Disk Utility Go here for the simple steps to initialize G RAID mini for use with Mac NOTE If the Disk Insertion dialog does not appear go to Application Utilities and open the Disk Utility program Once Disk Utility is open you are ready to initialize and par...

Page 19: ...Maintenance for Your Drive Initialize Drive for Mac p 20 Restore the Drive Icon p 23 Reformat with Partitions p 25 ...

Page 20: ...k Utility program This application is located on your hard drive under Applications Utilities Disk Utility The window below will appear Your G RAID mini will be displayed in the left hand column 2 Select the G RAID mini by clicking its drive icon in the left side column Information about the drive willl be displayed at the bottom of the window 3 Select the Erase tab to view the formatting options ...

Page 21: ... Time Machine or to create a separate bootable installation of OS X Mac OS Extended Use this format for best performance and media storage To se lect click the Format pop up and its option to Mac OS Extended 5 Click the Erase button in the lower right corner of the window A dialog box will ap pear asking if you want to erase the G RAID mini partition ...

Page 22: ... the drive is reinitialized you should automatically see the Time Machine dialog box Click the Use as Backup Disk button if you want to use the drive with Time Machine Click the Don t Use or Decide Later button if you do not want to use Time Machine at this point 8 Quit the Disk Utility program After reinitializing the drive the custom icon for G RAID mini has been erased You can optionally restor...

Page 23: ...rance on the computer desktop look nicer and more accurate 1 To get the G Technology icon package go to g technology com support and navigate to your product There will be a link to download the icons 2 Once downloaded it should automatically open the G Technology Icons folder as shown below If not double click the Zip file to open Next double click the DMG file to open the G Technology Icons pack...

Page 24: ...s its Get Info window below left 5 Select the default icon in the Get Info window below left 6 Press Command V to paste the custom G RAID mini icon into the Get Info window below right The icon for your G RAID mini has been restored and you can close the Get Info window Your drive is now fully ready for use ...

Page 25: ...poses For instance segment user data from backup data set up a multi boot environment with different Operating Systems or cre ate a dedicated capture scratch disk for programs like Final Cut Pro The following steps will guide you through this simple process of partitioning your drive In this example we will partition a 500 GB G RAID mini connected via FireWire The steps will be identical for your ...

Page 26: ...con not the G Technology drive icon by clicking it in the left side column 3 Click on the Partition button in the main window 4 Select the number of partitions you would like from the Volume Scheme menu Below we have selected 2 Partitions to create two partitions ...

Page 27: ...s recommended to use Mac OS Extended or Mac OS Extend ed Journaled For info about formats go here In the Size field type in a size for the partition Alternately you can drag the bar in between each partition to quickly change the size 6 Repeat this process for each partition you have created 7 Click the Apply button in the lower right corner of the window A dialog box will ap pear asking if you wa...

Page 28: ... partitions will be displayed in the left hand panel of Disk Utility 10 Quit the Disk Utility program After reinitializing the drive the custom icon for the G Technology drive has been erased You can optionally restore this icon to each partition with the steps on this page 11 The multiple partitions of the G Technology drive will be displayed on the desktop Your drive is now setup with two or mor...

Page 29: ...Using Your Drive on Windows Windows Use p 30 Cross Platform Use p 31 ...

Page 30: ...s set up at the factory for use with Mac OS systems A simple initialization will prepare your drive for use with Windows 8 7 Vista and XP systems For helpful information on configuring and using your drive with Windows please visit www g technology com support ...

Page 31: ...lity program This application is located on your hard drive under Applications Utilities Disk Utility The window below will appear Your G RAID mini will be displayed in the left hand column 2 Select the G RAID mini by clicking on its drive icon in the left side column Information about the drive will be displayed at the bottom of the window 3 Select the Erase tab to view the formatting options By ...

Page 32: ...T32 NOTE You may need to rename the drive because FAT32 does not support more than 11 letters in the drive name WARNING THIS NEXT STEP WILL ERASE ALL DATA ON YOUR DRIVE 5 Click the Erase button in the lower right corner of the window A dialog box will ap pear asking if you want to erase the G RAID mini partition ...

Page 33: ...or FAT32 With this format you will be able to read write on Windows 8 7 Vista and XP and on Mac OS machines Limitations with FAT32 There are some limitations when using FAT32 The MS DOS File System cannot write files over 4 GB If you are working with files over 4 GB you may want to choose a software option like MacDrive www macdrive com MacDrive is Windows software that enables you to mount Mac fo...

Page 34: ...Support Warranty Technical Support p 35 Limited Warranty p 36 Copyright p 38 ...

Page 35: ...nd support If you encounter any difficulties while installing or using G RAID mini please contact G Technology Technical Support at g technology com support Helpful information for support When contacting Technical Support it s best to be in front of your computer and have the following information available Your G RAID mini serial number on bottom of unit Operating System and version Computer bra...

Page 36: ...asured from the date of sale from HGST to the authorized distributor What does this limited warranty not cover The limited warranty does not cover damage resulting from commercial use misuse accident modification or alteration to hardware or software tampering unsuitable physical or operating environment beyond product specifications improper maintenance or failure caused by a prod uct for which H...

Page 37: ...arrier at HGST shipping point You are responsible for importation of the replaced product if applicable HGST will not return the original drive to consumers therefore the consumer is responsible for moving data to another media before returning Data Recovery is not covered under this warranty and is not part of the warranty returns process HGST warrants that the replaced products are covered for t...

Page 38: ... operat ing environment and formatting Copyright One gigabyte GB is equal to one billion bytes when referring to hard drive capacity Accessible capacity will vary depending on the operating environment and formatting Design by G Technology in California G RAID and G Technology are registered trademarks of HGST Inc and its affiliates in the U S and other countries Apple Mac FireWire MacBook Pro Tim...

Reviews: