background image


G-MINI Installation Guide 


Page 7 


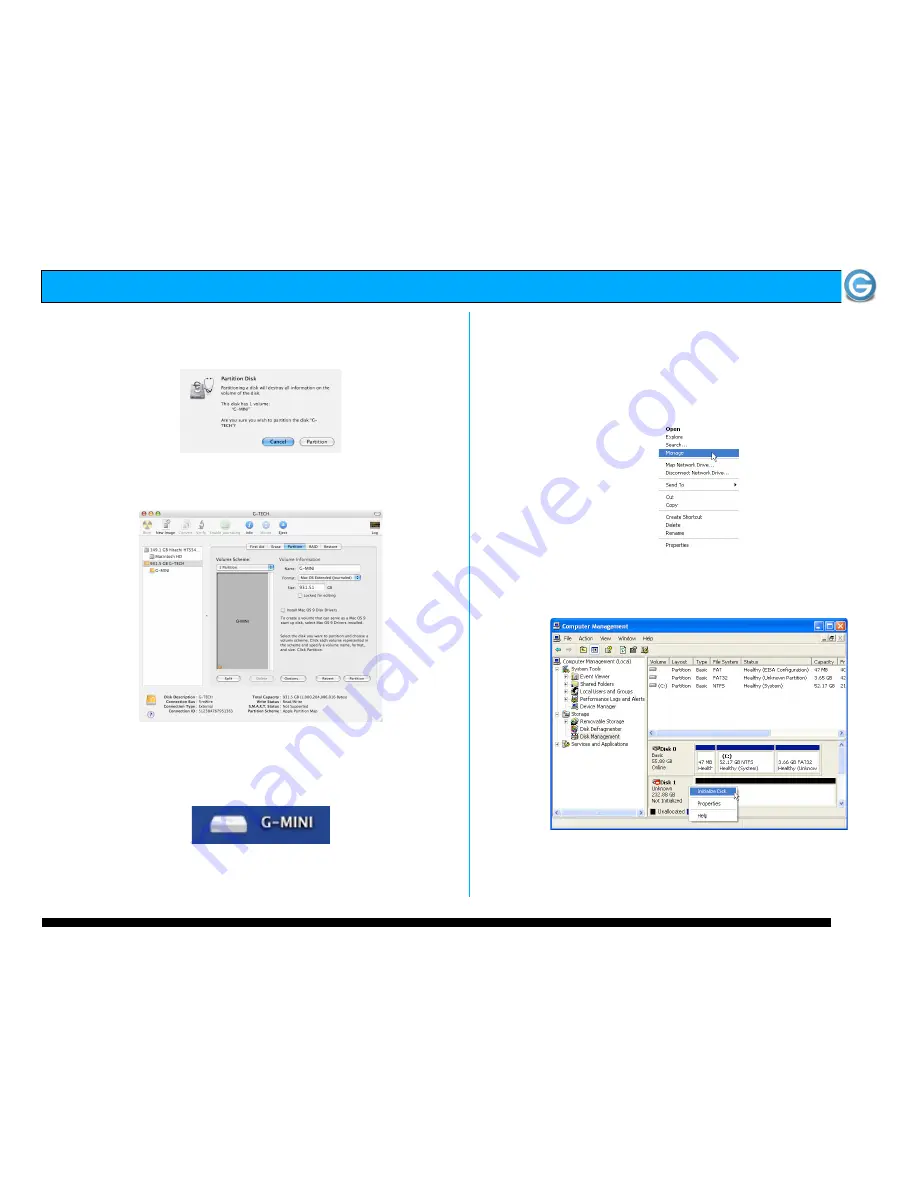
5. Click on the <Partition> button. The dialog box shown 
below  will  appear.    Click  on  the  <Partition>  button  to 
continue. 


6. When partitioning is complete, G-MINI will be displayed 
in the left-hand panel as shown below. 


7. Exit the Apple 

Disk Utility

 
8. G-MINI will be displayed on the desktop as shown below. 


G-MINI is now set up for use!!


7.2


Windows 2000/XP  

1. Power on G-MINI, wait 10 seconds, then power on your 
computer. 
 
2.  Open  the 

Disk  Management 

utility  by


right-clicking  on 

the  My  Computer  icon  on  the  desktop  and  selecting 

Manage

” from the drop down menu as shown below. 


3. The 

Computer Management 

console will appear as shown 

below. Click on “

Disk Management

” in the left-hand panel.  

G-MINI is identified as Disk 1 in this example.  


Right  click  on 

Disk  1

  and  select 

Initialize  Disk 

from  the 

pull-down menu as shown. The window shown on the next 
page will appear. 
 

Summary of Contents for G-Mini

Page 1: ...evA TABLE OF CONTENTS 1 INTRODUCTION 2 SAFETY PRECAUTIONS 3 SYSTEM REQUIREMENTS 4 WHAT S IN THE BOX 5 G MINI OVERVIEW 6 INSTALLING G MINI 7 INITIALIZING G MINI 7 1 Mac OSX 7 2 Windows 2000 XP 7 3 Cros...

Page 2: ...G MINI Installation Guide Page 2...

Page 3: ...G MINI Installation Guide Page 3...

Page 4: ...Please handle the unit with care Do not open the case Doing so will void the warranty If the product is returned with damage caused by improper handling the warranty will be void and liability will r...

Page 5: ...ktop right out of the box If it becomes necessary to re format G MINI for Mac OS X see section 7 1 Attention Windows Users G MINI must be formatted for the Windows Operating System before use on a PC...

Page 6: ...ties Folder located in the Applications Folder on the Macintosh HD Select G MINI by clicking on the entry in the left hand column as shown below Information about G MINI will be displayed at the botto...

Page 7: ...now set up for use 7 2 Windows 2000 XP 1 Power on G MINI wait 10 seconds then power on your computer 2 Open the Disk Management utility by right clicking on the My Computer icon on the desktop and se...

Page 8: ...The following window will appear G MINI Disk 1 is now identified as Basic and Online 6 Right click on the Disk 1 Unallocated bar entry and select New Partition from the pull down menu as shown below 7...

Page 9: ...e available space on G MINI Note Multiple partitions can be created on G MINI Consult your Windows documentation for instructions on setting up multiple partitions 10 Windows will automatically assign...

Page 10: ...INI is now set up for use 7 3 Cross Platform Use To setup your G MINI for use on both Windows and Macintosh systems use the Apple Disk utility and format G MINI FAT32 1 Open the Apple Disk Utility The...

Page 11: ...eat feature of G MINI is its ability to be connected and disconnected while your computer is running To prevent failures and or data loss it is important to follow the steps below when unmounting disc...

Page 12: ...ment parts or products will be furnished on an exchange basis and will be either new or reconditioned All replaced parts or products shall become the property of G Tech This warranty shall not apply i...

Reviews: