


Page 10
User Programming via the DIP Switch & Push Button
Some of the operating parameters of the
Trackside base station
can
be modified to meet your individual needs. No programming is neces-
sary to get your system up and running, only to modify it, if so desired.
User configurable parameters can be programmed using the 2-position
DIP switch, the on-board push-button next to the DIP switch, and on-
board LED. The DIP switch selects the parameter to be programmed,
and the LED flashes the currently selected option. See the program-
ming chart following this discussion for specific instructions.
Parameter 0
Throttle Momentum
This parameter sets the amount of momentum applied to the throttle
when the momentum function is turned ON using the “Toggle Rate”
button. “Momentum” is the length of time it takes to accelerate or decel-
erate while holding down the Faster or Slower buttons.
Parameter 1
Direction Control
Loco normally runs in the forward direction at power-up. Set this for
reverse at power up.
Parameter 13
User Feedback
Option 2 enables vibrate mode on transmitters equipped with a vibra-
tion motor. Upon pressing any key, the transmitter will vibrate if, and
only if, the receiver actually received the signal. This can be used for
testing radio range.
Parameters 2-12
Are not used at this time.
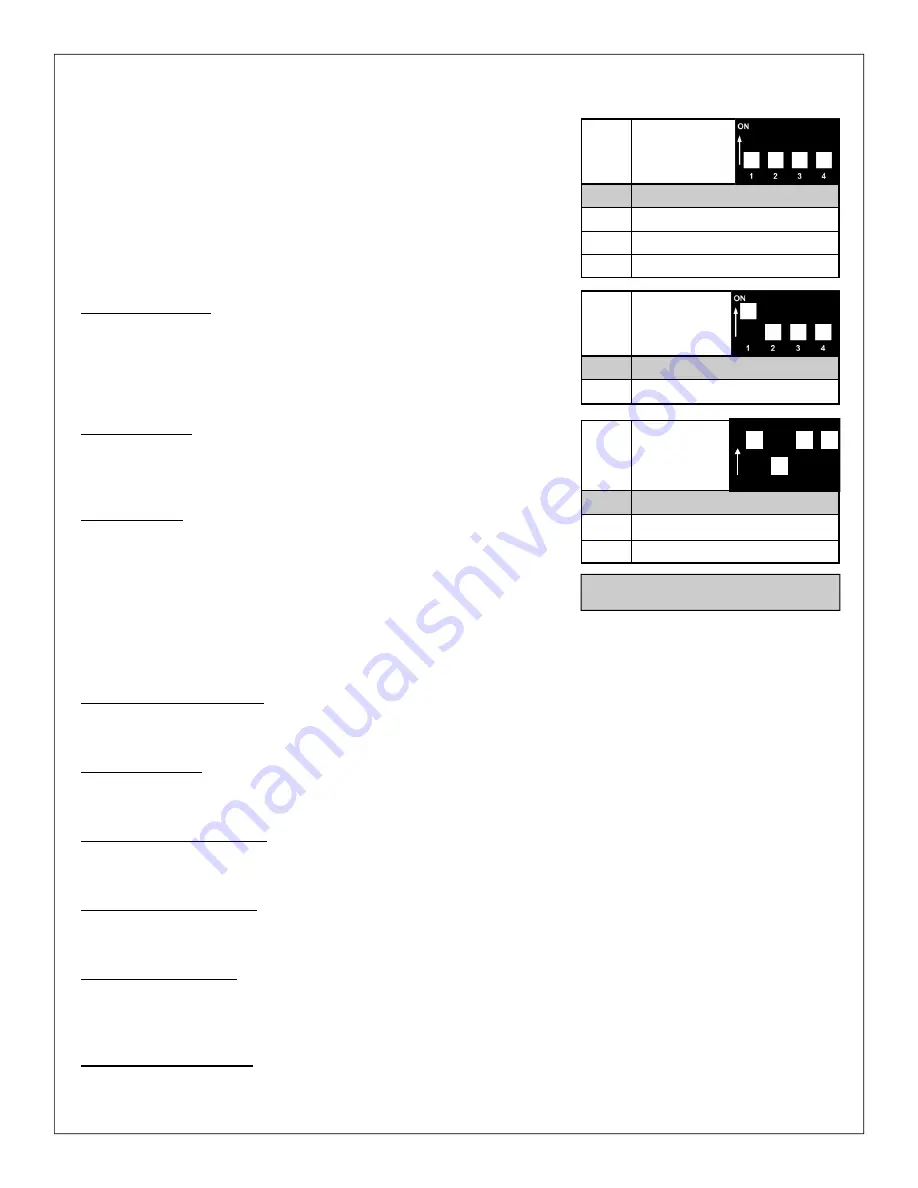
Enter Programming Mode
Hold the button (next to the DIP switch) down on the TrackSide board until the LED goes out. Release the button.
The LED will begin flashing the option code of the selected parameter.
Select Parameter
Select the parameter you wish to view or program using the DIP switch. (the white square indicates position of the
switch; e.g. for parameter 0, all switches are in the down or off position.
View Current Option Code
The LED will repeatedly flash the option code for the currently selected parameter; e.g. two flashes followed by a
pause indicate option 2.
Change the Option Code
Momentarily press the push-button during the pause to advance the option to the next higher number, until you
get the desired number of flashes.
Save the Option Code
During the pause between code flashes, press and hold down the push-button for about 4 seconds until the LED
goes off. Upon release, the LED should stay on solid. This saves the option code and exits User Programming.
The new option will now be active.
Exit Programming Mode
To exit programming mode without saving any changes, turn off TrackSide power.
Factory setting
Option
Parameter 0 -
Throttle
Momentum
1
20 secs 0 to 100% Slowest
2
15 specs
3
10 secs
4
6 secs Fastest
Option
Parameter 1 -
Motor
Direction
1
Normal - Powers up in Forward
2
Reverse - Powers up in Reverse
Option
Parameter 13 -
User Feedback
1
Disabled
2
Transmitter Vibration
3
Not Used
1
2
3
4
ON


