background image


EDR User Manual 


19 


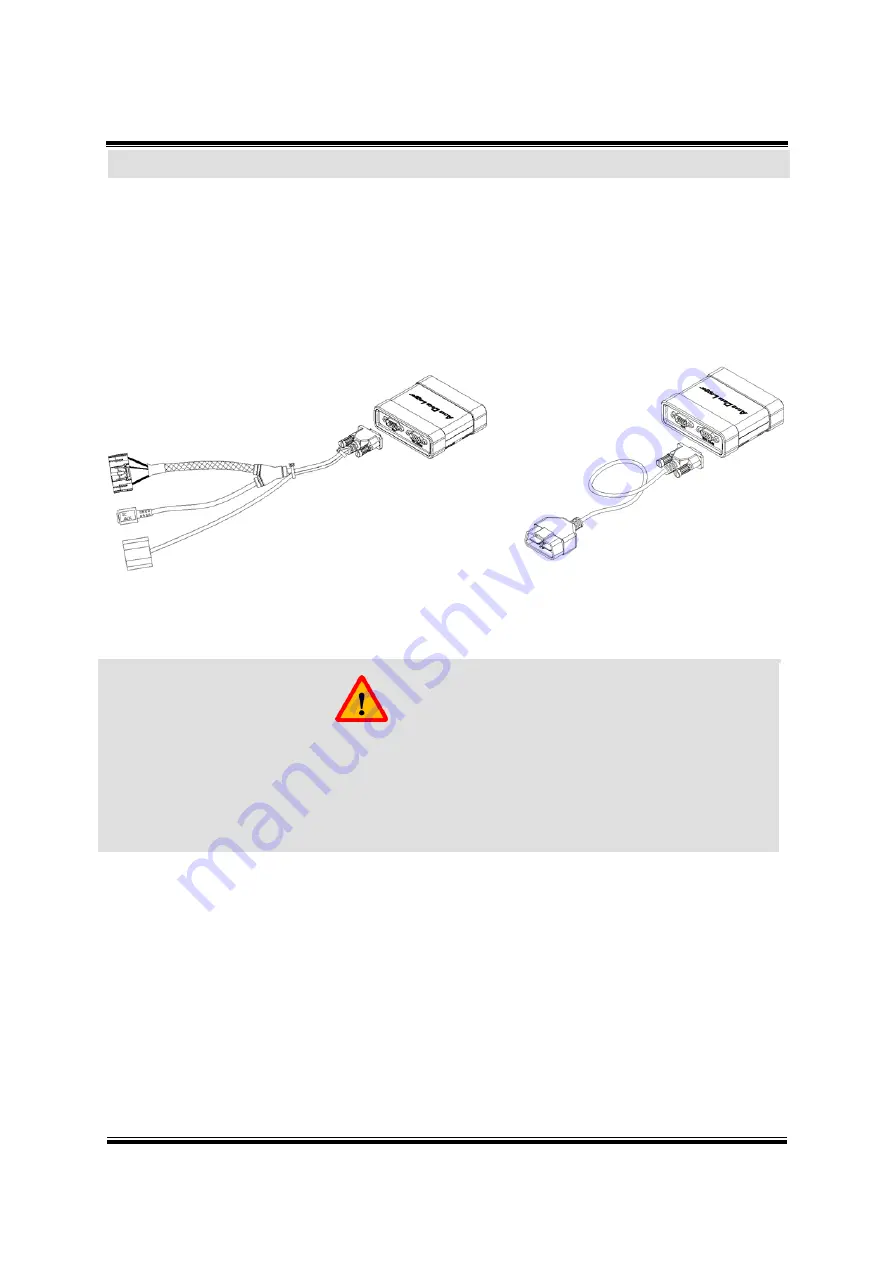
To  connect  the  ADL  main  body  with  the  vehicle’s  diagnosis  connector,  you  must  connect  the 

main  DLC  cable  to  the  ADL  main  body  first.  As  seen  in  [Figure  3],  you  can  complete  the 

connection by ma tching the direction of  the main ADL cable to push it in to  the ADL main body. 

After  the connection, re -check that  the main cable and ADL  main body are connected properly 

before actual use. 


[ Figu r e  3]  Con n e c tion  of M a in  DLC Ca ble  to ADL M a in  Body  


Con nection of M ain DLC Cable to ADL Main Body 


Warning


During the connection between the ADL  main body and the vehicle, the location of 

the vehicle’s diagnosis connector must be identified  correctly for proper connection 

as a faulty  connection may cause issues in communication with  the vehicle. 


Summary of Contents for EDR2.0

Page 1: ...or Communication with Vehicle 16 Additional Input and Output Function 17 Basic Component of ADL Main Body 19 Power ON OFF Method and Switch Control 20 How to Turn On ADL Main Body 21 Status Light of A...

Page 2: ...on 35 Connector Component Number Check 36 Search 37 Search Complete 38 Initial Screen 39 Opening Saved Files 40 Saving PDF Files 40 Opening Saved Files 41 Single page Summary of Events 42 Settings and...

Page 3: ...EDR User Manual 3 Read First A Guide to EDR Precautions for Safety Precautions for the Environment Chapter 1 Introduction...

Page 4: ...this user manual Without a written consent from G I T Co Ltd this user manual including its partial information cannot be copied or used without notice The purchase of this manual does not imply the...

Page 5: ...e we recommend you update the EDR2 0 program regularly through the Internet The after sales service for products not manufactured by G I T Co Ltd including information terminal devices laptops and pri...

Page 6: ...f the collision status 2 Precise analysis of the performance of safety devices Components of the EDR2 0 The EDR2 0 consists of the ADL ADL connector and EDR2 02 0 software Main body of ADL This device...

Page 7: ...vehicle to which the EDR2 0 can connect Handle the product in an environment with temperature and humidity in which it can operate For temperature and humidity specifications please refer to the manu...

Page 8: ...ce Circulation of Electrical and Electronic Equipment and Vehicles Please comply with the following content warning when you dispose of the product Warning When the EDR2 0 is being discarded due to ex...

Page 9: ...EDR User Manual 9 BasicEDR Components ADL Components Chapter 2 EDR Components...

Page 10: ...m USB G1ZKEDB001 EDR2 0 program USB 1 Carry on bags G1DDDHA002 A carry bag for your EDR Product 1 ADL main body G1ZDDMN001 The main body is connected to the vehicle and controller to perform functions...

Page 11: ...at is connected to the main body and the vehicle s OBD II diagnosis contactor to be used for the communication with the vehicle Includes power supply Cable length 1 5m 1 Diagnosis adapter D SUB male t...

Page 12: ...munication Adapter length 0 4m Adapter color yellow 1 Diagnosis adapter 36 PIN 52 PIN G1ZDDPA030 An adapter used for the single ACU communication Adapter length 0 4m Adapter color yellow 1 The diagnos...

Page 13: ...EDR User Manual 13 Chapter 4 ADL Basic Functions ADL Specifications and Functions ADL Power ON OFF Controls ADL Main Body and DLC Cable Connection...

Page 14: ...30V DC Operating environment Temperature Humidity During operation Temperature 20 to 60 Humidity Non condensed at 0 to 10 32 to 50 95 RH at 10 to 30 50 to 86 70 RH at 30 to 50 86 to 122 40 RH at 50 t...

Page 15: ...nector connected to C type USB cable 4 Vehicle communication LED green red 5 AUX D SUB 15 PIN male connector Ethernet 100BASE TX communication and authorized power cable connection 6 VEH COM D SUB 15...

Page 16: ...off Figure 1 Power Switch of ADL Main Body An indication screen with LED is located on the front of the ADL main body to show its operation status Figure 2 ADL Main Body s LED Status Power The main bo...

Page 17: ...Connector may vary depending on the vehicle Please identify the accurate DLC location of the vehicle and the adapter to be used Also please keep in mind that the ADL main body cable must be connected...

Page 18: ...DLC cable you must remove the lock clip around the connector before the disconnection Please be aware that you may damage the cable and connector if you pull the cable part or twist the cable for disc...

Page 19: ...ADL main body After the connection re check that the main cable and ADL main body are connected properly before actual use Figure 3 Connection of Main DLC Cable to ADL Main Body Connection of Main DLC...

Page 20: ...etween the ADL main body and USB C type cable s connector is complete Sudden disconnection during communication may cause failures Figure 5 Connection of USB C type Cable to ADL Main Body During the m...

Page 21: ...EDR User Manual 21 Starting Main Screen Layout VehicleType Selection and Search Savingand Opening Files Settingsand Internet Update Chapter 4 Basic EDR Operations...

Page 22: ...0 Operations Chapter Basic EDR2 0 Operations Starting After installing the software double click the shortcut on the main screen two times to s tart the EDR2 0 as shown on Figure 1 below Figure 1 EDR...

Page 23: ...l 23 Clicking the icon on the main screen initiates the integrated launcher as shown in Figure 2 The user may choose between the EDR2 0 and ADL Figure 2 EDR2 0 and ADL s election s creen s hown on the...

Page 24: ...e EDR2 0 main page consists of menu title bars for the use of the service The tab features vehicle type selection initial screen opening up PDF files saving PDF flies summary reports settings and Inte...

Page 25: ...aved PDF files Click the icon to save the test results as PDF files Click the icon to summarize and view events in a single page Click the icon to open a screen on product name copyright information m...

Page 26: ...w a vehicle type selection screen as seen in Figure 1 When the EDR2 0 vehicle type selection screen appears you can select the vehicle type according to the two options below You can selectthe vehicle...

Page 27: ...IN entered on the search bar Resets the searched vehicle Shows the manufacturer s vehicle model Shows the adapter for the vehicle Completes the vehicle selection Cancels the vehicle selection Allows e...

Page 28: ...17 digit VIN vehicle identification number and click Search The vehicle type will then appear automatically as shown in Figure 2 Figure 2 VIN Input on ADL Communication All VINs How to select vehicle...

Page 29: ...gure 3 Then selectthe vehicle type and adapter in consecutive order Using this function will not allow the VIN search It will allow vehicle diagnosis but the type of the vehicle to be diagnosed will n...

Page 30: ...ehicle type selection is complete you can then enter additional information VIN user event number event generation date tire size memos as seen in Figure 4 Figure 4 Entering Additional Information Con...

Page 31: ...put check the connector component number as seen in Figure 5 to make a connection to the ACU and ADL connector The connector component number can be ignored for direct communication with the vehicle a...

Page 32: ...data reception button as seen in Figure 6 will make the side of the button turn red generating a pop up screen to commence searching Figure 6 ADL Communication Search in Prog res s When the search is...

Page 33: ...EDR User Manual 33 7 Figure 7 Search Complete Initial Screen...

Page 34: ...the initial screen to be shown after clicking the initial screen button as seen in Figure 8 Figure 8 ADL Communication Initial Screen Saving and Opening Files Basic EDR2 0 Operations Chapter Basic EDR...

Page 35: ...files to be saved by clicking the Save PDF File button as seen in Figure 9 Figure 9 Saving PDF File This function allows the saved PDF files to be opened by clicking the Open button as seen in Figure...

Page 36: ...iew the PDF file with events summarized into single pages by clicking the Display Summary Report button as seen in Figure 11 The categories of the summary may differ depending on the vehicle type and...

Page 37: ...The categories shown on the summary include vehicle speed engine throttle control pedal operation status engine rev count ABS operation status steering wheel angle and gas pedal Figure 11 Single page...

Page 38: ...EDR User Manual 38...

Page 39: ...EDR User Manual 39 Figure 12 Event Categories in the Summary...

Page 40: ...date Basic EDR2 0 Operations Chapter Basic EDR2 0 Operations Settings and Internet Update This function allows viewing of the user guide manual and language settings by clicking the Open button as see...

Page 41: ...EDR User Manual 41 The software update and ADL firmware update function allows updates by clicking the Internet Update button as seen in Figure 14 Figure 14 Internet Update Internet Update...

Page 42: ...EDR User Manual 42 Disposal of Old Electric and Electronic Equipment Chapter 5 Appendix...

Page 43: ...reat them as domestic waste Instead they should be delivered to their collection sites for electric and electronic equipment recycling This allows potential harm to public health and the environment t...

Reviews: