background image

15

MAX PRESSURE LIMITING SCREw (FIG.30)

WARNING! Do not adjust the max pressure limiting
screw. The maximum pressure was set by a qualified
mechanic with professional instruments to ensure the
log splitter works under pressure no more than 6 Tons.
Unauthorised resetting will cause hydraulic pump
failure and can result in serious injury as well as
damage to the machine.

POSITIONING THE LOGS

Always place the logs on the log retaining plates.

Make sure the logs do not twist, rock or slip while
being split.

Do not force the log splitter by splitting the log on the
upper part of the wedge. This will break the wedge or
damage the machine.

Break log in the direction of its grain.

Do not place the log across the log splitter for splitting.
It may be dangerous and may seriously damage the
machine.

Do not attempt to split 2 logs at the same time. One of
them may fly up and hit you.

RECOMMENDED LOG SIZE

Log size: 520 mm (length) x 50-250 mm (diameter).

The specified diameter is only a guideline. If the log
contains a burl or the log fibre is too hard, it will be
very difficult to split the log. On the other hand if the
fibre of another log if even and soft, the log splitter may
be able to split it.

OPERATION

This log splitter is designed to be operated by one
person only and requires two handed operation by the
user. The left hand controls the hydraulic control lever
and the right hand controls the push button switch.

Push and hold the push button switch, Fig.31 (1).

Then press and hold down the control lever, Fig.31 (2)
to start the log splitter.

The log splitter will freeze if either control is released.

When both controls are released, the log splitter
returns to the starting position.

NOTE: Once you start splitting the log, never reach into
the splitting zone.

wARNING: NEVER FORCE THE LOG SPLITTER FOR
MORE THAN 5 SECONDS TO SPLIT EXCESSIVELY
HARD wOOD. AFTER THIS TIME, THE OIL UNDER
PRESSURE wILL OVERHEAT AND THE MACHINE
COULD BE DAMAGED.

For extremely hard logs, rotate the log by 90° to see
whether it can be split in a different direction. In any
case, if you are still not able to split the log, this means
that the wood exceeds the capacity of the machine
and should be discarded to protect the log splitter.

FREEING A JAMMED LOG (FIG.32)

Release both controls.

The log splitter moves back and completely stops at its
starting position.

Insert a wedge of wood under the jammed log.

Start the log buster to push the wedge under the
jammed log.

Repeat above procedure with sharper sloped wedges
until the log is completely free.

Caution: Do not try to hit the jammed log off of the log
buster, this may damage the machine or may cause
the log to fly up and cause an accident.

MAINTENANCE

Warning! Make sure the the log splitter is switched off
and disconnected from the mains supply before
starting any cleaning or maintenance procedures.

REPLACING THE HYDRAULIC OIL (FIG.33 & 34)

Replace the Hydraulic oil in the log splitter after every
150 hours of use. Take following steps to replace it.

Ensure that the log splitter has returned to its starting
position and that that the machine is completely
disconnected from power source.

Loosen the bleed screw three or four turns.

Loosen the oil drain bolt with dipstick and remove it.

Place a dish under the log splitter that is able to take at
least 3.5 litres of oil. Tilt the log splitter and empty the
oil into the dish, Fig.33.

Tilt the log splitter in the other direction so that the oil
change hole faces upwards, Fig.34. Pour the hydraulic
oil into the oil tank using a clean funnel. Pour in the
amount of oil specified below.

Wipe the dipstick, using a clean soft cloth and check
the oil level as before

Add more oil if required.

Clean the filler neck and plug/dipstick washer/seal
thoroughly and refit, tighten sufficiently to prevent oil
leaking, DO NOT overtighten.

Carefully return the machine to normal working
position.

Finally, tighten the bleed screw.

HYDRAULIC OIL VOLUME

3.5 Litres

RECOMMENDED HYDRAULIC OIL

We recommend the following hydraulic oils for use in
the hydraulic system:

SHELL Tellus 22

MOBIL DTE 11

ARAL Vitam GF 22

BP Energol HLP-HM 22

or other corresponding oils

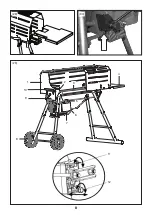
Summary of Contents for FXA502018666

Page 1: ...FXA502018666 Instruction manual Original instructions GB pg 11 18 K ytt ohje Alkuper isten ohjeiden k nn s FI pg 19 26 Bruksanvisning vers ttning av originalinstruktionerna SE pg 27 34...

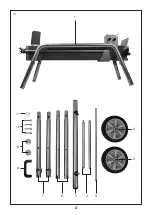
Page 2: ...2 1 1 7 11 2 2 6 5 3 4 10 8 9...

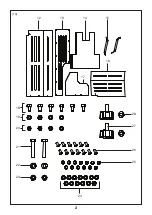
Page 3: ...2 12 1A 28 27 24 18 22 21 13 14 15 16 17 19 20 23 26 25...

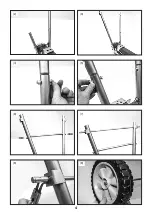
Page 4: ...4 2 3 4 5 6 7 9 8...

Page 5: ...5 10 11 12 13 14 15 17 16...

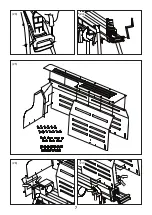
Page 6: ...6 22 18 19 20 21...

Page 7: ...7 23 24 25 26 27...

Page 8: ...8 28 30 29 6 2 1 3 2 5 6 4 1 7 8 9 10 11 12...

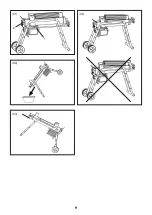
Page 9: ...9 31 32 33 34 1 2...

Page 10: ...ra bilderna VIKTIG Les n ye gjennom alle advarslene instruksene og spesifikasjonene som f lger med verkt yet og se p tegningene po e ce y a a c py c pa c e a c T HTIS Lugege l bi k ik elektrilise t ri...

Page 11: ...of for any other reason it must not be disposed of in household waste In order to preserve natural resources and to minimise adverse environmental impact please recycle or dispose of this product in...

Page 12: ...ns that are particularly hazardous physically Never use this equipment without proper safety gloves ones that do not conduct electricity hard toed and non slip boots and approved eye protectors Beware...

Page 13: ...same time Danger Never add the next log or change a log while the machine is in operation Danger Never tamper with the log splitter s protective equipment and do not use the machine without protectiv...

Page 14: ...mbled log splitter should look like the picture in Fig 22 ATTACHING THE HANDLE 1 Attach the handle to the front of the machine with the 2 screw provided Fig 23 ATTACHING THE GUARD 1 Unscrew the bolts...

Page 15: ...s rotate the log by 90 to see whether it can be split in a different direction In any case if you are still not able to split the log this means that the wood exceeds the capacity of the machine and s...

Page 16: ...BUSTER MAKE SURE THE BLEED SCREw IS TIGHTENED TO AVOID OIL LEAKING When you want to move the log splitter a short distance lift the front handle such that the front part of the machine rises up and th...

Page 17: ...ation for private householders for the environmentally responsible disposal of Waste Electrical and Electronic Equipment WEEE This symbol on products and or accompanying documents indicates that used...

Page 18: ...rity or retailer for recycling advice Product conforms to RoHs requirements Wear hearing protection Wear eye protection Wear respiratory protection Wear protective gloves Wear protective boots Danger...

Page 19: ...imiseksi kierr t tuote tai h vit muulla ymp rist yst v llisell tavalla Tuote tulee vied paikalliseen kierr tyskeskukseen tai muuhun viralliseen ker ily ja h vityspisteeseen Jos olet ep varma kysy kier...

Page 20: ...i kiinni koneistoon l k yt v lj vaatetusta solmioita tai koruja sormukset kellot jne Ne voivat j d kiinni koneen liikkuviin osiin l koskaan yrit halkaista tukkeja jotka ovat liian isoja tai pieni maht...

Page 21: ...koneen suorituskyvyn Kielletty l koskaan avaa kytkent laatikkoa tai s hk moottorin kantta Ota tarvittaessa yhteytt p tev n s hk asentajaan Varoitus Pid huolta ett kone ja s hk johto pysyv t kaukana ve...

Page 22: ...EN KIINNITT MINEN 1 Kierr etujalkojen yl osiin kiinnitetyt pultit irti ja yhdist puun tukitelineet Kierr pultit takaisin paikoilleen kuva 24 2 Yhdist suojus kuten n ytet n kuvassa 25 ulkopuolen kuusio...

Page 23: ...SEMAAN ERITT IN KOVAA PUUTA T M N AIKAV LIN UMPEUDUTTUA PAINEELLE ALISTETTU LJY YLIKUUMENEE JA KONE SAATTAA VAURIOITUA Muuta erityisen kovan tukin asentoa 90 n hd ksesi voiko sen halkaista toisessa su...

Page 24: ...minta on t ysin pys htynyt anna koneen j hty ja kierr s hk johto ja kiinnit se HUOMIO ENNEN PUUNHALKAISUKONEEN LIIKUTTELUA TULEE VARMISTAA ETT ILMAUSRUUVI ON KIRISTETTY JOTTA V LTET N LJYN VALUMINEN J...

Page 25: ...ELU Tietoja yksityisten kotitalouksien k ytetyn s hk ja elektroniikkalaitteiston Waste Electrical and Electronic Equipment WEEE ymp rist llisesti vastuullisesta h vitt misest T m symboli tuotteissa ja...

Page 26: ...ikallisilta viranomaisilta tai j lleenmyyj lt Tuote vastaa RoHs vaatimuksia K yt kuulosuojaimia K yt suojalaseja K yt hengityssuojaa K yt suojak sineit K yt turvajalkineita K den leikkautumisen tai mu...

Page 27: ...nnan beh rig insamlings och sophanteringscentral Om du r os ker p hur produkten ska sorteras kan du kontakta den lokala sophanteringsstationen g llande tervinning och bortskaffande S RSKILDA S KERHETS...

Page 28: ...rs k aldrig att klyva stockar som r f r stora eller f r sm f r att passa i maskinen F rs k aldrig att klyva stockar som har spikar st ltr d eller n gon annan komponent som kan skada maskinen St da up...

Page 29: ...inneb r det att tr ets h rdhet verstiger maskinens kapacitet F rbjudet ppna aldrig kopplingsboxen eller skyddet f r den elektriska motorn Kontakta en kvalificerad elektriker vid behov Varning Var noga...

Page 30: ...fr mre del med de 2 medf ljande skruvarna bild 23 MONTERA SKYDDET 1 Skruva upp bultarna som r monterade p de vre delarna av frambanen och anslut st df sten Skruva tillbaka bultarna p plats bild 24 2 M...

Page 31: ...da stockar rotera stocken 90 f r att se om den kan klyvas i en annan riktning Hur som helst om du nnu inte kan klyva stocken inneb r det att tr stocken verskrider maskinens kapacitet Kasta undan stock...

Page 32: ...UVEN R TDRAGEN F R ATT UNDVIKA OLJEL CKAGE N r du beh ver flytta vedklyven ett kort avst nd lyft upp det fr mre handtaget s att den fr mre delen av maskinen r i luften och hjulen mot backen Putta elle...

Page 33: ...n insidan MILJ SKYDD Information f r privathush ll om milj s kert bortskaffande av avfall som utg rs av eller inneh ller elektriska eller elektroniska produkter WEEE Denna symbol p produkter eller med...

Page 34: ...eller terf rs ljare f r information om tervinning Produkten uppfyller RoHs kraven Anv nd h rselskydd Anv nd gonskydd Anv nd andningsskydd Anv nd skyddshandskar Anv nd skyddsst vlar Risk f r kapning el...

Page 35: ...35...

Page 36: ...y with the relevant Union harmonisation legislation Yll kuvatun vakuutuksen kohde on olennaisten Unionin harmonisaatiolains d nt vaatimusten mukainen M let med ovanst ende deklaration r verensst mmels...

Reviews: