Futuro Futuro Skylight 54

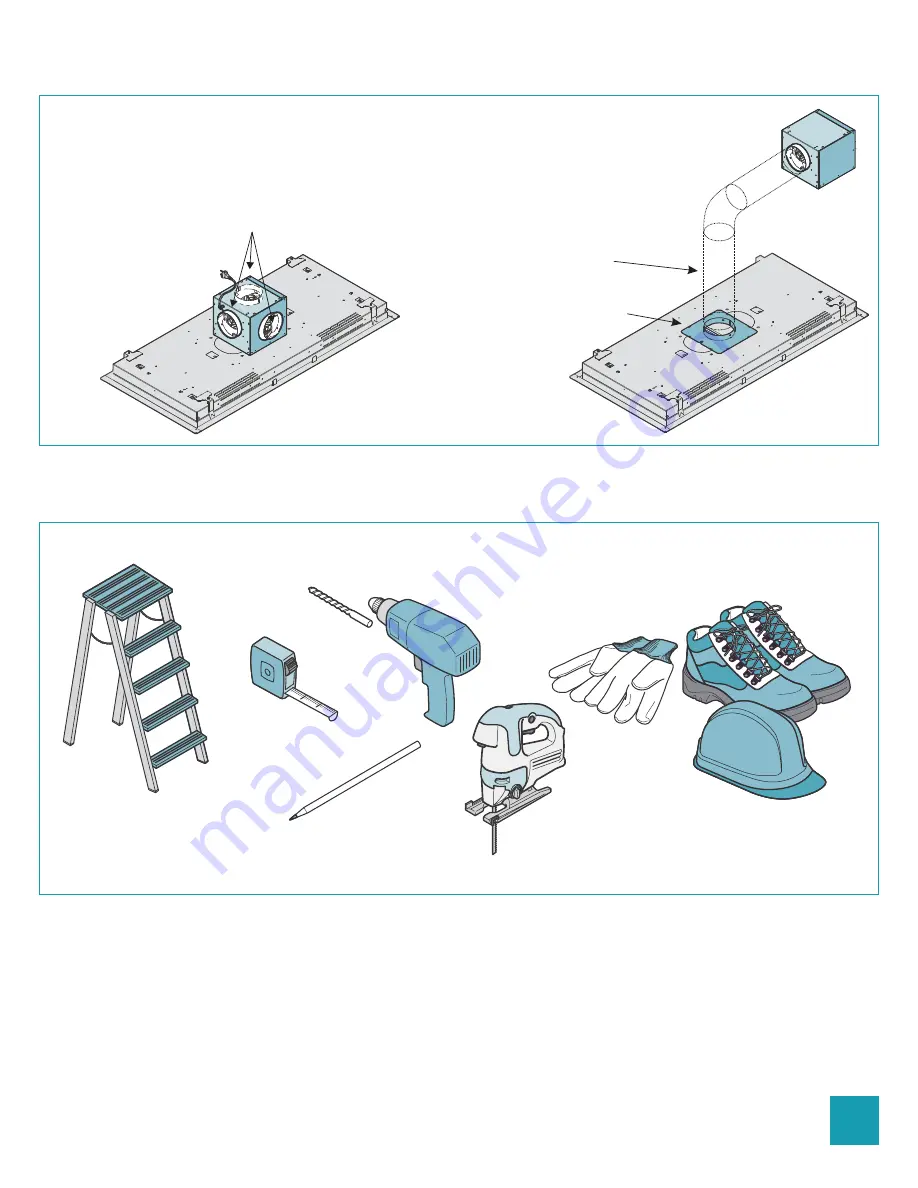
Blower chamber may be installed
with opening facing any direction

6" round, 

RIGID

 duct

(do NOT use exible duct!)

Duct Adapter

(included)

OPTION 2: Blower installed

in

 remote location

(attic, garage, etc)

OPTION 1: Blower installed

directly on hood

BLOWER LOCATION

TOOLS NEEDED

ø9 mm

2

Summary of Contents for Skylight 54"

Page 1: ...ONI INSTRUCTIONS BOOKLET GEBRAUCHSANWEISUNG MODE D EMPLOI MANUAL DE INSTRUCCIONES INSTRUKCJA OBS UGI GEBRUIKSHANDLEIDING MANUAL DE INSTRU ES BRUGSANIVSNINGER INSTRUKTIONSBOK OHJEKIRJA BRUKSANVISNING S...

Page 2: ...h opening facing any direction 6 round RIGID duct do NOT use exible duct Duct Adapter included OPTION 2 Blower installed in remote location attic garage etc OPTION 1 Blower installed directly on hood...

Page 3: ...BLOWER BOX DIMENSIONS 11 9 3 4 5 1 2 12 11 6 12 11 4 11 9 3 4 6 3...

Page 4: ...3 4 13 3 4 53 1 2 24 5 8 4 11 6 5 1 2 min 1 max 51 9 16 14 1 2 25 3 16 22 3 4 23 1 4 52 3 16 CUTOUT DIMENSIONS DIMENSIONS IF BLOWER IS MOUNTED ON HOOD BOTTOM VIEW SIDE VIEW 3D OVERVIEW SIDE VIEW TOP V...

Page 5: ...CUTOUT DIMENSIONS DIMENSIONS IF BLOWER IS MOUNTED REMOTELY ATTIC GARAGE BOTTOM VIEW SIDE VIEW 3D OVERVIEW 5 4 1 2 min 1 max SIDE VIEW TOP VIEW 6 5 1 4 5 53 1 2 24 5 8 23 1 4 52 3 16 51 9 16 22 3 4...

Page 6: ...FC FM 1 2 UM 3A 3B 4 FL x2 x2 SM UM FLF FL SM FLF INSTALLATION BLOWER ON HOOD 6 AIR AIR AIR...

Page 7: ...During installation chains or cables may be used to TEMPORARILY support the hood Permanent installation requires secure attachment to load bearing elements joists frame sof t box with screws or bolts...

Page 8: ...INSTALLATION REMOTE BLOWER S1 R F FC 2 150mm 1 2 CUE F x2 3 G 5 FC G V3 6 Smontaggio OK Disassembly 4 CUE 8...

Page 9: ...may be used to TEMPORARILY support the hood Permanent installation requires secure attachment to load bearing elements joists wooden frame or sof t box using screws or bolts INSTALLATION REMOTE BLOWER...

Page 10: ...V 3 2 M 1 N U 3 1 2 T 1 MAGNETE MAGNET FILTER LIGHT BULB REMOVAL REPLACEMENT 10...

Page 11: ...arried out by in competent and unauthorised persons can cause damage even serious to things and or persons not covered by the Manufacturer s warranty Do not modify the electrical mechanical and functi...

Page 12: ...ilter assembly therefore the internal recirculation ver sion cannot be installed ASSEMBLY INSTRUCTIONS only intended for personnel quali ied to assemble the hood Before installing the hood make sure t...

Page 13: ...means of suitable piping connects the hood to the under roof remote motor unit Phase R page 18 Should you wish to use a check valve assemble it on the lange FC Fig 1 lock it to the lange by pushing t...

Page 14: ...take out the blown luorescent tube M Fig 2 and 3 put in a new luorescent lamp by performing in reverse order the operations described in Fig 2 and 3 The new uorescent lamp must be identical to the old...

Page 15: ...red alcohol Finish of cleaning by rinsing well and drying with soft cloths CLEANING THE WHITE FINISH STEEL HOOD To clean the hood use water and neutral soap and a soft cloth Finish of cleaning by rins...

Reviews: