


INSTALLATION
ANIHEATER®
El og kontakter skal installeres af autoriseret EL installatør, ANIHEATER® skal forbindes til jord.
ANIHEATER® skal installeres:
•
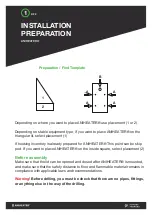
Hullerne på skabelonen der er markeret med A skal bores med et 5,5 mm bor (4 stk.)
•
Hullet på skabelonen der er markeret med B skal bores med et 9,5 mm. bor (1 stk.) (til ledning)
•
ANIHEATER® ligges ind i hulen, under de borede huller. ANIHEATER® skal ligge med trådnet
ned mod gulvet, og boltene med 1 skive på hver, som vender opad.
•
Ledningen føres op i det borede hul (B) ryk i ledningen, til ANIHEATER® begynder at følge med
op, så de 4 bolte rammer de 4 borede huller (A), på undersiden af hulen.
•
Når boltene er kommet op igennem låget, sættes først skiverne, og dernæst låse møtrikkerne
på de 4 bolte. Træk ledningen godt til
•
Låse møtrikken spændes evt. med en skraldenøgle 7 mm.
•
Min. 500 mm. over gulv
•
Min. 500 mm. afstand til brandbare materiale
Tjek ledningen er trukket helt stramt igennem, så grisene / dyrene ikke kan bide i ledningen.
(Garantien dækker ikke ved lednings bid)
OF 2
2
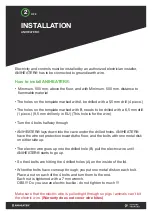
Electricity and controls must be installed by an authorized electrician installer,
ANIHEATER® has to be connected to ground/earth wire.
How to install ANIHEATER®:
• Minimum. 500 mm. above the floor, and with Minimum. 500 mm. distance to
flammable material
• The holes on the template marked with A be drilled with a 5,5 mm drill (4 piece.)
• The holes on the template marked with B, needs to be drilled with a 6,5 mm drill
(1 piece.) (9,5 mm drill only in EU) (This hole is for the wire)
• Turn the 4 bolts halfway through
• ANIHEATER® lays down into the cave under the drilled holes. ANIHEATER®
have the wire net protection towards the floor, and the bolts with one metal disk
on either side up.
• The electric wire goes up into the drilled hole (B) pull the electric wire until
ANIHEATER® starts to go up.
• So the 4 bolts are hitting the 4 drilled holes (A) on the inside of the lid.
• When the bolts have come up through, you put one metal disk on each bolt.
Place a nut on each of the 4 bolts and turn them to the end.
Each nut is tightened with a 7 mm wrench.
OBS !!! Do you use an electric buckle - do not tighten to much !!!
Make sure that the electric wire is pulled tight through so pigs / animals can´t bit
the electric wire.
(Warranty does not cover wire bites)
BESKRIVELSE
ANIHEATER®
Volt 220 – 240
Forbrug
100W – eller 150W
Tilslutning
Vælg det stik/tilslutning
som passer til stald
Sæt indhold
Aniheater-skabelon
Monterings sæt
Omgivelses
temperaturer
`-10/+40 grader
IP Klasse
IPX9K
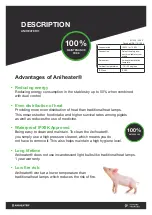
Fordele ved Aniheater
®
•
Reducerer strømforbrug
Reduktion af energiforbruget i stalde med op til 50%, når de kombineres med
vores kontakter
•
Bedre fordeling af varmen
Giver mere jævn fordeling af varme end traditionelle varmelamper. Det sikrer
bedre fødeindtagelse og højere overlevelsesrate blandt smågrise såvel som
reducerer brugen af medicin.
•
Vandtæt IPX9K godkendt
Nem at rengøre og vedligeholde. For at rense Aniheater® bruger du en
højtryksrenser, hvilket betyder at du ikke behøver at fjerne Aniheater®. Dette
hjælper med at opretholde et højt hygiejne niveau.
•
Lang levetid
Aniheater® bruger ikke glødelamper som traditionelle varmelamper
1 års garanti.
•
Lav brandrisiko
Aniheater® arbejder ved en lavere temperatur end traditionelle varmelamper
som reducerer risikoen for brand.
100%
VEDLIGEHOLDELSES
FRI
100%
VANDTÆT