background image

Multicross 8 High Precision  Super Vision                 43

   EN

IMPORTANT!

Read the instructions for use carefully before using the instrument. Keep them in a safe 

place for consultation when necessary.

1. 

Whether on or off, keep the instrument out of reach of children.

2. 

This equipment is a high quality precision instrument which must be handled  

with care.

3. 

Avoid shocks and vibration.

4. 

After use, always replace the instrument in its carrying case.

5. 

Make sure that the case and instrument are dry; otherwise condensation may  

occur in the device.

6. 

Make sure that the windows are free of dirt, and clean them using a soft cloth and 

a glass cleaning product only.

7. 

Regularly inspect the accuracy of the instrument, especially when starting any  

major square-setting work. You have sole responsibility for the accuracy of your 

work.

8. 

Do not use any optical equipment such as a magnifying glass to view the laser 

beam, and take care to remove all reflecting objects to avoid damage to the eye.

9. 

Locate the laser in such a way that it is not possible for any person to look at the 

laser beam (intentionally or otherwise).

10. 

Under no circumstances take the instrument apart, since this may expose you to 

powerful laser radiation.

11. 

The laser is only to be used for the projection of laser lines.

12. 

Do not use the instrument in rain or near flammable materials.

13. 

Technical modification or alterations to the instrument may be carried out  

without prior notice.

14. 

The manufacturer's responsibility shall in no case exceed the value of the costs of 

repair or replacement of the instrument.

15. 

Respect the environment and do NOT discard the instrument or batteries in  

household waste. Take them to a recycling centre.

Summary of Contents for MULTICROSS 8

Page 1: ...NL FR EN DE Gebruiksaanwijzing Mode d emploi Users Manual Anleitung MULTICROSS 8 High Precision Super Vision ...

Page 2: ......

Page 3: ...Multicross 8 High Precision SuperVision 3 NL MULTICROSS 8 High Precision Super Vision Gebruiksaanwijzing ...

Page 4: ... Laserontvanger Eerste ingebruikname Horizontale uitlijning Verticale uitlijning Hellingsfunctie Loodpunt Veiligheidsvoorschriften 12 Algemeen Beperkingen in het gebruik Verantwoordelijkheden Gebruiksrisico s Laserclassificatie Nauwkeurigheid controleren Internationale Beperkte Garantie 19 Technische gegevens 19 Inhoudsopgave ...

Page 5: ... High Precision Super Vision Professionele kruislijnlaser met extra zichtbare laserstralen dankzij krachtige laserdioden Automatische nivellering d m v electronische stelmotoren De electronische libellen zorgen voor een hogere stabiliteit en uiterst preciese nivellering Behuizing 1 verticale laseruitgang 2 horizontale laseruitgang 3 draaibare behuizing 4 fijninstelling 5 verstelbare poten 6 5 8 sc...

Page 6: ...odus Laserontvanger Line Tracer Optie 13 aan en uit schakelaar 14 batterij indicatoren 15 volume geluidssignaal 16 ontvangstveld 17 laserpositie indicator 18 meetlathouder 19 batterijvak 20 waterpaslibellen 21 horizontale positie 22 verticale positie Voorzijde Achterzijde 13 14 15 16 17 18 19 20 20 21 22 11 H V Multicross 8 HPSV 4 Horizontal 4 Vertical Outdoor 041 08 9 10 12 ...

Page 7: ...an belangrijke uitpaswerkzaamheden De juistheid van uw werk valt volledig onder uw verantwoordelijkheid 9 Gebruik geen optische materialen om naar de laserstraal te kijken zoals een vergrootglas en let op voor spiegelende objecten om oogletsels te voorkomen 10 Plaats de laser zo zodat niemand opzettelijk of onopzettelijk in de laserstraal kan kijken 11 Demonteer in geen geval dit apparaat dit kan ...

Page 8: ...uik steeds oplaadbare batterijen in het laadtoestel Open het batterijvak en plaats de accu s zoals de polarisatie aangeeft Schakel vervolgens het toestel aan de power indicator brandt continu wanneer de accu s bijna leeg zijn gaat de power indicator knipperen Let op dat het apparaat niet te schuin staat binnen de 4 Staat het toestel buiten deze 4 gaan de lasers automatisch uit of knipperen deze Ge...

Page 9: ... laser straal Bv bij het plaatsen van wanden Indien de werkplaats een hoge lichtintensiteit heeft bv bij buitenwerkzaamheden kan het noodzakelijk zijn de laserontvanger te gebruiken Horizontale uitlijning Zodra het toestel zich binnen zijn nivelleringsbereik bevindt staat de horizontale lijn automatisch waterpas De horizontale lijn kan u aan of uitschakelen d m v de toets H Het is raadzaam om de h...

Page 10: ... hellingsfunctie te activeren dient men in de eerste plaats het apparaat parallel met het hellingsvlak te positioneren Dit doet men door het loodpunt 7 en een laserlijn te gebruiken Schakel het toestel aan en laat het nivelleren Om de hellingsfunctie in te schakelen drukt men een aantal seconden op de aan uit schakelaar totdat de middelste LED rood oplicht LET OP Enkel de horizontale en de voorste...

Page 11: ...door De LED S bij V en outdoor duiden nu de volgende as richting aan Y as Om de helling van de laserstraal aan te passen dient men op toets V of outdoor te blijven drukken Dit blijft u doen tot de gewenste helling verkregen wordt LET OP De X as en Y as staan uitgelijnd t o v het loodpunt en de verticale lijnen H V Multicross 8 HPSV 4 Horizontal 4 Vertical Outdoor On Off 041 08 X H V Multicross 8 H...

Page 12: ...de functies Modificatie of aanpassing van het instrument Gebruik na ontvreemding Gebruik van instrumenten met duidelijk zichtbare schade of defecten Gebruik van accessoires van andere fabrikanten zonder de nadrukkelijke voorafgaande toestemming van FUTECH Onvoldoende veiligheidsmaatregelen op de meetlocatie bijvoorbeeld bij metingen op of langs wegen Andere personen met opzet verblinden Het bestur...

Page 13: ...t FUTECH accessoires Fabrikanten van niet Futech accessoires voor het instrument zijn verantwoordelijk voor het ontwikkelen invoeren en communiceren van veiligheidsconcepten voor hun producten en voor het functioneren daarvan in combinatie met het FUTECH instrument Exploitant van het instrument De beheerder van het instrument heeft de volgende verplichtingen Hij begrijpt de veiligheidsinformatie o...

Page 14: ...etransporteerd WAARSCHUWING Als het instrument wordt gebruikt met accessoires bv masten baken meetstokken kan het risico van blikseminslag worden vergroot Voorzorgsmaatregelen Gebruik het instrument niet tijdens onweer WAARSCHUWING Onvoldoende beveiliging van de werklocatie kan leiden tot gevaarlijke situaties bijvoorbeeld in het verkeer op bouwlocaties en op industriële installaties Voorzorgsmaat...

Page 15: ...chriften wordt voldaan Neem vooraf contact op met uw plaatselijke agent of vrachtvervoersbedrijf WAARSCHUWING Hoge mechanische belasting hoge omgevingstemperaturen of onderdompeling in vloeistoffen kan lekkage brand of explosie van de accu s veroorzaken Voorzorgsmaatregelen Bescherm accu s tegen mechanische invloeden en hoge omgevingstemperaturen Laat accu s niet in vloeistoffen vallen of dompel z...

Page 16: ...cherm het product te allen tijde tegen het gebruik door onbevoegden LASERCLASSIFICATIE Algemeen De onderstaande richtlijnen in overeenstemming met de geldende internationale normen IEC 60825 1 2007 03 en IEC TR 60825 14 2004 02 bieden instructie en trainingsinformatie voor de exploitant van het instrument en de persoon die de apparatuur werkelijk gebruikt ten einde op werkrisico s te anticiperen e...

Page 17: ...n controleer het verschil tussen het midden van het laserkruis en de markering op wand nr 1 9 Dit verschil mag niet groter zijn dan 2 mm 10 LET OP de tolerantie is afhankelijk van de afstand van de muren waartussen u de controle heeft uitgevoerd Deze afstand dient u te vermenigvuldigen met 2 Dus indien uw apparaat een nauwkeurigheid heeft van 2mm 10m dan is de berekening in ons voorbeeld 10m afsta...

Page 18: ...rlijn 6 In ons voorbeeld dient deze 1mm te zijn Verticale laserlijn controleren 1 Plaats het apparaat op ongeveer 5m van een wand 2 Hang tegen de wand een schietlood met een lengte van 2m 3 Schakel het apparaat aan en laat het nivelleren 4 Plaats de verticale laserlijn op de schietloodlijn 5 In ons voorbeeld dient de tolerantie 1mm te zijn LET OP indien uw toestel de vereiste tolerantie niet haalt...

Page 19: ...derszins met inbegrip van garanties regels of voorwaarden van verhandelbaarheid geschiktheid voor specifieke toepassingen bevredigende kwaliteit en het niet maken van inbreuk die alle nadrukkelijk worden afgewezen Laser golflengte 635 nm Klasse II 1 mW Nauwkeurigheid 1 mm 10 m Nivelleringsbereik 4 Nivellering Electronische Stelmotoren Gebruiksduur 6 uur Power supply 4 x AA batterijen Dimensies 220...

Page 20: ......

Page 21: ...Multicross 8 High Precision SuperVision 21 FR MULTICROSS 8 High Precision Super Vision Mode d emploi ...

Page 22: ...epteur laser Première mise en marche Alignement horizontal Alignement vertical Faisceau d aplomb La fonction d inclinaison Consignes de sécurité 30 Informations générales Limites d utilisation Responsabilités Risques liés à l utilisation Classification laser Contrôler la précision Garantie internationale limitée 37 Données techniques 37 ...

Page 23: ...er Vision Laser à réseau professionnel extrêmement précis avec rayons lasers ultravisibles grâce à des diodes lasers superpuissantes Nivellement automatique au moyen de moteurs de réglage électroniques Les niveaux à bulle électroniques assurent une stabilité supérieure et un nivellement extrêmement précis Description générale Boîtier 1 sortie du laser vertical 2 sortie du laser horizontal 3 boîtie...

Page 24: ...éception 17 indicateur position laser 18 fixation mire 19 compartiment batterie 20 bulles d air de nivellement 21 position horizontale 22 position verticale Panneau de commande 9 touche marche arrêt 10 lignes laser verticale 11 lignes laser horizontale 12 outdoor mode cellule Face Arrière 13 14 15 16 17 18 19 20 20 21 22 11 H V Multicross 8 HPSV 4 Horizontal 4 Vertical Outdoor 041 08 9 10 12 ...

Page 25: ...lorsque vous débutez d importants travaux d équerrage La justesse de votre travail tombe entièrement sous votre responsabilité 9 N utilisez aucun matériel optique pour regarder le rayon laser comme par ex une loupe et veillez à éliminer tous les objets réfléchissants pour éviter des lésions oculaires 10 Placez le laser de manière à ce que personne ne puisse regarder dans le rayon laser expressémen...

Page 26: ...rs s eteignent automatiquement ou ils clignotent Utilisez les pieds reglables 5 ou placez le statif de maniere a ce que l indicateur de niveau reste allume en continu durant une dizaine de secondes et que les rayons laser ne clignotent plus Alignement horizontal Dès que l appareil se trouve dans sa portée de nivellement la ligne horizontale est automatiquement à niveau horizontal Vous pouvez activ...

Page 27: ...ppareil est placé bas et plus il est placé près du mur plus le rayon laser est long P ex lors du placement du mur En cas de grande intensité lumineuse sur lieu de travail p ex lors de travaux à l extérieur il peut être nécessaire d utiliser le récepteur laser Faisceau d aplomb Le faisceau d aplomb 8 est visible dès qu un laser vertical est activé Utilisez le faisceau d aplomb 8 pour vous aider dan...

Page 28: ...ont visible Méfiez vous Si vous souhaitez utiliser le récepteur laser il faut d abord activer cette fonction avant d activer la fonction de pente Méfiez vous Si vous voulez faire un angle de 90 c est mieux de le faire avant d activer la fonction d inclinaison Dès que la fonction d inclinaison est activé il y a encore deux LED vert allumée Un chez le H et un chez le V Ces deux leds vous indiquent l...

Page 29: ...la pente du ligne laser vous devez appuyer sur la touche V ou Outdoor Vous continuez à faire ceci jusqu à la pente désirée est obtenue Méfiez vous Les axes X et Y sont alignées par rapport à la mine de plomb 7 et les lignes verticales H V Multicross 8 HPSV 4 Horizontal 4 Vertical Outdoor On Off 041 08 Y H V Multicross 8 HPSV 4 Horizontal 4 Vertical Outdoor On Off 041 08 H V Multicross 8 HPSV 4 Hor...

Page 30: ...xpresse pour certaines fonctions Modification ou transformation du produit Utilisation du produit après vol Utilisation de produits présentant des défauts ou dégâts éminemment reconnaissables Utilisation d accessoires d autres fabricants non agréés expressément par FUTECH Mesures de sécurité inappropriées dans la zone de travail par exemple lors de mesures sur des routes ou à proximité Aveuglement...

Page 31: ...icants d accessoires autres que la societé FUTECH Les fabricants d accessoires autres que la societé FUTECH utilisés avec le produit sont responsables de l élaboration de la mise en pratique et de la diffusion de concepts de sécurité relatifs à leurs produits ainsi que de l efficacité de ces concepts en combinaison avec le matériel de FUTECH Responsable du produit Obligations incombant au responsa...

Page 32: ...g stockage ou un transport AVERTISSEMENT En cas d utilisation de ce produit avec des accessoires par exemple des mâts mires et cannes il y a un risque de foudroiement Précautions Ne pas utiliser ce produit par temps d orage AVERTISSEMENT Des mesures de sécurité inadéquates sur le lieu de travail peuvent conduire à des situations dangereuses par exemple en relation avec la circulation des chantiers...

Page 33: ...produit doit s assurer que les réglementations nationale et internationale en vigueur sont appliquées Avant le transport ou l expédition contacter la société chargée du transport AVERTISSEMENT Des contraintes mécaniques fortes des températures ambiantes élevées ou une immersion dans des liquides peuvent entraîner des fuites incendies ou explosions des batteries Protéger les batteries des chocs et ...

Page 34: ...pays concerné Seul le personnel autorisé peut avoir accès au produit Informations générales Les consignes suivantes conformément aux normes internationales CEI 60825 1 2007 03 et CEI TR60825 14 2004 02 fournissent des instructions d emploi et de sécurité au responsable du produit et à l opérateur effectif afin de leur permettre d anticiper et d éviter les risques liés à l utilisation Le responsabl...

Page 35: ...80 et contrôlez la différence entre le milieu de la croix laser et le marquage sur le mur n 1 9 Cette différence ne peut pas dépasser 2 mm 10 ATTENTION la tolérance dépend de la distance des murs entre lesquels vous avez effectué le contrôle Vous devez multiplier cette distance par 2 Donc si votre appareil a une précision de 2 mm 10 m le calcul dans notre exemple est donc 10 m de distance x 2 20 m...

Page 36: ...s notre exemple celle ci doit être de 2 mm Contrôler la ligne laser verticale 1 Placez l appareil à environ 5 m d un mur 2 Placez un fil à plomb de 2 m de longueur contre le mur 3 Activez l appareil et laissez le se niveler 4 Placez la ligne laser verticale sur le fil à plomb 5 Dans notre exemple la tolérance doit être de 1 5 mm ATTENTION si votre appareil n atteint pas la tolérance requise vous d...

Page 37: ...res ou autres y compris les garanties clauses ou conditions ayan trait à la valeur commerciale à l adéquation du produit à une application particulière à la qualité satisfaisante et à la non violation Toutes ces garanties clauses ou conditions sont expressément exclues Données techniques Longueur d onde du laser 635 nm Class laser II 1 mW Précision 1 mm 10 m Portée de nivellement 4 Nivellement Ele...

Page 38: ......

Page 39: ...Multicross 8 High Precision SuperVision 39 EN MULTICROSS 8 High Precision Super Vision Users Manual ...

Page 40: ...contents 40 General description 41 Case Control panel Laser receiver First steps Horizontal alignment Vertical alignment Plumb beam Slope function Safety directions 48 General Limits of Use Responsibilities Hazards of Use Laser Classification Accuracy control Warranty 55 Technical data 55 ...

Page 41: ...Super Vision An extremely accurate professional mains powered laser whose extra powerful laser diodes provide ultra visible beams Automatic levelling using electronically controlled motors Electronic spirit levels guarantee superior stability and extremely precise levelling General description Case 1 vertical laser exit 2 horizontal laser exit 3 rotating housing 4 fine adjustment 5 adjustable feet...

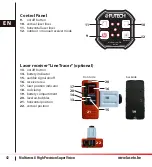
Page 42: ...l 13 on off button 14 battery indicator 15 audible signal on off 16 receiver area 17 laser position indicator 18 rod clamp 19 battery compartiment 20 level air bubbles 21 horizontal position 22 vertical position Laser receiver Line Tracer optional Front side backside 13 14 15 16 17 18 19 20 20 21 22 11 H V Multicross 8 HPSV 4 Horizontal 4 Vertical Outdoor 041 08 9 10 12 ...

Page 43: ...g work You have sole responsibility for the accuracy of your work 8 Do not use any optical equipment such as a magnifying glass to view the laser beam and take care to remove all reflecting objects to avoid damage to the eye 9 Locate the laser in such a way that it is not possible for any person to look at the laser beam intentionally or otherwise 10 Under no circumstances take the instrument apar...

Page 44: ...ndicatoris continuously lit for 10 seconds and the laser beams no longer flash NB this instrument may also be used with a mains adaptor to operate directly from mains power Make sure that the mains cable does not lie in the road damage caused by a fall Horizontal alignment Once the instrument is within its levelling range then the laser lines are automatically level The horizontal lines may be tur...

Page 45: ... the instrument is located the nearer it is to the wall and the longer the laser beam E g for placing of walls If the workplace is very brightly lit when working out of doors for example it may be necessary to use the laser receiver Plumb beam The plumb point is visible as soon as a vertical laser is turned on Use the plumb point as an aid in simpler positioning of the vertical laser beam under ce...

Page 46: ... you want to use a laser receiver activate this function by pressing the outdoor button first You have to do this before setting a slope BEWARE If you want to set a 90 angle please do this before activating the slope function When the slope function manual mode is activated the LED s next to H and V turns green These LED S indicate the first axe X axe To adjust the slope hold button H or V Keep do...

Page 47: ...the next axe Y axe To adjust the slope hold button V or outdoor Keep doing this untill the correct slope is obtained BEWARE X axe and Y axe are aligned compared with the plumb point and the vertical lines H V Multicross 8 HPSV 4 Horizontal 4 Vertical Outdoor On Off 041 08 Y H V Multicross 8 HPSV 4 Horizontal 4 Vertical Outdoor On Off 041 08 H V Multicross 8 HPSV 4 Horizontal 4 Vertical Outdoor On ...

Page 48: ... is specifically permitted for certain functions Modification or conversion of the product Use after misappropriation Use of products with obviously recognizable damages or defects Use with accessories from other manufacturers without the prior explicit approval of FUTECH Inadequate safeguards at the work site for example when using on or near roads Deliberate dazzling of third parties Controlling...

Page 49: ...non FUTECH accessories The manufacturers of non FUTECH accessories for the product are responsible for de veloping implementing and communicating safety concepts for their products and are also responsible for the effective ness of those safety concepts in combination with the FUTECH product Person in charge of the product The person in charge of the product has the following duties To understand ...

Page 50: ... field adjustments indicated in the user manual particularly after the product has been subjected to abnormal use and before and after important measurements WARNING If the product is used with accessories for example masts staffs poles you may increase the risk of being struck by lightning Precautions Do not use the product in a thunderstorm WARNING Inadequate securing of the working site can lea...

Page 51: ...observed Before transportation or shipping contact your local passenger or freight transport company WARNING High mechanical stress high ambient temperatures or immersion into fluids can cause leackage fire or explosions of the batteries Precautions Protect the batteries from mechanical influences and high ambient temperatures Do not drop or immerse batteries into fluids WARNING Short circuited ba...

Page 52: ...e national regulations in force in your country LASER CLASSIFICATION General The following directions in accordance with the state of the art international standard IEC 60825 1 2007 03 and IEC TR 60825 14 2004 02 provide instruction and training information to the person responsible for the product and the person who actually uses the equipment to anticipate and avoid operational hazards The perso...

Page 53: ... note the difference between the middle of the laser cross and the marker on wall no 1 9 This difference should not exceed 2 mm 10 NB The tolerance depends on the distance of the walls between which the inspection has been carried out This distance should be multiplied by 2 Hence if the instrument has an accuracy of 2 mm 10 m then in our example the calculation is 10 m distance x 2 20 m Tolerance ...

Page 54: ...ion of the laser line 6 This should be 2 mm in our example Vertical laser line 1 Place the instrument approximately 5 m from a wall 2 Place a 2 m long plumb line against the wall 3 Switch on the instrument and let it self level 4 Place the vertical laser line on the plumb line 5 This should be 1 5 mm in our example NB If your instrument does not reach the required tolerance it should be returned t...

Page 55: ...act or by operation of law statutory or otherwise including warranties terms or conditions of merchantability fitness for a particular purpose satisfactory quality and non infringement all of which are expressly disclaimed Technical Data Laser wavelength 635 nm Class II 1 mW Accuracy 1 mm 10 m Levelling range 4 Levelling electronic controlled motors Battery life 6 hr Power supply 4 x AA alkaline b...

Page 56: ......

Page 57: ...Multicross 8 High Precision SuperVision 57 DE MULTICROSS 8 High Precision Super Vision Anleitung ...

Page 58: ...ng 58 Gehäuse Steuertafel Laser Empfänger Erste Inbetriebnahme Horizontale Ausrichtung Vertikale Ausrichtung Lotstrahl Neigungsfunktion Sicherheitshinweise 66 Allgemeines Einsatzgrenzen Verantwortungsbereiche Gebrauchsgefahren Laserklassifizierung Präzisionskontrolle Internationale Herstellergarantie 73 Technische Daten 73 ...

Page 59: ...eit ausgerichtet sind FUTECH Multicross 8 High Precision Super Vision Ein extrem präziser Kreuzlaser mit sehr gut sichtbaren Laserstrahlen durch extra starke Laserdioden Automatisches Ausrichten mit elektronischen Regelmotoren Die elektronischen Libellen sorgen für hohe Stabilität und eine extrem präzise Ausrichtung Allgemeine Beschreibung Case 1 Vertikaler Laserausgang 2 Horizontaler Laserausgang...

Page 60: ...afel 13 on off button 14 Batterieanzeige 15 akustisches Signal on off 16 Empfänger Bereich 17 Laser Stellungsanzeige 18 Stangenklemme 19 Batterie compartiment 20 Ebene Luftblasen 21 Horizontale Position 22 Vertikale Position Laser Empfänger optional Vorderseite Achterseite 13 14 15 16 17 18 19 20 20 21 22 11 H V Multicross 8 HPSV 4 Horizontal 4 Vertical Outdoor 041 08 9 10 12 ...

Page 61: ... Arbeiten im Bereich der Winkel haltigkeit Die Genauigkeit Ihrer Arbeit unterliegt alleine Ihrer Verantwortung 8 Verwenden Sie für die Ansicht des Laserstrahls nie optische Instrumente wie eine Lupe und achten Sie zur Vermeidung von Augenverletzungen darauf dass sich keine reflektierenden Gegenstände im Messbereich befinden 9 Bringen Sie den Laser so an dass niemand absichtlich oder aus Versehen i...

Page 62: ...der Stromversorgung leuchtet durchgehend Bei fast leeren Akkus beginnt die Kontrollleuchte der Stromversorgung zu blinken Das Gerät darf nicht zu stark geneigt werden weniger als 4 Sollte die Neigung des Gerätes mehr als 4 betragen schalten sich die Laser automatisch aus oder blinken Verwenden Sie die höhenverstellbaren Füße oder eine Unterlage um zu gewährleisten dass die Nivellieranzeige innerha...

Page 63: ...endung des Laser Empfängers erforderlich sein Vertikale Ausrichtung Sobald das Gerät ausgerichtet ist können die vertikalen Laserstrahlen durch Betätigung der Taste V aktiviert werden Diese verlaufen in einem 90 Winkel zueinander Die Laserstrahlen verlaufen durch die Selbstnivellierung auf gleicher Ebene und senkrecht zur horizontalen Laserlinie Für die Positionierung der vertikalen Linie können d...

Page 64: ...gulierung Der Lotpunkt befindet sich auf einer Ebene mit dem Kreuz des vertikalen Lasers an der Decke Diese Position ist ideal für die Einstellung der Winkelhaltigkeit oder für Linienverlauf an einer Wand Neigungsfunktion Zur Aktivierung der Neigungsfunktion soll das Gerät parallel zur Neigungsebene positio niert werden Verwenden Sie den Lotstrahl und eine Laserlinie Schalten Sie das Gerät ein und...

Page 65: ...e grüne LED wechselt von H zu OUTDOOR Die LEDs mit V und OUTDOOR zeigen die nächste Achse Y Achse Um den Neigungswinkel zu verändern drücken Sie die Taste V oder Outdoor bis die gewünschte Neigung erreicht wird Achtung X Achse und Y Achse beziehen sich auf die Lotstrahl und die vertikalen Linien H V Multicross 8 HPSV 4 Horizontal 4 Vertical Outdoor On Off 041 08 X H V Multicross 8 HPSV 4 Horizonta...

Page 66: ...ubt Durchführung von Umbauten oder Veränderungen am Produkt Inbetriebnahme nach Zweckentfremdung Verwendung des Produkts mit offensichtlich erkennbaren Mängeln oder Schäden Verwendung von Zubehör anderer Hersteller das von FUTECH nicht ausdrücklich genehmigt ist Ungenügende Absicherung der Arbeitsumgebung z B bei der Verwendung auf oder in der Nähe von Strassen Absichtliche Blendung Dritter Steuer...

Page 67: ...antwortlich für die sicherheitstechnisch einwandfreie Lieferung des Produktes inklusive Gebrauchs anweisung und Originalzubehör Hersteller von Fremdzubehör für Produkte von FUTECH Hersteller von Fremdzubehör für das Produkt sind verantwortlich für die Entwicklung Umsetzung und Kommunikation von Sicherheitskonzepten für ihre Produkte und deren Wirkung in Kombination mit dem Produkt von FUTECH Betre...

Page 68: ...ach übermässiger Beanspruchung des Produkts und vor und nach wichtigen Messaufgaben WARNUNG Wenn das Produkt mit Zubehör wie zum Beispiel Mast Messlatte oder Lotstock verwendet wird erhöht sich die Gefahr von Blitzeinschlag Gegenmassnahmen Verwenden Sie das Produkt nicht bei Gewitter WARNUNG Ungenügende Absicherung bzw Markierung Ihrer Baustelle kann zu gefährlichen Situationen im Strassenverkehr ...

Page 69: ...sport oder Versand Ihr lokales Personen oder Frachttransportunternehmen WARNUNG Starke mechanische Belastungen hohe Umgebungstemperaturen oder das Eintauchen in Flüssigkeiten können zum Auslaufen Brand oder zur Explosion der Batterien führen Gegenmassnahmen Schützen Sie die Batterien vor mechanischen Einwirkungen und hohen Umgebungs temperaturen Batterien nicht in Flüssigkeiten werfen oder eintauc...

Page 70: ...s Befolgen Sie die länderspezifischen Entsorgungsvorschriften LASERKLASSIFIZIERUNG Allgemeines Die folgenden Anweisungen die den aktuellen internationalen Normen IEC 60825 1 2007 03 und IEC TR 60825 14 2004 02 entsprechen enthalten Hinweise und Informationen welche die Betreiber und Benutzer des Produkts in die Lage versetzen allfällige Gebrauchsgefahren rechtzeitig zu erkennen und zu vermeiden De...

Page 71: ...zontale Linie in der Mitte des Kreuzes auf Wand Nr 1 5 Drehen Sie das Gerät um 180 und markieren Sie den Laserstrahl in der Mitte des Laserkreuzes auf Wand Nr 2 6 Führen Sie das Gerät so dicht wie möglich an Wand Nr 2 heran 7 Nehmen Sie die Höheneinstellung des Lasers so vor dass sich das Laserkreuz auf der Markierung an Wand Nr 2 befindet 8 Drehen Sie das Gerät dann um 180 und kontrollieren Sie d...

Page 72: ... darf sie 1 mm betragen Kontrolle der vertikalen Laserlinie 1 Stellen Sie das Gerät in ca 5 m Abstand zu einer Wand auf 2 Hängen Sie an der Mauer ein 2 m langes Lot auf 3 Schalten Sie das Gerät ein und lassen Sie es die Nivellierung durchführen 4 Positionieren Sie die vertikale Laserlinie auf dem Lotfaden 5 In unserem Beispiel muss die Toleranz 1 mm betragen ACHTUNG Wenn Ihr Gerät nicht innerhalb ...

Page 73: ...ächlicher oder gesetzlicher Natur einschliesslich solcher welche sich auf die marktübliche Qualität die Eignung für einen bestimmten Gebrauch zufriedenstellende Qualität oder Beachtung der Rechte Dritter beziehen welche alle ausdrücklich ausgeschlossen werde Technische Daten Längenwelle Laser 635 nm Klass II 1mW Präzision 1 mm 10 m Ausrichtungsebene 4 Ausrichtung Elektronische Motorsteuerung Betri...

Page 74: ...74 Multicross 8 High Precision SuperVision www laseto be NOTES ...

Page 75: ...Multicross 8 High Precision SuperVision 75 NOTES ...

Page 76: ...LASETO N V Ondernemersstraat 4 2500 Lier BELGIUM Tel 32 0 3 488 15 75 Fax 32 0 3 289 07 67 info laseto be www laseto be Uw dealer Votre revendeur Your Dealer Ihr Händler ...

Reviews: