


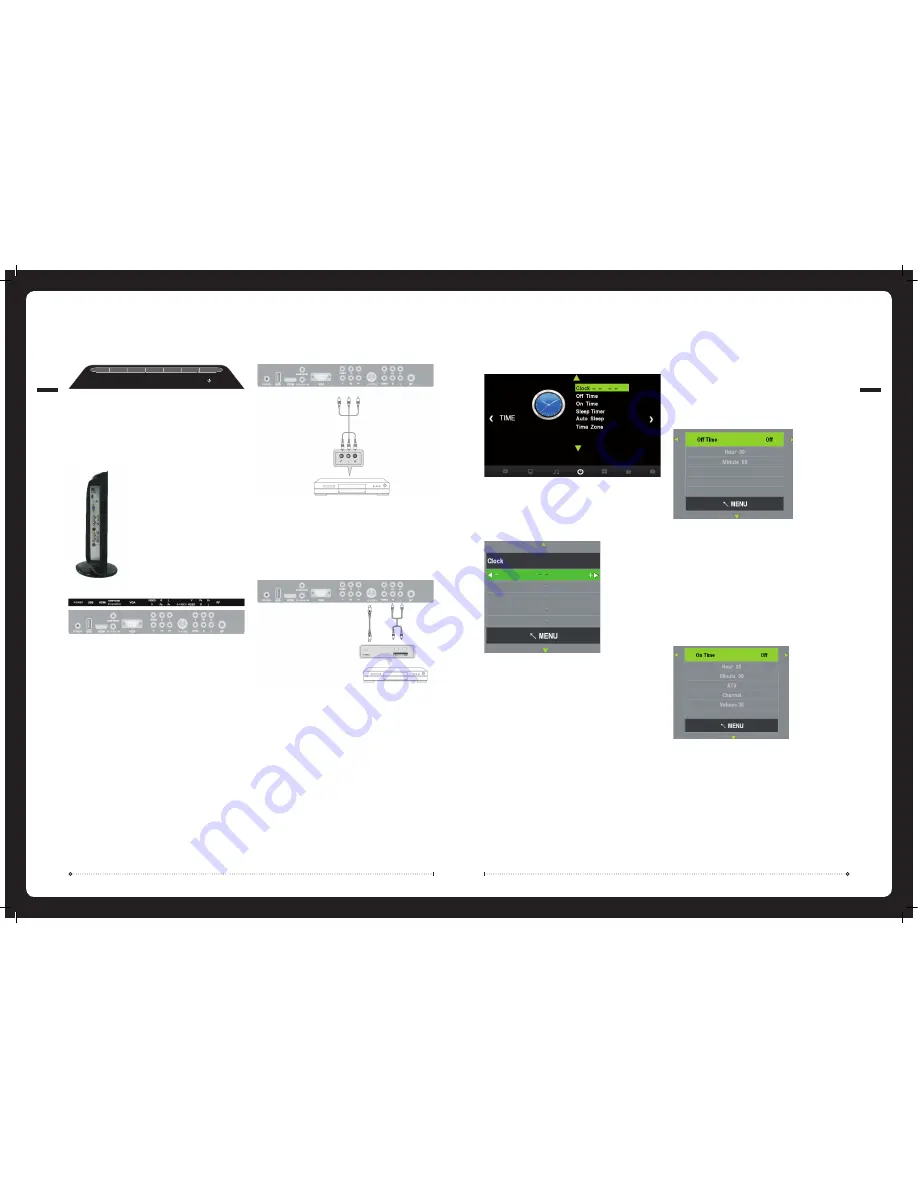
Time
Press
MENU
button on the remote and
◄
/
►
use to cycle to
TIME
page below:
Clock:
Set TV system time settings
Select
Clock
Press
◄
or
►
to cycle through available clock settings:
Date, Month, Year, Hour
and
Minute
.
Sleep Timer:
From the
TIME
menu select
Sleep Timer
Select Sleep Timer setting:
Off, 10min, 20min, 30min, 60min, 90min, 120min, 180min
or
240min
Auto Sleep:
From the
TIME
menu select
Auto Sleep.
Select
ON
or
OFF
Time Zone:
From the
TIME
menu select
TIME ZONE.
Select your Time Zone
»
»
»
»
»
»
»
»
Off Time:
Set TV system to turn off automatically.
From the
TIME
menu select
Off Time
Press
◄
or
►
to select Off Time mode:
Off, Once, Every Day, Mon - Fri, Mon - Sat, Sat -Sun
or
Sunday
Set the
Hour
and
Minute
On Time:
Set TV system to turn on automatically.
From the
TIME
menu select
On Time
Press
◄
or
►
to select On Time mode:
Off, Once, Every Day, Mon - Fri, Mon - Sat, Sat -Sun
or
Sunday
Set the
Hour
and
Minute
Select the input source
If
ATV
or
DTV
source is selected, also select the program number
Select the
Volume
setting at turn on
»
»
»
»
»
»
»
»
»
009
Press
VOL-
or
VOL+
to decrease or increase the sound level.
Press
CH-
or
CH+
to scan through channels.
Press
MENU
to bring up the main menu screen.
Press
SOURCE
to select the input source.
Press
POWER
button to alternate between standby and ‘on’ modes.
Red
light indicates TV is in standby mode,
Green
indicates TV is on.
POWER:
DC 12V input
HDMI:
Connect the HDMI output jack of DVD
VGA:
Connect the PC-RGB output jack of PC
S-VIDEO:
Connect the S-VIDEO output jack of DVD or VCR
VIDEO:
Connect the video output jack of DVD or VCR
PC AUDIO INPUT:
Connect the audio output jack of PC audio.
EARPHONE:
Connect the headphone
RF IN:
Connect the antenna
USB:
Connect the USB flash drive to play multimedia files
Y/Pb/Pr IN:
Connect component Video
»
»
»
»
»
VOL-
VOL+
CH-
CH+
MENU
SOURCE
Button Description
Antenna Connection
To ensure good picture and sound, a Terrestrial TV antenna system needs to be
installed.
AV Connection
Connect the
VIDEO
and
AUDIO
output jack of the DVD or VCR to the
AV IN
jacks using
the RCA cable (Yellow [Video], White and Red [left and right audio]).
Select the AV input source using the
SOURCE
button on the remote.
S-Video Connection
Connect the
S-VIDEO
output jack of the DVD or VCR to the
S-VIDEO
jacks.
Connect the
AUDIO
output jack of the DVD or VCR to the
Audio In
jacks using the RCA
cable.
Select the S-Video input source using the
SOURCE
button on the remote.
004


