background image

7. AIS OPERATION 


43

7.14  AIS System Messages 

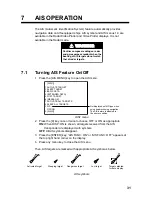
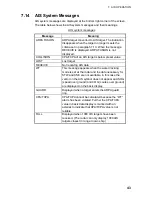
AIS system messages are displayed at the bottom right corner of the screen. 
The table below shows the AIS system messages and their meanings. 

AIS system messages 

Message Meaning 

ARPA FUSION 

ARPA target converted to AIS target. The indication 
disappears when the target no longer meets the 
criteria set in paragraph 7.13. When the message 
RECEIVE is displayed, ARPA FUSION is not 
displayed. 

COLLISION 

CPA/TCPA of an AIS target is below preset value. 

LOST Lost 

target 

RECEIVE 

Not receiving AIS data 

WT 

This message appears when the water tracking 
mode is set at the radar and the data necessary for 
STW and CSE are not available. In this case the 
vector on the AIS symbol does not appear and SOG 
(speed over ground) and COG (course over ground) 
are displayed on the basic display. 

GUARD 

Displayed when a target enters the ARPA guard 
ring. 

CPA/TCPA 

CPA/TCPA cannot be calculated because the “WT” 
alarm has been violated. Further the CPA/TCPA 
value in basic data display is marked with an 
asterisk to indicate that CPA/TCPA value is not 
reliable. 

FULL 

Displayed when 1000 AIS targets have been 
received. (The radar can only display 1000 AIS 
targets closest in range to own ship.) 


Summary of Contents for RP-250

Page 1: ...VIDEO PLOTTER RP 250...

Page 2: ...4200 FIRST EDITION FIRST EDITION AUG AUG 2002 2002 Printed in Japan Printed in Japan All rights reserved All rights reserved G G MAR MAR 10 2004 10 2004 PUB No PUB No OME 30470 OME 30470 00080933204 0...

Page 3: ...always be checked against nautical charts as well as other aids to navigation Handle chart memory cards carefully The chart and memory cards are weak against electrostatic discharge Handle them with...

Page 4: ...lines 15 3 4 3 Erasing line segments 15 3 5 Finding Mark Line Memory Used 16 4 WAYPOINTS NAVIGATION LINES 17 4 1 Entering Waypoints 17 4 1 1 Entering waypoints at cursor position 17 4 1 2 Entering way...

Page 5: ...arget Range 40 7 12 ROT Display Setting 41 7 13 Combining AIS with ARPA fusion 42 7 14 AIS System Messages 43 7 15 AIS Alarm Message 44 8 MAINTENANCE 45 8 1 Replacing the Battery on the RP Board 45 8...

Page 6: ...t the rigorous demands of the marine environment However no machine can perform its intended function unless properly installed and maintained Please carefully read and follow the operation installati...

Page 7: ...d and each line may contain up to 30 waypoints Five nav lines may be simultaneously shown on the display 100 waypoints are available The user may enter position data in waypoints 01 98 Waypoint 00 is...

Page 8: ...menu NAV MENU Open and close the video plotter menu CHART ALIGN Align video plotter display with radar display MARK Enter various marks Numeric keys Enter data ENTER Terminate keyboard input AIS contr...

Page 9: ...rms will be released even if the display shows AIS OFF provided the AIS feature is active Radar Display Radar Video Plotter Video Plotter Display modes 10 011 POSN DR MAN 35 20 370 N 141 18 300 E CURS...

Page 10: ...tep 3 above Item Setting Item Setting Lighthouse wreck ON Background Black green characters Coastline ON Echo color Yellow Land density ON Heading line brilliance Bright Place name OFF Plotter brillia...

Page 11: ...the video plotter display or the radar video plotter display To eject a card press the Eject button and pull out the card Note If a card inserted after the power is turned on change the range with th...

Page 12: ...Showing graphics 1 Press the NAV MENU and 8 keys to display the PLOT DISPLAY SELECT menu Current selections appear in reverse video Blank items have been turned off on the VIDEO PLOTTER INITIAL SETTIN...

Page 13: ...AV MENU and 1 keys to display the NAV INFORMATION 1 menu NAV INFORMATION 1 1 VIDEO PLOTTER 1 2 SELECT NAVAID GPS LC DEAD RECKONING AIS 3 OWN SHIP POSN OFF L L 4 POSN 00 00 000 N S 000 00 000 E W 5 CUR...

Page 14: ...3 WIND UNIT m s KT 4 CURRENT DATA OFF ON 5 CURRENT GRAPH OFF ON 6 DEPTH DATA OFF ON 7 DEPTH GRAPH OFF ON 8 DEPTH SCALE 10 20 50 100 200 500 9 DEPTH UNIT m ft 0 NAV INFORMATION 3 R G type fishing mode...

Page 15: ...SEC 1 2 3 6MIN 7 TARGET PLOT COLOR 8 SMOOTHING OFF 1 2 3 4 5 6 7 8 9 OWN SHIP TARGET PLOT menu 2 Press the 2 key twice to choose OFF 3 Press the ENTER key 4 Press the NAV MENU key to close the menu Ow...

Page 16: ...21 hrs 20 min 6 min 83 days 8 hr The memory for other ship s track is 20 000 points for 10 ships The table below shows the relation between plotting interval and maximum recording time for each ship N...

Page 17: ...asing Track In busy traffic the screen may become cluttered You can remove all or a percentage of own ship s track from the memory to clear the display Tracks of other ships can also be cleared 1 Pres...

Page 18: ...below Not available on IMO type 1 Press the NAV MENU key and the 5 key to choose OWN SHIP TARGET PLOT 2 Press the 7 key to choose TARGET PLOT COLOR TARGET PLOT COLOR 1 OWN SHIP TARGET PLOT 2 TARGET N...

Page 19: ...Press the ENTER key 4 Press the NAV MENU key to close the menu 3 2 Entering Marks Lines 3 2 1 Entering marks lines at cursor or own ship position 1 Press the MARK key to display the ENTER MARK menu MA...

Page 20: ...ring marks at desired position 1 Press the MARK key to open the MARK menu 2 Enter latitude by the numeric keys and then press the ENTER key To change polarity press 5 for North 6 for South 3 Enter lon...

Page 21: ...to choose MARK CANCEL 4 Operate the trackball to place the cursor on the mark you want to erase 5 Press the ENTER key 6 Press the CANCEL key to escape 3 4 2 Erasing all marks and all lines 1 Press the...

Page 22: ...3 5 Finding Mark Line Memory Used 1 Press the NAV MENU and 0 keys Mark memory used appears as below MEMORY IN USE OWN SHIP 03456 TARGET 01124 MARK 00021 MEMORY IN USE display 2 Press the NAV MENU key...

Page 23: ...ess the 3 key to choose WPT NO 4 Use the trackball to place the cursor on position desired 5 Enter waypoint number in two digits with the numeric keys and then press the ENTER key 6 To continue enteri...

Page 24: ...e menu 4 2 The Waypoint List To display the waypoint list which shows all registered waypoints do the following 1 Press the NAV MENU 4 and 3 keys Waypoint 00 for own ship position through 09 are shown...

Page 25: ...e position of the waypoint appears on the menu and the waypoint is displayed on the screen Five waypoints may be displayed 5 Press the NAV MENU key to close the menu Note 1 To display no waypoints cho...

Page 26: ...o close the menu Note Waypoints currently displayed can be deleted collectively but not individually Waypoints used in a navigation line cannot be deleted collectively or individually unless the navig...

Page 27: ...ress the NAV MENU 4 and 5 keys 2 Press the 2 key enter navigation line number and then press the ENTER key twice 3 Press the 9 key enter waypoint number and then press the ENTER key 4 Press the NAV ME...

Page 28: ...d WPL sentence required to display navigation line Only Numeric ID data in the WPL sentence is read 5 Press the 4 key to set NAV WIDTH to ON and press the ENTER key 6 Enter lane width in nautical mile...

Page 29: ...displayed data are as follows BWR Range and bearing to waypoint great circle BWC range and bearing to waypoint RMB Generic navigation data range and bearing to waypoint latitude and longitude positio...

Page 30: ...ine 1 Press the NAV MENU and 3 keys 2 Press the 3 key to choose NAV LINE NO 3 Key in nav line no with the numeric keys and then press the ENTER key You may enter five nav line numbers Note that the sa...

Page 31: ...ver all data stored on the card will be erased Type Code No 00RAM01MC 003 00432818000 00RAM256C 001 00432107000 00RAM512C 002 00432223000 1 Insert a new memory card in the lower slot and press the NAV...

Page 32: ...wn ship s track Press the 2 key Target track Press the 3 key Marks Press the 4 key 6 Enter file name You may use seven figures 7 Press the ENTER key to begin recording COMPLETED appears when the recor...

Page 33: ...sing and holding down the 1 key 1 Press the NAV MENU key 2 Press the 0 key twice to display the VIDEO PLOTTER INITIAL SETTING menu VIDEO PLOTTER INITIAL SETTING 1 VIDEO PLOTTER 2 2 DANGER HIGHLIGHT OF...

Page 34: ...error occurs on the radar display For example when own ship is at 60 N and 135 E even if the cursor indication is 62 N and 139 E the real cursor position is deviated to the left west side The table b...

Page 35: ...3000029 0 00323737 0 0063035 0 00903844 0 01130406 0 01299309 0 01403609 0 0144058 0 0141187 0 01323356 1 2780 1 2192 1 1233 0 9933 0 8332 0 6479 0 4431 0 2249 0 1 24442563 1 18701379 1 09356117 0 966...

Page 36: ...6 OTHER PLOTTER FUNCTIONS 30 This page intentionally left blank...

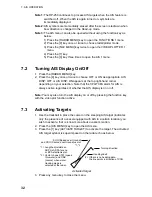
Page 37: ...ED DATA 5 LOST TARGET 6 MESSAGE 7 ACTIVATE ALL TARGETS 8 SLEEP ALL TARGETS 9 AIS OFF ON 0 AIS 2 Not displayed on IMO type when using dead reckoning navigation The AIS feature is disabled in the above...

Page 38: ...on your selection Note that the CPA TCPA alarm for AIS is always active regardless of whether the AIS display is on or off Note You may also turn the AIS display on or off by pressing the function key...

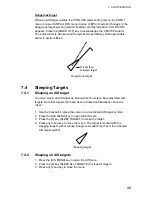
Page 39: ...eping an AIS target You may sleep an AIS target as below when the screen becomes filled with targets Note that targets that have been activated automatically cannot be slept 1 Use the trackball to pla...

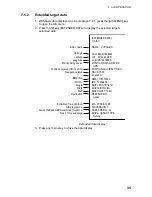
Page 40: ...G 234 1 TRU COG 321 2 TRU SOG 21 1KT CPA 2 8NM TCPA 23 5MIN HDG 234 TRU ROTR 1 1 MIN Ship s name Call sign Range from own ship to target Bearing from own ship to target Course over ground Speed over g...

Page 41: ...OSITION ACCURACY HIGH NAV STATE at anchor MMSI 107374182 IMO 12354876 SHIP LENGTH 187m SHIP WIDTH 28m SHIP DRAFT 12 2m DESTINATION Osaka ETA 01 FEB 12 59 AIS VERSION 0 ARPA FUSION 02 SHIP CARGO TYPE F...

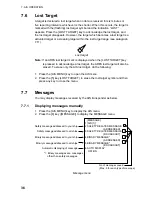
Page 42: ...he AIS lost target do the following 1 Press the AIS MENU key to open the AIS menu 2 Press the 5 key LOST TARGET to erase the lost target symbol and then press any key to close the menu 7 7 Messages Yo...

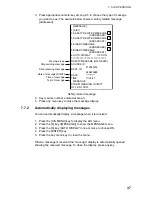
Page 43: ...ge Ship receiving message Date of message D M Y Time of message Text of message Message type 1 1 1 1 Safety related message 4 Key is same number entered at step 3 5 Press any menu key to close the mes...

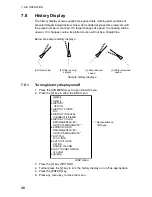
Page 44: ...increased speed Sample history displays 7 8 1 Turning history display on off 1 Press the AIS MENU key to open the AIS menu 2 Press the 0 key to show the AIS2 menu AIS 2 1 AIS 1 2 HISTORY OFF ON 3 HIS...

Page 45: ...ey HISTORY INTERVAL 7 Press the 4 key again to choose history interval desired among 10 30 s 1 2 3 and 6 min 8 Press the ENTER key 9 Press the 5 key to choose HISTORY COLOR 10 Press the 5 key again to...

Page 46: ...he numeric keys to enter automatic activation range 000 1 to 999 9 nm 6 Press the ENTER key 7 Press any menu key to close the AIS menu 7 11 Lost Target Range Set the distance at which an AIS target is...

Page 47: ...heading line on target symbols will point in direction of turning 1 Press the AIS MENU key to open the AIS menu 2 Press the 0 key to show the AIS2 menu 3 Press the 7 key ROT TAG 4 Use the numeric keys...

Page 48: ...be used to determine which ARPA targets to convert POSN Range between AIS target and ARPA target RNG Enter the range difference from own ship to AIS target and ARPA target BRG Enter the bearing differ...

Page 49: ...get RECEIVE Not receiving AIS data WT This message appears when the water tracking mode is set at the radar and the data necessary for STW and CSE are not available In this case the vector on the AIS...

Page 50: ...7 AIS OPERATION 44 7 15 AIS Alarm Message The AIS3 menu provides AIS alarm message information AIALR sentence from the AIS transponder...

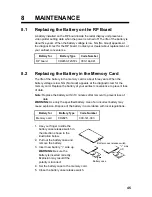
Page 51: ...the diagnostic test for the memory card Replace the battery at your earliest convenience to prevent loss of data Note Replace the battery within 10 minutes after removal to prevent loss of data WARNIN...

Page 52: ...equipment switches to the radar mode and the audible alarm sounds When this occurs turn the display unit off and on again If the above message does not appear the equipment is operating normally Howev...

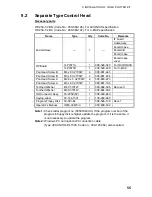
Page 53: ...1 404 Not used Pan Head Screw A M2 6 x 5 C2700W 2 000 800 973 Not used Pan Head Screw A M3 x 8 C2700W 1 000 881 104 Not used Toothed Washer M4 C5191W 1 000 864 506 Toothed Washer M3 C5191W 1 000 864 5...

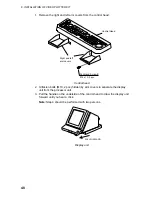
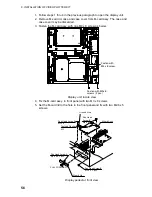
Page 54: ...Screw B M4 x 10 2 pcs Control Head Control head 2 Unfasten bolts M10 2 pcs hidden by arm covers to separate the display unit from the processor unit 3 Pull the handle on the underside of the control h...

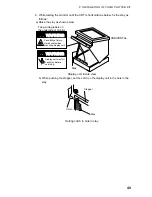
Page 55: ...below Stay HORIZONTAL WARNING Possibility of injury Hold handle when mounting display unit Display unit may fall Lock stay before servicing Two warning labels on the underside of monitor WARNING Displ...

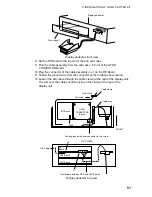
Page 56: ...washer supplied as shown below b Fasten the arm cover to the M card case with three M4 x 8 screws supplied Right Arm Cover Pan Head Screw B M4 x 8 Pan Head Screw B M4 x 8 3 pcs Toothed Washer M4 M Ca...

Page 57: ...oard 11 Fasten the ground wire from the connector at the location shown below 12 Lead in the AIS cable through the cable clamp at the rear of the display unit The armor of the cable should be lying in...

Page 58: ...lder Armor 25 26 27 TD A TD B GNDiso Clamp armor by cable clamp Use JIS cable TTYCS 1Q or equivalent See FA 100 s installation manual Pair Pair Wiring between RP board and AIS transponder attaching NH...

Page 59: ...ut 90 seconds i Confirm RP program no by pressing the RADAR MENU 0 0 0 3 and ENTER Program number 1 03591870 for C MAP specification FR 2105 TEST PROGRAM NO ROM RAM CRAM DISPSW MAIN 03591840 OK OK 123...

Page 60: ...TA and then press the ENTER key d Press 1 and 6 e Press 2 to choose OPERATION and then press the ENTER key f Rotate the trackball to choose AIS MENU and then press the ENTER key g Press the RADAR MENU...

Page 61: ...8 C2700W 2 000 881 404 Pan Head Screw A M2 6 x 5 C2700W 2 000 800 973 Pan Head Screw A M3 x 8 C2700W 1 000 881 104 Toothed Washer M4 C5191W 1 000 864 506 Not used Toothed Washer M3 C5191W 1 000 864 50...

Page 62: ...w Fasten with M4 x 8 screw Fasten with M3 x 8 screws 2 pcs Display unit inside view 4 Fix the M card assy to front panel with two M3 x 8 screws 5 Set the M card lid to the hole in the front panel and...

Page 63: ...previous page 7 Unfasten four pan head screws M4 x 8 from the display pedestal to remove the front panel lid 8 Set the RP Board in the top slot of the pcb card case 9 Run the cable assembly from the M...

Page 64: ...AIALR hhmmss ss xxx A A c c hh CR LF 6 5 4 3 2 1 1 Time of alarm condition change UTC 2 Local alarm number identifier 3 Alarm condition A threshold exceeded V not exceeded 4 Alarm s acknowledge state...

Page 65: ...es needed to transfer the message 1 to 9 2 Message sentence number 1 to 9 3 Sequential message identifier 0 to 9 4 AIS channel Number 5 Encapsulated ITU R M 1371 radio message 6 Number of fill bits 0...

Page 66: ...xing equipment ETA maximum present static draught destination 3 Data displayed in the Message display safety related message addressed AIVDM message 12 source ID destination ID safety related text saf...

Page 67: ...done to the main board SPU board 03P9253 The program of the main board SPU board is changed The program no after the change is 03591840XX Previous program no 03591491XX XX Program Version No Modifica...

Page 68: ...ected AIS alarm display ON WT WT CPA TCPA ON OFF OFF WT WT CPA TCPA ON WT None ON OFF ON WT None SOG selected on menu When data sentence VHW is present and set drift and VTG are on or off VHW Set Drif...

Page 69: ...SCALE 10 20 50 100 200 500 9 DEPTH UNIT 1 m ft 0 NAV INFORMATION 3 1 NAV INFORMATION 2 2 WATER TEMPERATURE 1 OFF ON 3 DATE OFF UTC LOCAL Enter time difference 4 USED WPL NAV LINE WP R type radar only...

Page 70: ...OLOR RED MAGENTA YELLOW 1 GREEN 1 CYAN BLUE WHITE 1 1 VIDEO PLOTTER 1 2 OWN SHP PLOT Enter file name 3 TARGET PLOT Enter file name 4 MARK Enter file name 0 FORMAT NO YES RECORD 1 VIDEO PLOTTER 1 2 9 F...

Page 71: ...target range 0 AIS 3 Detailed data for selected target 1 ACTIVATE TARGET 2 SLEEP TARGET 3 BASIC DATA 4 EXTENDED DATA 5 LOST TARGET 6 MESSAGE 7 ACTIVATE ALL TARGETS 8 SLEEP ALL TARGETS 9 AIS OFF ON 0 A...

Page 72: ...n ship 20 000 for other ship Plot Interval 10 s 30 s 1 2 3 6 10 20 30 60 min and OFF 1 8 Marks Memory Capacity 20 000 points Marks Type Fish school Wreck Lighthouse Buoy illuminated Buoy Radio Station...

Page 73: ...ngs video plotter 6 L Longitude error 28 Lines changing type 14 color 15 entering by cursor own ship position 13 entry method 13 erasing 15 memory points used 16 M Marks color 15 entering by cursor ow...

Reviews: