


7
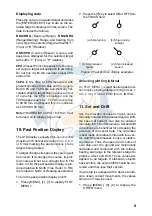
Lost Target Target in GZ
PLOT SYMBOLS
R
1
Reference
Target
(Received
reliable
referencing)
Immediately
After
Acquisition
20 scans
after
acquisition
60 scans after
acquisition
(Steady tracking)
Target which
is being
plotted
Target on
collision course
(CPA/TCPA)
1
1
1
1
1
1
1
Figure 5 Plot symbols
CAUTION
TARGET SWAP
When a tracked target near another tracked
target, the targets may be "swapped."
When two targets come close to each
other, one of the two can become a "lost
target." Should this happen, reacquisition
of the "lost target" is required after the two
targets have separated.
Automatic acquisition
1. Press [MENU], [7], [7] to display PLOT
MENU 1.
2. Press the [0] key twice.
3. Press the [2] key to select SET from the
AUTO ACQ field.
4. Press the [ENTER/SELECT] key.
5. Place the cursor at upper (lower) left edge
of area and press the [ENTER/SELECT]
key.
6. Place the cursor at the lower (upper) right
edge of the area and press the [ENTER/
SELECT] key.
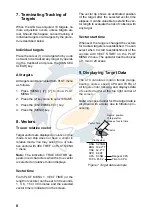
Sector
0.5nm
A
A
B
B
Figure 6 Automatic acquisition area
Note: If you wish to create an auto acquisi-
tion area having a 360 degree coverage
around own ship, set point B in almost the
same direction (approx.
±
5
°
) as point A and
press the [ENTER/SELECT] key.
Changing plot symbol shape
The plot symbol for a target may be changed
after acquiring the target, on the R-type ra-
dar only.
1. Place the cursor on the plot symbol mark
you wish to change.
2. Press the [ENTER/SELECT] key succes-
sively while pressing and holding down
the [HL OFF] control to select plot sym-
bol mark desired.
Plot symbols
Note: Changing the plot symbol mark
while a target is under acquisition (target
marked with dashed square) will cause
all plot symbol marks above to be shown
with dashed lines.
3. To inscribe a smaller plot symbol mark,
place the cursor on any plot symbol, then
press the [ENTER/SELECT] key. Mark
size can be alternately selected to large
or small by repeating this step.