background image

1.  PREPARATION

10

1.8.3

[Own Ship Mark Setting] menu

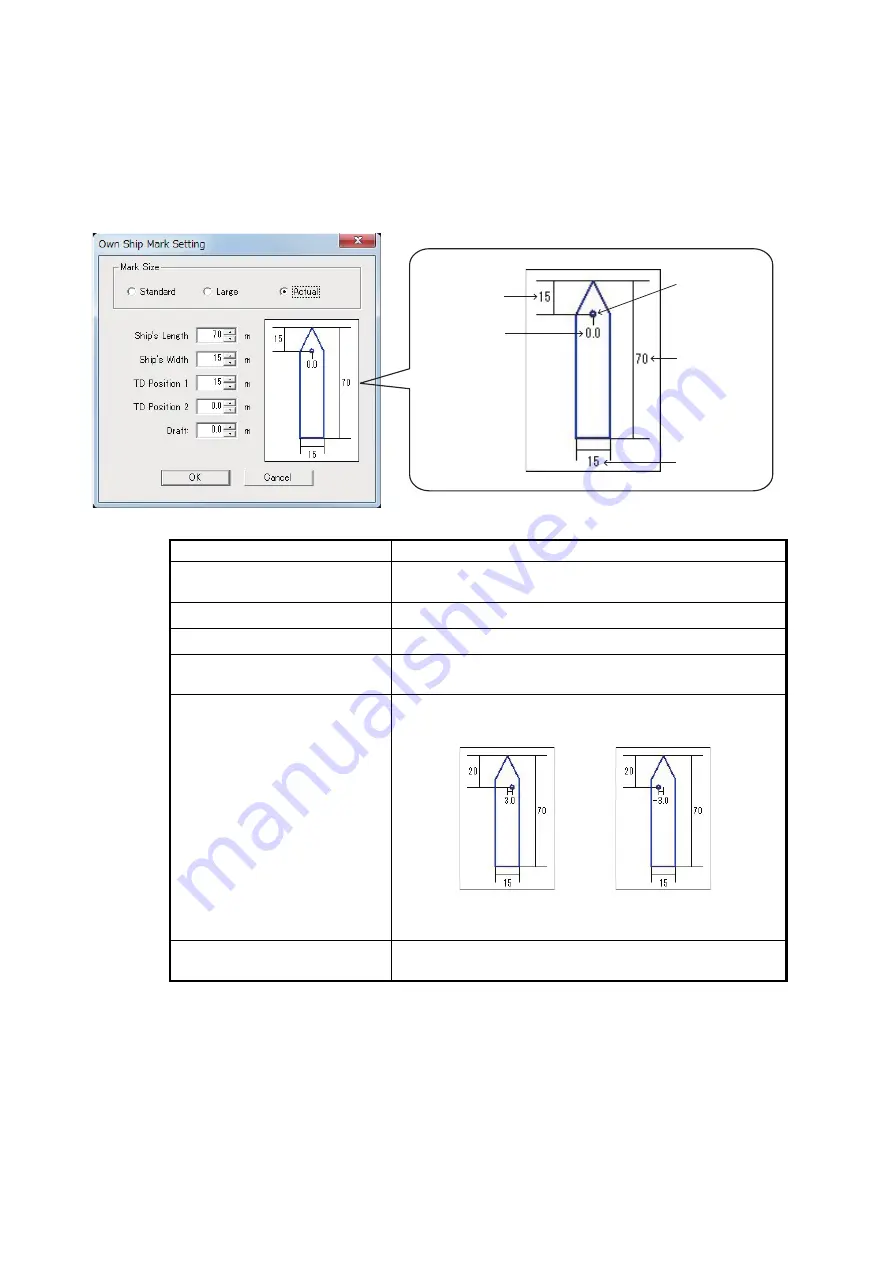
The [Own Ship Mark Setting] menu sets the size of the own ship mark, based on your 
ship's actual dimensions and transducer location.

1. Click [Setting] on the menu bar.
2. Click [Own Ship Mark …] to open the [Own Ship Mark Setting] dialog box.

3. Referring to the table below, set each menu item.

*

1

: The ship mark is appears on the screen in the following manner:

[Standard] / [Large]: fixed size, does not change when the range is changed.
[Actual]: displayed in direct proportion to the selected range.
*

2

: These settings are required in order to prevent the transducer from protruding 

excessively.

Menu item

Description

[Mark Size]*

1

Select the size of the own ship mark among [Standard], 
[Large] or [Actual].

[Ship’s Length]*

2

Set the length of your ship (setting range: 15 to 150 m).

[Ship’s Width]*

2

Set the width of your ship (setting range: 5 to 30 m).

[TD Position 1]*

2

Set the horizontal distance from the bow to the trans-
ducer (setting range: 5 to 50 m).

[TD Position 2]*

2

Set the horizontal distance from the center of the ship 
to the transducer (setting range: -10.0 to 10.0 m).

[Draft]

Set the vertical distance from the keel to the transducer 
(setting range: 0.0 to 10.0 m).

Ship’s Length

Ship’s Width

TD Position 1

TD Position 2

Origin

TD Position 1: 20
TD Position 2: 3.0

TD Position 1: 20
TD Position 2: -3.0

Summary of Contents for 3D Sonar Visualizer F3D-S

Page 1: ... 25S IMPORTANT NOTICES i SYSTEM CONFIGURATION ii 1 PREPARATION 1 1 1 Necessary Parts 1 1 2 Requirements for FSV 25 2 1 3 How to Connect the LAN Cable 2 1 4 How to Setup the PC 3 1 5 How to Install the Driver Install File 3 1 6 How to Install the F3D S Software 4 1 7 How to Start and Quit the Software 6 1 8 Initial Settings 8 2 DISPLAY SCREEN OPERATIONAL OVERVIEW 11 APPENDIX 1 MENU TREE AP 1 ...

Page 2: ......

Page 3: ...nfiguration and equip ment settings Save this manual for future reference Any modification of the equipment including software by persons not authorized by FURUNO will void the warranty The following concern acts as our importer in Europe as defined in DECISION No 768 2008 EC Name FURUNO EUROPE B V Address Ridderhaven 19B 2984 BT Ridderkerk The Netherlands Microsoft and Windows are registered trad...

Page 4: ...IF Unit FSV 8502 Control Unit FSV 2501 Hull Unit FSV 253 254 Transceiver Unit FSV 251 Junction Box FSV 2550 Raise Lower Control Box FSV 2530 Monitor Power Supply Unit FSV 252 100 110 115 220 230 VAC 1ø 50 60 Hz Rectifier RU 1746B 2 100 110 115 220 230 VAC 1ø 50 60 Hz 12 24 VDC Standard supply Local or optional supply 200 220 VAC 3ø 50 60 Hz ...

Page 5: ...ame Type Code No Qty Remarks CD ROM CDR700S WP S1P10S 000 177 025 10 1 For details see Folder structure of the CD ROM USB Protec tion Key 942 000058 001 KQAKA 000 197 077 10 1 Installation Manual IMC 13442 x 000 196 806 1x 1 Folder File Remarks F3D S_setup 3DSonarVisualizer msi F3D S intallation file in cludes Operator s Manual See section 1 6 setup exe NET Framework installation file OSS OSS txt ...

Page 6: ... cable at the back of the processor unit to Port 3 or Port 4 Note Do not connect the cable to Port 1 or Port 2 because the system will auto matically shut down after boot up 2 Use a cable tie to fasten the cable to the cable clamp on the processor unit 3 Connect the other end of the cable to the LAN port on the PC Unit Name of operation test Program version Processor Unit FSV 2503 FSV 2503 105 089...

Page 7: ...et Sleep and Screen to Never 4 Select Disable in Personalization Lock screen Screen saver settings 1 5 How to Install the Driver Install File 1 Turn the PC on 2 Login as a user with administration rights 3 Set the supplied CD ROM in the CD drive 4 Double click Sentinel_LDK_Run time_setup to open the folder 5 Double click HASPUserSetup exe 6 Click Next 7 Confirm the contents and click Next with I a...

Page 8: ...alog box shown below appears 9 Click Finish to finish 1 6 How to Install the F3D S Software 1 Turn the PC on 2 Login as a user with administration rights 3 Set the supplied CD ROM in the CD drive 4 Double click F3D S_setup to open the folder 5 Double click 3DSonarVisualizer msi F3D S F3D S F3D S ...

Page 9: ... Click Next to start the installation When the installation is complete the dialog box shown below appears 9 Click Close to finish Create a shortcut icon for 3DSonarVisualizer exe on the desktop A shortcut icon for the operator s manual is automatically generated in the startup fold er F3D S F3D S F3D S F3D S F3D S F3D S F3D S F3D S ...

Page 10: ...r the start up is completed the following screen appears Note If the following message appears re insert the USB dongle or re install the USB dongle See section 1 6 6 To quit the software click the close button x at the upper right hand corner of the screen All setting information is saved to the folder C Users User name Doc uments FURUNO F3D S Note If the information has not been saved open the p...

Page 11: ...Access the following URL https support microsoft com en us help 2977003 the latest supported visual c downloads 2 Run vc_redist x86 exe of Visual Studio 2015 2017 and 2019 3 Check the box for I agree to the license terms and conditions and click Install to start the installation When the installation is completed the dialog box shown below appears 4 Click Restart to restart the PC and complete the...

Page 12: ...menus 1 Click on the lower InstantAcces bar to open the lower user menu 2 Click to open the Advanced Setting dialog box 3 Click Menu Bar to show the dialog box for the password 4 Enter the password menuf1f3f5 and click OK The menu bar for the technician menus appears on the top left of the screen xx xx Menu bar for the technician menus ...

Page 13: ...View2 at the upper left corner of the view Vslice Grid Line Number Set the number of grid lines to display on Vslice View setting range 2 to 64 Vslice Y Axis View Ratio bp Set the aspect ratio of Vslice View setting range 10 to 10000 unit 0 01 Side View Depth Ratio bp Set the depth ratio vertical length vs range on Side View setting range 10 to 10000 unit 0 01 Bearing Scale Check the box to displa...

Page 14: ...ired in order to prevent the transducer from protruding excessively Menu item Description Mark Size 1 Select the size of the own ship mark among Standard Large or Actual Ship s Length 2 Set the length of your ship setting range 15 to 150 m Ship s Width 2 Set the width of your ship setting range 5 to 30 m TD Position 1 2 Set the horizontal distance from the bow to the trans ducer setting range 5 to...

Page 15: ...hows a bird s eye view of the echoes around the ship 4 3D View echo Shows a diagonal 3D view of the echoes 5 Vslice View echo Shows vertical slices of echoes at the same orientation as the vertical settings on the FSV 25 6 Settings of sonar Shows the range gain and user program number 7 External input data Shows the data output from external equipment connected to the FSV 25 8 Echo volume Shows th...

Page 16: ...ction click the icon again The color for the icon changes from cyan to gray 4 To hide the user menu click or on the upper or lower InstantAcces bar How to connect disconnect the FSV 25 25S 1 Click on the lower InstantAcces bar to show the lower user menu 2 Click to start communication with the FSV 25 3 To stop communication click Operator s manual The supplied CD ROM contains the operator s manual...

Page 17: ...econd level User Cont Reset Viewpoint No No Move Zoom No No Echo Region Mark 1 No No Delete No No Echo Region Mark 2 No No Delete No No Event Mark No No Delete No No Right Delete No No Purse Net Mark No No Delete No No Right Move No No Delete No No Trawl Mark No No Trawl Filter Yes Yes Delete No No Right Reset No No Move No No Delete No No Seabed Color No No Reset No No Auto Depth No Yes ...

Page 18: ...he screen Click to show the lower user menu Click to hide the lower user menu User Program No No Save No No User Program Number No Yes Return No No First level Second level User Cont View Setting No No Save No No Reset No No View Setting Number No No Return No No Connect No No Disconnect No No Replay No No Open No No First No No Previous No No Reverse No No Stop No No Play No No Next No No Last No...

Page 19: ... Yes Current1 Yes Yes Current2 Yes Yes Current3 Yes Yes Current4 Yes Yes Current5 Yes Yes TEMP Yes Yes Depth Digit Size Large Middle Small Yes Yes Trawl Door Size Large Middle Small Yes Yes Trawl Mouth Distance 10 to 2000 m 170 m Yes Yes Trawl Mouth Width 10 to 400 m 100 m Yes Yes Trawl Mouth Height 10 to 400 m 50 m Yes Yes Trawl Mouth Slope 0 to 45 deg 10 degrees Yes Yes Purse Net Radius 10 to 10...

Page 20: ...ub No IMC 13442 A1 Printed in Japan 機器の修理 使用方法等に関するお問い合わせは お買い上げの販売店 代理店 最寄りの 当社支店 営業所あてへお願いします Elemental Chlorine Free The paper used in this manual is elemental chlorine free FURUNO Authorized Distributor Dealer お問い合わせは JUL 2019 DEC 12 2019 A A1 00019680610 ...

Reviews: