


4
Min. 30" (762mm)
Vent
Vent
Min. 5⅛" (132mm)
Max. 15" (381mm)
36" (914mm)
Vent
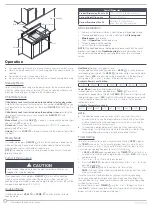
Overall Dimensions
Product Dimension (W x H x D)
121/2 x 25/8 x 15" (316 x 68 x 382mm)
Cut-out
Height Clearance
Min. 51/8" (132mm)
Cut-out Dimension (W x D)
Min. 115/8 x 14" (295 x 355mm)
Max. 11 7/8 x 143/8" (303 x 365mm)
After Installation
1.
Remove all the stickers and items from the top of the cooktop surface.
2. Clean cooktop before use. Dry with a soft cloth. See
Cleaning and
Maintenance
for reference.
3. Read the
Operation
section before use.
4. Turn on the power to the cooktop.
5. Verify all functions work properly.
NOTE
: If the cooktop does not work properly, please check that the circuit
breaker is not tripped. See
Troubleshooting
for more information. If you
cannot not solve the problem by yourself, please call us for assistance or
service.
Operation
●
This cooktop will get hot while in use and will remain hot for a while after use.
●
Never heat empty cookware. This can damage both the cookware and the
cooktop.
●
Remember to turn off the cooktop after use.
●
Make sure to wipe off water from the bottom of the cookware before using.
Standby Mode
Upon inserting the power plug into the power socket, the induction cooktop
will emit a “beep” sound once, and all the LEDs on the cooktop will blink once,
indicating the cooktop has entered into the standby mode.
Child Safety Lock
Child Safety Lock is activated when the cooktop is in standby mode:
Child Safety Lock prevents activation of any key, except for
LOCK
( )
, so you
must deactivate the Control Lock first, then touch
ON/OFF
( ) to turn on the
cooktop.
Child Safety Lock is activated when the cooktop is in use:
Child Safety
Lock prevents activation of any key, except for the
ON/OFF
( ) and
LOCK
( )
keys.
Manual Lock:
Press the
LOCK
( ), a “beep” will sound and the indicator light
above LOCK ( ) will be lit up.
Auto Lock:
The cooktop will automatically enter AUTO LOCK mode after
being turned off for 5 min.
Unlock:
Press the
LOCK
( ), a “beep” will sound and the indicator light will be
turned off.
Ready Mode
In standby mode, press
ON/OFF
( ) to turn on the cooktop, a “beep” sound
will be emitted and the heat mode, temp. mode and on/off indicators will be
blinking indicating that the cooktop is ready to use.
NOTE:
The cooktop will return to standby mode automatically if it has been
idle
for 60 seconds.
Turn Off the Cooktop
CAUTION
Do not unplug the power cord from the electrical outlet until the fan has
stopped after using the cooktop.
When cooking has finished, press
ON/OFF
( ) to turn off the cooktop,
a “beep” sound will be emitted and all the indicators will be turned off. The
cooktop will go into standby mode and the digital display will show “
H
” until the
temperature cooled below 140°F (60°C).
Cooking Mode
In ready mode, press
HEAT
( ) or
TEMP.
( ) to enter into heat or temp.
cooking mode.
Heat Mode:
Cook by setting power level.
In ready mode or temp. cooking mode, press
HEAT
( ) to switch to power
level cooking (heat) mode. The
HEAT
( ) indicator will light up and the digital
display shows “
900
” as default indicating the cooktop is in the power level
setting mode. Press “
+
” or “
-
” to adjust to the desired power level.
Available Power Level Setting:
300W
500W
700W
900W
1100W
1300W
1500W
Temp. Mode:
Cook by setting temperature level.
In ready mode or heat cooking mode, press
TEMP.
( ) to switch to
temperature cooking (temp.) mode. The
TEMP.
( ) indicator will light up and
the digital display shows “
260
” as default indicating the cooktop has entered
in the temperature cooking mode. Press “
+
” or “
-
” to adjust to the desired
temperature level.
Available Temperature Levels:
120°F
150°F
180°F
210°F
260°F
300°F
360°F
420°F
465°F
NOTE:
●
The cooktop can be used continuously for 2 hours and then will shut
off automatically. If using the integrated timer with either the Heat Mode
or Temp. Mode function, the cooktop maximum time is 2 hours and 59
minutes and will shut off automatically.
●
This cooktop is designed to prevent parching. When cooking in Heat
Mode, it might shut off automatically while this cooktop is used for frying,
stir-frying, grilling and other high temperature cooking situations.
Timer Setting
The timer setting function is only available when either the “
HEAT
” mode or
the “
TEMP.
” mode is on. The timer setting ranges from 1 minute to 2 hours
and 59 minutes. Use “
+
” or “
-
” key to set the timer. A short key press to set at
1-minute level and a long key press to set at 10-minute level.
1.
In
HEAT
or
TEMP.
cooking mode, press the
TIMER
( ) to set timer. The
timer indicator will blink and the digital display will show “
0:00
” with minute
number blinking.
2. Press “
+
” or “
-
” to set the minute to desired level.
3. Press the
TIMER
( ), the hour number will blink. Press “+” or “-” to set the
hour to desired level.
4. Press the
TIMER
( ) again to complete the timer setting.
NOTE:
The timer setting will be confirmed automatically after 10 seconds
without any operation.
Once the timer is set, the digital display will show the remaining cooking
time and cooking power/temperature alternatively every 5 seconds. When
the count down ends, a “beep” sound will be emitted and the cooktop will be
turned off automatically.
To cancel the timer, press
TIMER
( ), use the “
+
” or “
-
” to adjust the time to
read “
0:00
”. The timer indicator will blink for 10 seconds and then the digital
display will return to power/temperature display.
CCD-0005585 | REV DATE: 10.14.2022


