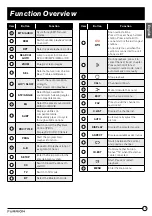
Furrion FDHK32V1A Instruction Manual Download Page 28

27

Soundbar Operation

English

General Operation

Power On/
Off

Press 

POWER 

button on the bottom 

of TV front panel or   button on the 
remote control to turn on/off the whole 
unit; 
When the whole unit is powered on with 
Zone 1/2 enabled by default, press and 
hold 

 button for 3 seconds to turn off 

the TV screen with Zone 1 and power 
on Soundbar only with Zone 2.

MUTE

Press 

 on the remote control to mute 

the audio. The MUTE icon will flash on 
the display. 

Press 

 again to unmute.

Select a 
Source

Press


the


button 

AM|FM

,

 AUX

,

 BT 

or

 TV 

on the bottom of front panel to 

select Radio, AUX, BT or TV as the 
source mode.

Adjust 
Volume

Rotate 

Volume Knob

 on the front 

panel to adjust volume.

Select Audio 
Feature

Press 

SEL

 on the remote control to 

select VOL, BAS (without EQ preset), 
TRE (without EQ preset) or BAL. 
Rotate 

Volume Knob

 on the front 

panel to adjust audio feature.

Preset EQ

Press 

EQ

 button on the remote control 

to select the sound mode MUSIC or 
MOVIE.

Select 
Speakers

ZONE 1

 is the built-in speaker. 

Turning on the TV will activate 

ZONE 1 

/ ZONE 2 

by default.

Press 

ZONE 2 

button on the remote 

control or on the front panel to turn on/
off ZONE 2.
The corresponding zone number will 
display on the LCD once it is selected.
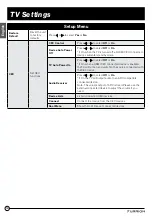
Reset

Turn on the TV and enter main menu 

Setup

” and select “

Restore Default

” 

to reset the TV and Soundbar to factory 
defaults. The TV and Soundbar enter 
standby mode.

Radio Operation

Select Area 
Frequency

Press and hold 

AM|FM 

once or more 

to select the radio region USA1, USA2, 
EUROPE or AUSTRALIA.

Manual 
Tuning

Press   or   button on the front panel 
to move radio frequency down or up 
one step at a time.

Automatical 
Tuning

Press and hold   or   button to 
search for the next strongest station 
automatically.

Select Band

Press 

AM|FM

 button on the front panel 

to select FM1, FM2, FM3, AM1, AM2.

Store and 
recall preset 
station

Press and hold any one of the six 
preset buttons (

1-6

) on the front panel 

to store the current frequency.
Press the corresponding preset button 
again to recall the frequency stored.

Automatically
Store 
Stations

Press and hold 

APS

 button on the 

remote control to automatically store 
the six strongest stations in the current 
band. (Up to 18 FM stations and 12 AM 
stations can be stored)

Scan Tuning

Press 

APS

 button on the remote 

control to scan preset station 1-6 in the 
current band.

LOC

Press 

LOC

 on the remote control 

repeatedly to set the LOC ON or LOC 
OFF.

Stereo/
Mono

In FM mode, press 

ST

 button on the 

remote control to select ST ON or ST 
OFF.

* The built-in Soundbar could be operated separately even when the TV is turned off.

Summary of Contents for FDHK32V1A

Page 1: ...DATE MODIFICATIONS NAME ECN NO DENSITY g cm3 MATERIAL Furrion Property Holding Ltd GENERAL TOLERANCES EXCEPT AS NOTED 0 TO 6mm 0 1 6 TO 30mm 0 2 30 TO 80mm 0 3 80 TO 180mm 0 4 180mm 0 5 ANGULAR 3 FINI...

Page 2: ...Product picture is for reference only 32 Furrion Sense HD D LED TV with Built in Entertainment system Instruction Manual Model FDHK32V1A...

Page 3: ...ct please read these instructions carefully This instruction manual contains information for safe use installation and maintenance of the product The manufacturer does not accept responsibility for an...

Page 4: ...el 10 Remote Control 12 About Your TV 14 Features 14 Power Source 14 What s in the box 15 Prepare your Remote Control 15 Before Operation 15 Getting Started 16 TV Settings 17 Setup Settings 17 Picture...

Page 5: ...ons 8 Do not install near any heat sources such as radiators heat registers stoves or other apparatus including amplifiers that produce heat 9 Do not defeat the safety purpose of the polarized or grou...

Page 6: ...TRIC SERVICE EQUIPMENT 20 NOTE TO CABLE TV INSTALLER This reminder is provided to call the CATV system installer s attention to Article 820 40 of the National Electric Code U S A The code provides gui...

Page 7: ...mouth immediately rinse and consult with your doctor Also if the liquid gets in your eyes or touches your skin consult your doctor after rinsing for at least 15 minutes in clean water Possible Advers...

Page 8: ...es cause harmful interference to radio or television reception which can be determined by turning the equipment off and on the user is encouraged to try to correct the interference by one or more of t...

Page 9: ...space around the entire unit Notes when mounting the LED TV on the wall If the unit is to be mounted on the wall contact the retailer where you purchased the LED TV for advice and have the equipment p...

Page 10: ...ts of a DVD Player Cable Box or other compatible devices Pb Pr 6 L AUDIO OUT R Connect to the AUDIO IN ports of an audio device 7 HDMI 1 ARC IN Connect to the HDMI OUT port of a DVD Player Games Conso...

Page 11: ...layback 3 In non radio mode press and hold this button once or more to select the alarm source input AL AUX AL BT AL TV or AL RADIO The corresponding source will display on LCD screen Item Description...

Page 12: ...down within a TV menu Item Description 13 In TV mode Select TV channel upward Move the cursor up within a TV menu 14 1 During playback with BT or USB with a USB device connected press this touch key...

Page 13: ...ithin a menu Press OK to confirm your selection 12 VOL Increase decrease volume 13 Eject DVD CD 14 Return to the previous track chapter during playback Press and hold it to rewind Automatic or manual...

Page 14: ...f track 32 SETUP Enter the Setup menu for the entertainment system 33 CC Switch Closed Captions On and Off 34 TV Switch to TV mode 35 BT Select the Bluetooth mode Item Button Function 36 Scan radio st...

Page 15: ...ect with an external USB device AV device Auxiliary device from the front of the TV Power Source NOTE Please make sure to insert the cord securely at both the LED TV and the wall outlet WARNING DO NOT...

Page 16: ...different types BATTERY PRECAUTIONS These precautions should be followed when using batteries in this device Use only the size and type of batteries specified Be sure to follow the correct polarity w...

Page 17: ...ized settings Move Return MENU 3 Use or on the remote control to highlight Menu Language then press or to select the desired language Press or to highlight Go to next step press OK or to go to the nex...

Page 18: ...r to select CC On CC Off or CC On Mute Analog CC Press or to select CC1 CC2 CC3 CC4 Text 1 Text 2 Text 3 or Text 4 Digital CC Press or to select Off Service1 Service 2 Service 3 Service 4 Service 5 or...

Page 19: ...r On Press or to select Off or On If On when a HDMI CEC connected device is enabled the TV will turn on and switch to the source connected with the CEC device Audio Receiver Press or to select Off or...

Page 20: ...tness Control the picture brightness Press or to adjust the brightness Only adjustable when Picture Mode is User Contrast Control the picture contrast Press or to adjust the contrast Only adjustable w...

Page 21: ...rce was selected Audio Menu Equalizer Select the EQ mode Press or to select Standard Music Movie Sports or User mode User Press or to select 200 Hz 500 Hz 1 5K Hz 5K Hz 10K Hz or Balance Audio Languag...

Page 22: ...to the previous menu or press EXIT at any time to exit the setting Time Menu Sleep Timer Set the time to automatically switch off the TV Press or to select Off 5min 10min 15min 30min 60min 90min 120mi...

Page 23: ...menu 2 Use or to highlight Lock mode 3 Use or to highlight Enter Password and input 0000 to enter the setup window 4 Use or to highlight the item you would like to reset then press or to select the s...

Page 24: ...V Press to enter the TV Ratings menu and use to select your TV rating preference Refer to the following tables of Age and Genre MPAA Press buttons to select your movie rating preference based on US Ra...

Page 25: ...ly Genre ALL All FV Fantasy Violence V Violence S Sex L Language D Dialogue Canadian Rating System English E Exempt from the ratings All ages C Suitable for children age of 0 7 years C8 Suitable for c...

Page 26: ...ss or to select Air or Cable Auto Scan Automatically scan for available channels Press or OK to select Cable System or Start to Scan Favorite Add the channel to the favorite list Press or to select a...

Page 27: ...o navigate the files or folders stored on a USB device 4 Press MENU to return to the previous menu or press EXIT at any time to exit the setting For photos you can use the tools on the photo viewer to...

Page 28: ...lay on the LCD once it is selected Reset Turn on the TV and enter main menu Setup and select Restore Default to reset the TV and Soundbar to factory defaults The TV and Soundbar enter standby mode Rad...

Page 29: ...first chapter track Repeat Press RPT to repeat current playing track chapter Press RPT again to resume Random Press RDM to play each track in random order Press RDM again to resume Bluetooth Operatio...

Page 30: ...A 29 x 21 13 16 x 4 10 15 736 7 x 554 3 x 118 3 mm 1366 x 768 60Hz HD INPUT OUTPUT CONNECTIONS TV Model HDMI in AM FM ANTENNA Audio in Optical Out USB Audio Out Zone 2 Out Component YPb Pr In Aux in R...

Page 31: ...o 480i 480p 720p 1080i 1080p HDMI 480i 480p 720p 1080i 1080p CEC including remote control pass through HDCP Version 1 4b CVBS audio L R RCA input 0 2 2 0VRMS Component YPbPr audio USB Playback Output...

Page 32: ...ustments Poor TV reception Ensure the antenna amplifier is turned on for Antenna TV Adjust the antenna position to a stronger signal receiving angle Check if the Antenna connection is tight to the TV...

Page 33: ...ology 52567 Independence Ct Elkhart IN 46514 USA Toll free 1 888 354 5792 Email support furrion com 2007 2019 Furrion Ltd Furrion and the Furrion logo are trademarks licensed for use by Furrion Ltd an...

Reviews: