background image

– 6 –

EN

Setup

Select this connection when you want to view or record a scram-
bled channel. With this connection, channels cannot be changed
on the DVD/VCR. You can view or record ONLY the channels you
have selected on the cable box or the satellite box.
• While you are recording, only the recorded channel can be

viewed.

To select channels of the cable box or satellite box

1) Turn on the DVD/VCR by pressing the POWER button, and

then, press the VCR/TV button.The “POWER” light on the front
panel will appear. Then, press the CHANNEL buttons to select
channel 3 or 4 (the same channel as the output channel of the
cable b ox or satellite box).

• If you use the channel 4, you need to change the DVD/VCR’s

RF output to channel 4. Refer to “RF Output Channel”.

2) At the TV, select channel 3 or 4 (the same channel as you

have selected at step 1).

3) At the cable box or satellite box, select the channel you want to

view or record.

Select this connection when you want to change channels on the
DVD/VCR. With this connection, you may watch one channel
while recording another.
• You may not view or record a scrambled channel.

To select channels of the cable box or satellite box

1) At the cable box or satellite box, select channel 3 or 4 (the

same channel as the DVD/VCR’s RF output channel.)

• Refer to “RF Output Channel”.
2) At the TV, select the same channel as the output channel (3 or

4) of the cable box or satellite box.

3) Turn on the DVD/VCR by pressing the POWER button, and

then, press the VCR/TV button. The “POWER” light on the front
panel will appear. Then, select the channel you want to view or
record.

To play back a tape

Follow the steps 1) to 2) above. Then, play back a tape.
• Refer to “Playback” on page 11.

To view one channel while recording another

1) While you are recording on the DVD/VCR, press the VCR/TV but-

ton.

2) At the cable box or satellite box, select the channel you want to view.
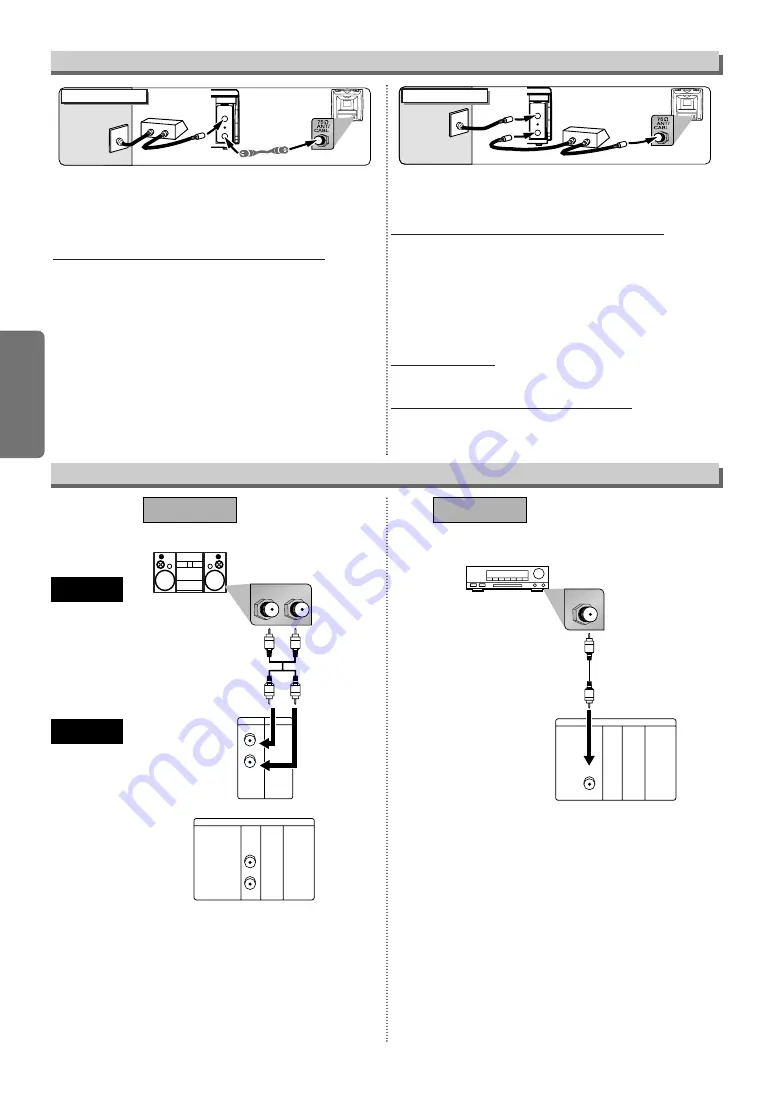
ANT-OUT

ANT-IN

RF Cable

(supplied)

(Back of DVD/VCR)

IN

OUT

E

(Back of TV)

Cable 

Signal

Connection A

(Cable  box or 

Satellite box)

ANT-OUT

ANT-IN

RF Cable 

(supplied)

RF Cable

(Back of TV)

IN

OUT

(Cable  box or

Satellite box)

E

Cable 

Signal

Connection B

(Back of DVD/VCR)

Hint for Cable Box or Satellite Box

R

L

VCR

DVD/VCR

AUDIO IN

VIDEO IN

AUDIO OUT

VIDEO OUT

L

R

DIGITAL

AUDIO OUT

or

COAXIAL

AUDIO

OUT

DVD

S-VIDEO

OUT

COMPONENT

VIDEO OUT

L

R

Y

C

B

/

P

B

C

R

/

P

R

Stereo system

DIGITAL

AUDIO OUT

COAXIAL

AUDIO

OUT

DVD

S-VIDEO

OUT

COMPONENT

VIDEO OUT

L

R

COAXIAL

Y

C

B

/

P

B

C

R

/

P

R

AUDIO

DVD/VCR

Method 1

Analog audio
input jacks

Digital audio
input jack

(Analog)
AUDIO OUT

DIGITAL
AUDIO OUT

Method 2

Connection to an Audio System

Audio cable

(supplied)

Audio Coaxial

Digital cable

(commercially

available)

Note

• If output is Dolby Digital encoded audio, connect to a Dolby

Digital decoder, and set “DOLBY DIGITAL” to “ON” in the
AUDIO menu. (Refer to pages 20-21.)

• The audio source on a disc in a Dolby Digital 5.1 channel

surround format cannot be recorded as digital sound by an
MD or DAT deck.

• Unless connected to a Dolby Digital decoder, set “DOLBY

DIGITAL” to “OFF” in the AUDIO menu. Playing a DVD
using incorrect settings may generate noise distortion, and
may also damage the speakers. (Refer to pages 20-21.)

• Set “DOLBY DIGITAL” to “OFF” in the AUDIO menu for con-

necting to an MD deck or DAT deck. (Refer to pages 20-
21.)

• By hooking this unit up to a Multi-channel Dolby Digital

decoder, you can enjoy high-quality 5.1ch Dolby Digital
surround sound as heard in the movie theaters.

Dolby Digital decoder,

MD deck or DAT deck

Summary of Contents for Sylvania DVC840E

Page 1: ...ettes and Discs 5 Playable Video Cassettes 5 Playable Discs 5 Unplayable Discs 5 Connections 5 RF Output Channel 5 Hint for Cable Box or Satellite Box 6 Connection to an Audio System 6 Connection to a...

Page 2: ...equipment does cause harmful interference to radio or television reception which can be determined by turning the equipment off and on the user is encouraged to try to correct the interference by one...

Page 3: ...a Grounding If an outside antenna or cable system is connected to the video product be sure the antenna or cable system is grounded so as to provide some protection against voltage surges and built up...

Page 4: ...s ammonia or abrasive CLEANING DISCS When a disc becomes dirty clean it with a cleaning cloth Wipe the disc from the center out Do not wipe in a circular motion Do not use solvents such as benzine thi...

Page 5: ...mal CD layer can be delivered The sound recorded on the high density Super Audio CD layer cannot be delivered Any other discs without compatibility indications If channel 3 is already occupied for bro...

Page 6: ...bove Then play back a tape Refer to Playback on page 11 To view one channel while recording another 1 While you are recording on the DVD VCR press the VCR TV but ton 2 At the cable box or satellite bo...

Page 7: ...jack of a decoder or audio receiver DVD only VIDEO IN jack Connect a cable com ing from the video out jack of a camcorder another VCR or an audio visual source laser disc player video disc player etc...

Page 8: ...me at a time To advance playback one frame at a time To pause disc playback To pause disc playback To pause tape playback or recording To stop playback To stop playback To stop playback or recording T...

Page 9: ...ss the VCR button on the remote control Verify that the VCR OUTPUT light is lit VCR MODE Note Pressing only the OUTPUT button on the front panel DOES NOT switch the mode of the remote control You MUST...

Page 10: ...memo rized in this unit by using the CHANNEL buttons If AUTO SET UP appears on the TV screen again check the cable connections Then press the B button once again Y Yes es Press the MENU button to exit...

Page 11: ...are recording on the DVD VCR press the VCR TV button 2 At the cable box or satellite box select the channel you want to view If you have connect ed the DVD VCR to a cable box or satel lite box refer...

Page 12: ...C SPEED AM B PM Select AM or PM 7 7 Repeat the procedure in steps 5 and 6 to set the end time Select the desired channel Timer Recording If you have connected the DVD VCR to a cable box or satellite b...

Page 13: ...ty shielded cables with RCA type connectors Standard audio cables are not recommended You can use a video disc player satellite receiver or other audio video component with A V outputs L1 or L2 is fou...

Page 14: ...SELECT Hint Hint To cancel Auto Repeat follow steps 1 2 above Then press the B button so that OFF appears beside AUTO REPEAT Press the CLEAR C RESET button to exit If menu remains on the TV screen at...

Page 15: ...utton Resume message will appear on the TV screen Press the PLAY button play back will resume from the point at which playback was stopped To cancel resume press the STOP button one more time during t...

Page 16: ...urrent track number Total tracks Elapsed time of the current chapter Remaining time of the current chapter Elapsed time of the current title Remaining time of the current title Layer numbers appears o...

Page 17: ...ingle digit tracks 1 9 press a single number eg track 3 press 3 To play track 29 press 10 2 9 of the Number buttons Using the SEARCH Using the SEARCH MODE MODE b button utton 1 1 Track Search Using th...

Page 18: ...our programs are still stored until either the disc tray is open or power is turned off To repeat the current track in the program press the REPEAT but ton repeatedly until TRACK appears during playba...

Page 19: ...during CD playback DVD CD CD 1 1 STEREO AUDIO PLAY Each time you press the AUDIO button Stereo Sound mode Camera Angle This unit allows you to select a subtitle language if available during DVD play...

Page 20: ...splay QUICK ENTER ENTER SETUP SETUP PARENTAL PASSWORD Please enter a 4 digit password SETUP AUDIO DRC DOWN SAMPLING DOLBY DIGITAL ON ON ON SETUP DISPLAY TV ASPECT STILL MODE ANGLE ICON AUTO POWER OFF...

Page 21: ...OFF ON TV ASPECT 4 3 LETTER BOX STILL MODE AUTO ANGLE ICON ON AUTO POWER OFF ON 4 3 LETTER BOX AUTO ON OFF TV ASPECT 4 3 LETTER BOX STILL MODE AUTO ANGLE ICON ON AUTO POWER OFF ON 4 3 LETTER BOX AUTO...

Page 22: ...eneral children can be played back Levels 7 to 2 Only DVD softwares intended for general use and chil dren can be played back Level 1 Only DVD softwares intended for children can be played back with t...

Page 23: ...tape Cannot remove the tape Check if this unit is in the VCR mode If not press the VCR button on the remote control to switch the mode No picture Connect the video cables firmly Insert a correct video...

Page 24: ...s DURATION PARTS FUNAI CORP will provide parts to replace defective parts without charge for one 1 year from the date of original retail purchase Two 2 years for Picture Tube Certain parts are exclude...

Page 25: ...en la toma ANT IN de DVD VCR Pantalladeltelevisor Mando a distancia VCR VCR o VCR 1 1 MENU PROGRAMAR AUTOREPETIR OFF AJUSTE CANAL B AJUSTE DE RELOJ SELEC IDIOMA MENU AJUSTE DE RELOJ MES DIA A O 0 3 HO...

Page 26: ...cto en el modo de grabadora de v deo Para borrar los marcadores Para borrar los marcadores Disco compacto Para retirar el N de estado en la entrada de programa Para borrar los n meros entrados incorre...

Page 27: ...OUTPUT button on the front panel DOES NOT switch the mode of the remote control You MUST select the correct mode on the remote control Press the DVD button on the remote control Verify that the DVD O...

Page 28: ...To search track To search time CD To rapidly return to a location of disc Search the markers CD To select the recording speed To select channel The 10 button has no effect in VCR mode To clear the ma...

Reviews: