background image

EN

14

BASIC OPERATIONS

1

B

A

S

I

C


P

L

A

Y

B

A

C

2

2

3

3

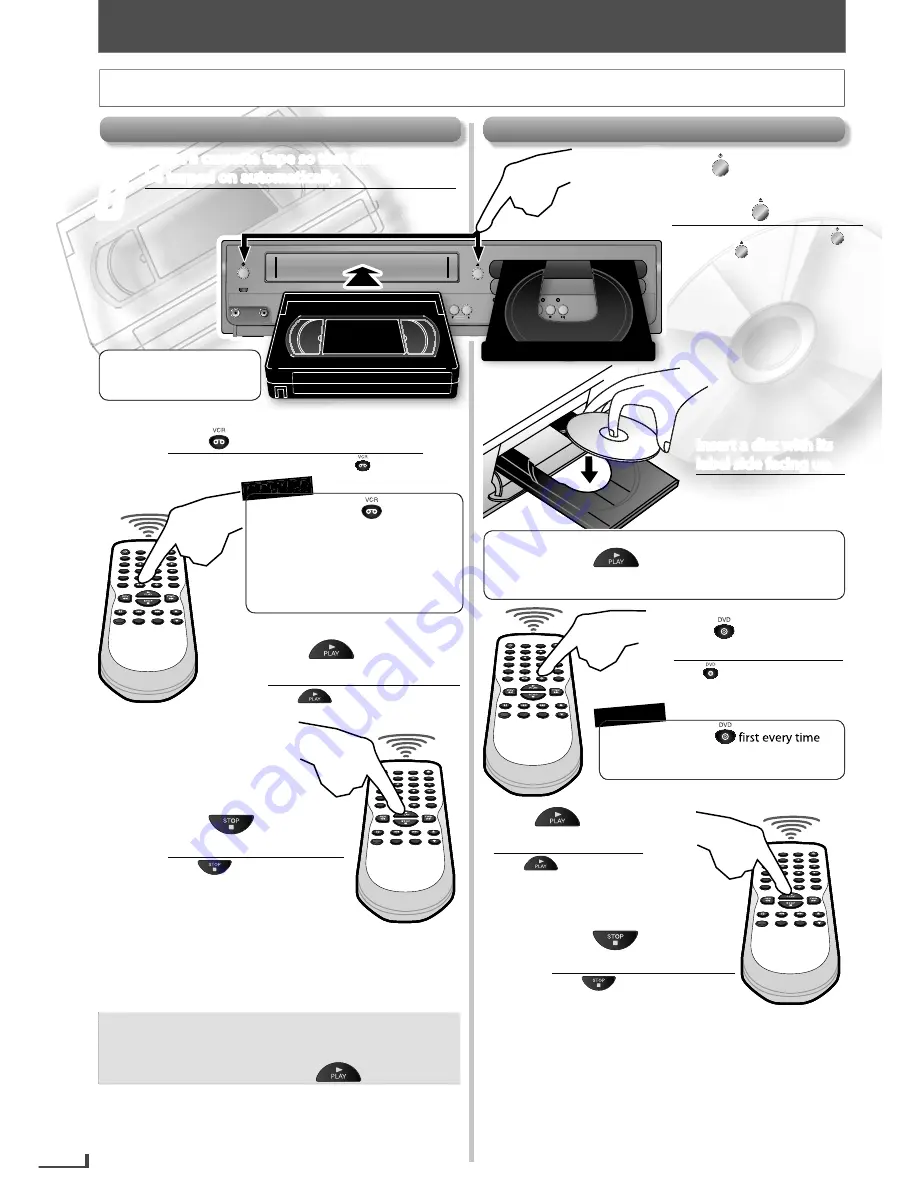
For advanced playback, refer to the following pages.

• Time Search

p.17

• Index Search

p.17

• Auto Repeat

p.17

Note:

•  To prevent damage to the cassette tape, pause or 

slow mode will automatically stop after 5 minutes.

•  To return to playback from the picture search,

pause or slow mode, press

.

te tape so

at the unit wi

Insert a cassette tape so tha

sert a cassette tape so that

hat

ette tape so 

e tape so

t t

o

ett

ape

se

t e tape so

t

p

p

p

p

ca

a

ta

a

t

t

t

s

ss

ss

s

s t

t

t t

t

t

t

t

i

i

Insert a cassette tape so that the unit will 

y.

omat

be turned on automatically

b

be t

d on automatic

utomat c

ut

tt

b

on au

on a

.

o

o

o

b

ca

d

d

t

tt

t

a

ca

t

t

t

i

be turned on automatically.

Inserte un casete para que la unidad se encienda 
automáticamente.

Press 

Press 

witch to the VCR mode.

w tc

wit

to sw

to switch to the VCR mode.

Para cambiar al modo de VCR, pulse 

.

Press

Press

to start

to start

playb

playback.

a

ack.

Pulse 

 para comenzar la 

reproducción.

4

4

Press 

Press 

 to stop the

to stop the

playback.

playback.

Pulse 

 para detener la 

reproducción.

PLAY

DISC IN

DVD

VCR

POWER ON

AUDIO

REC

REC

TIMER REC

TRACKING

SOURCE

VIDEO

PLAY

DISC IN

DVD

VCR

SOURCE

O

TRACKING

• If the protection tab has 

removed, playback will
start automatically.

Before:

 Turn on the TV.

5

5

BASIC OPERATIONS

For VCR Playback

1

Press

Press

 to turn on the

to turn on the

unit. 

unit. 

Then press 

Then press

..

Para encender la unidad, pulse 

 .

Luego pulse 

.

For Disc Playback

REMEMBER

2

2

3

3


t

h

h

h

h

h

h

tt

w

w

w

w

w

w

sc w

nse a d

ert a

n e

d

ts

ttt

s

s

s

s

s

t

t

t

t

t i

i

i

i

i

i

Insert a disc with its

p

p.

g up

p

ng

label side facing

el side

bel side 

e f

s e f

s

.

p

b

b

b

c

d

d

d

d

g

fa

s

a

ac

b

be

a

f

d

label side facing up.

Inserte un disco con el lado 
de la etiqueta hacia arriba.

Press 

Press 

to switch to 

to switch to 

the DVD mode.

the DVD mode.

Pulse 

 para cambiar al modo 

de DVD.

4

4

Press

Press

to start 

to start 

playback.

playback.

Pulse 

 para comenzar 

la reproducción.

Press 

Press 

 to stop the

to stop the

playback.

playback.

Pulse 

 para detener la 

reproducción.

For advanced playback, refer to the following pages.

• Disc Menu

p.16 • Resume Playback

p.16

• Pause Mode

p.15 • Step-by-step Playback

p.15

• Zoom

p.16 • Repeat Playback

p.17

• Search Functions

p.16 • Angle

p.16

• JPEG Playback

p.18 • Random Playback

p.18

• You need to press

you operate any of DVD functions / 
features.

REMEMBER

• You need to press 

 first every

time you operate any of VCR
features.

• When using DVD AUDIO OUT jack, 

DIGITAL AUDIO OUT COAXIAL jack 
and COMPONENT VIDEO OUT jack, 
no VCR audio / video will be output.

RE

E

E

EM

EM

ME

EM

E

EM

EM

MBE

ER

R

R

E

E

EM

E

EME

REMEMBER

•  Depending on the disc, playback will start automatically 

without pressing

 .

•  In case the DVD is recorded on both sides, make sure the 

label of the side you want to playback is facing up.

E8R6AUH̲DV220FX5̲OM̲v1.indd   14

2014/10/06   15:41:48

Summary of Contents for DV220FX5

Page 1: ...ECAUTIONS PREPARATION ADVANCED PLAYBACK BASIC OPERATIONS RECORDING OPTIONAL SETTINGS TROUBLESHOOTING INFORMATION 2014 Funai Electric Co Ltd DV220FX5 DVD Player VCR with Line in Recording Owner s Manua...

Page 2: ...nvenience receptacles and the point where they exit from the apparatus 11 Only use attachments accessories specified by the manufacturer 12 Use only with the cart stand tripod bracket or table specifi...

Page 3: ...id a place with drastic temperature changes Install the unit in a horizontal and stable position Do not place anything directly on top or bottom of the unit Depending on your external devices noise or...

Page 4: ...t Search 16 Index Search 17 Time Search 17 Repeat Playback 17 Repeat A B Playback 17 Auto Repeat Playback 17 JPEG Playback 18 Random Playback 18 Settings 18 Subtitle Language 18 Audio Language 18 On S...

Page 5: ...al computers the discs with labels scratches stains blemishes etc HD DVD Blu ray disc Caution The sound may not be heard on the following disc super audio CD Note Only the sound recorded on the normal...

Page 6: ...PEAT p 17 DVD mode Press to play back a chapter title repeatedly DVD Pulse para reproducir un cap tulo o t tulo reiteradamente DVD Press to play back repeatedly CD JPEG Pulse para reproducir repetidam...

Page 7: ...ess to call up the menu when playing back a disc DVD Pulse para volver al men o pantalla anteriormente visualizado DVD Press to return to the file list when thumbnail is displayed JPEG Pulse para volv...

Page 8: ...R p 22 Connect an RCA monaural audio cable from the audio output jack of your camcorder and other such devices here 14 E VCR p 15 Press to rewind the cassette tape or to view the picture rapidly in re...

Page 9: ...viewing You can enhance your DVD picture and sound quality with component video cables or a digital audio coaxial cable Please purchase the necessary cables at your local store Refer to pages 11 12 Re...

Page 10: ...eo ca cable To audio R input jack To audio R input jack After making the connection illustrated above 1 Set your RF modulator s channel 3 4 switch to either 3 or 4 whichever the TV channel is least u...

Page 11: ...IN AUDIO OUT VIDEO OUT L L Y R R CB CR AUDIO IN R L DIGITAL AUDIO OUT COAXIAL AUDIO OUT DVD VCR DVD VCR COMPONENT VIDEO OUT AUDIO IN VIDEO IN AUDIO OUT VIDEO OUT L L Y R R CB CR AUDIO OUT DVD L R To...

Page 12: ...IDEO OUT L L Y R R CB CR DIGITAL AUDIO OUT COAXIAL DVD To coaxial input jack To coaxial input jack digital audio coaxial cable To coaxial output jack d digital audio k digital au digital aud i i udio...

Page 13: ...setting will be lost after a power failure or this unit has been unplugged for more than 30 seconds Turning On Unit for the First Time Please note most instructions in this manual refer to remote cont...

Page 14: ...RATIONS For VCR Playback 1Press Press to turn on the to turn on the unit unit Then press Then press Para encender la unidad pulse Luego pulse For Disc Playback REMEMBER 2 2 3 3 t h h h h h h h t t w w...

Page 15: ...the normal playback press PLAYB Note For VCR to prevent damage to the cassette tape pause mode will automatically stop after 5 minutes Slow Forward Playback Press first Press PAUSE F during playback t...

Page 16: ...if appears on the TV screen Press first 1 During playback press ANGLE Each time you press ANGLE camera angle changes Track File Search Press first 1 Press SEARCH Available Search Mode Displayed list T...

Page 17: ...cleared when you select time search during random playback For VCR press STOPC to stop the search For VCR if a cassette tape ends during a search the time search will be cancelled and the unit will re...

Page 18: ...the discs for details JPEG Playback JPEG is a method of compressing data in files You can copy JPEG files on DVD or CD R RW from a computer and play back the files on this unit Press first Insert a J...

Page 19: ...disc information will automatically appear on the TV screen when a CD disc is inserted Insert a JPEG formatted disc then the Folder File List will automatically appear on the TV screen jpg9999 Jpeg01...

Page 20: ...switch to the VCR mode Para cambiar al modo de VCR pulse To stop recording temporarily press To stop recording temporarily press Para detener la grabaci n temporalmente pulse 6 6 7 7Press Press to st...

Page 21: ...se K L to enter the correct numbers You can cancel the entire program by pressing 0 while the program number blinks 4 Press CLEAR to exit 5 Press TIMER SET to return to the timer standby mode To Cance...

Page 22: ...If external tuner is not set to output signals satellite link will remain in standby mode To Cancel the Satellite Link on Standby To Cancel the Satellite Link on Standby Press TIMER SET on the remote...

Page 23: ...4 3 aspect ratio in the center of the 16 9 screen when playing back 4 3 images Movie Rating 1 ALL 2 NR 3 G 4 PG 5 PG 13 6 R 7 NC 17 8 X Adult Sets the rating level for the disc playback Rating setting...

Page 24: ...sh Sets the Language in DVD Menu Language options are not available with some discs Only the Languages supported by the disc can be selected AUDIO Audio Out Bitstreem PCM Set to Bitstream when the uni...

Page 25: ...justs the Brightness The Settings will remain effective even if the unit is switched into the Standby mode The effect of Picture Adjustment may differ depending on the connected TV Set Contrast 12 10...

Page 26: ...Connect the video cable firmly Video or color fades in and out when making a copy of a cassette tape You cannot copy a copyrighted cassette tape No picture and sound Please confirm to connect to DVD...

Page 27: ...ture If the playback picture is blurred or interrupted while the TV broadcast is showing clear the dirt may have accumulated on the video heads or the usage of rental or worn cassette tapes can cause...

Page 28: ...t apply a to damage caused by accident abuse misuse neglect misapplication or non supplied product b to damage caused by service performed by anyone other than company approved Authorized Service Loca...

Reviews: