background image

2

Recovering Your Factory Image

In the event you need to restore your original Factory Image, perform the following steps. Note that there 
may be some third-party applications that need to be installed from the application media bundled with your 
system.

In order to recover your Factory Image, perform the steps outlined in “Running Recovery and Utility from 
hard disk” on page 3. 

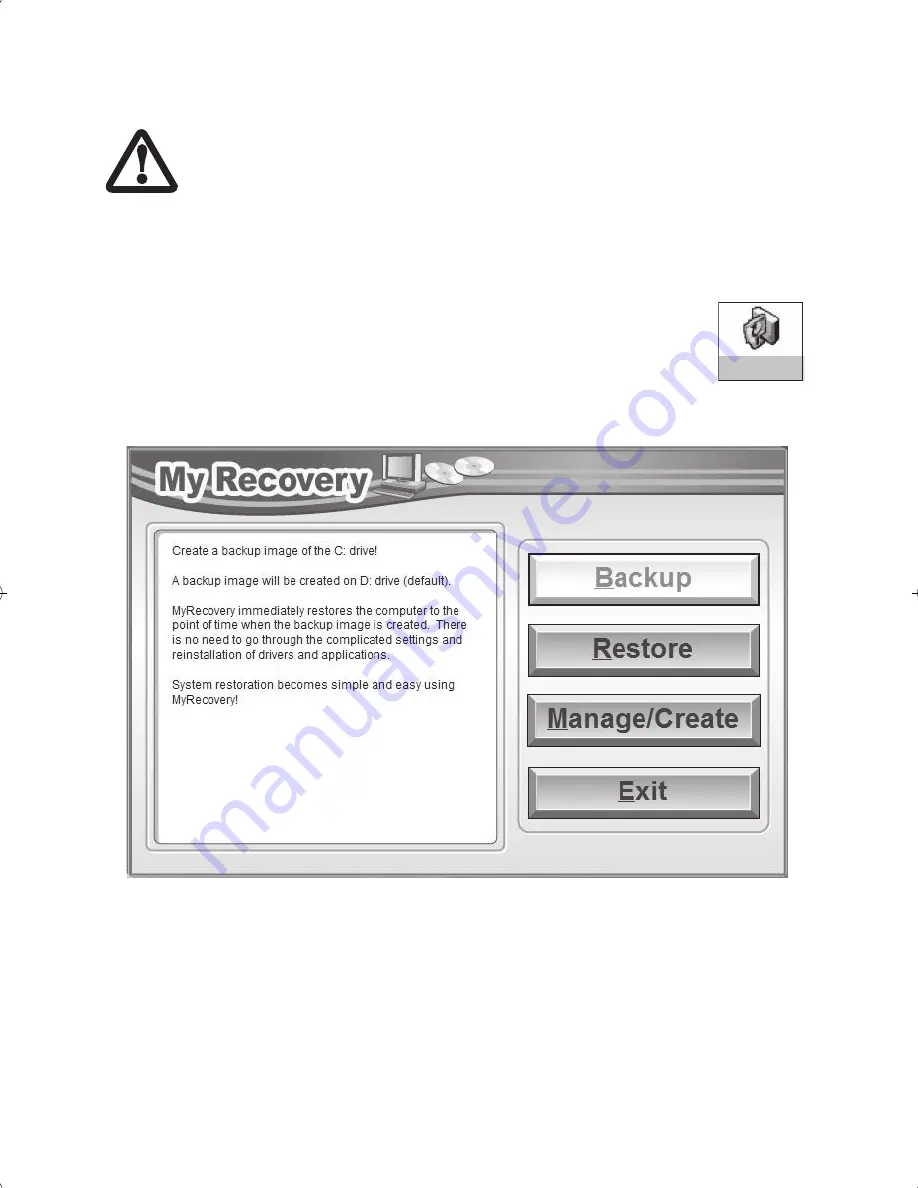
Backing Up a System Image

User-Configured System Backups:

 On your desktop, there is a 

[MyRecovery]

 icon that 

allows you to make backups of your current system image either to another location on your 
hard drive or on removable media. A system image is the configuration of your C: drive at a 
particular point of time. You may want to make system image backups occasionally in order 
to have points to which you can return without having to go all the way back to the Factory 
Image.

By default, system images are saved in the D: drive in the MyRecovery folder. You can also elect to save the 
image to an external hard drive.

1.

Click the [MyRecovery] icon on your desktop.

2.

Click the [Backup] button on the MyRecovery screen.

3.

On the next screen that appears, you can enter up to 200 characters of information about the backup 
file. This information will help you to identify the image at a later date.

4.

Click the [OK] button and the system will reboot.

5.

After rebooting, the “Creating of the backup image” window appears, in which you can either click [Cre-
ate the image on D drive] or [Select the drive] if you want to save to an external hard disk drive.

6.

An image appears showing you graphically how the image will be stored. Click the [Next] button.

7.

Click [Execute] to start the backup. 

A

LL


USER

-

CREATED


DATA


WILL


BE


DELETED


FROM


YOUR


SYSTEM


WHEN


THE

 F

ACTORY


I

MAGE


IS


RESTORED

.

My Recovery

HDD Restore Generic-Multi-lang B6FJ-3031-03EN-00.fm  Page 2  Friday, September 11, 2009  8:57 AM

Summary of Contents for Saving and Recovering Your Factory and System Images

Page 1: ...listed in Backup Images then click Make DVD 4 Be sure you have an internal or externally connected recordable DVD drive attached to your system A popup will appear displaying the types of supported DVD R R media 5 Insert a blank disc then click OK 6 A second popup displaying Recovery Disc 1 will appear Enter your comments and number of media on the DVD 7 When the first disc is complete you will be...

Page 2: ...to which you can return without having to go all the way back to the Factory Image By default system images are saved in the D drive in the MyRecovery folder You can also elect to save the image to an external hard drive 1 Click the MyRecovery icon on your desktop 2 Click the Backup button on the MyRecovery screen 3 On the next screen that appears you can enter up to 200 characters of information ...

Page 3: ...his will make Drivers and Applica tion Restore Disc Insert a new disc and click Yes for DAR disc creation 7 When DAR disc creation is completed a message is displayed This will make Application Restore Disc Click Yes to create the Applications disc 8 When the Application disc creation is completed the same message will appear Click Yes to make the bootable Disc Note If you only want to burn one me...

Page 4: ... Recovery and Utility Recovery and Utility tabs Diagnostics tab The Diagnostics tool is designed for use by IT professionals It is not likely you will need to use this tool When you select devices from the Diagnosis window then click Execute several tests are performed on the selected components Recovery tab The Recovery tab contains three tools Recovering User Configured System Backups Restoring ...

Page 5: ...Execute to start the recovery process 14 1 Recovery Disc Check will be in bold and the rest will be grayed out Follow the instructions and Insert the Recovery Disc 1 In some cases you may prompted to Insert the Recovery Disc 2 depending upon the size of the Recovery Image 15 Click Next to begin the check Click Next again when the check is complete 16 2 Initializing hard disk drive will be in bold ...

Page 6: ...e d origine 3 Dans la zone Images de sauvegarde sélectionnez Image d origine puis cliquez sur Créer DVD 4 Assurez vous que votre système dispose d un graveur de DVD interne ou externe Une fenêtre contex tuelle affiche les types de disques DVD R R pris en charge 5 Insérez un disque vierge et cliquez sur OK 6 Vous voyez apparaître une deuxième fenêtre contextuelle affichant Disque de restauration 1 ...

Page 7: ...e Une image système est un enregistrement de la configuration de votre unité de disque C à un moment précis Il est conseillé de faire occa sionnellement une copie de sécurité de l image système afin de pouvoir revenir à certains stades précédents sans avoir à revenir au tout début à l image d origine Par défaut les images de système sont enregistrées dans l unité de disque D à l intérieur du dossi...

Page 8: ...liquez sur Créer DVD 4 Assurez vous que la case de dénombrement affiche 4 pour les quatre images devant être dans la partition cachée image d origine disque PRA disque d applications et disque d amorçage Remarque Dans certains cas un 5 peut apparaître si l image d origine tient sur deux disques 5 Vous voyez apparaître le message Le disque de restauration 1 sera créé Inscrivez quelques com mentaire...

Page 9: ...e Si vous désirez vérifier changer la priorité d amorçage plutôt que de démarrer à partir d un disque dur ou d un lecteur de disquette externe exécutez les opérations suivantes 1 Mettez le système sous tension Lorsque le logo Fujitsu apparaît à l écran appuyez sur la touche Entrée ou cliquez avec le bouton gauche de la souris ou du pavé tactile TouchPad Le menu SecureCore s affichera 2 Dans le men...

Page 10: ...tion et Utili taires 6 Lorsque la boîte de dialogue Options de restauration du système apparaît choisissez une nouvelle configuration de clavier si nécessaire puis cliquez sur Suivant 7 Lorsque la boîte de dialogue Système d exploitation apparaît cliquez sur Suivant 8 Si nécessaire entrez votre mot de passe puis cliquez sur OK 9 Lorsque la fenêtre Options de restauration du système apparaît clique...

Page 11: ...fábrica 3 Seleccione la Imagen de fábrica que aparece en Imágenes de copia de seguridad y haga clic en Crear DVD 4 Asegúrese de tener una unidad de DVD grabable interna o externa conectada al sistema Aparecerá una ventana emergente con los tipos de medios DVD R R compatibles 5 Inserte un disco en blanco y haga clic en Aceptar 6 Aparecerá una segunda ventana emergente con la leyenda Disco de Recupe...

Page 12: ...omendable realizar copias de seguridad de la imagen del sistema periódicamente a fin de tener estados a los cuales regresar sin necesidad de volver a la imagen de fábrica De manera predeterminada las imágenes del sistema se guardan en la carpeta MyRecovery de la unidad D También puede optar por guardar la imagen en un disco duro externo 1 Haga clic en el icono MyRecovery del escritorio 2 Haga clic...

Page 13: ...a del disco de DAR y de otros discos Con el botón Administrar Cambiar también puede crear imágenes de copia de seguridad de la imagen de fábrica del disco de DAR del Disco de Aplicaciones o del disco de inicio 1 Inicie My Recovery desde el icono del escritorio 2 Seleccione Administrar Crear Imagen de fábrica 3 Seleccione la Imagen de fábrica que aparece en Imágenes de copia de seguridad y haga cli...

Page 14: ...ión y Herramientas con tres fichas Diagnóstico Recuperación y Her ramientas Tenga en cuenta que algunos modelos de LifeBook Stylistic no incluyen la ficha Diagnóstico cuando el subprograma Recuperación y Herramientas se ejecuta desde el disco duro Para restaurar el sistema operativo use el icono central Restauración de la imagen de fábrica sólo la unidad C de la ficha Recuperación Cómo ejecutar el...

Page 15: ... menú SecureCore 3 Resalte la opción CD DVD 4 Inserte el disco de inicio en la unidad de DVD y haga clic en Aceptar 5 Cuando aparezca la ventana Opciones de recuperación del sistema haga clic en Recuperación y Herramientas 6 Cuando se abra el cuadro de diálogo Opciones de recuperación del sistema seleccione un nuevo dis eño de teclado si es necesario y luego haga clic en Siguiente 7 Cuando aparezc...

Page 16: ...a société Phoenix Technologies Ltd Toutes les autres mar ques de commerce mentionnées dans le présent document appartiennent à leur propriétaire respectif Nous ne pou vons pas garantir l exactitude du contenu de ce document Nous réfutons toute responsabilité relative à des erreurs des omissions ou des modifications futures Para obtener más información llame al 1 877 372 3473 o visite nuestro sitio...

Reviews: