197
PRIMERGY TX120 User’s Guide
8
Con
figurin
g Hardwa
re
a
nd utili
ties
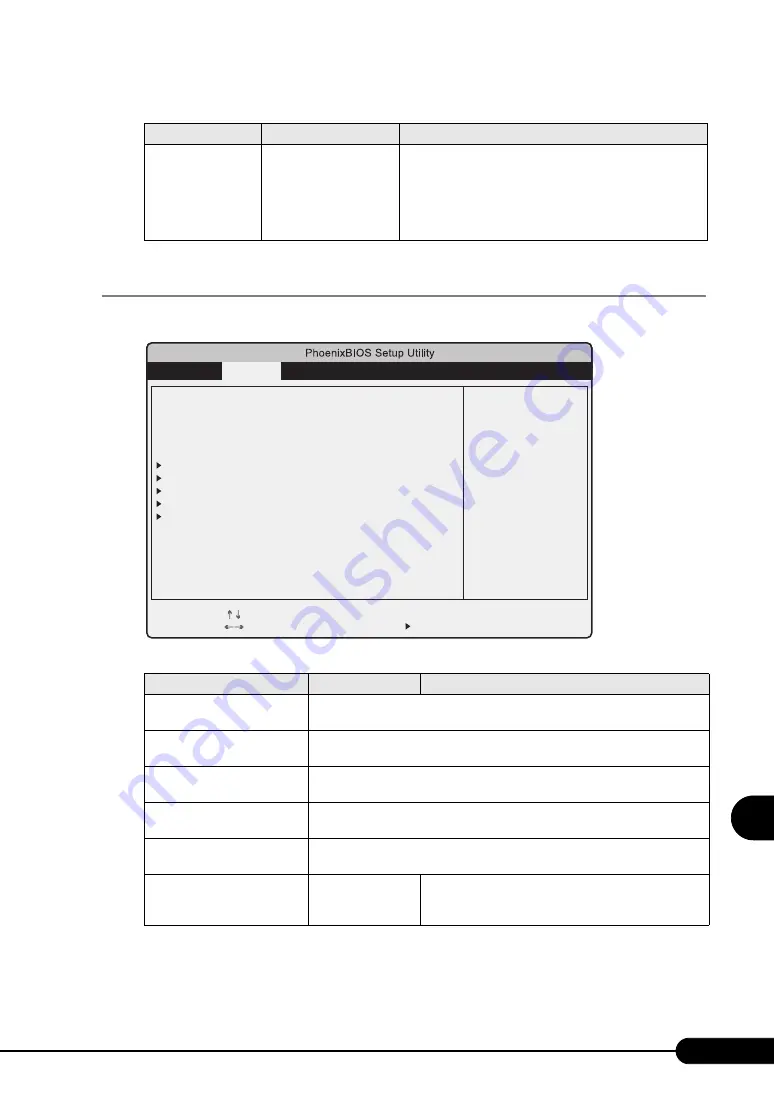
8.2.5 Advanced Menu
The [Advanced] menu sets the peripheral device and PCI device options.
Boot Sequence
• CD-ROM Drive
• Diskette
• Hard Drive
• Legacy LAN Card
• MBA V9.4.5 Slot
0900
The order of reading the OS is set by pressing [Enter].
Use the [+] [-] keys to change the order of priority for the
selected device. Booting from a selected device can be
disabled with the [Space] key. (The mark "!" is displayed by
the name of the disabled device.) If a non-existing device is
displayed, delete it from the list by pressing the [*] key.
table: Items on the Advanced Menu
Item
Setting
Description
Peripheral Configuration
Configures the serial port, parallel port, etc. Press the [Enter] key to display the
"8.2.6 Peripheral Configuration Submenu" (
pg.198) window.
PCI Configuration
Configures the PCI device. Press the [Enter] key to display the "8.2.7 PCI
Configuration Submenu" (
pg.199) window.
Advanced System
Configuration
Configures additional settings. Press the [Enter] key to display the "8.2.8
Advanced System Configuration Submenu" (
pg.200) window.
Power On/Off
Configures power On/Off settings. Press the [Enter] key to display the "8.2.9
Power On/Off Submenu" (
IPMI
Configures server management settings. Press the [Enter] key to display the
"8.2.10 IPMI Submenu" (
pg.202) window.
Reset Configuration Data
• Yes
• No (Initial value)
Sets whether or not to initialize the Extended System
Configuration Data (ESCD) where the system resources
are recorded.
table: Items on the Boot Options Submenu
Item
Setting
Description
Item Specific Help
Change Values
-/+
F9
Select Item
Select Menu
Select Sub-Menu
Enter
F1
Esc
Help
Exit
F10
Setup Defaults
Save and Exit
Advanced
Security
Server
Exit
Main
Peripheral Configuration
PCI Configuration
Advanced System Configuration
Power On/Off
IPMI
Reset configuration Data:
[No]
Setting items on this menu to incorrect values
may cause your system to malfunction.
Setup Warning
Summary of Contents for Primergy TX120
Page 6: ...6 ...
Page 12: ...12 ...
Page 122: ...122 Chapter 4 Manual OS Installation ...
Page 152: ...152 Chapter 5 Operations after OS Installation ...
Page 188: ...188 Chapter 7 Installing Hardware Options ...
Page 210: ...210 Chapter 8 Configuring Hardware and Utilities ...
Page 262: ...262 ...


