


36
Installing additional processors
Processors
©
c
ogn
it
a
s
.
G
e
s
e
lls
c
h
ft
f
ü
r T
e
c
h
ni
k
-D
o
k
u
m
e
n
ta
ti
o
n m
b
H
200
7
P
fad
: D
:\
A
k
tu
e
lle
s
_
P
roj
ek
t\
P
R
IM
E
RG
Y
\R
X
800
S
3
\og_
rx
80
0s
3_u
s
\R
X
800
S
2
u
S
3
_o
g_u
s
.k
0
6
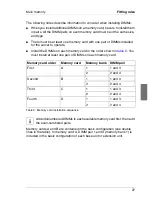
Inserting a new microprocessor
Ê
Touch the static-protective package that contains the new microprocessor to
any unpainted metal surface on the server; then, remove the microprocessor
from the package.
V
CAUTION!
To avoid bending the pins on the microprocessor, do not use
excessive force when pressing it into the socket.
Ê
Position the microprocessor over the microprocessor socket as shown in the
following illustration. Carefully press the microprocessor into the socket.
Figure 18: Inserting the microprocessor into the socket
Ê
Close the microprocessor release lever to secure the microprocessor.
Ê
Remove the heat sink from its package and remove the cover from the
bottom of the heat sink.
Ê
Position the heat sink above the microprocessor; then, press the heat sink
into place and close the heat-sink release lever.
Microprocessor
orientation indicator
Microprocessor
release lever
Microprocessor
connector
Microprocessor


