background image

BX620 S6

Options Guide

49

Storage module variants

Installing the BBU card

Before installing the BBU card on the riser card, please check the following:

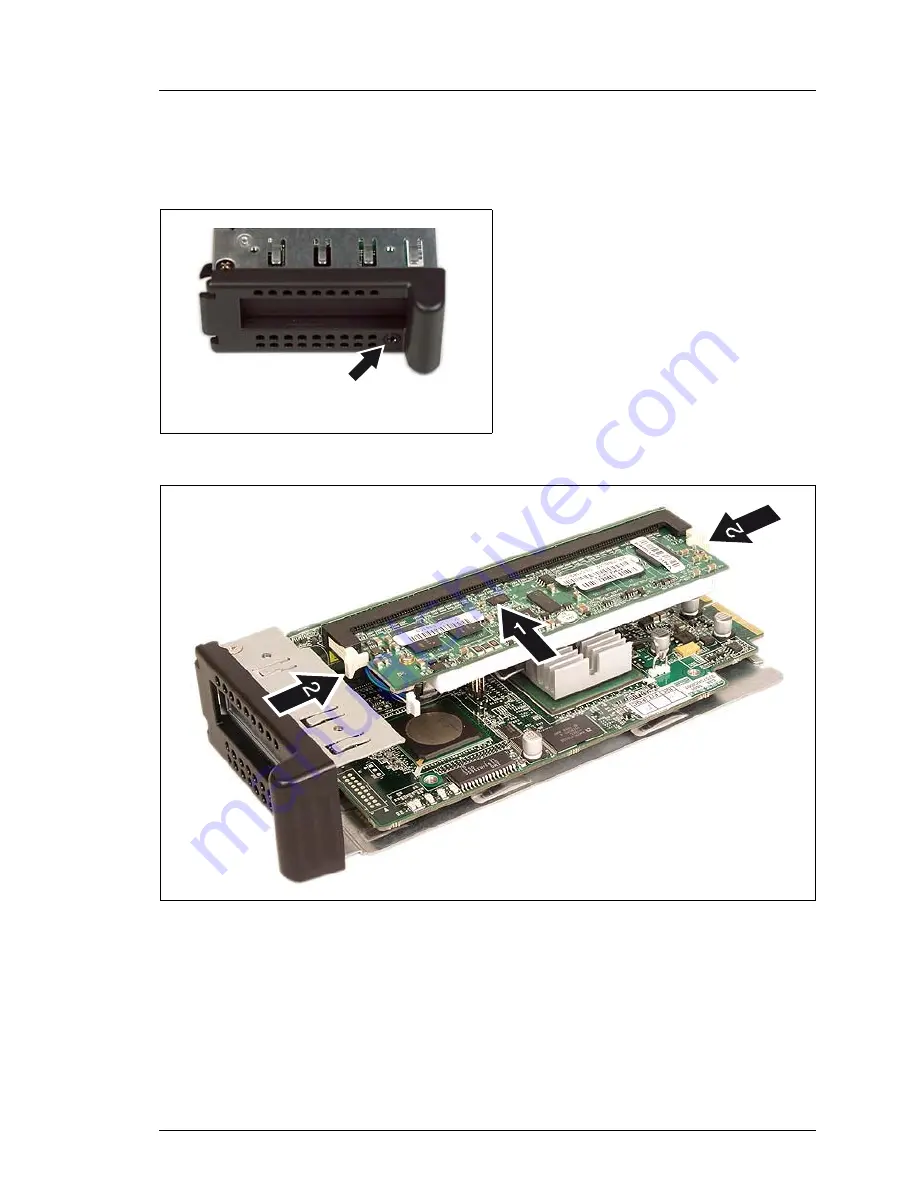
Figure 28: Connector for the BBU cable

Figure 29: Installing the BBU card

Ê

Push the BBU card into the slot on the riser card (1) as far as it will go.

Ê

Let the two ejection tabs on the right and left engage in the notches of the 
BBU card (2).

How to install the storage module in the server blade is described in the 
following section.

I

Make sure the BBU cable is 
plugged in (see circle).

Summary of Contents for PRIMERGY BX620 S6

Page 1: ...Options Guide English PRIMERGY BX620 S6 Server Blade Options Guide August 2010 ...

Page 2: ...ation mbH 2010 Pfad C Programme FCT tim_app tim_local work PICHOL OBJ_DOKU 7372 001 fm Copyright 2010 Fujitsu Technology Solutions GmbH All rights reserved Delivery subject to availability right of technical modifications reserved All hardware and software names used are trademarks of their respective manufacturers The contents of this manual may be revised without prior notice Fujitsu assumes no ...

Page 3: ...the mouse and keyboard are limited life components Use of these components beyond their operating life may result in electrolyte leakage or depletion potentially causing emission of foul odor or smoke As a guideline in a normal office environment 25 C operating life is not expected to be reached within the maintenance support period 5 years However operating life may be reached more quickly if for...

Page 4: ...llows the guidelines of Voltage Dip Immunity of Personal Computer issued by JEITA the Japan Electronics and Information Technology Industries Association Technology controlled by the Foreign Exchange and Foreign Trade Control Law of Japan Documents produced by Fujitsu may contain technology controlled by the Foreign Exchange and Foreign Trade Control Law of Japan Documents which contain such techn...

Page 5: ...nly for the Japanese market I Although described in this manual some sections do not apply to the Japanese market These options and routines include CSS Customer Self Service USB Flash Module UFM Replacing the lithium battery ...

Page 6: ...OptionsGuide BX620 S6 cognitas Gesellschft für Technik Dokumentation mbH 2010 Pfad C Programme FCT tim_app tim_local work PICHOL OBJ_DOKU 7372 001 fm ...

Page 7: ... 1 4 Structure of the server blade 13 1 5 Notational conventions 15 2 Procedure 17 3 Safety instructions 19 4 Preparation 23 4 1 Opening the server blade 23 5 Processors 27 5 1 Installing a second processor 27 6 Memory modules 33 6 1 Fitting rules 35 6 2 Upgrading replacing the main memory 36 7 Optional I O modules 37 7 1 Installing an I O daughter card 40 ...

Page 8: ...p tim_local work PICHOL OBJ_DOKU 7373 001 fm 8 Storage modules 43 8 1 Storage module variants 44 8 1 1 BX620 S6 SAS storage module 44 8 1 2 BX620 S6 SAS PCI Express storage module 45 8 1 3 BX620 S6 SAS RAID storage module 47 8 2 Replacing a storage module 50 9 Completion 53 9 1 Closing the server blade 53 Index 55 ...

Page 9: ...HDD SSD configurations for different usage scenarios The configuration options range from the low cost platform with SATA hard disks up to the high end platform with SAS hard disks and a SAS storage module with RAID5 and Cache iTBBU As an option the communications interfaces can be extended by two Fibre Channel channels or two additional Ethernet channels 1 1 Concept and target groups of this manu...

Page 10: ...mentation available on the Internet can be found using the URL for EMEA market http manuals ts fujitsu com The PRIMERGY server documentation can be accessed using the Industry standard servers navigation option More information on your PRIMERGY BX620 S6 can be found in the following documents PRIMERGY BX620 S6 Server Options Guide PRIMERGY BX620 S6 Server Service Supplement Technical manual for th...

Page 11: ...cities 2 GB 4 GB 8 GB and 16 GB I A combination of both memory module types is not allowed Optional I O module The server blade has one slot for an extension board daughter card which can be used to provide two Fibre Channel connections or two additional Ethernet connections The following I O modules are available 4 Gbit Fibre Channel daughter card PCIe 1 Gbit Ethernet daughter card PCIe To be abl...

Page 12: ...10 Pfad C Programme FCT tim_app tim_local work PICHOL OBJ_DOKU 7374 001 fm Storage modules can be installed replaced via the front of the server blade without having to remove the housing cover However they cannot be replaced while the system is running non hot plug the server blade must be switched off ...

Page 13: ... Guide 13 Structure of the server blade 1 4 Structure of the server blade Figure 1 PRIMERGYBX620 S6 server blade The figure 1 shows the positions of the most important components of the server blade 6 7 8 0 1 2 3 4 5 9 ...

Page 14: ...itions 1 I O daughter card Fibre Channel or Gigabit Ethernet daughter card optional 2 CPU 2 with heat sink 3 Slots for the CPU 2 memory modules 4 USB Flash Module UFM 5 Lithium battery on the system board 6 Trusted Platform Module TPM 7 Control panel board with foil cable 8 2 5 inch hard disk module 1 SAS or SATA 9 2 5 inch hard disk module 2 SAS or SATA 10 Storage module 11 Slots for the CPU 1 me...

Page 15: ...BIOS enabled OFF Restore system BIOS disabled Switch 4 ON Reserved OFF Reserved Switch 5 ON Reserved OFF Reserved Switch 6 ON Reserved OFF Reserved Text in italics indicates commands or menu items Quotation marks indicate names of chapters and terms that are being emphasized Ê describes activities that must be performed in the order shown V CAUTION pay particular attention to texts marked with thi...

Page 16: ...16 OptionsGuide BX620 S6 Notational conventions cognitas Gesellschft für Technik Dokumentation mbH 2010 Pfad C Programme FCT tim_app tim_local work PICHOL OBJ_DOKU 7374 001 fm ...

Page 17: ...afety instructions on page 19 Ê Make sure that all the manuals you need see Documentation overview on page 10 are available printing out the PDF files if necessary You will definitely need the operating manual for the server blade and the Service Supplement Ê Shut down the server blade correctly switch it off and remove it from the basic unit as described in the chapter Preparation on page 23 Ê Ex...

Page 18: ...18 OptionsGuide BX620 S6 Procedure cognitas Gesellschft für Technik Dokumentation mbH 2010 Pfad C Programme FCT tim_app tim_local work PICHOL OBJ_DOKU 7375 001 fm ...

Page 19: ...unauthorized interference with the system will void the warranty and exempt the manufacturer from all liability Any failure to observe the guidelines in this manual and any improper repairs could expose the user to risks electric shock energy hazards fire hazards or damage the equipment Before installing removing internal options to from the server blade turn off the server blade all peripheral de...

Page 20: ...s Ethernet and or of category 5e for Gigabit Ethernet The requirements of the specification ISO IEC 11801 must also be taken into account Route the cables in such a way that they do not form a potential hazard tripping and cannot be damaged When connecting the device refer to the relevant notes in the operating manual Do not connect or disconnect any data transmission cables during a thunderstorm ...

Page 21: ...rranty will be invalidated You may only set the resolutions and refresh rates specified in the operating manual for your monitor Otherwise you may damage the monitor If you are in any doubt contact your sales outlet or customer service center Batteries V CAUTION Incorrect replacement of batteries may lead to a risk of explosion The batteries may only be replaced with identical batteries or with a ...

Page 22: ...ower outlets before installing or removing components with ESDs You must always discharge static build up e g by touching a grounded object before working with such components Any devices or tools that are used must be free of electrostatic charge Wear a suitable grounding cable that connects you to the external chassis of the system unit Always hold components with ESDs at the edges or at the poi...

Page 23: ... Ê Exit all applications and shut down the server blade correctly Ê Press the On Off button on the server blade control panel Removing the server blade from the basic unit Figure 3 Removing the server blade Ê Press the two green touch points 1 to unlock the ejection levers Ê Open out the two ejection levers 2 simultaneously to disengage the server blade 1 1 2 2 ...

Page 24: ...ning the server blade cognitas Gesellschft für Technik Dokumentation mbH 2010 Pfad C Programme FCT tim_app tim_local work PICHOL OBJ_DOKU 7377 001 fm Figure 4 Removing the server blade Ê Pull the server blade out of the basic unit ...

Page 25: ...emoving the cover Ê Press the two touch points 1 of the cover simultaneously to disengage it and slide back the cover as far as it will go in the direction of the arrow 2 Ê Take off the cover plate The server blade components are now freely accessible see figure 1 on page 13 1 1 2 ...

Page 26: ...26 OptionsGuide BX620 S6 Opening the server blade cognitas Gesellschft für Technik Dokumentation mbH 2010 Pfad C Programme FCT tim_app tim_local work PICHOL OBJ_DOKU 7377 001 fm ...

Page 27: ...t place it on an insulated antistatic surface with the smooth side down Never slide a processor over a surface 5 1 Installing a second processor If only one processor is installed in your server blade you can upgrade it to include a second one V CAUTION Always use processors of the same type All processors must have the same frequency capacity and organization For multi processor operation use a s...

Page 28: ...as Gesellschft für Technik Dokumentation mbH 2010 Pfad C Programme FCT tim_app tim_local work PICHOL OBJ_DOKU 7378 001 fm Removing the dummy heat sink Figure 6 Removing the dummy heat sink Ê Undo the two screws which fasten the dummy heat sink and remove it 2 2 1 ...

Page 29: ... locking lever of the processor socket Ê Press the locking lever of the processor socket out of its locking position arrows and swivel it upward Figure 8 Opening the locking frame of the processor socket Ê Open up the locking frame of the processor socket and take off the black protective cover arrow 1 2 ...

Page 30: ...schft für Technik Dokumentation mbH 2010 Pfad C Programme FCT tim_app tim_local work PICHOL OBJ_DOKU 7378 001 fm Figure 9 Inserting the processor Ê Place the processor in the socket making sure the marks on the processor point to the corresponding marks on the socket a a ...

Page 31: ...0 Closing the locking frame of the processor socket Ê Close the locking frame of the processor socket 1 swivel the locking lever downward 2 and lock it under the small clip a that is attached to the socket Installing the heat sink Figure 11 Processor heat sink 1 2 a ...

Page 32: ...nk Ê Carefully place the heat sink onto the CPU Ê Fix the heat sink by fastening the four premounted screws in diagonally opposite sequence V CAUTION Never install a processor without a heat sink The processor is likely to overheat which may cause damage to the processor and the system board Ê Close the server blade place it in the system unit and switch on the server blade as described in the cha...

Page 33: ...red DIMMs Figure 13 Main memory organization logical view Each slot can be fitted with 1 GB 2 GB 4 GB 8 GB or 16 GB memory modules This allows a maximum memory configuration of 24 GB with UDIMMs capacities 1 GB and 2 GB and 192 GB with RDIMMs capacities 2 GB 4 GB 8 GB or 16 GB I A combination of UDIMM and RDIMM memory modules is not allowed CPU 1 Cha nnel A Cha nnel B Cha nnel C DIM M 2B DIM M 1B ...

Page 34: ...page 33 can be used maximum 64 GB The channels B and E are for failure protection purposes only They contain the mirrored data from channels A and D Channels C and F are not used Performance Channel Mode high memory configuration with high security The populated memory of the 6 channels A F can be used completely max 192 GB Spare channel mode large population and large security Only the populated ...

Page 35: ...annel DIMM 1C DIMM 1B DIMM 1A DIMM 2B DIMM 2A DIMM 2C CPU 1 Independent Channel Mode Mirrored Channel Mode Performance Channel Mode required UHTXLUHG LI QG 38 LV FRQŰJXUHG optional same type in bank per CPU optional any type not used DIMM 1C DIMM 1B DIMM 1A DIMM 2B DIMM 2A DIMM 2C CPU 1 DIMM 1C DIMM 1B DIMM 1A DIMM 2B DIMM 2A DIMM 2C CPU 2 DIMM 2D DIMM 2E DIMM 2F DIMM 1E DIMM 1F DIMM 1D DIMM 2D DI...

Page 36: ...on on page 23 Figure 15 Removing a memory module Ê Flip out the fastening tabs on both sides of the relevant slot 1 Ê If the slot was filled pull the memory module out of the slot 2 Figure 16 Installing a memory module Ê Flip out the fastening tabs on both sides of the slot Ê Carefully press the memory module into the slot 1 until the fastening tabs on both sides of it engage 2 Ê Close the server ...

Page 37: ...the BX620 S6 server blade 4 Gbit Fibre Channel daughter card PCIe 1 Gbit Ethernet daughter card PCIe I To be able to use the additional I O functionality at least one FC I O blade or an Ethernet I O blade must be installed in slots NET3 and or NET4 of the BX600 S3 basic unit For further information on I O blades see the operating manual for your basic unit It is not possible to install a combinati...

Page 38: ... Gbit Fibre Channel daughter card PCIe The 4 Gbit FC daughter card PCIe provides two independent serial 1 2 4 Gbit s FC ports It is fitted with an Emulex chip and supports multiple FC storage subsystems of the corresponding versions I The 4 Gbit FC daughter card can only be used in combination with the 4 4 Gbit FC switch blade For further information see the operating manual for your BX600 S3 basi...

Page 39: ...it Ethernet daughter card PCIe Figure 18 Gbit Ethernet daughter card PCIe The 1 Gbit Ethernet daughter card PCIe has two Broadcom 5708S chips and provides two 1 Gbit s Ethernet ports TOE TCP IP Offload Engine and iSCSI are supported ...

Page 40: ... OBJ_DOKU 7380 001 fm 7 1 Installing an I O daughter card V CAUTION Please observe the safety information in the chapter Safety instructions on page 19 Ê Remove the server blade from the basic unit and open it as described in the chapter Preparation on page 23 Figure 19 Position for an I O daughter card Ê Plug the I O daughter card onto the two sockets see arrows ...

Page 41: ...BX620 S6 Options Guide 41 Installing an I O daughter card Figure 20 Installing an I O daughter card Ê Fasten the I O daughter card with three screws see arrows ...

Page 42: ...42 OptionsGuide BX620 S6 Installing an I O daughter card cognitas Gesellschft für Technik Dokumentation mbH 2010 Pfad C Programme FCT tim_app tim_local work PICHOL OBJ_DOKU 7380 001 fm ...

Page 43: ...the housing cover The following figure shows the position of the storage module in the open server blade Figure 21 Position of the storage module in the server blade There are three storage module variants with SAS hard disk controllers available which can also have additional optional functions SAS storage module SAS RAID storage module SAS PCIe storage module this variant allows the installation...

Page 44: ...BJ_DOKU 7381 001 fm 8 1 Storage module variants This section introduces the different storage modules and describes the installation of the optional extensions 8 1 1 BX620 S6 SAS storage module This storage module supports RAID 1 with Advanced Error Logging Figure 22 BX620 S6 SAS storage module 1 Connection to system board 2 SAS controller 3 Front panel 0 1 ...

Page 45: ... storage module This storage module supports RAID 1 with Advanced Error Logging and allows the installation of a low profile PCI Express card Figure 23 BX620 S6 SAS PCI Express storage module 1 Connection to system board 2 SAS controller 3 Front panel 4 PCI Express riser card 0 1 2 ...

Page 46: ...eed as follows Figure 24 Opening the front panel Ê Open out the front panel to the left Figure 25 Installing the PCI card Ê Push the PCI card into the slot on the riser card 1 as far as it will go Ê Secure the PCI card with a screw 2 How to install the storage module in the server blade is described in the section Replacing a storage module on page 50 Ê Undo the screw which secures the front panel...

Page 47: ...rage module This storage module supports RAID 0 1 as standard and optionally RAID 5 with a 256 MB DDR2 Cache iTBBU card Figure 26 BX620 S6 SAS RAID storage module 1 Riser card for a BBU card 2 Connection to system board 3 SAS controller 4 Socket for the RoMB activation key 0 1 2 ...

Page 48: ...m_app tim_local work PICHOL OBJ_DOKU 7381 001 fm To install a BBU card in the storage module proceed as follows Installing the RoMB activation key Figure 27 Installing the RoMB activation key Ê Place the RoMB activation key in the round socket see arrow V CAUTION Make sure the writing on the RoMB activation key is facing upward ...

Page 49: ...ector for the BBU cable Figure 29 Installing the BBU card Ê Push the BBU card into the slot on the riser card 1 as far as it will go Ê Let the two ejection tabs on the right and left engage in the notches of the BBU card 2 How to install the storage module in the server blade is described in the following section I Make sure the BBU cable is plugged in see circle ...

Page 50: ...in the chapter Safety Instructions on page 19 You must switch off the server blade before replacing the storage module non hot plug All variants of the storage module are installed and removed in the same way This section shows the required steps Removal Figure 30 Undoing the screws on the storage module Ê Undo the two screws 1 which fasten the storage module to the frame of the server blade Ê Und...

Page 51: ...igure 31 Removing the storage module Installation To install a storage module follow the steps in reverse order Ê Open out the front panel 1 as shown in the figure This unlocks the storage module Ê Pull the storage module out of the server blade chassis 2 ...

Page 52: ...52 OptionsGuide BX620 S6 Replacing a storage module cognitas Gesellschft für Technik Dokumentation mbH 2010 Pfad C Programme FCT tim_app tim_local work PICHOL OBJ_DOKU 7381 001 fm ...

Page 53: ... the cover of the server blade on the housing at a distance of 1 2 cm from the frame such that the cover lies flush with the edges on both sides Ê Push the cover forward in the direction of the arrow see figure 32 until it engages Ê Insert the server blade in the basic unit I To insert the server blade follow the procedure described in Removing the server blade from the basic unit on page 23 in re...

Page 54: ...54 OptionsGuide BX620 S6 Closing the server blade cognitas Gesellschft für Technik Dokumentation mbH 2010 Pfad C Programme FCT tim_app tim_local work PICHOL OBJ_DOKU 7382 001 fm ...

Page 55: ...install Ethernet I O module 39 Fibre Channel I O module 38 memory modules 36 processor 27 storage modules 43 L lithium battery 21 M main memory fitting rules 35 upgrade 36 meaning of the symbols 15 memory operating modes 34 upgrade options 11 memory modules fitting rules 35 install 36 N notational conventions 15 P processor overheating 32 R RDIMM memory modules 11 S server blade close 53 component...

Page 56: ...56 OptionsGuide BX620 S6 Index cognitas Gesellschft für Technik Dokumentation mbH 2010 Pfad C Programme FCT tim_app tim_local work PICHOL OBJ_DOKU 7383 001 fm ...

Reviews: