background image

E-27

Engli

sh

Deuts

ch

Esp

a

ñol

Fran

ç

ais

Italiano

Portu

g

u

ê

s

日 本 語

Póññêèé

中文

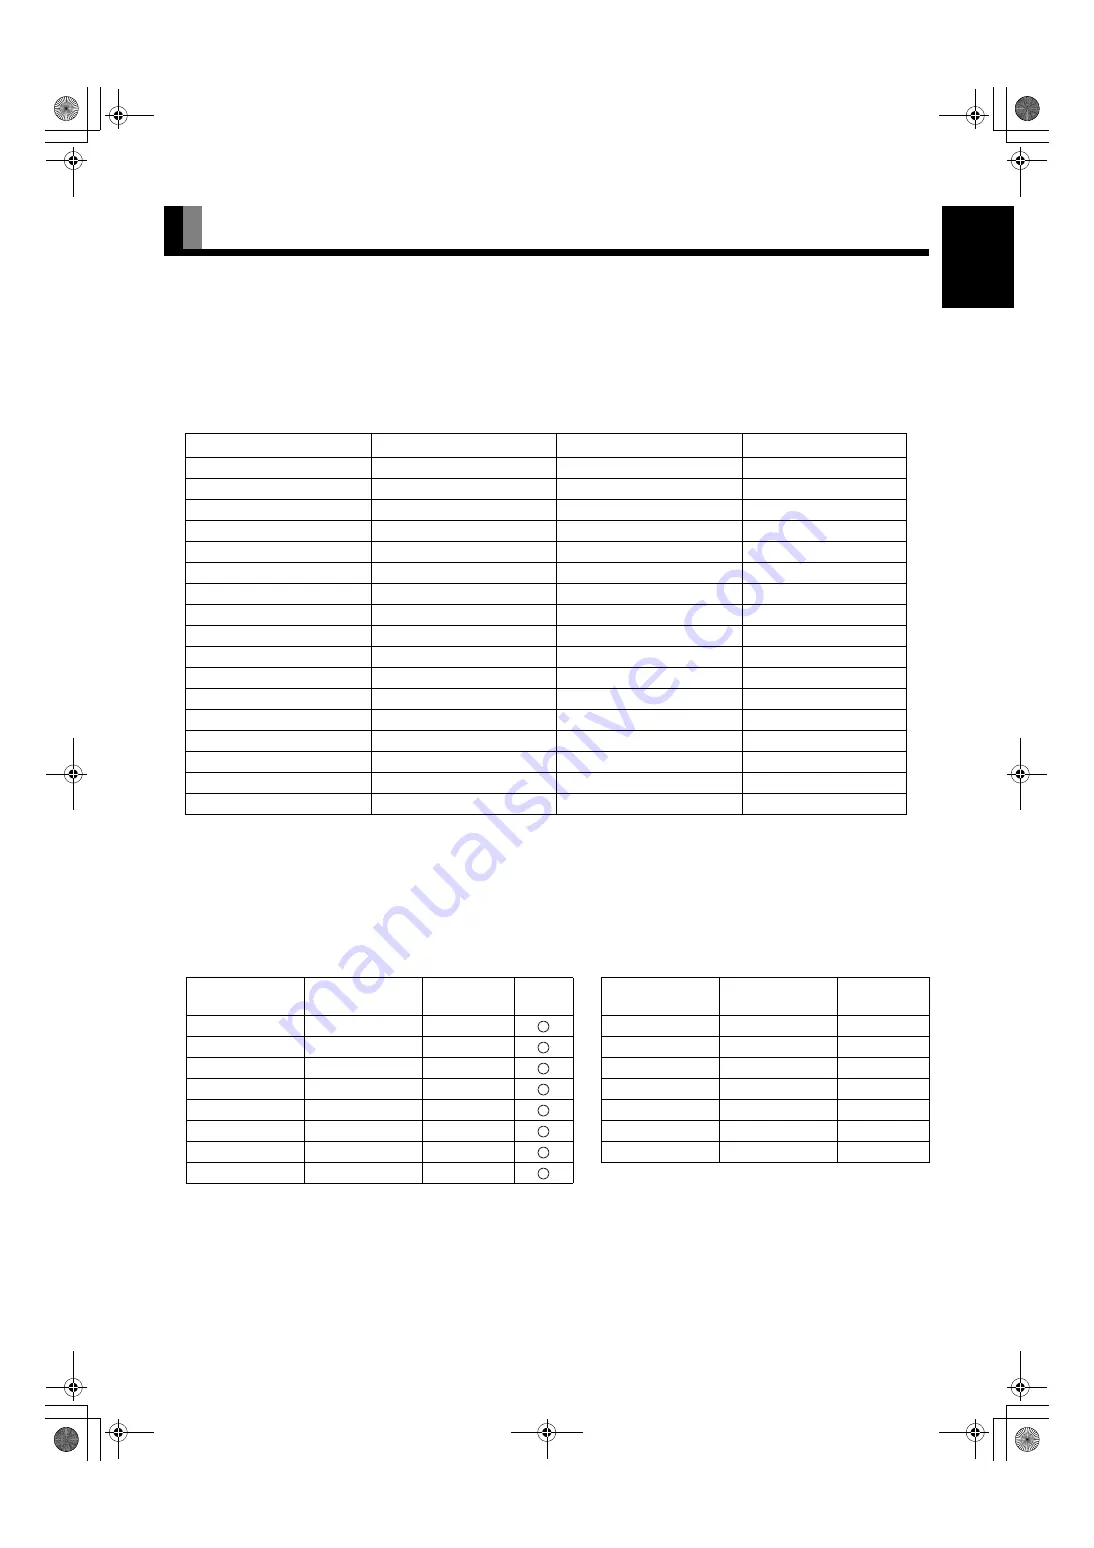
MAIN SUPPORTED SIGNALS

The plasma display can store up to four types of signals for RGB adjustment values. The plasma display uses the first-in, first-out method; 
therefore, the first input signal is cleared when the fifth one is input. 

Input the signal you want to store and adjust to a desired screen according to “ADJUSTING SCREEN POSITION AND SIZE”. 

When the adjustment has been made, it is automatically stored. Thus, when the plasma display receives the same signal later, pictures will 
be displayed in accordance with the adjustment value most recently stored.

Main corresponding signals (RGB mode)

• With some input signals, “Out of range” may appear or the image may appear in black and white when the horizontal and vertical 

frequencies are outside their permissible ranges, or even when the frequencies are within their permissible ranges. In this case, match the 
input signal to a different frequency in the above table.

It doesn’t support the model with 42” display (displayed pixels 852 x 480 dots x lines).

In the Comp.video and Video/S-video modes, the display has been factory-set as follows for different input signals: 

Main corresponding signals (Comp.video, HDMI mode)

Main corresponding signals (Video, S-video mode) 

Display (dots x lines)

Horizontal frequency (kHz)

Vertical frequency (Hz)

Signal

640 x 480

31.47

59.94

VGA

640 x 480

37.50

75.00

VGA 75 Hz

640 x 480

43.27

85.01

VGA 85 Hz

720 x 400

31.47

70.09

400 lines

800 x 600

37.88

60.32

SVGA 60 Hz

800 x 600

46.88

75.00

SVGA 75 Hz

800 x 600

53.67

85.06

SVGA 85 Hz

1024 x 768

48.36

60.00

XGA 60 Hz

1024 x 768

60.02

75.03

XGA 75 Hz

1024 x 768

68.68

84.99

XGA 85 Hz

1280 x 1024

63.98

60.02

SXGA 60 Hz

*

1280 x 1024

79.98

75.03

SXGA 75 Hz

*

848 x 480

31.02

60.00

852 x 480

31.72

59.97

1360 x 768

47.71

60.01

720 x 485

15.73

59.94

60 fields

720 x 575

15.63

50.00

50 fields

Horizontal 

frequency (kHz)

Vertical 

frequency (Hz)

Signal HDMI

Horizontal 

frequency (kHz)

Vertical

 frequency (Hz)

Signal

15.73

59.94

SDTV 480i

15.73

59.94

NTSC

15.63

50.00

SDTV 576i

15.63

50.00

PAL

31.47

59.94

SDTV 480p

15.63

50.00

SECAM

31.25

50.00

SDTV 576p

15.63

59.52

PAL60

45.00

60.00

HDTV 720p

15.63

50.00

N-PAL

37.50

50.00

HDTV 720p

15.73

59.95

M-PAL

33.75

60.00

HDTV 1080i

15.73

59.94

4.43NTSC

28.13

50.00

HDTV 1080i

Note

• Depending on the input signal, the display may show pictures of reduced size due to size reduction and interpolation. 
• You can check input signals through 

Information

 on the FEATURES Menu screen.  (See P. E-24.) 

• In order to facilitate the explanations, pictures and diagrams in this manual may differ slightly from the actual items. 
• All terms (i.e., company and product names) used in this document are trademarks or registered trademarks. 

7619_E.book  27 ページ  2006年10月11日 水曜日 午後8時18分

Summary of Contents for P63XHA51

Page 1: ...selected at Language of the on screen display colour will be displayed in the case of the E model and color will be displayed for all other models The notation used in this user s manual is color The last digit of MODEL NO 10 digit alphanumeric characters indicated on the product means the body color indication alphabet or the management number The Illustration of external appearance is for 42 mod...

Page 2: ...st E 17 Drive Contrast E 17 Brightness E 17 Color E 17 Tint E 17 Sharpness E 17 Ambient Sensor E 17 Picture Mode E 18 Color Temp E 18 Picture Memory E 18 ADJUSTING SCREEN POSITION AND SIZE E 19 Screen Position E 19 Screen Size E 19 ADJUSTING AUDIO E 20 Treble E 20 Bass E 20 Balance E 20 Loudness E 20 OTHER ADJUSTMENTS E 21 ADJUSTMENT E 21 Dot Clock E 21 Clock Phase E 21 Clamp Position E 21 Auto Ca...

Page 3: ...ration Be careful of the air emitted by the radiator fan as it may be hot Contact your dealer when causing a bad influence to the plasma display and other audio visual equipment mutually You may need to move your plasma display if it produces degraded pictures or noise due to electromagnetic radiation or if the infrared remote control does not function properly Pictures may not be displayed proper...

Page 4: ...isplay to prevent it from tipping over Display Section The ferrite cores are used to reduce noise Attach them correctly as shown in the following illustrations Be sure to turn off power of the plasma display and external equipment before making any connections Carefully check the terminals for position and type before making any connections Loose connectors can result in picture or color problems ...

Page 5: ...ontrol signal receiver Receives the signals from the remote control Ambient Sensor Detects the brightness of ambient light It is important not to obstruct it for full functionality of the feature DISPLAY SECTION BACK Warning If the power indicator lamp flashes red or green this signifies that the plasma display has developed a problem When this happens be sure to remove the power plug from the rec...

Page 6: ...eo input terminal VIDEO3 INPUT Component video input terminal VIDEO4 INPUT Connect this terminal to the Component video output terminal of DVD recorder player or satellite receiver Video input terminal VIDEO1 INPUT Connect this terminal to the video output terminal of your VCR S Video input terminal VIDEO2 INPUT Connect this terminal to the S video output terminal of your VCR Audio3 input terminal...

Page 7: ... 2 RD Received Data 3 TD Transmit Data 4 DTR Data Terminal ready 5 GND Ground 6 DSR Data Set Ready 7 RTS Request To send 8 CTS Clear To Send 9 RI Ring Indication HDMI input terminal VIDEO5 6 INPUT HDMI Pin No Input signal Pin No Input signal 1 T M D S Data2 11 T M D S Clock Shield 2 T M D S Data2 Shield 12 T M D S Clock 3 T M D S Data2 13 CEC 4 T M D S Data1 14 Reserve 5 T M D S Data1 Shield 15 DD...

Page 8: ...a Picture Memory WIDE button Î E 13 Press to switch the screen size Video input mode selector button Î E 11 Press to select VIDEO1 6 Press to select VIDEO1 5 Model P42VHA RGB input mode selector button Î E 12 Press to select RGB1 12 Volume adjustment buttons Î E 11 Press to adjust the volume MENU button Î E 16 E 25 Press to display or hide the menu screen Use for picture or audio adjustment ENTER ...

Page 9: ...wards while pressing it down 2 Place two AA batteries in the remote control Make sure that the batteries are properly oriented 3 Close the cover until it snaps into place PRECAUTIONS EFFECTIVE RANGE FOR THE REMOTE CONTROL CAUTION It is very important to use replacement batteries of the same type as the originally used Do not use rechargeable batteries Ni Cd etc When disposing of used batteries ple...

Page 10: ... connecting a PC differs with the PC model please consult your dealer for information on the right cable to purchase DVD RECORDER PLAYER SATELLITE TUNER VCR PC To S video output To video output To component video outputs To audio outputs Antenna commercially available product To HDMI output To HDMI input To video input To S video input To audio inputs Display bottom To component video inputs To vi...

Page 11: ...restore the audio to the original level The mute mode can also be released by pressing the volume buttons VIDEO INPUT MODE 1 Press to select the input mode You can select from VIDEO1 mode to VIDEO6 mode The video modes corresponding to each input terminal are as follows VIDEO1 Video VIDEO2 S video VIDEO3 Component video VIDEO4 Component video VIDEO5 HDMI VIDEO6 HDMI Model P42VHA does not have this...

Page 12: ...tch between the set status and the fine mode For the picture mode settings see Picture Mode P E 18 Picture Memory Press 5 This button can be used to recall the settings of the picture memories 1 8 Each time this button is pressed the setting changes as follows For the picture memory settings see Picture Memory P E 18 You can also use the buttons on the display s control panel to perform these step...

Page 13: ...of burn in when watching in the Normal we recommend you set the Background to Light Gray See P E 24 When a residual image was created it is reduced by using the White Screen settings Note that there may also be cases when it can not be recovered completely See P E 24 A variety of Screen Sizes are available with this display Remember that if you select a mode with an aspect ratio ratio of frame wid...

Page 14: ...asy to read however depending on the picture The Zoom mode display method may be different depending on the input signal The following aspect ratios are available 4 3 aspect ratio 16 9 aspect ratio VHF UHF broadcasting BS broadcasting HDTV broadcasting 1 85 1 aspect ratio 2 35 1 aspect ratio Vista Vision size Cinema Scope size SCREEN SIZE ASPECT RATIO Picture of standard size Wide1 Vertically exte...

Page 15: ... E 18 Default POSITION SIZE E 19 Position E 19 Size E 19 Default AUDIO E 20 Treble E 20 Bass E 20 Balance E 20 Loudness E 20 FEATURES E 21 Adjustment E 21 Dot Clock E 21 Clock Phase E 21 Clamp Position E 21 Auto Calibration E 21 On Screen Menu E 21 OSD E 21 Language E 21 Name Select E 22 Input Terminal E 22 Video Input E 22 S video Input E 22 D SUB Input E 22 Others E 23 Auto Off NO SIG E 23 Audio...

Page 16: ...Press E or F to change tint values F More greenish colors E More purplish colors 6 Press to store 7 Press when you finish Repeat steps 3 4 5 and 6 when you wish to make changes to other options Select Default and press The PICTURE items are changed back to the default settings available when the plasma display was purchased Press to halt the operation in progress PICTURE selected in the main menu ...

Page 17: ... Color Press F to darken the color Press E to lighten the color Press to store Tint Press F to change the tint to a more greenish color Press E to change the tint to a more purplish color Press to store Sharpness Press F to sharpen the Sharpness Press E to soften the Sharpness Press to store Ambient Sensor Ambient Sensor can be set Automatically adjusts the picture quality to an optimized level th...

Page 18: ...e Cor Dto select Memory 1 8 When is pressed the values becomes the picture adjustment values stored in the selected Memory Save Use C or D to select Memory 1 8 If is pressed the current picture adjustment values are stored to the selected Memory Natural Enables you to watch pictures with natural color tones and high picture clarity This mode is suitable for watching movies or TV Fine Best for watc...

Page 19: ...re you need to select a desired input mode before making any changes Screen Position Horizontal position Horizontal F Moves screen to the right E Moves screen to the left Vertical position Vertical C Moves screen up D Moves screen down Press to store Screen Size Screen width Width F Increases width E Reduces width Screen height Height C Increases height D Reduces height Press to store POSITION SIZ...

Page 20: ...t Press to store Loudness Corrects the balance between bass and treble for easy listening even with weak volume Each time you press E or F one of the available choices appears in the following sequence Off On Press to store AUDIO Menu screen Note If the operation is not executed for about 60 seconds the menu disappears Depending on the model or the optional devices some of the functions may not be...

Page 21: ...the screen 1 Select Language and press The Language selection screen will appear 2 Press C or D to select your desired language English Deutsch German Español Spanish Français French Italiano Italian Nederlands Dutch Ðóññêèé Russian 3 Press The menu is displayed in the selected language ADJUSTMENT Adjustment Item Contents of Adjustments Operation Dot Clock mD sub You may find the vertically stripe...

Page 22: ...uto1 Auto2 NTSC PAL SECAM PAL60 N PAL M PAL 4 43NTSC Auto1 Automatically selects NTSC PAL and SECAM Auto2 Automatically selects NTSC and M PAL Other than Auto You need to select a system appropriate to the input signal Press to store D SUB Input Terminal You can use this option to select the signal system it will receive to D SUB Input terminal 1 Select D SUB Input and press D SUB Input screen app...

Page 23: ...oices appears in the following sequence No Audio Audio1 Audio2 No Audio No audio in the corresponding mode Audio 1 3 Selects Audio 1 through 3 for receiving audio in the corresponding mode Audio 4 5 HDMI There is also Audio Input that cannot be selected Repeat steps 2 and 3 for each piece of input equipment 4 Press to store AUDIO menu will not be displayed when No Audio is selected Screen Orbiter ...

Page 24: ... to minimize phosphor burn in Each time you press E or F one of the available choices appears in the following sequence Off On Press to store Background When the screen size was set to Normal to reduce burn in the brightness of the part at which left and right images are not displayed can be set Normally we recommend that Light Gray be used Each time you press E or F the settings is switched Black...

Page 25: ...e following sequence PICTURE POSITION SIZE AUDIO FEATURES FACTORY DEFAULT The FACTORY DEFAULT Menu screen will appear 3 Press Displays the message of whether to proceed with the initialization 4 Press C or D to select the Yes 5 Press The message of having completed the initialization will be displayed after initializing 6 Press when you finish FACTORY DEFAULT selected in the main menu screen Displ...

Page 26: ... P SP5010 for attaching to the display for 55 model P SP6300 for attaching to the display for 63 model P SP4200 for mounting on the speaker stands for 42 model P SP5010 for mounting on the speaker stands for 50 model 55 model 63 model Desktop Speaker Stand 1 set of 2 speaker stands P ST4200 for P SP4200 P ST5000 for P SP5010 Warning To prevent injury fire and electric shock arrange for options to ...

Page 27: ...isplay dots x lines Horizontal frequency kHz Vertical frequency Hz Signal 640 x 480 31 47 59 94 VGA 640 x 480 37 50 75 00 VGA 75 Hz 640 x 480 43 27 85 01 VGA 85 Hz 720 x 400 31 47 70 09 400 lines 800 x 600 37 88 60 32 SVGA 60 Hz 800 x 600 46 88 75 00 SVGA 75 Hz 800 x 600 53 67 85 06 SVGA 85 Hz 1024 x 768 48 36 60 00 XGA 60 Hz 1024 x 768 60 02 75 03 XGA 75 Hz 1024 x 768 68 68 84 99 XGA 85 Hz 1280 x...

Page 28: ...VIDEO3 VIDEO4 INPUT 3 RCA terminals Y 1 Vp p 75 Ω Component video input PB CB 0 7 Vp p 75 Ω PR CR 0 7 Vp p 75 Ω VIDEO5 INPUT HDMI terminal HDMI type A connector HDMI input Video Audio VIDEO5 VIDEO6 INPUT HDMI terminal HDMI type A connector HDMI input Video Audio PC input terminal RGB1 input mD sub 3 rows 15 pin Picture signal 0 7 Vp p 75 Ω Synchronization signal TTL level Audio terminals 2 audio i...

Page 29: ... 1 Vp p 75 Ω Component video input PB CB 0 7 Vp p 75 Ω PR CR 0 7 Vp p 75 Ω VIDEO5 VIDEO6 INPUT HDMI terminal HDMI type A connector HDMI input Video Audio PC input terminal RGB1 input mD sub 3 rows 15 pin Picture signal 0 7 Vp p 75 Ω Synchronization signal TTL level Audio terminals 2 audio input pin jacks L R 3 lines 500 mVrms at least 22 kΩ Control terminal RS 232C connector D sub 9 pin External s...

Page 30: ...ands or contracts due to variations in temper ature This sound does not indicate that the display has a problem The display makes a buzzing sound The display has fans to maintain the temperature of internal components at a constant level This sound is produced by the fan as it rotates Applies to models equipped with a fan There are spots on the screen Check whether your AV equipment is affected by...

Reviews: