Fujitsu LIFEBOOK U9310 Operating Manual Download Page 58

Connecting external devices

Connecting USB devices

USBports

On the USB ports, you can connect external devices that also have a USB port
(e.g. a DVD drive, a printer, a scanner or a modem).

USB devices are hot-pluggable. This means you can connect and disconnect
devices while your operating system is running.

USB 1.x has a maximum data transfer rate of 12 Mbit/s.

USB 2.0 has a data transfer rate of up to 480 Mbit/s.

USB 3.0 has a data transfer rate of up to 5 Gbit/s.

USB 3.2 (Gen1) has a data transfer rate of up to 5 Gbit/s.

USB 3.2 (Gen2) has a data transfer rate of up to 10 Gbit/s.

Additional information can be found in the documentation for the USB devices.
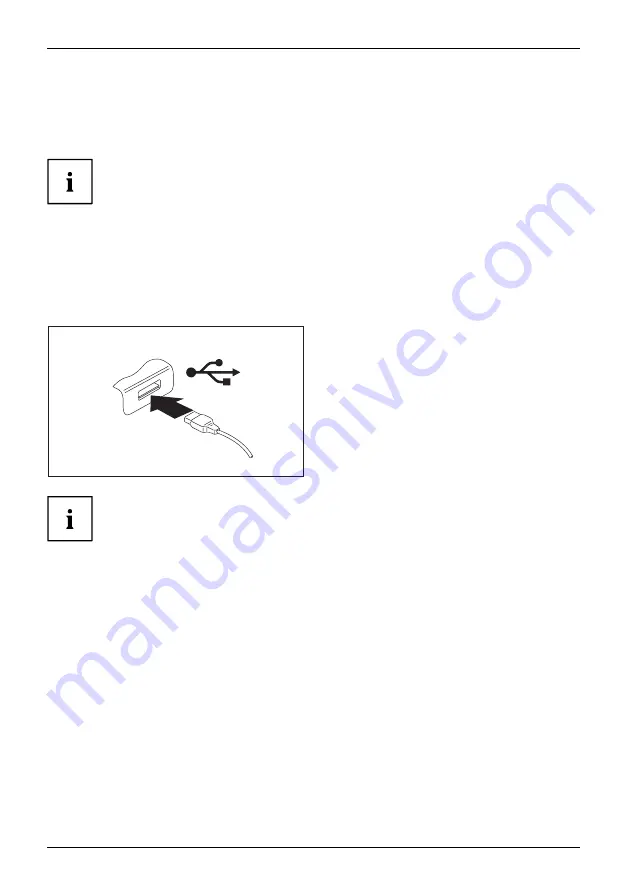
Connect the data cable to the
external device.

Connect the data cable to a USB
port of the notebook.

Device drivers

USB devices will be automatically recognised and installed by your operating system.

54

Fujitsu

Summary of Contents for LIFEBOOK U9310

Page 1: ...System Operating Manual FUJITSU LIFEBOOK U9310 ...

Page 2: ... found on the Internet at http www fujitsu com fts You can find driver updates at http support ts fujitsu com download Should you have any technical questions please contact our Hotline Service Desk http support ts fujitsu com contact servicedesk Your sales partner Your sales office We hope you enjoy working with your new Fujitsu system ...

Page 3: ......

Page 4: ...echnology Solutions GmbH Mies van der Rohe Straße 8 80807 Munich Germany http www fujitsu com fts Copyright Fujitsu Technology Solutions GmbH2020 All rights reserved Publication Date 06 2020 Order No A26391 K504 Z325 1 7619 edition 1 ...

Page 5: ...t notes 12 First time setup of your device 16 Working with the notebook 19 Security functions 45 Connecting external devices 52 Removing and installing components during servicing 58 Settings in BIOS Setup Utility 59 Troubleshooting and tips 64 Technical data 72 Manufacturer s notes 75 Index 76 ...

Page 6: ...e USA and or other countries The terms HDMI and HDMI High Definition Multimedia Interface and the HDMI logo are trademarks or registered trademarks of HDMI Licensing Administrator Inc in the United States and other countries Bluetooth and the Bluetooth logo are registered trademarks of Bluetooth SIG Inc Adobe Reader is a trademark of Adobe Systems Incorporated USB Type C and USB C are trademarks o...

Page 7: ...he notebook 21 Notebook switching off 21 Keyboard 22 Virtual numeric keypad 24 Function keys and key combinations 24 F Lock setting 26 Keyboard with backlight 27 Country and keyboard settings 27 Touchpad and touchpad buttons 28 Moving the pointer 28 Selecting an item 28 Executing commands 28 Dragging items 29 Touchscreen LCD screen without touch function device dependent 29 Using fingers 30 WebCam...

Page 8: ...ction for the hard disk 49 Trusted Platform Module TPM device dependent 50 Enabling TPM 50 Disabling TPM 50 SmartCard reader 51 Inserting the SmartCard 51 Connecting external devices 52 HDMI port 52 Connecting an external monitor to the port replicator 53 Connecting USB devices 54 USB port Intel ThunderboltTM 3 with charging function and display port USB Type C 55 USB port with charging function A...

Page 9: ...al monitor is blank or the image is unstable 67 The notebook cannot be started 68 The notebook stops working 68 The printer does not print 68 The wireless connection to a network does not work 69 SmartCard reader is not recognised 69 SmartCard PIN forgotten 69 SmartCard lost 69 Error messages on the screen 70 Technical data 72 LIFEBOOK 72 Rechargeable battery 72 Mains adapter notebook computer 73 ...

Page 10: ...Contents 6 Fujitsu ...

Page 11: ... properties Information on the connections and user components of your notebook can be found in Ports and controls Page 9 Further information The Windows drivers for your device can be found on our Internet site The factory installation of your device does not support any other operating system Fujitsu Technology Solutions accepts no liability whatsoever if any other operating system is used Softw...

Page 12: ...e123 or a command used to start a program start exe This font indicates information that is displayed on the screen by a program e g Installation is complete This font indicates terms and texts used in a software interface e g Click on Save names of programs or files e g Windows or setup exe This font indicates cross references to another section e g Safety information cross references to an exter...

Page 13: ...of the device Please familiarise yourself with these components before you start to work with the device Front 9 7 8 5 5 6 1 3 2 1 4 2 1 Microphone optional 2 Infrared camera sensors optional 3 WebCam optional 4 WebCam LED optional 5 Status indicators 6 ON OFF button 7 Fingerprint sensor optional or palm sensor optional 8 Touchpad buttons 9 Touchpad Fujitsu 9 ...

Page 14: ...der The descriptions in this document show the standard product configuration with Intel ThunderboltTM 3 Alternative USB configurations without Intel ThunderboltTM 3 are also available for projects Pos 2 USB 3 2 Gen2 port with charging function and DisplayPort USB Type C Pos 3 USB port 3 2 Gen1 USB Type C Right side 1 2 3 4 5 1 Slot for SIM cards optional 2 Slot for memory cards 3 USB port 3 2 Gen...

Page 15: ...Ports and controls Bottom 2 1 1 1 Loudspeaker 2 Off button for the battery recessed Fujitsu 11 ...

Page 16: ...nings are not obstructed Read the information on the ambient conditions in the Technical data Page 72 and First time setup of your device Page 16 before preparing your notebook for use and switching it on for the first time When cleaning the device please observe the relevant notes in the section Cleaning the notebook Page 15 Pay attention to the additional safety notes for devices with wireless c...

Page 17: ... flammable gases or into hazardous environments e g petrol station paintshops as the transmitted radio waves can cause an explosion or a fire For information on how to switch radio components on and off see chapter Switching the wireless components on and off Page 39 Energy saving Notes Energy Energysaving Switch the notebook off when it is not in use Switch off external connected devices if you a...

Page 18: ... If this is not the case obtain the appropriate mains adapter for your notebook Do not use any other voltage converter Check whether the local mains voltage and the power cable are compatible If this is not the case buy a power cable that matches the local conditions Contact the relevant authorities of the country you will be travelling in as to whether you may operate the radio component integrat...

Page 19: ...Only clean the display surface with a very soft slightly damp cloth Switch the notebook off Cleaning Notes Notebook Keyboard Touchpad LCDscreen CrystalViewdisplay To prevent accidental activation of the device remove the power plug of the mains adapter from the power socket The surface may be cleaned with a dry cloth If particularly dirty use a damp cloth that has been dipped in water mixed with m...

Page 20: ...ollow the instructions on the screen NEVER switch off your device during the first time setup process The battery must be charged if you want to operate your device using the battery When used on the move the built in battery provides the device with the necessary power You can increase the operating time by using the available energy saving functions For instructions on how to connect external de...

Page 21: ... device may mark certain types of delicate surfaces Keep other objects at least 100 mm 3 94 inches away from the device and its mains adapter to ensure adequate ventilation Never cover the ventilation slots of the device Do not expose the device to extreme environmental conditions Protect the device from dust humidity and heat Mains adapter connecting Preparingforoperation Mainsadapter Observe the...

Page 22: ... DO NOT restart the device unless you are requested to do so To make it easier to use your device for the first time the operating system is pre installed on the hard disk Switch on your device During installation follow the instructions on screen If a Windows operating system is installed on your device you will find more information on the system and drivers help programmes updates manuals etc o...

Page 23: ...hapter entitled Connecting external devices Page 52 for instructions on how to connect devices such as a mouse and a printer to the notebook Please refer to the notes in Important notes Page 12 Status indicators Statusindicators The status indicators provide information about the status of the power supply the hard disk and the keyboard functions F Fujitsu 19 ...

Page 24: ...ttery abnormality error The indicator flashes red Batterystatusindicator Batterysymbol Batteryindicator F F Lock indicator Indicator FLock The indicator lights up The key combination Fn F has been pressed Instead of the imprinted standard functions of the function keys the Fn functions can be executed by pressing the keys directly see chapter Function keys and key combinations Page 24 Num Lock ind...

Page 25: ... on The power on indicator is lit Notebook switching off Back up your data and close all applications before you switch off your device Otherwise data might be lost Shut down the operating system correctly Notebook If the notebook does not switch itself off automatically press the ON OFF button for about 5 10 seconds Close the LCD screen Fujitsu 21 ...

Page 26: ...unctions of an enhanced keyboard Some enhanced keyboard functions are mapped with key combinations The following description of keys refers to Windows Additional functions supported by the keys are described in the relevant manuals supplied with your application programs The figure below shows how to access the different characters on keys with overlaid functions The example applies when the Caps ...

Page 27: ... the character printed on the upper left of the key will appear when that key is pressed To cancel the Caps Lock function simply press the Caps Lock key again Shiftkey CapsLock Shift key The Shift key causes uppercase characters to appear In the case of overlay keys the character printed on the upper left of the key appears when that key is pressed Shiftkey Shift Fn key The Fn key activates the Fn...

Page 28: ...s when the Num key is not activated 2 Valid characters when the Num key is activated Further information about the status indicators can be found in chapter Status indicators Page 19 Function keys and key combinations Keycombinations The following description of the function keys and key combinations applies to Windows operating systems Some of the functions described below may not work in other o...

Page 29: ...creases the brightness of the screen F7 LCDscreen Screenbrightness Increase screen brightness This function key increases the brightness of the screen F8 Screenbrightness Power management functions Use this function key to activate the energy saving functions see chapter Using the power management features Page 33 F9 Energysavingfunctions Toggle output screen If an external monitor is connected th...

Page 30: ... keys as the primary function for the upper row of keys The F Lock function is deactivated by default as delivered F Lock is turned on and off by pressing Fn Esc When F Lock is turned on it remains activated like the Caps Lock key Changing the F Lock setting changes the primary and secondary key functions as follows Status Hot Key Function key F Lock is deactivated F Lock symbol is not illuminated...

Page 31: ...ound lighting to be switched on and off and also a choice to be made between two levels of brightness In battery mode it is recommended to turn on the backlight only when needed and to use the lower brightness level to maximize battery life Country and keyboard settings Change the country and keyboard settings as described in the documentation for your operating system Fujitsu 27 ...

Page 32: ...pond to the buttons on a conventional mouse You can also deactivate the touchpad with the F6 key so that you cannot unintentionally move the pointer on the screen see chapter Function keys and key combinations Page 24 Moving the pointer Move your finger on the touchpad Touchpad The pointer will move Selecting an item Move the pointer to the item you wish to select Touchpad Tap the touchpad once or...

Page 33: ...ample A screen with an HD resolution of 1366 x 768 has 1366 x 768 1049088 pixels Each pixel consists of three subpixels red green and blue making a total of about 3 million subpixels According to ISO 9241 307 class II a maximum of 2 light and 2 dark pixels and in addition 5 light or 10 dark subpixels or an equivalent mix 1 light subpixel counts as 2 dark subpixels are allowed to be defective Pixel...

Page 34: ...tance drag apps or widgets onto the home page in this way Double tap To enlarge a view quickly tap twice on a web page map or another screen When you double tap on an image in a web browser it will be enlarged and another double tap will make it smaller again Zoom in Zoom out With some apps you can enlarge the display size by moving two fingers apart on the touchscreen and reduce it by moving your...

Page 35: ...am is switched on The picture quality depends on the lighting conditions and the software being used You can only operate the webcam with a particular application e g an Internet telephony program or a video conferencing program which supports a webcam When using the webcam the notebook support must not wobble The webcam automatically adjusts itself to the current light level For this reason the L...

Page 36: ...echargeable battery is less than 90 and the mains adapter is connected the battery will be charged to 100 When the battery state of charge is low a message from the operating system appears If you do not connect the mains adapter within about 5 minutes of the message appearing your notebook will automatically switch off monitoring the battery charging level Battery Batterystatusmeter Windows also ...

Page 37: ...power management functions in your Control Panel If you need further information about an option you can get help about most settings by pressing the key combination Fn F1 to show the Microsoft help When the notebook is in power saving mode the following must be remembered During power saving mode open files are held in the main memory or in a swap file on the hard disk Never turn off your noteboo...

Page 38: ...reduced Call up the BIOS Setup Utility In the menu Advanced Miscellaneous Configurations select the Fan Control function Choose the setting Normal or Silent Instructions for how to call up and operate the BIOS Setup Utility can be found in chapter Settings in BIOS Setup Utility Page 59 With the Fujitsu Utility Function Manager you can also switch between these two settings with Windows In the Func...

Page 39: ... feel it click into place The label area must be facing upward Do not apply any force otherwise the delicate contact surfaces could be damaged Memorycard Depending on the particular type used the memory card may protrude slightly from the slot Removing the memory card Memorycard In order to protect your data always follow the correct procedure for removing the card see the documentation for your o...

Page 40: ...chapter Ports and controls Page 9 Please refer to chapter Function keys and key combinations Page 24 for information on setting the volume and also enabling disabling the loudspeakers using key combinations When you connect headphones or external speakers the built in speakers are disabled Information on connecting headphones and a microphone can be found in Connecting external devices Page 52 36 ...

Page 41: ...cess to a mobile radio network Follow the instructions supplied by the provider of the SIM card Inserting the SIM card Switch off the battery so that the device is currentless see Switch the battery off and on Page 32 1 2 Open the cover of the SIM card slot 1 and pull the SIM card holder out 2 2 1 Place the SIM card in the carrier and slide the SIM card fully home into the slot as shown The contac...

Page 42: ...and on Page 32 2 1 Open the cover of the SIM card slot 1 Pull the SIM card holder out of the slot in the direction of the arrow and remove the SIM card 2 2 1 Push the SIM card holder into the SIM card slot 1 and close the cover of the SIM card slot 2 Switch the battery on again see chapter Switch the battery off and on Page 32 38 Fujitsu ...

Page 43: ...vider Setting up WLAN access Requirement A WLAN must be available and you must have the corresponding access information Information on configuring the WLAN access can be found in the documentation for your operating system Access via LTE optional You can purchase the accessories for LTE reception from your retailer or your Fujitsu Technology Solutions dealer If you have ordered an LTE module your...

Page 44: ...on the notebook in the direction of the arrow 2 1 Push the LAN adapter upwards in the direction of the arrow 1 Connect the network cable to the LAN adapter 2 Connect the network cable to your network port Your network administrator can help you to configure and use the LAN connections The network cable is not included in the delivery scope This type of cable can be obtained from a specialist deale...

Page 45: ... peripheral devices In addition to the USB type C port replicator described here this system also supports a Thunderbolt 3 port replicator which is also connected to the system via the USB type C connector Ports on the Port Replicator PortReplicator Ports 1 9 10 8 3 4 5 6 2 7 2 8 1 Combined headphones microphone port 2 USB port 3 2 Gen1 USB Type A 3 VGA monitor port 4 HDMI port 5 DisplayPort 6 LAN...

Page 46: ...ensitive surface Do not expose the port replicator to extreme environmental conditions Protect the port replicator from dust humidity and heat Connecting the mains adapter to the Port Replicator 3 1 2 Connect the power cable 1 to the power adapter provided for the device see chapter Technical data Page 72 Plug the power cable into the mains socket 2 Connect the mains adapter cable to the DC jack D...

Page 47: ... of the notebook 1 2 Connect one end of the USB cable USB Type C to the USB port Intel ThunderboltTM 3 with charging function and display port USB Type C on the notebook 1 Connect the other end of the USB cable USB Type C to the USB 3 2 Gen1 port for data connection and power supply USB Type C on the Port Replicator 2 Fujitsu 43 ...

Page 48: ... operating system Press the ON OFF button on the port replicator to switch the notebook off If the notebook cannot be shut down properly press the ON OFF button of the notebook for about four seconds The notebook will switch itself off Any unsaved data may however be lost Disconnecting the notebook from the Port Replicator Disconnect the supplied USB cable USB Type C from the USB port Intel Thunde...

Page 49: ... made for assistance If you change the Password Severity setting from Strong to Stringent in the Security BIOS Setup Utility menu the Fujitsu Service Desk can no longer reset the password In this case the system can remain permanently unusable Therefore Fujitsu recommends to generally set up a supervisor password with the setting Password Severity Strong Configuring the fingerprint sensor Fingerpr...

Page 50: ...onductor Basic software for hand vein and fingerprint sensor is available on the Internet at https www fujitsu com emeia solutions business technology security product secure Using the Security Lock Your device comes with a Security Lock mechanism for the Kensington Lock Cable You can use the Kensington Lock Cable a sturdy steel cable to help protect your notebook from theft The Kensington Lock Ca...

Page 51: ... the Fujitsu Service Desk can no longer reset the password In this case the system can remain permanently unusable Therefore Fujitsu recommends to generally set up a supervisor password with the setting Password Severity Strong Protecting BIOS Setup Utility supervisor and user password If you have opened these operating instructions on the screen we recommend that you print them out You cannot cal...

Page 52: ...en the BIOS Setup Utility Please note that the user password only provides access to a few of the BIOS settings Changing the supervisor or user password You can only change the supervisor password when you have logged into the BIOS Setup Utility with the supervisor password Password Supervisorpassword Userpassword Call the BIOS Setup Utility and go to the Security menu When changing the password p...

Page 53: ... You will be prompted to enter your password the supervisor password Deactivating system protection Start the BIOS Setup Utility and go to the Security menu Operatingsystem Select the Password on Boot option and press the Enter key Select the Disabled option and press the Enter key If you do not want to change any other settings you can exit BIOS Setup Utility Select the Save Changes Exit option u...

Page 54: ...y Chip menu option appears With Clear Security Chip you can delete the owner in the TPM if the TPM has already been used With Enabled all secret keys generated by applications e g SRK Storage Root Keys AIK Attestation Identity Keys etc are deleted Please note that you will then no longer be able to access the data you have encrypted with the keys based on that holder Select the Exit Saving Changes...

Page 55: ...to be able to take advantage of all the security features of your notebook you will need a CardOS SmartCard from Fujitsu The SmartCard can only be used with a PIN offering maximum protection even if you lose the SmartCard In order to maximise your security the CardOS SmartCard is disabled if three incorrect attempts are made to enter the PIN When you use the CardOS SmartCard for the first time you...

Page 56: ...sary to switch off the notebook and the device before connecting disconnecting For more information about whether or not devices need to be switched off please refer to the documentation supplied with the external device Some of the external devices require special drivers see the operating system and external device documentation HDMI port HDMIport The HDMI port on your notebook or on the optiona...

Page 57: ...en Monitor VGAconnectionsocket Monitorport Monitorport Analogue VGA monitor port on optional port replicator Digital DisplayPort on optional Port Replicator Switch off the notebook and the external monitor Plug the data cable of the external monitor into the monitor port First switch on the external monitor and then the notebook You can also switch between the external monitor and the LCD monitor ...

Page 58: ... transfer rate of 12 Mbit s USB 2 0 has a data transfer rate of up to 480 Mbit s USB 3 0 has a data transfer rate of up to 5 Gbit s USB 3 2 Gen1 has a data transfer rate of up to 5 Gbit s USB 3 2 Gen2 has a data transfer rate of up to 10 Gbit s Additional information can be found in the documentation for the USB devices Connect the data cable to the external device Connect the data cable to a USB ...

Page 59: ...er Delivery on System Off Instructions for how to call up and operate the BIOS Setup Utility can be found in section Settings in BIOS Setup Utility Page 59 With the USB Type C Port Replicator available as an accessory the notebook can be supplied with power via this USB port USB devices are hot pluggable This means you can connect and disconnect the cables of USB devices while the system is runnin...

Page 60: ...more quickly if an external USB device is being charged The power supply unit must already be connected when the notebook is switched off as otherwise the USB charging function will be disabled and the connected USB devices will not be charged Some USB devices e g mobile telephones require a driver in order to utilise the USB charging function In this case the USB charging function will not work w...

Page 61: ...r notebook Connect the audio cable to the external device Connect the audio cable to the headset port of the notebook The internal loudspeakers are disabled If you buy a cable from a retailer please note the following information The headset port on your notebook is a 3 5 mm jack socket If you want to connect a headset headphones or loudspeakers you will need a 3 5 mm jack plug Fujitsu 57 ...

Page 62: ...g and installing components during servicing Only qualified technicians should repair your notebook Unauthorised opening or incorrect repair may greatly endanger the user electric shock fire risk and will invalidate your warranty Components Servicing 58 Fujitsu ...

Page 63: ... processor and notebook System Set calendar and clock configure SATA drive Advanced Configuration of various hardware components such as mouse keyboard processor Security Password settings and security functions Boot Configuration of the start up sequence Exit Exits the BIOS Setup Utility Starting the BIOS Setup Utility Start the device switch off on or reboot the Operating System BIOSSetupUtility...

Page 64: ... BIOS Setup Utility With the F9 key you can load the default settings of the BIOS Setup Utility Use the cursor keys or to select the menu in which you would like to configure settings The menu is displayed on the screen Select the option that you want to change with the cursor keys or Press the Enter key Press the ESC key to exit the selected menu For future reference make a note of the changes yo...

Page 65: ...ndard entries for all menus of the BIOS Setup Utility choose Load Setup Defaults and Yes Discard Changes Discard changes without exiting the BIOS Setup Utility To discard the changes you have made select Discard Changes and Yes The settings in place when BIOS Setup Utility was called remain effective You can now make additional settings in the BIOS Setup Utility If you want to exitBIOS Setup Utili...

Page 66: ...set Start after Reboot Then select Save Changes and Exit in the menu Save Exit Exit to initiate a reboot and start Erase Disk Because of the reboot the Erase Disk will be started You have the option to interrupt the process during the user selection After the application starts the Administrator Supervisor password must be entered for security reasons A dialogue field appears in which a particular...

Page 67: ...rnal USB stick Select whether a status report should be written to the USB stick The user can select the following tasks which should be run by the system after the deletion process Reset administrator and user password Load BIOS setup defaults Shutdown the Computer Exit Erase Disk with no additional options upon completion Select the function which you require The deletion process starts Fujitsu ...

Page 68: ...nnected to your system Your sales contract Our notebooks have been designed primarily with mobile applications in mind This means that considerable effort has been made to optimise components and equipment in terms of weight space and energy requirements Depending on the particular configuration you have purchased it is possible that functionality may be slightly reduced compared to a desktop PC i...

Page 69: ...l be deleted We advise you to backup your files to an external hard drive or CD DVD disk before you start Switch the notebook on Depending on the Fast Boot setting in the BIOS Setup utility the following information may appear on the screen during start ESC Diagnostic screen F12 Boot Menu F2 BIOS Setup When this message appears press the function key F12 Insert the Windows Recovery CD into the opt...

Page 70: ...ching on the notebook Please contact your sales outlet or our Hotline Service Desk When certain characters are entered on the keyboard only numerals are written Cause Troubleshooting The virtual numeric keypad of your device is activated see Virtual numeric keypad Page 24 Press the Num key The notebook s LCD screen remains blank LCDscreen LCDscreenistoodark Cause Troubleshooting Monitor is switche...

Page 71: ...he data cable is properly connected to the notebook and the external monitor if it is plugged in with a connector Switch on the external monitor and the notebook The external monitor is blank or the image is unstable Screen Monitor Cause Troubleshooting The wrong external monitor has been selected or the wrong screen resolution has been set for the application program Stop the application program ...

Page 72: ...e operating system or switching the device off and back on again The battery is dead Connect the notebook to the mains voltage via the mains adapter and charge the battery The printer does not print Printerdoesnotprint Cause Troubleshooting The printer is not switched on Make sure that the printer is switched on and ready for operation refer to the documentation supplied with the printer The print...

Page 73: ...ponent can be found in the help files SmartCard reader is not recognised Cause Troubleshooting Chip card inserted incorrectly Check if you inserted your SmartCard into the SmartCard reader correctly Check whether the SmartCard you are using is supported Your SmartCard must comply with the ISO standard 7816 1 2 3 and 4 SmartCard PIN forgotten Cause Troubleshooting PIN forgotten If you are working i...

Page 74: ... OK and press the Enter key Extended memory failed at offset xxxx Failing Bits zzzz zzzz When testing the extended memory an error has resulted at the address xxxx Check whether the additional memory module has been inserted correctly Failure Fixed Disk n The settings of the hard disk drive are incorrect Start the BIOS Setup Primary Master submenu and select the correct settings Keyboard controlle...

Page 75: ...to do so Real time clock error Contact your sales outlet or our customer service centre nnnnK Shadow RAM failed at offset xxxx Failing Bits zzzz Contact your sales outlet or our customer service centre System battery is dead Replace and run SETUP Contact your sales outlet or our customer service centre System cache error Cache disabled Contact your sales outlet or our customer service centre Syste...

Page 76: ...b with 50 Wh rechargeable battery Main memory LPDDR3 memory with 8 or 16 GByte soldered The data sheet for the device provides further technical data You can find the data sheet on your device or you can download it from the Internet at http www fujitsu com fts support Rechargeable battery You can find information on the batteries used in your device on the Internet at http www fujitsu com fts sup...

Page 77: ...able can be ordered at any time USB Type C Port Replicator optional Electrical data Complied safety regulations CE Protection class II Ports Monitor port analogue 15 pin HDMI port 1 x Display port 1 x Maximum resolution of an external monitor VGA 1920 x 1200 pixels HDMI or Display Port 4096 x 2160 pixels LAN port RJ45 USB Universal Serial Bus 3 x USB 3 2 Gen 1 2 x USB Type C Microphone port Line i...

Page 78: ...e mains adapter supplied with the USB Type C Port Replicator which you can order separately Primary Rated voltage 100 V to 240 V automatic Nominal frequency 50 Hz to 60 Hz automatic Max rated current 0 7 A to 1 2 A Secondary Nominal power 90 W Rated power voltage 19 V Maximum rated current 4 74 A An additional mains adapter or power cable can be ordered at any time 74 Fujitsu ...

Page 79: ...TCO Certified TCOCertified Please note that TCO certified systems bear the TCO certified logo Further information is given in the TCO certified manual appendix at http support ts fujitsu com Manuals Certification markings Certificationmarkings Certification markings are listed as applicable in the Manual Appendix Additional Certifications supplement If such markings are available you can find the ...

Page 80: ...dicator 20 Certification markings 75 Cleaning 15 Components installing removing 58 Configuration BIOS Setup Utility 59 Connecting audio devices 57 Connecting headphones 57 Crystal View display cleaning 15 Ctrl Alt Del 26 Cursor control 23 Cursor keys 23 D Date is incorrect 66 Device setting up 17 Disable microphone 25 E Enable microphone 25 Energy energy saving 13 Energy saving 13 Energy saving fu...

Page 81: ...s blank 67 Monitor port see VGA connection socket 53 N Notebook before you travel 14 cannot be started 68 cleaning 15 stops working 68 switching off 21 transporting 14 using 19 Notebook operation 19 Notes 12 cleaning 15 disposal recycling 75 energy saving 13 LCD screen 29 Safety 12 transport 14 Num Lock indicator 20 24 Numeric keypad 22 see Virtual numeric keypad 24 O Operating system activating s...

Page 82: ...dapter 73 notebook 72 The wireless connection to a network does not work 69 Time not correct 66 Tips 64 Toggle output screen 25 Touchpad 25 28 buttons 28 cleaning 15 dragging items 29 executing commands 28 moving the pointer 28 selecting an item 28 switch off 25 Touchpad buttons 25 TPM 50 Transport Transport damage 16 Transportation 14 Travel notebook 14 Troubleshooting 64 Trusted Platform Module ...

Reviews: