


35
U s e r I n s t a l l a b l e F e a t u r e s
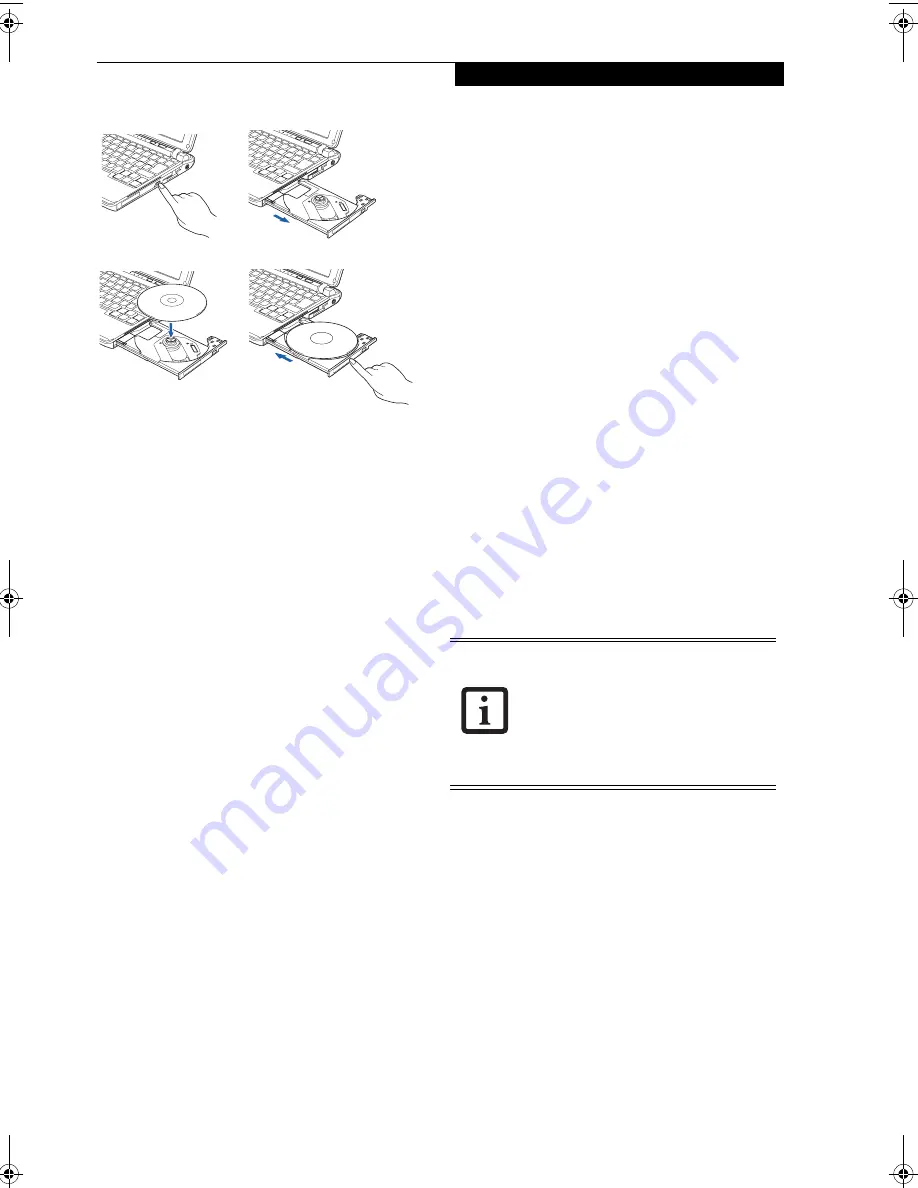
Figure 4-6 Loading/Removing Media
REMOVING MEDIA
1. Push and release the eject button on the front of the
optical drive. This will stop the drive and the holder
tray will come out of the notebook a short distance.
2. Gently pull the tray out until the disc can easily be
removed from the tray.
3. Carefully remove the media disc from the holder
tray.
4. Gently push the holder tray back in until you hear a
click.
USING THE OPTICAL DRIVE SOFTWARE
Starting a DVD Movie
1. Insert the DVD movie into the optical drive of your
notebook. If the CD AutoRun feature activates,
skip Step 2.
2. The first time you insert a movie into the media tray,
you will be prompted to select what you want the
system to do when discs are inserted (i.e., start auto-
matically or wait for a prompt). Until you make a
selection, you will receive the same prompt when-
ever you insert a disc.
Opening the Optical Drive Control Panel
With most DVD-ROMs, you have the option of altering
how the movie should play and what you wish to view.
You can do this by using the optical drive control panel
and the mouse.
1. Right-click on the movie screen to open a dropdown
menu for options.
2. Select
View,
then
Player
for all the controls available.
This will open the control panel into the bottom of
the screen.
Using the Optical Drive Control Panel
The optical drive software allows you to watch the movie
much like a VCR player. You have the option to pause,
rewind, fast-forward and stop the movie at any point.
1. To Pause the movie, click the
button.
2. To Rewind the movie, click the
button to rewind
to a specific portion of the movie, or the
button
to return to the opening screen.
3. To Fast-forward the movie, click the
button to
forward to a specific portion of the movie, or the
button to jump to the ending credits.
4. To Stop the movie, click the
button.
Exiting the DVD/CD-RW Application
1. Click the
U
located in the upper right corner of the
title bar. This will open an optical drive dialog box.
2. Click Yes to stop and exit the movie, or No to close
the optical drive dialog box and return to the movie.
USING DOLBY
TM
HEADPHONE
The Dolby Headphone utility lets you enjoy multi-
channel sound sources, such as movies, with realistic
surround sound using your
conventional
stereo head-
phones.
Dolby Headphone is a signal processing system that
enables your stereo headphones to realistically portray
the sound of a five-speaker playback system
.
To use the Dolby Headphone feature, perform the
following steps:
1. Double click the InterVideo WinDVD icon on your
desktop.
2. On the toolbar that appears, click the Fujitsu logo
3. Select the desired Room Filter Setting.
4. Click OK. The Dolby Headphone feature will now
be enabled until you disable it selecting Disable in
the Dolby Headphones menu (click on the Fujitsu
logo to open it). Note that Dolby Headphone is not
accessible if a DVD is not inserted.
a)
b)
c)
d)
■
Media discs which do not have the
Dolby Surround 5:1 symbol will not
support Dolby Headphone.
■
After making changes to the Dolby
Headphone feature and clicking OK,
wait at least ten seconds before making
another change in order to allow the
system to stabilize.
P7120.book Page 35 Monday, October 10, 2005 4:38 PM
Summary of Contents for Lifebook P7120
Page 6: ...L i f e B o o k P 7 0 0 0 N o t e b o o k ...
Page 7: ...1 Preface ...
Page 8: ...L i f e B o o k P 7 0 0 0 N o t e b o o k ...
Page 10: ...2 L i f e B o o k P 7 0 0 0 N o t e b o o k S e c t i o n O n e ...
Page 11: ...3 2 Getting to Know Your LifeBook Notebook ...
Page 12: ...4 L i f e B o o k P 7 0 0 0 N o t e b o o k S e c t i o n T w o ...
Page 28: ...20 L i f e B o o k P 7 0 0 0 N o t e b o o k S e c t i o n T w o ...
Page 29: ...21 3 Getting Started ...
Page 30: ...22 L i f e B o o k P 7 0 0 0 N o t e b o o k S e c t i o n T h r e e ...
Page 37: ...29 4 User Installable Features ...
Page 38: ...30 L i f e B o o k P 7 0 0 0 N o t e b o o k S e c t i o n F o u r ...
Page 53: ...45 5 Using the Integrated Wireless LAN Optional Device ...
Page 54: ...46 L i f e B o o k P 7 0 0 0 N o t e b o o k S e c t i o n F I v e ...
Page 71: ...63 6 Troubleshooting ...
Page 72: ...64 L i f e B o o k P 7 0 0 0 N o t e b o o k S e c t i o n S i x ...
Page 85: ...77 7 Care and Maintenance ...
Page 86: ...78 L i f e B o o k P 7 0 0 0 N o t e b o o k S e c t i o n S e v e n ...
Page 90: ...82 L i f e B o o k P 7 0 0 0 N o t e b o o k S e c t i o n S e v e n ...
Page 91: ...83 8 Specifications ...
Page 92: ...84 L i f e B o o k P 7 0 0 0 N o t e b o o k S e c t i o n E i g h t ...
Page 96: ...88 L i f e B o o k P 7 0 0 0 N o t e b o o k S e c t i o n E i g h t ...
Page 99: ...91 9 Glossary ...
Page 100: ...92 L i f e B o o k P 7 0 0 0 N o t e b o o k S e c t i o n N i n e ...
Page 105: ...97 Appendix A Using the Fingerprint Sensor ...
Page 106: ...98 L i f e B o o k P 7 0 0 0 N o t e b o o k A p p e n d i x ...
Page 114: ...106 L i f e B o o k P 7 0 0 0 N o t e b o o k A p p e n d i x ...
Page 119: ......
Page 120: ......


