44
L i f e B o o k N S e r i e s U s e r ’ s G u i d e
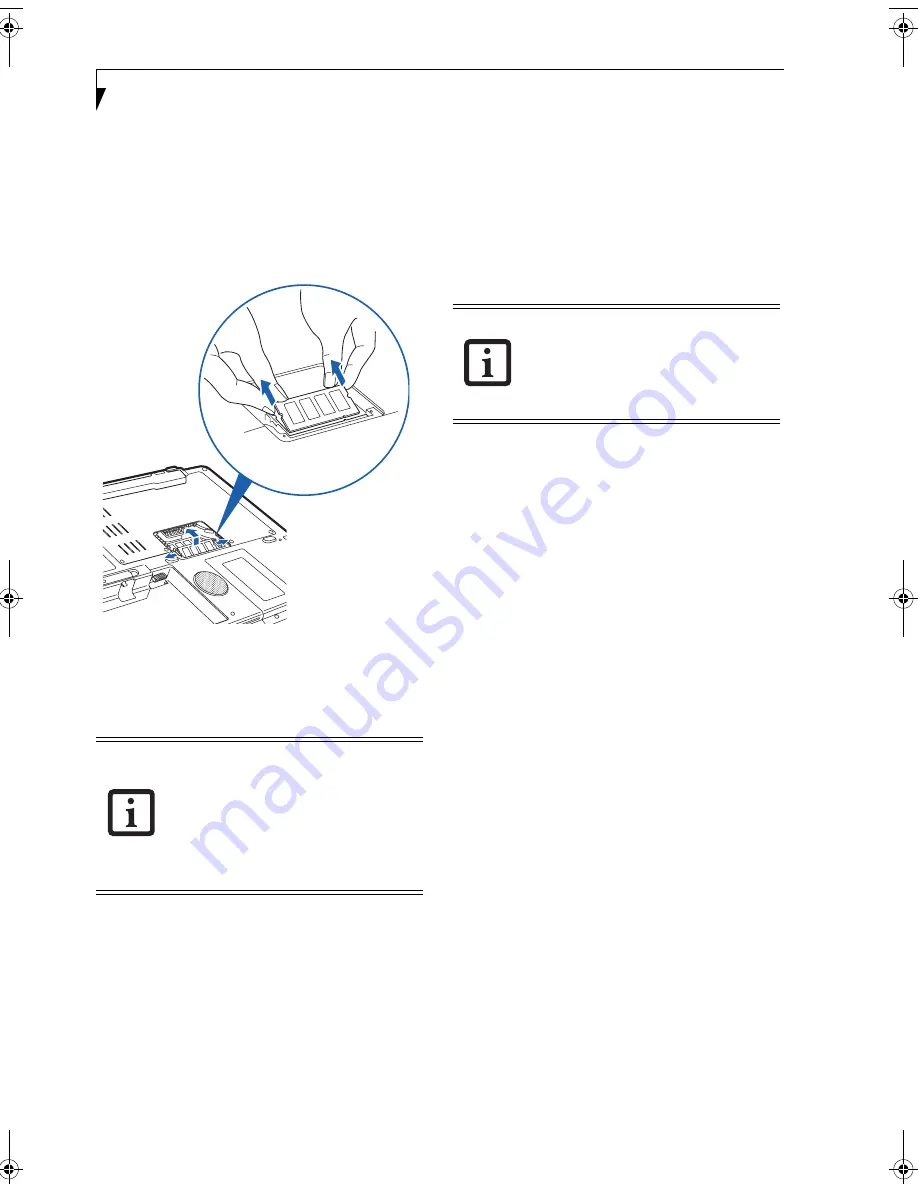
REMOVING A MEMORY UPGRADE MODULE
1. Perform steps 1 through 5 of Installing a Memory
Upgrade Module.
2. Pull the clips sideways away from each side of the
memory upgrade module at the same time.
3. While holding the clips out, remove the module
from the slot by lifting it up and pulling towards the
rear of your LifeBook notebook.
(Figure 4-13)
Figure 4-13. Removing a Memory Upgrade Module
4. Store the memory upgrade module in a static
guarded sleeve.
5. Replace the cover by following steps 9 and 10 of
Installing a Memory Upgrade Module.
CHECKING THE MEMORY CAPACITY
Once you have changed the system memory capacity by
either adding or removing a memory upgrade module,
be sure to check that your notebook has recognized the
change.
You can check the memory capacity by clicking [Start]
-> Control Panel, then double-clicking the System icon.
Select the General tab and check the amount of memory
under “Computer.”
After installing your added memory
module, you must complete the Resetting
the Save-to-Disk Parameters procedure in
order for the Save-to-Disk mode to
operate properly on your LifeBook
notebook.
(See Hibernation (Save-to-
disk) Feature on page 28 for more
information)
If the total memory displayed is incorrect,
check that your memory upgrade module
is properly installed.
(If the module is
properly installed and the capacity is still
not correctly recognized, see
Troubleshooting on page 51.
N6220.book Page 44 Tuesday, September 27, 2005 5:11 PM
Summary of Contents for Lifebook N6220
Page 6: ...L i f e B o o k N S e r i e s U s e r s G u i d e ...
Page 7: ...1 1 Preface ...
Page 8: ...2 L i f e B o o k N S e r i e s U s e r s G u i d e ...
Page 10: ...4 L i f e B o o k N S e r i e s U s e r s G u i d e ...
Page 11: ...5 2 Getting to Know Your LifeBook Notebook ...
Page 12: ...6 L i f e B o o k N S e r i e s U s e r s G u i d e ...
Page 27: ...21 3 Getting Started ...
Page 28: ...22 L i f e B o o k N S e r i e s U s e r s G u i d e ...
Page 35: ...29 4 User Installable Features ...
Page 36: ...30 L i f e B o o k N S e r i e s U s e r s G u i d e ...
Page 53: ...47 U s e r I n s t a l l a b l e F e a t u r e s Figure 4 19 External Video Connection ...
Page 54: ...48 L i f e B o o k N S e r i e s U s e r s G u i d e ...
Page 55: ...49 5 Troubleshooting ...
Page 56: ...50 L i f e B o o k N S e r i e s U s e r s G u i d e ...
Page 69: ...63 6 Care and Maintenance ...
Page 70: ...64 L i f e B o o k N S e r i e s U s e r s G u i d e ...
Page 74: ...68 L i f e B o o k N S e r i e s U s e r s G u i d e ...
Page 75: ...69 7 Specifications ...
Page 76: ...70 L i f e B o o k N S e r i e s U s e r s G u i d e ...
Page 80: ...74 L i f e B o o k N S e r i e s U s e r s G u i d e ...
Page 81: ...75 8 Glossary ...
Page 82: ...76 L i f e B o o k N S e r i e s U s e r s G u i d e ...
Page 89: ...83 Appendix A Integrated Wireless LAN User s Guide Optional Device ...
Page 90: ...84 L i f e B o o k N S e r i e s U s e r s G u i d e ...
Page 103: ...97 Appendix B TV Tuner User s Guide Optional Device ...
Page 104: ...98 L i f e B o o k N S e r i e s U s e r s G u i d e ...
Page 107: ...101 Index ...
Page 108: ...102 L i f e B o o k N S e r i e s U s e r s G u i d e ...
Page 112: ...106 L i f e B o o k N S e r i e s U s e r s G u i d e ...


