8
L i f e B o o k A 3 0 0 0 S e r i e s N o t e b o o k - S e c t i o n T w o
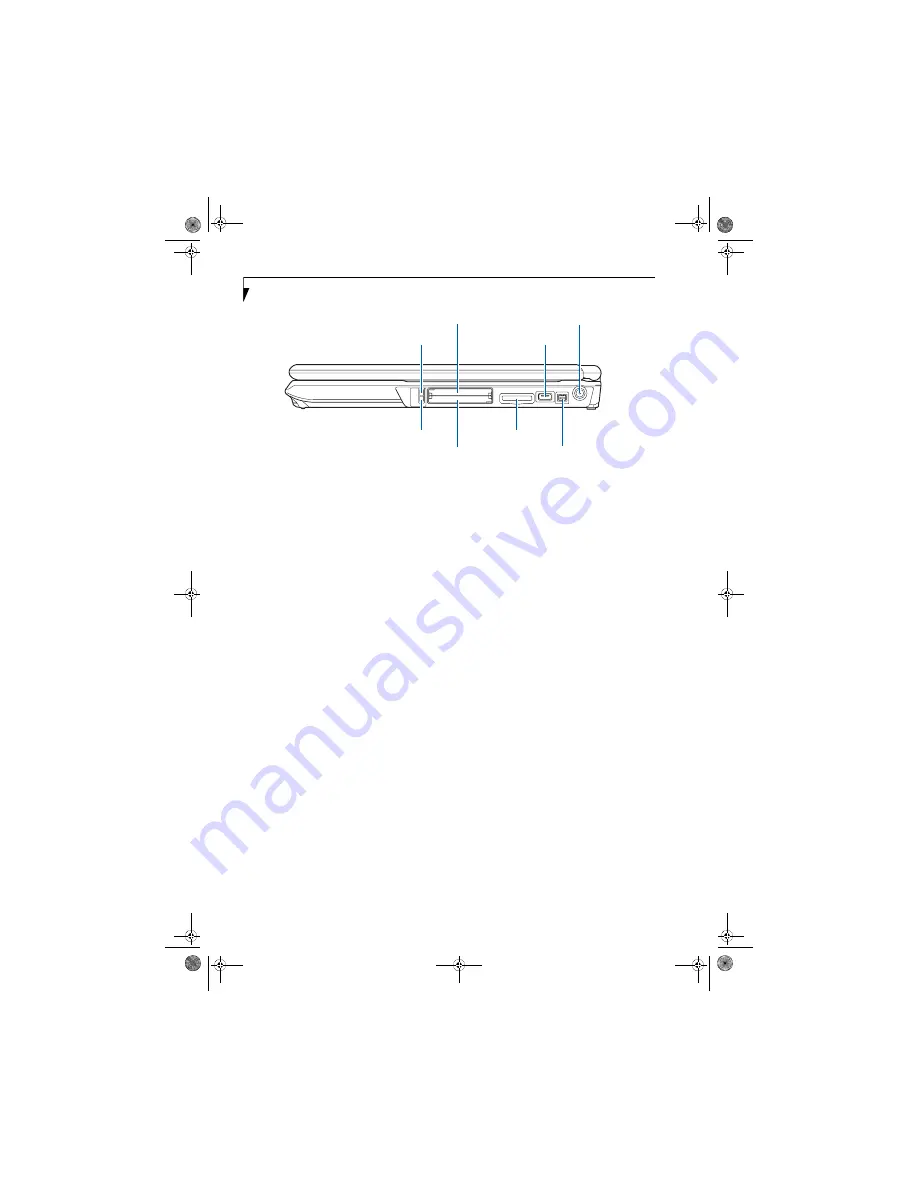
Figure 2-5. LifeBook notebook right-side panel
RIGHT-SIDE PANEL COMPONENTS
The following is a brief description of your LifeBook
notebook’s right-side components.
ExpressCard Eject Button
The ExpressCard eject button is used for removing an
ExpressCard from the slot.
ExpressCard Slot
The ExpressCard slot allows you to insert an Express-
Card.
(See PC Cards/ExpressCards™ on page 38 for more
information)
USB 2.0 Ports
The USB 2.0 ports allow you to connect Universal Serial
Bus devices. USB 2.0 transfers data at up to 480 Mbps
and is backward compatible with USB 1.1 devices, which
transfer data at up to 12 Mbps. There is a total of five
USB 2.0 ports on your system: one on the right side and
four in the back.
(See Universal Serial Bus Ports on
page 42 for more information)
DC Power Jack
The DC power jack allows you to plug in the AC adapter
to power your LifeBook notebook and charge the
internal Lithium ion battery.
IEEE 1394 (4-pin) Jack
The 4-pin 1394 jack is used to connect between your
notebook and an IEEE 1394 peripheral such as a digital
video camera.
(See IEEE 1394 Port on page 43 for more
information)
SD/Memory Stick/xD Picture Card Slot
The Secure Digital/Memory Stick/xD Picture card slot
allows you to insert a memory card for data storage. This
architecture allows you to transfer data from a variety of
different digital devices.
(See Inserting Memory Stick/SD/
xD Cards on page 36 for more information)
PC Card Slot
The PC Card Slots allow you to insert a Type I or Type II
PC Card.
(See PC Cards/ExpressCards™ on page 38 for
more information)
PC Card Eject Button
The PC Card eject button is used for removing a PC
Card from the slot.
PC Card Slot
PC Card Eject Button
DC Power Jack
ExpressCard Eject Button
ExpressCard Slot
SD/Memory Stick/
IEEE 1394 Jack
USB 2.0 Port
xD Card Slot
falcon2.book Page 8 Thursday, December 21, 2006 10:30 AM
Summary of Contents for Lifebook A3120
Page 2: ...falcon2 book Page 2 Thursday December 21 2006 10 30 AM ...
Page 9: ...1 Preface falcon2 book Page 1 Thursday December 21 2006 10 30 AM ...
Page 31: ...21 3 Getting Started falcon2 book Page 21 Thursday December 21 2006 10 30 AM ...
Page 39: ...29 4 User Installable Features falcon2 book Page 29 Thursday December 21 2006 10 30 AM ...
Page 55: ...45 5 Troubleshooting falcon2 book Page 45 Thursday December 21 2006 10 30 AM ...
Page 71: ...61 6 Care and Maintenance falcon2 book Page 61 Thursday December 21 2006 10 30 AM ...
Page 77: ...67 7 System Specifications falcon2 book Page 67 Thursday December 21 2006 10 30 AM ...
Page 83: ...73 8 Glossary falcon2 book Page 73 Thursday December 21 2006 10 30 AM ...
Page 119: ...falcon2 book Page 109 Thursday December 21 2006 10 30 AM ...
Page 120: ...falcon2 book Page 110 Thursday December 21 2006 10 30 AM ...


