36
L i f e B o o k A S e r i e s – S e c t i o n F o u r
provide power, you can continue to use your LifeBook
notebook while an adapter is charging the battery.
REPLACING THE BATTERY
With the purchase of an additional battery, you can have
a fully charged spare to swap with one that is not
charged.
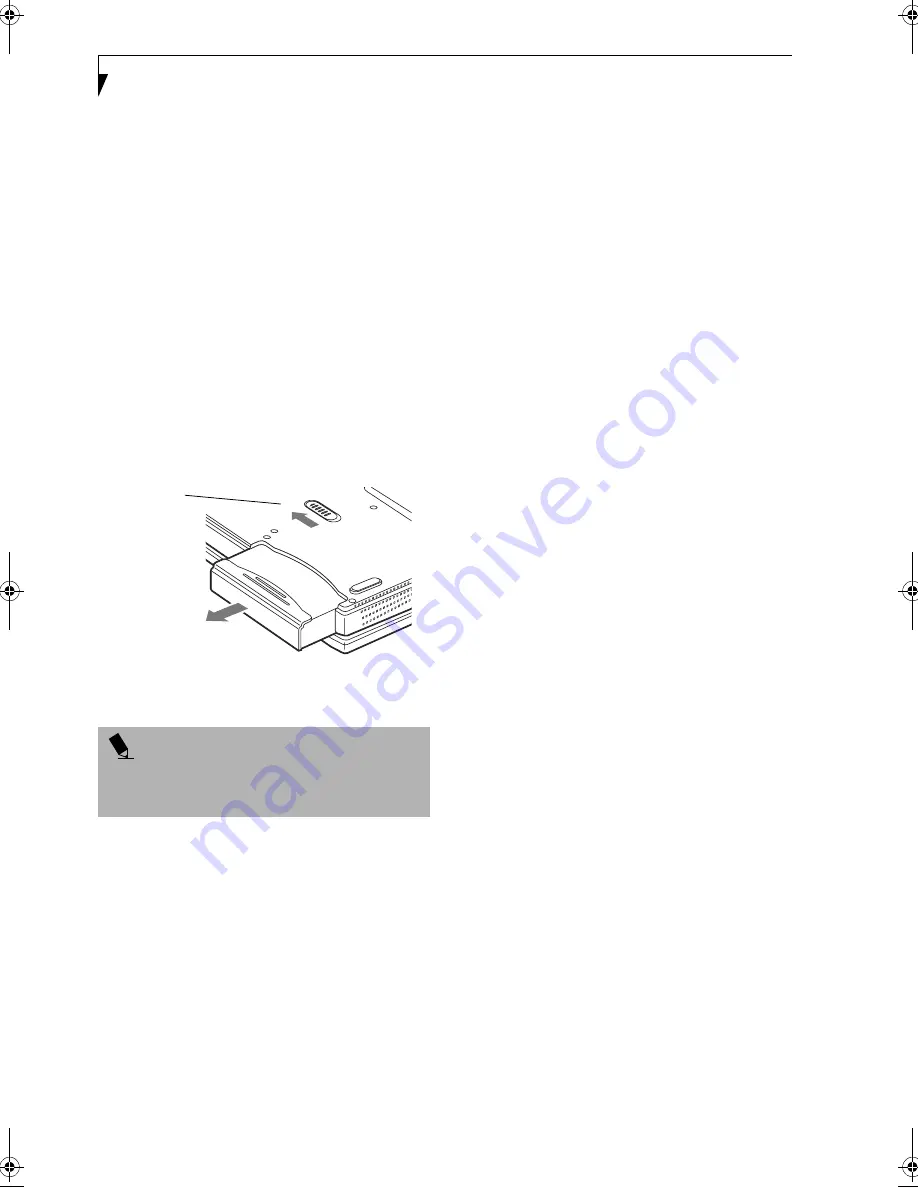
(Figure 4-1)
1. Have a charged battery ready to install.
2. Shut down your LifeBook notebook and disconnect
the AC adapter.
3. Slide the battery release latch while pulling the
battery from the bay.
(Figure 4-1)
4. Remove the battery from the bay.
5. Slide the new battery into the bay. The pins will
automatically align with the connector.
6. Press the battery in until the battery release latch
snaps into place.
7. Plug in the AC adapter and turn the power on.
Figure 4-1 Replacing the Battery
P O I N T
If the Lithium ion battery connector is not fully seated,
you may not be able to use your LifeBook notebook or
charge your battery.
Battery Latch
B5FH-5121-01EN-00.book Page 36 Wednesday, April 10, 2002 11:02 AM
Summary of Contents for LifeBook A1010
Page 2: ...L i f e B o o k A S e r i e s ...
Page 6: ...L i f e B o o k A S e r i e s ...
Page 7: ...1 1 Preface ...
Page 8: ...2 L i f e B o o k A S e r i e s ...
Page 10: ...4 L i f e B o o k A S e r i e s S e c t i o n O n e ...
Page 11: ...5 2 Getting to Know Your Computer ...
Page 12: ...6 L i f e B o o k A S e r i e s S e c t i o n T w o ...
Page 29: ...23 3 Getting Started ...
Page 30: ...24 L i f e B o o k A S e r i e s S e c t i o n T h r e e ...
Page 38: ...32 L i f e B o o k A S e r i e s S e c t i o n T h r e e ...
Page 39: ...33 4 User Installable Features ...
Page 40: ...34 L i f e B o o k A S e r i e s S e c t i o n F o u r ...
Page 54: ...48 L i f e B o o k A S e r i e s S e c t i o n F o u r ...
Page 55: ...49 5 Troubleshooting ...
Page 56: ...50 L i f e B o o k A S e r i e s S e c t i o n F i v e ...
Page 71: ...65 6 Care and Maintenance ...
Page 72: ...66 L i f e B o o k A S e r i e s S e c t i o n S i x ...
Page 76: ...70 L i f e B o o k A S e r i e s S e c t i o n S i x ...
Page 77: ...71 7 Specifications ...
Page 78: ...72 L i f e B o o k A S e r i e s S e c t i o n S e v e n ...
Page 81: ...75 8 Glossary ...
Page 82: ...76 L i f e B o o k A S e r i e s S e c t i o n E i g h t ...
Page 90: ...84 L i f e B o o k A S e r i e s ...
Page 94: ...L i f e B o o k A S e r i e s ...