background image

8

S t y l i s t i c   S T 4 0 0 0   S e r i e s   T a b l e t   D o c k

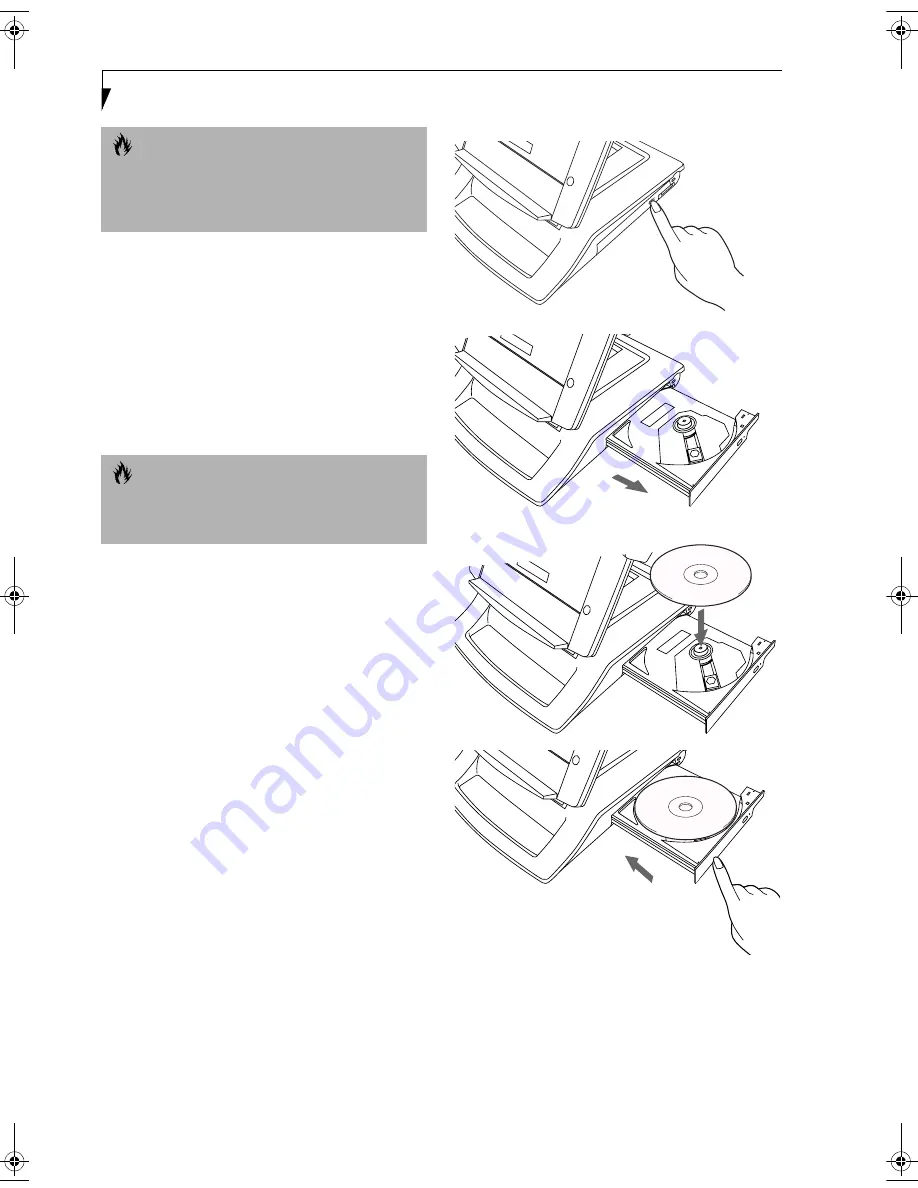
LOADING MEDIA

(Refer to Figure 8 for the following steps)

To load a disc into your media player drive, follow these 
steps:

1. Push and release the eject button on the front of the 

drive to open the holder tray. The tray will come out 
of the system a short distance. 

2. Gently pull the tray out until a media disc can easily 

be placed in the tray.

3. Place the media into the tray, label side up, with the 

hole in the center of the disc. Snap the disc onto the 
raised circle in the center of the tray.

4. Gently push the holder tray back in until you hear 

a click. 

REMOVING MEDIA

(Refer to Figure 8 for the following steps)

1. Push and release the eject button on the front of

the media player drive. This will stop the drive and 
the holder tray will come out of the system a short 
distance.

2. Gently pull the tray out until the disc can easily be 

removed from the tray.

3. Carefully remove the media disc from the holder 

tray.

4. Gently push the holder tray back in until you

hear a click.

Figure 8.  Loading/Ejecting Media

C A U T I O N

Do not operate your media drive unless your system is 
sitting on a relatively flat surface. Using the drive when 
the system is not level may damage the drive or prevent 
proper operation.

C A U T I O N

There may be a protective sheet in the tray from when it 
was shipped; please make sure it is removed before 
operating the drive.

Tablet Dock.fm  Page 8  Wednesday, September 11, 2002  10:06 AM

Summary of Contents for FPCPR32AP

Page 1: ...Fujitsu Stylistic ST4000 Series TABLET DOCK USER S GUIDE ...

Page 2: ...ucts Tablet Dock w Combo DVD CD RW FPCPR32AP Tablet Dock w CD ROM FPCPR33AP Comply with Part 15 of the FCC Rules This device complies with Part 15 of the FCC rules Operations are subject to the following two conditions 1 This device must not be allowed to cause harmful interference 2 This device must accept any interfer ence received including interference that may cause undesired operation ...

Page 3: ...s or hubs IEEE 1394 Jack Allows you to connect a peripheral such as a digital video camera W A R N I N G S Do not expose the Tablet Dock to rain moisture excessive dirt or temperatures outside the Environ mental Specifications as it may cause fire and shock hazards High voltage is present inside the Tablet Dock Do not remove the cover under any circumstances There is a serious shock hazard Switch ...

Page 4: ... Front View Figure 2 Back View Side Latch Back Latch Back Latch Interface Lock Release Lock Handle CD ROM or Combo DVD CD RW Drive Platform both sides Kensington Lock Slot Button Positioning Guide Positioning Guide Connector Front of base Do not use as a carrying handle LAN RJ 45 Jack External Monitor VGA Port Line Out Jack DC In Jack USB Ports Qty 3 IEEE 1394 Jack Easel Release Buttons ...

Page 5: ...far as it will go This engages the back latches and side latches and locks the system in place 5 Your Tablet Dock is now ready for use You may now attach devices to it UNDOCKING YOUR SYSTEM Use these instructions when you want to remove your system from the Tablet Dock 1 If you are running a CD or DVD in the Tablet Dock drive be sure to stop the drive before undocking the ST4000 2 Press the lock r...

Page 6: ... the direction shown in Figures 6 and 7 If the display is in portrait position turn the display to the right as shown in Figure 6 If the display is in landscape position turn the display to the left as shown in Figure 7 Figure 6 Changing DIsplay from Portrait to Landscape Mode Figure 7 Changing Display from Landscape to Portrait Mode P O I N T When you change the orientation of the system the disp...

Page 7: ...uctions USING THE INTERNAL MEDIA DRIVE The Tablet Dock is outfitted with either a CD ROM drive or a Combo DVD CD RW drive depending upon the configuration of your dock A CD ROM drive allows you to access software data or audio CDs A DVD CD RW combo drive allows you to access movies audio software data or audio DVD CDs and to write data onto recordable CDs CD ROM drive All of the software you need ...

Page 8: ...hear a click REMOVING MEDIA Refer to Figure 8 for the following steps 1 Push and release the eject button on the front of the media player drive This will stop the drive and the holder tray will come out of the system a short distance 2 Gently pull the tray out until the disc can easily be removed from the tray 3 Carefully remove the media disc from the holder tray 4 Gently push the holder tray ba...

Page 9: ...Tablet PC after turning it off Failure to do this can result in damage to the system s electrical circuitry FUJITSU CONTACT INFORMATION If you have problems you are unable to resolve consult your support representative toll free at Phone 1 800 8Fujitsu 1 800 838 5487 FAX 901 259 5900 E mail 8fujitsu fujitsupc com Web Site www fujitsupc com Before you place the call have the following information r...

Page 10: ... phones or external speakers DC input 16VDC IEEE 1394 4 pin standard connector USB Universal Service Bus Ports quantity 3 LAN connector 100Base TX 10Base T RJ 45 System Bay Accommodates CD ROM or DVD CD RW drive Power 16VDC with current of 3 75 A Dimensions Height 12 95 329mm Width 8 66 220mm Depth 10 35 263mm Weight 5 95 lbs 2 7Kg Environmental Operating Temperature 40o 95o F 5o 35o C Storage Tem...

Page 11: ...11 T a b l e t D o c k U s e r s G u i d e ...

Page 12: ...registered trademarks of the Microsoft Corporation Fujitsu and the Fujitsu logo are regis tered trademarks of Fujitsu Ltd and Stylistic is a registered trademark of Fujitsu PC Corporation All other trademarks mentioned herein are the property of their respective owners Product description data reflects Fujitsu design objectives and is provided for comparative purposes actual results may vary based...

Reviews: