background image


fi-7480 / fi-7460


C

ONSUMABLE 

R

EPLACEMENT AND 

C

LEANING 

I

NSTRUCTIONS 


11 


C

LEANING THE 

S

CANNER 


The Scanners Automatic Document Feeder (ADF) should be cleaned at least every 5000 pages.  This is 
very dependent on the types of paper being scanner, when scanning documents with toner that has not 
fused will or have ink, the scanner may require more frequent cleaning. 
 

2.  Turn off the scanner and wait for at least 15 minutes 
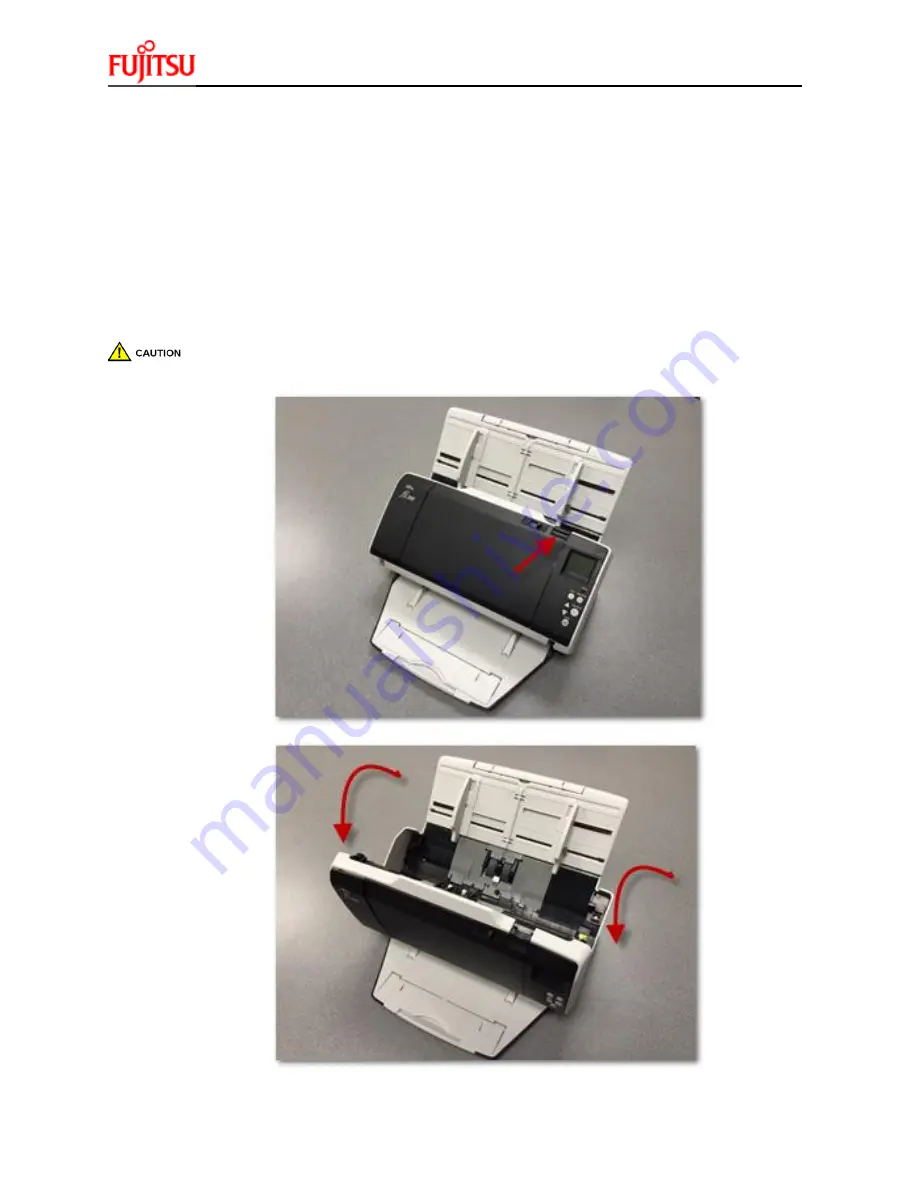
3.  Open the ADF by pressing the ADF Open Lever and Pull the ADF towards the front of the 

scanner in the direction of the arrow shown in the pictures below. 


   When the ADF is open, it might close accidentally.  Use caution when the ADF is open. 


Summary of Contents for fi-7460

Page 1: ...fi 7480 fi 7460 CONSUMABLE REPLACEMENT AND CLEANING INSTRUCTIONS CG00002 293601 Version A fi 7480 fi 7460 CONSUMABLE REPLACEMENT AND CLEANING INSTRUCTION fi 748PRB Imprinter ...

Page 2: ...ks Pick Roller Kit PA03670 0002 A shaft is not included in the Pick Roller Kit When replacing the pick roller reuse the old Pick shaft Brake Roller Kit Part Name Part Number Remarks Brake Roller Kit PA03710 0001 A shaft is not included in the Brake Roller Kit When replacing the brake roller reuse the old brake shaft Brake Roller Assembly with shaft Pick Roller Assembly with shaft ...

Page 3: ...r cable and let cool for 15 minutes 1 Remove all documents from the ADF paper chute 2 Open the ADF When the ADF is open it might close accidentally Use caution when the ADF is open 3 Remove the Brake Roller Shaft Assembly a Hold both Ends of the cover and open it in the direction of the arrow b Lift the right side of the roller Pull out the shaft form the slot on the left 4 Remove the brake roller...

Page 4: ...the Protrusion on the Brake Roller Shaft Assembly into the slot on the brake roller 6 Attach the Brake Roller Shaft Assembly a Insert the left end of the Brake Roller Shaft Assembly into the hole in accordance with the hole shape and then attack the right side of the shaft b Close the cover 7 Close the ADF 8 Reset the Brake Roller Counter ...

Page 5: ...emove the documents from the ADF paper Chute 2 Remove the ADF Paper Chute 3 Open the ADF Open the ADF by pressing the ADF Open Lever and Pull the ADF towards the front of the scanner in the direction of the arrow shown in the pictures below When the ADF is open it might close accidentally Use caution when the ADF is open 4 Remove the Pick Shaft Assembly a Open the sheet guide by lifting the tabs b...

Page 6: ...e arrow below 2 f Lift the Pick Shaft Assembly up in the direction of the arrow below 3 Be careful not to touch the gear near the bushing on the shaft as it contains grease 5 Remove the two 2 pick rollers from the Pick Shaft Assembly on at a time a Pull out one of the pick rollers from the as you press the retaining clip b Pull out the other pick roller from the Pick shaft Assy as you press the re...

Page 7: ...Assembly one at a time a Insert the retaining clip of the pick roller into the slot b Insert the retaining clip of the other pick roller into the slot Check that the pick rollers are attached properly Otherwise it may cause feeding errors such as paper jams Make sure to insert the pick rollers until they lock in place ...

Page 8: ...er end gradually b Rotate the bushing on the pick shaft in the direction of the arrow below c Close the sheet guide Make sure that both ends of the sheet guide are locked firmly Confirm that the pick Shaft Assembly is installed properly Otherwise it may cause feeding errors such as paper jams 8 Close the ADF 9 Attach the ADF paper Chute 10 Reset the pick Roller Counter ...

Page 9: ...r the rollers are still dirty after they are wiped with a dry cloth use a cloth moistened with 90 or higher Isopropyl Alcohol As the scanner continues to feed documents paper dust will accumulate inside the ADF and it may cause scanning errors Cleaning should be performed approximately every 5 000 sheers scanned The glass inside the ADF can be very hot when the scanner is being used Before you sta...

Page 10: ...ed pages for the Brake roller unit and the Pick roller unit by referring to each counter on this scanner Description Qty Life Fujitsu P N Pick Rollers 2 1 200 000 PA03710 0001 Brake Roller 1 200 000 PA03670 0002 Note Replacement Cycles are estimated guidelines established by testing with A4 Letter sized wood free and wood based 17 lb paper NCR or Carbonless paper has chemical composition which dam...

Page 11: ...being scanner when scanning documents with toner that has not fused will or have ink the scanner may require more frequent cleaning 2 Turn off the scanner and wait for at least 15 minutes 3 Open the ADF by pressing the ADF Open Lever and Pull the ADF towards the front of the scanner in the direction of the arrow shown in the pictures below When the ADF is open it might close accidentally Use cauti...

Page 12: ...NSTRUCTIONS 12 4 Clean the following parts with a dry lint free cloth or moistened with F1 1 Cleaning the Brake Roller x2 a Remove the Brake Roller Refer to b Gently wipe off any dirt or dust along the grooves taking care not to damage the roller surface ...

Page 13: ...roller surface Make sure that it is wiped properly because black residue on the roller will affect the feeding performance When wiping the roller be careful not to damage the sponge that is attached to the middle of the plastic idler roller 4 Cleaning the Glass x2 Gently wipe off any dirt or dust on surface of the glass sections 5 Ultrasonic Senor x2 See pictures below 6 Document Sensor x8 Gently ...

Page 14: ...hen to perform Cleaning 2 Check After Cleaning 3 This counter turns yellow when the page count after cleaning reaches 100 of the value specified in Cleaning Cycle Scanner cleaning cycle setting in Software Operation Panel c Resetting the sheet counters d Click the Clear 1 button for After Cleaning the counter is reset to 0 The following message may appear while the scanner is in use In this case c...

Page 15: ...ate on the package to make sure it hasn t expired o The install by date is printed on the package of the print cartridge The Cartridge needs to be installed by the date specified o The cartridge can be used for six months from the time the package is opened Notice when installing the print cartridge make sure it is installed properly 1 Turn of the Scanner 2 Place your hand in the middle part of th...

Page 16: ...ridge holder 4 Lift the print cartridge holder by pinching the lever with your fingers as shown below 5 If there is a print cartridge already installed remove the print cartridge 6 When replacing the print cartridge prepare a new print cartridge as shown below Notice Do not touch the metal part of the print cartridge or put the tape back on again ...

Page 17: ...ng to the right Notice be careful not to let the print cartridge catch the print circuit film 8 Lower the print cartridge holder gently until it locks in place 9 Place the print cartridge within the printing area a Hold the print cartridge as shown below and slide it left and right to place it where the document will pass through ...

Page 18: ...n Panel see page 9 or 14 12 After replacing the print cartridge run a test print in maintenance menu a Hit the Menu button in the Operator Control Panel b Use the down arrow to go to option 3 Test Print c Hit the Scan Enter button i 1 If you select 1 printing is not performed ii 2 if you select 2 the test proceeds to print pattern d Select the print pattern you wish to print i L Landscape and P Po...

Reviews: