background image


7


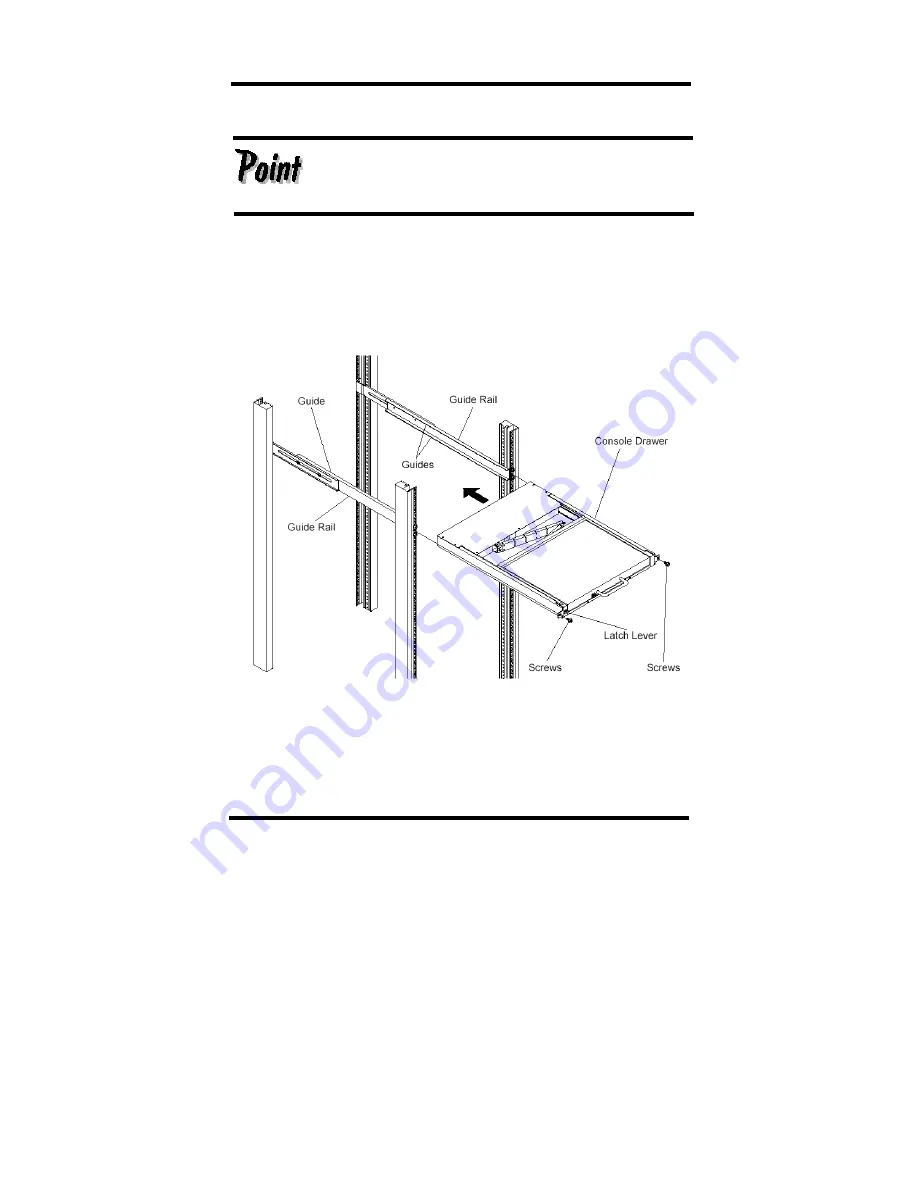
Installing Console Drawer 


Be careful that the latch lever (see page 15) does not come loose. 
If the latch lever comes loose the Console Drawer may slip. If the 
Console Drawer does not slide easily into the guide rail or is 
heavy, lift and insert it with two or more people. 


1.

 After installing the guide rails, insert the Console Drawer into the front end of the 

guide rails. 


2.

 Push the Console Drawer in until it stops, then fasten with two screws, one on each 

side of the front of the Console Drawer. 


Installing the Console Drawer 

Summary of Contents for FD-1000ST

Page 1: ...Console Drawer FD 1000ST SUN PC SERVER User s Manual ...

Page 2: ...severe physical damage or other loss hereinafter High Safety Required Use including without limitation reaction core cont in nuclear power facilities aircraft autopilot flight control air traffic contro operation control in mass transport control systems medical instruments for life support systems missile launching control in weapon systems You shall not use this Product without securing the suff...

Page 3: ...NG AND REMOVING CABLES 12 Connecting Cables 12 Removing Cables 12 Connecting to Ports 13 OPERATION 14 Operating the Console Drawer 14 Adjusting the Monitor 17 Basic Adjustment Procedure 18 Menu Screen Display Example 18 Menu Description 19 Resolution and Refresh Rate 20 Keyboard Operation 20 Pointing Device Operation 21 Hot key and Reset Buttons 22 Using CRT KB Switcher 23 Storing Console Drawer 2...

Page 4: ...ii ...

Page 5: ...e Console Drawer or physical injury which may result if the Console Drawer is operated incorrectly by ignoring this symbol This logo indicates supplemental information comments or hints CAUTION Text that is preceded by a number such as 1 indicates that the operation must be done in the order indicated Reference to important chapter titles and terminology are in brackets Packing List Make sure that...

Page 6: ... damaged when unpacking 2 Remove the rubber stabilizer from the front left side of the Console Drawer The rubber stabilizer is inserted to prevent the Console Drawer from sliding when installing or moving it Be sure to keep it after finishing the installation for when it needs to be used again CAUTION Rubber stabilizer removal ...

Page 7: ...nsole Drawer Make sure that the rated voltage meets the specifications of this device Refer to Technical Specifications and the model plate on this device The power cable for the Console Drawer is specially certified Do not connect it to anyplace other than a grounded wall outlet in order to avoid electric shocks and or short circuit Arrange the immediate area around the Console Drawer s power soc...

Page 8: ...sary to adequately isolate the data cables connected to peripheral equipment To cut off the power supply unplug the power cable from its socket Follow the instructions in the appropriate section in Operation when cleaning the server Keep this manual with the Console Drawer If you give the Console Drawer to a third party give them this manual also Do not use the Console Drawer as a stepladder or le...

Page 9: ...n them Rear Spacers will be at the back See the installing the guide rail diagram on page 6 1 Insert the rear spacer studs of the guide rails into the holes in the rear rack pillars Fasten each guide rail with two screws inserted from the outside of the pillar one into each of the top and bottom holes of the rear spacer 2 Extend the guide rails to reach the inside of the front rack pillar Fasten e...

Page 10: ...6 Installing the Guide Rails ...

Page 11: ...nsole Drawer does not slide easily into the guide rail or is heavy lift and insert it with two or more people 1 After installing the guide rails insert the Console Drawer into the front end of the guide rails 2 Push the Console Drawer in until it stops then fasten with two screws one on each side of the front of the Console Drawer Installing the Console Drawer ...

Page 12: ...tric charges Only work on this device after checking that it has been electrically discharged Some metal edges may be sharp Be careful to not cut yourself To avoid damaging this device do not place foreign objects including metal objects water and or liquids inside it Also do not touch except as necessary To avoid damage only licensed engineers should install the 4 port KVM switch Philips screwdri...

Page 13: ... the open space in the rear top panel making sure that the 4 port KVM switch s connectors face out from the rear of the Console Drawer 3 Reattach the KVM holder to the rear top panel with the four screws removed in step 1 Installation Method 1 4 port KVM switch Assembly viewed from the left rear ...

Page 14: ...se the Installing Console Drawer operation on page 7 1 Remove the four screws that secure the KVM holder in place 2 Insert the 4 port switch into the open space in the rear top panel making sure that the 4 port KVM switch s connectors face out from the rear of the Console Drawer 3 Fasten the 4 port KVM switch in place with the four new screws inserted from underneath the rear panel 4 Reattach the ...

Page 15: ...eft and right sides of the 4 port KVM switch Insert the 4 port KVM switch under the KVM holder between the two bent down flaps of the rear top panel making sure that the 4 port KVM switch s connectors face out from the rear of the Console Drawer Fasten it in place with the four screws removed in step 2 3 Reattach the rear top panel with 4 port KVM switch attached to the rear plate Comp using the t...

Page 16: ...er CAUTION Connecting Cables 1 Unplug the power cords from the power outlets of all the equipment that is affected 2 Connect the Sun cable and the monitor cable to their respective pieces of equipment 3 Plug the power cable into the Console Drawer 4 Plug the power cable into a grounded power outlet Connecting cables to Console Drawer Removing Cables Unplug the power cords from the power outlets of...

Page 17: ...ing You can connect as many servers as there are ports 1 Connect the Sun cable to the Sun port and the monitor cable to the DISP port 2 Use the dedicated cable to connect the server sun port to the CRT KB Switcher 3 Connect the terminal monitor cable to the DISP port 15 pin mini D SUB Connecting ports If you are using a separate CRT KB switcher rather than the back of the Console Drawer refer to t...

Page 18: ...ties as pulling or pushing the slide module and opening and closing the LCD Operating the Console Drawer 1 If the rubber stabilizer has not been removed yet remove it now 2 Push down on the latch lever on the front left side of the Console Drawer Pull out the Console Drawer with its handle until it clicks Before pulling it out make sure that the two screws on the front of the Console Drawer are ti...

Page 19: ... out the slide module 3 Push up on the LCD lock on the left side of the handle and then grasp the handle and open the top of the monitor 4 Turn on the power by pushing the POWER button Open the monitor completely ...

Page 20: ...16 Opening the LCD ...

Page 21: ...Menu button Push this button to adjust the monitor Button Push this button to select OSD menu items downward Button Push this button to select OSD menu items upward Auto Button Push this button to adjust the window s position phase and clock automatically You can eliminate screen noise by adjusting the Phase on the setting menu Be careful when applying a strong force to the equipment when the Cons...

Page 22: ... Switch to the various adjustment screens with the Menu button 4 Change setting values with the button and the button 5 Apply setting values and return to the menu screen with the Menu button 6 Push the menu button to close the menu The menu button automatically closes if no button operations are done for a set time Example Menu Screen ...

Page 23: ...djusts the vertical position of the screen Color Mode Adjusts the color Clock Adjusts the width of the screen Phase Adjusts the phase eliminates screen noise Management Accesses the Scaling OSD Display Language Source and Recall settings menu Scaling Switches the screen size between Full maximum size and 1 1 actual size OSD Display Adjusts the menu screen position Language Selects the menu languag...

Page 24: ...eration By making use of the Function Fn key it is possible to obtain full keyboard functionality from even a reduced space keyboard Fn key key combinations The extra command keys that are enclosed in billets e g Help around the perimeter of the keyboard may be accessed by pressing the associated key together with the Function key e g Help Fn Esc The command keys that are not enclosed e g compose ...

Page 25: ...or lightly tap the touchpad surface twice and lightly slide over the device without releasing it 1 The pointing device has been designed to be operated with one finger do not use it in the following ways 1 While wearing gloves 2 With a pen ballpoint pen or pencil etc 3 With two or more fingers 4 Operating while something is placed on the touchpad surface 2 Normal operation may become impossible if...

Page 26: ...his will also be the Hot key mode OSD display when connected to a KVM switch Reset Button Resets the keyboard and mouse KVM switch keyboard and mouse will be reset if connected to a FS 10XX Series KVM switch KVM Switch Reset is only valid with the following series FS 1004 1008 and 1016 CAUTION ...

Page 27: ...of one type of parameters supports these settings which are stored for the screen Displays on other servers are affected by correcting an on screen image that has shifted To correct shifted displays change the following settings 1 Set the refresh rate of servers that have displays with incorrect images to a different value 2 Select the best screen display and the save it As multiple refresh rates ...

Page 28: ... in place 3 Depress the slide rail lock springs and slide the Console Drawer back into the rack Make sure that the latch lever clicks back into its lock position at the end Be careful not to pinch your fingers or hands in the guide rails slide rails or the Console Drawer itself when storing the Console Drawer If the latch lever is not locked the Console Drawer may suddenly slide out when the rack ...

Page 29: ...25 Inserting the slide module ...

Page 30: ...wer If liquids enter the interior of the Console Drawer it may result in malfunctions or damage CAUTION Wipe the Console Drawer and monitor with a dry cloth If the dirt is excessive wipe it off with a soft cloth that has been thoroughly wrung out after being dipped in household cleanser diluted with water Remove dust with a soft brush Clean the keyboard and pointing device with a sterile cloth Lig...

Page 31: ...45 mm Weight 12 0 Kg Required Environmental Conditions Operating Temperature 15 35 C Avoid condensation during use According to the server environmental conditions Monitor Panel monitor 15 TFT color LCD Resolution Max Horizontal 1280 dots x vertical 1024 lines Pitch 0 2175 x 0 2175mm Refresh rate Max 85Hz Colors Max 16 777 216 dithering Brightness 150 cd m Connector mini D SUB 15 pin analog RGB Po...

Page 32: ...Layout US layout EU layout Number of keys US layout 83 EU layout 84 Connector mini DIN 8 pin Pointing Device Model Static Touch Pad Resolution 220 cpi counts inch Connector mini DIN 8 pin Button Number of buttons 3 ...

Page 33: ...Note ...

Page 34: ...Note ...

Page 35: ...NENT LIMITED Printed in Japan The contents of this manual may be modified for improvements without prior notice Fujitsu bears no responsibility for infringement of patent or other rights of third parties ascribable to the use of data in this manual Reprinting of this manual without permission is prohibited ...

Page 36: ...This manual is made of recycled paper 021220 ...

Reviews: