background image

En-19

10.2. Setting the dip switches

Set the remote controller DIP switches.

[Example]

ON

ON

OFF

1
2
3
4
5
6

DIP switch 1

Front case (back side)

NO.

SW state

Detail

OFF

ON

DIP- 
switch 1

1

)

Cannot be used.  
(Do not change)

2

)

Dual remote controller setting

*

  Refer to 2. DUAL REMOTE 

CONTROLLERS in 11 
SPECIAL INSTALLATION 
METHODS.

3

)

Cannot be used.  
(Do not change)

4

)

Cannot be used.  
(Do not change)

5

)

Cannot be used.  
(Do not change)

6

)

Invalidity

Validity

Memory backup setting

*

  Set to ON to use batteries 

for the memory backup. If 
batteries are not used, all 
of the settings stored in 
memory will be deleted if 
there is a power failure.

(

)

 Factory setting)

10.3. Function setting

This procedure changes the function settings used to control 
the indoor unit according to the installation conditions. Incorrect 
settings can cause the indoor unit to malfunction. This proce-
dure should be performed by authorized installation or service 
personnel only.

Perform the “FUNCTION SETTING” according to the installation 
conditions using the remote controller. (Refer to the indoor unit 
installation manual for details on the function numbers and set-
ting values.)

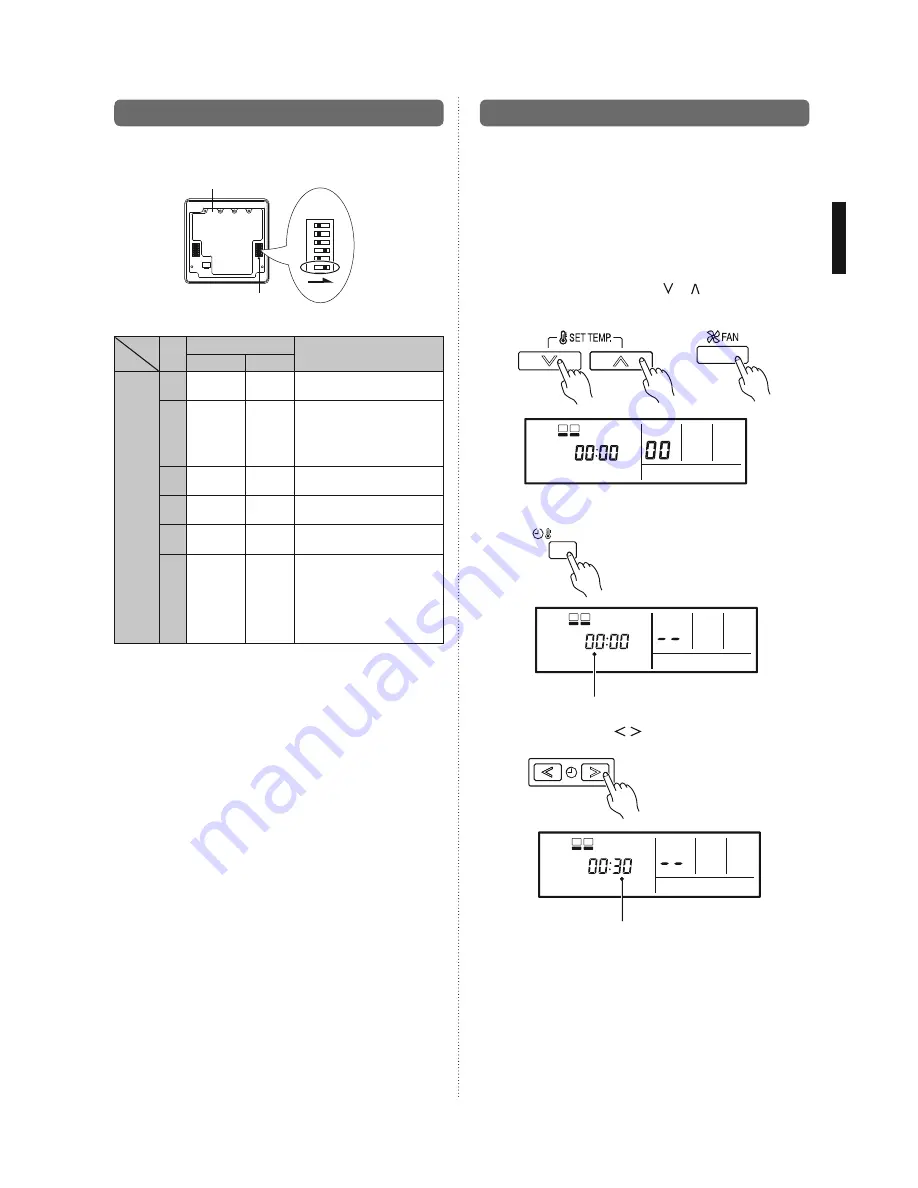
(1)  Press the SET TEMP. buttons (   ) (   ) and FAN button 

simultaneously for more than 5 seconds to enter the function 
setting mode.

SU MO TU WE TH FR SA

(2)  Press the SET BACK button to select the indoor unit num-

ber.

SU MO TU WE TH FR SA

Unit number of INDOOR UNIT

SET BACK

(3)  Press the SET TIME ( 

 ) buttons to select the function 

number.

Function number

SU MO TU WE TH FR SA

Summary of Contents for AirStage AR12

Page 1: ...ype Floor standing concealed type 7 6 2A Installation the unit Ceiling concealed type 7 6 2B Install the unit Wall mounted type Floor standing concealed type 10 7 PIPE INSTALLATION 12 7 1 Selecting the pipe material 12 7 2 Pipe requirement 12 7 3 Flare connection Pipe connection 12 7 4 Installing heat insulation 13 8 INSTALLING DRAIN PIPES 14 8 1A Installing drain pipes Ceiling concealed type 14 8...

Page 2: ...nect all wiring tightly Loose wiring may cause overheat ing at connection points and a possible fire hazard When Transporting Be careful when picking up and moving the indoor and out door units Get a partner to help and bend your knees when lifting to reduce strain on your back Sharp edges or thin alu minum fins on the air conditioner can cut your fingers When Installing In a Ceiling or Wall Make sur...

Page 3: ...pipes It is necessary to use seamless copper pipes and it is desirable that the amount of residual oil is less than 0 0014 oz 10 m 33 ft Do not use copper pipes having a collapsed deformed or discolored portion especially on the interior surface Otherwise the expansion value or capillary tube may become blocked with contaminants As an air conditioner using R410A incurs pressure higher than when us...

Page 4: ...ication Operating Manual 1 Installation Manual 1 This book Installation template 1 For positioning the indoor unit Washer 8 For installing indoor unit Coupler heat insulation Large 1 For indoor side pipe joint Large pipe Coupler heat insulation Small 1 For indoor side pipe joint Small pipe Binder Medium 3 For power supply and remote control cable binding Large 4 For fixing the coupler heat insulat...

Page 5: ...eter Liquid pipe Gas pipe AR9 12 model 6 35 mm 1 4 in 9 52 mm 3 8 in AR18 model 6 35 mm 1 4 in 12 70 mm 1 2 in AR24 model 6 35 mm 1 4 in 15 88 mm 5 8 in Use pipe with water resistant heat insulation CAUTION Install heat insulation around both the gas and liquid pipes Failure to do so may cause water leaks Use heat insulation with heat resistance above 248 F Reverse cycle model only In addition if ...

Page 6: ...nd receptacle Do not extend the power cable WARNING Refer to local codes for acceptable cable type Cable Cable size Remarks Connection cable 14 AWG 3 cable Ground 1Φ 208 230 V Max Cable Length Limit voltage drop to less than 2 In crease cable gauge if voltage drop is 2 or more 5 SELECTING THE MOUNTING POSITION Correct initial installation location is important because it is difficult to move unit a...

Page 7: ...32 or more 300 11 13 16 or more 300 11 13 16 or more Inlet air Inlet air Strong and durable floor Strong and durable floor 10 13 32 or less Right side PIPE side Right side PIPE side Grill Duct Grill Strong and durable floor unit mm in 6 2A Installation the unit Ceiling concealed type WARNING Install the air conditioner in a location which can withstand a load do at least 5 times the weight of the mai...

Page 8: ...n WG AR24 Model Set the static pressure outside the unit to 0 2 in WG or less the allowable range is between 0 and 0 2 in WG Replace the cover as follows Remove the screws and then remove cover and fan guard Install the cover with the screws as shown in the illustration below Model Screw M5 AR9 12 9 AR18 11 AR24 13 screw M5 Cover Fan guard Side Inlet Side Outlet Insulation material Field supply Al...

Page 9: ...7 32 unit mm in AR9 12 AR18 AR24 A 734 28 29 32 934 36 25 32 1134 44 21 32 6 2A 4 FIX THE UNIT 1 Hang the unit Hanger bolt Nut A Field supply Nut B Field supply Washer Accessories Hanger Hanger bolt Nut A Field supply Washer Accessories Nut B Field supply Unit Hanger 20 mm 25 32 in length Cover It might become difficult to open and shut the Cover control box cover when the length exceeds 20 mm 25 3...

Page 10: ...r in return duct 2 Outlet side Connect the duct to outlet flange Wind the outlet flange connecting to the duct with aluminum tape etc to avoid the air discharge Insulate the duct to avoid condensation CAUTION Check that duct work does not exceed the range of external static pressure of equipment Make sure to insulate ducts to avoid condensation Make sure to insulate between ducts and walls if metal...

Page 11: ...is installed in wall mounted type floor standing concealed type 6 2B 3 INSTALLING THE UNIT To prevent overturning attach the unit to the floor or the wall To avoid vibration of the unit install vibration isolation pad between the unit and the floor or the wall Leveling Level unit before attaching to floor or wall Level 10 mm or less 13 32 in NO GOOD OK Level NO GOOD OK 10 mm or less 13 32 in CAUTION F...

Page 12: ...f connecting pipe or for difference of its elevation Use pipe with water resistant heat insulation CAUTION Install heat insulation around both the gas and liquid pipes Failure to do so may cause water leaks Use heat insulation with heat resistance above 248 F Reverse cycle model only In addition if the humidity level at the installation location of the refrigerant piping is expected to exceed 70 i...

Page 13: ... with a torque wrench using the specified tightening method Otherwise the flare nuts could break after a prolonged period causing refrigerant to leak and generate a hazardous gas if the refrigerant comes into contact with a flame CAUTION Connect the piping so that the control box cover can easily be removed for servicing when necessary In order to prevent water from leaking into the control box make ...

Page 14: ...M1 Be sure to connect the pipes for drainage without leakage To avoid condensation and dripping always insulate the indoor drain pipe Install the drain pipe with downward gradient 1 50 to 1 100 and so there are no rises or traps in the pipe Use general hard polyvinyl chloride pipe 19 mm 3 4 in O D 27 mm 1 1 16 in and connect it with adhesive polyvinyl chloride so that there is no leakage When the ...

Page 15: ...ten the Hose band 2 at the position where vertical against ground The Hose band 2 must be positioned at the right side of the Drain hose 1 as in the figure CAUTION Do not connect to the Drain hole with adhesive Using adhesive may cause damage and water leaks 3 After installing the Drain hose 1 check if the drainage is smooth When drain pump is not used Natural drainage Downward gradient 2 5 5 0 mm ...

Page 16: ...h box Erroneous wiring may cause burning of the electric parts Connect the connection cords firmly to the terminal board Imperfect installation may cause a fire Always fasten the outside covering of the connection cord with the cable clip If the insulator is chafed electric leakage may occur Always connect the ground wire 1 Use ring terminals with insulating sleeves as shown in the figure below to co...

Page 17: ... correct capacity of disconnect switch according to the load CAUTION Tighten the indoor unit connection cable and power supply indoor and outdoor unit branch box terminal board connections firmly with the terminal board screws Faulty connection may cause a fire If the indoor unit connection cable and power supply are wired incorrectly the air conditioner may be damaged Connect the indoor unit connec...

Page 18: ...ntroller Open the operation panel on the front of the remote control ler remove the 2 screws indicated in the following figure and then remove the front case of the remote controller When installing the remote controller remove the connector from the front case The wires may break if the connector is not removed and the front case hangs down When installing the front case connect the connector to t...

Page 19: ...tion setting This procedure changes the function settings used to control the indoor unit according to the installation conditions Incorrect settings can cause the indoor unit to malfunction This proce dure should be performed by authorized installation or service personnel only Perform the FUNCTION SETTING according to the installation conditions using the remote controller Refer to the indoor un...

Page 20: ...ing to the amount of dust or debris in the room If you do not wish the filter sign to be displayed select the setting value for No indication Factory setting Setting description Function number Setting value Standard 400 hours 11 00 Long interval 1000 hours 01 Short interval 200 hours 02 No indication 03 2 Static pressure Select appropriate static pressure according to the installation conditions F...

Page 21: ...he room temperature sensor may require a correction The settings may be changed as shown in the table below Factory setting Setting description Function number Setting value Standard 31 00 Lower control 01 Slightly warmer control 02 Warmer control 03 When using floor console installation change the setting value to 01 5 Auto restart Enable or disable automatic system restart after a power outage F...

Page 22: ...pressor protection CHECK ITEMS 1 Is operation of each button on the remote control unit normal 2 Does each lamp light normally 3 Do not air flow direction louvers operate normally 4 Is the drain normal 5 Is there any abnormal noise and vibration during operation Do not operate the air conditioner in test run for a long time OPERATION METHOD For the operation method refer to the operating manual 1 S...

Page 23: ... off the main power DUAL REMOTE CONTROLLERS 2 separate remote controllers can be used to operate the indoor units The timer and self diagnosis functions cannot be used on the slave units 1 Wiring method indoor unit to remote controller Remote controller cable Indoor unit Remote controller Slave unit Master unit 2 Remote controller DIP switch 1 setting Set the remote controller DIP switch 1 No 2 ac...

Page 24: ...1 12 2 Remote sensor Optional parts Connection method Connection terminals Remote sensor terminal CN8 Wiring arrangement Binder Remove the existing connector and replace it with the remote sensor connector ensure that the correct connector is used The original connector should be insulated to ensure that it does not come into contact with other electrical circuitry Setting for room temperature cor...

Page 25: ... Active filter error PFC circuit error Voltage error stoppage permanently Voltage error can restore Over current protected operation stoppage permanently PFC hardware error 6 5 Outdoor unit IPM error Trip terminal L error 6 10 Outdoor unit Display panel error Microcomputers communication error 7 1 Outdoor unit Discharge thermistor error Discharge thermistor 1 error 7 2 Outdoor unit Compressor therm...

Page 26: ...cordance with the operating manual 1 Starting and stopping method operation switching temperature adjustment timer air flow switching and other remote control unit operations 2 Air filter removal and cleaning and how to use the air louvers 3 Give the operating manual to the customer 4 If the wireless remote control signal code is changed from A to B C or D it will change back to A when the batteries...

Reviews: