background image

39

Using the 

Camera

Viewing the Images

Playback your images to check them. For important 
photographs, always take a test shot and view the image 
to make sure that the camera is working normally.

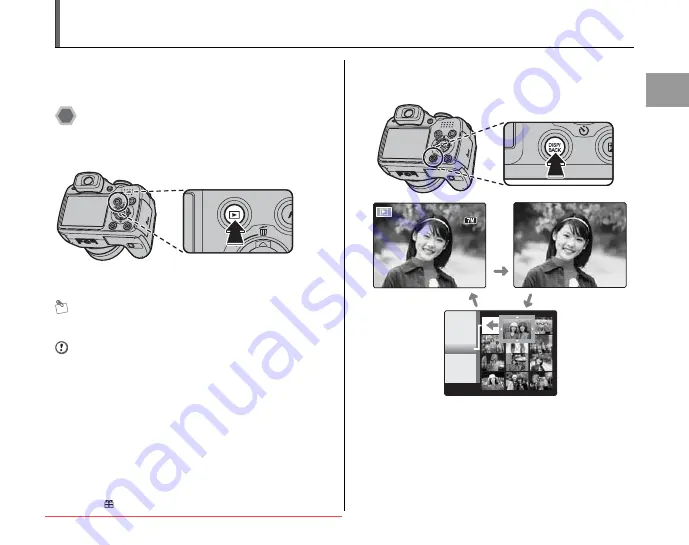
Setting the camera to Playback 
mode

Press 

w

 during shooting to change to Playback mode.

When the camera is off, press 

w

 for about 1 second to 

turn the camera on in Playback mode.

MEMO

Press 

w

 to play back the last shot.

CAUTION

 Still images viewable on 

FinePix S5700 / FinePix S700 / FinePix S5800 / 
FinePix S800

This camera will display still images recorded on FinePix 
S5700 / FinePix S700 / FinePix S5800 / FinePix S800 or 
still images (excluding some uncompressed images) 
recorded on any FUJIFILM digital camera that supports 

xD-Picture Card

s or SD Memory Cards. Clear playback 

or playback zooming may not be possible for still images 
shot on cameras other than FinePix S5700 / FinePix S700 
/ FinePix S5800 / FinePix S800.
When playing back images shot with a camera other than 
FinePix S5700 / FinePix S700 / FinePix S5800 / FinePix 
S800, 

 a present icon appears on the screen.

Select the screen display.

Press DISP/BACK during Playback mode to change the 
screen display.

100

100- 0001

0001

3/ 31

31/ 2007

2007   

    10

10: 00

00  AM

AM

3/ 31

31/ 2007

2007   

    10

10: 00

00  AM

AM

100

100- 0001

0001

N

N

2007

2007

1/11

1/11

3/30

30

3/29

29

3/31

31

Text displayed

No text displayed

Sorting by date

Downloaded from ManualsCamera.com Manuals

Summary of Contents for FinePlx S5700

Page 1: ...inePix S700 FinePix S5800 FinePix S800 correctly Please follow the instructions carefully BL00644 200 1 Getting Ready Using the Camera Advanced Features Photography Settings Camera Connection Software Installation Playback Movie Appendices Troubleshooting Downloaded from ManualsCamera com Manuals ...

Page 2: ...arantee that interference will not occur in a particular installation If this equipment does cause harmful interference to radio or television reception which can be determined by turning the equipment off and on the user is encouraged to try to correct the interference by one or more of the following measures Reorient or relocate the receiving antenna Increase the separation between the equipment...

Page 3: ...oftware 4 Ownership All copyrights and other proprietary rights to Software and Documentation are owned and retained by FUJIFILM or the third party suppliers as indicated on or in Software or Documentation Nothing contained herein shall be construed expresslyor implicitly as transferring or granting anyright license or title to you other than those explicitly granted under this Agreement 5 Limited...

Page 4: ...OME MINATO KU TOKYO 107 0052 JAPAN conforms to the following Standards Safety EN60950 1 2001 EMC EN55022 2006 Classe B EN55024 1998 A1 2001 A2 2003 EN61000 3 2 2000 A2 2003 following the provision of the EMC Directive 2004 108 EC and Low Voltage Directive 2006 95 EC Dusseldorf Germany Place June 1 2007 This product comes with batteries When these are empty you shouldn t throw them away but deliver...

Page 5: ...u will help prevent potential negative consequences to the environment and human health which could otherwise be caused by inappropriate waste handling of this product If your equipment contains easy removable batteries or accumulators please dispose these separately according to your local requirements The recycling of materials will help to conserve natural resources For more detailed informatio...

Page 6: ...Using zoom function 36 Adjusting the shot composition 37 Viewing the Images 39 Erasing the Images Movies 44 Using the erase button n 44 Erasing the images using Playback menu 44 Advanced Features Photography Using the Photography Functions Procedure of Setting 47 Setting the Shooting Mode 51 B Auto 51 Picture Stabilization 51 Natural Light 52 NATURAL d 52 SCENE POSITION 53 N Program AE 57 Aperture...

Page 7: ...he same image with different exposure BRACKETING 90 Advanced Features Playback Playback Information 91 Using p MODE MENU Playback PLAYBACK MENU 92 Setting the p MODE MENU Playback 92 Setting the PLAYBACK MENU 92 p MODE MENU Playback 93 Setting automatic playback SLIDE SHOW 93 DPOF set frame PRINT ORDER DPOF 93 PLAYBACK MENU 97 Rotating the images IMAGE ROTATE 97 Protecting the images PROTECT 98 Co...

Page 8: ... 143 Power Supply and Batteries 144 Discharging rechargeable batteries 146 Notes on the xD Picture Card the SD Memory Card and the Internal Memory 148 Warning Displays 149 Troubleshooting Troubleshooting 153 Specifications 160 Explanation of Terms 167 FUJIFILM Digital Camera Worldwide Network 169 Safety Notes 176 Usable Memory Cards You can use the xD Picture Card and the SD Memory Card and the SD...

Page 9: ...d take particular care with the liquid crystal in the monitor If any of the following situations arise take the urgent action indicated If liquid crystal comes in contact with your skin Wipe the area with a cloth and then wash thoroughly with soap and running water If liquid crystal gets into your eye Flush the affected eye with clean water for at least 15 minutes and then seek medical assistance ...

Page 10: ...em Z Exif Print Exif ver 2 2 Exif Print Format is a newly revised digital camera file format that contains a variety of shooting information for optimal printing See Using Your Camera Correctly p 143 for more information NTSC National Television System Committee color television telecasting specifications adopted mainly in the U S A Canada and Japan PAL Phase Alternation by Line a color television...

Page 11: ...e in Super macro Approx 1 cm to 1 0 m 0 4 in to 3 3 ft Wide angle only Effective flash range Approx 30 cm to 3 0 m 1 0 ft to 9 8 ft MEMO Use a tripod to prevent camera shake in Macro mode Any of the following cancels Macro mode Changing the Mode dial to or mode Turning the camera off If the flash is too bright use flash brightness adjustment P 89 Even if MULTI p 87 in the AF MODE is set the camera...

Page 12: ...Accessories Included AA size Alkaline Batteries LR6 4 Strap 1 Lens cap 1 set A V cable 1 USB cable 1 CD ROM 1 Software for FinePix CX Owner s Manual this manual 1 Downloaded from ManualsCamera com Manuals ...

Page 13: ...es in parentheses for information on using the camera parts or features A Strap mount p 17 B Zoom lever p 36 C Shutter button D Power switch p 25 E f Continuous shooting button p 71 F Mode dial Continued Q Downloaded from ManualsCamera com Manuals ...

Page 14: ...sist illuminator p 36 Self timer lamp p 70 H USB socket A V OUT Audio Visual output socket p 123 I DC IN 5V power input socket p 124 J Auto popup flash p 67 K Microphone L Speaker M Terminal cover Downloaded from ManualsCamera com Manuals ...

Page 15: ...xposure compensation button p 64 91 T Cover lock release button p 19 U Battery cover p 19 V EVF LCD monitor selector button p 30 W w Playback mode button p 39 X p Photo mode button p 75 79 Y nopq 4 direction button Z MENU OK button Slot cover p 22 _ Memory Card slot p 22 Downloaded from ManualsCamera com Manuals ...

Page 16: ...d shooting p 84 G f Continuous shooting p 71 H AF frame p 31 I Date Time p 26 J Shutter speed p 60 K Aperture p 58 L Photometry p 82 M 9 White balance p 83 N ISO 100 Sensitivity p 79 O N Quality mode p 80 P Number of available frames p 164 165 Q FinePix COLOR p 81 R AF warning p 149 S Camera shake warning p 149 T Increasing monitor brightness p 74 U Y Internal memory p 24 V Exposure compensation i...

Page 17: ...th ends of the strap check carefully to make sure that the strap is firmly secured 2 Attach the lens cap cord to the lens cap 3 Pull the lens cap cord through the strap CAUTION Attach the strap correctly to prevent dropping the camera Attach the lens cap cord to prevent losing the lens cap 17 Getting Ready Downloaded from ManualsCamera com Manuals ...

Page 18: ...18 Attaching the Strap and Lens Cap Attaching the lens cap Attach the lens cap to the lens by pressing in on both sides of the cap Downloaded from ManualsCamera com Manuals ...

Page 19: ...gs 2 Combinations of different types of batteries or new and used batteries together Do not use manganese Ni Cd or lithium batteries Use the same brand and grade AA size alkaline batteries as those supplied with the camera 1 While pressing the cover lock release button slide and open the battery cover CHECK Check that the camera is turned off before opening the battery cover CAUTION Do not open th...

Page 20: ...y as indicated by the polarity icons CAUTION Match the polarity icons and of the batteries to those on the inside of the battery cover 3 Press on the battery cover to push the batteries down Slide the cover closed Downloaded from ManualsCamera com Manuals ...

Page 21: ...to 50 F For this reason it is better to use AA size Ni MH batteries Due to the nature of the battery the battery level warning V may appear early when the camera is used in cold locations Try warming the batteries in your pocket or a similar location before use Depending on the battery type and the level of charge in the batteries the camera may run out of power without first displaying a battery ...

Page 22: ... products digital Depending on the SD Memory Card recording of movies may be interrupted Use of above mentioned SD Memory Cards are recommended The camera is not compatible with multimedia cards 1 Open the slot cover CHECK Check that the camera is turned off before opening the slot cover CAUTION Do not open the slot cover while the camera is on This could damage the Memory Card or ruin the image f...

Page 23: ...d on a PC or any device other than the camera should be formatted p 120 on the camera before use Do not use a miniSD adaptor or a microSD adaptor which have exposed contact areas on the back Use of these adaptors may cause a malfunction or damage due to the improper contacts 3 Close the slot cover How to replace the Memory Card Push the Memory Card into the slot and then slowly remove your finger ...

Page 24: ... number recorded may not represent the actual number of frames See p 164 165 for information on the standard number of available frames Z About internal memory When a Memory Card sold separately is inserted Record images Record images to a Memory Card Playback images Playback images in a Memory Card When a Memory Card sold separately is not inserted Record images Record images to internal memory P...

Page 25: ... mode Pressing w when the camera is in Photography mode switches the camera to the Playback mode Pressing the shutter button switches the camera to the Photography mode Turning the camera on in Playback mode Press w for about 1 second to turn the camera on in Playback mode Pressing w when the camera is in Playback mode turns the camera off MEMO Press the shutter button to switch to the Photography...

Page 26: ...lding down n or o changes the numbers continuously When the time displayed passes 12 the AM PM setting changes APress n o p or q to select the language BPress MENU OK to confirm the setting SET SET NO NO START MENU START MENU LANG LANG APress p or q to select Year Month Day Hour or Minute BPress n or o to correct the setting SET SET NO NO DATE TIME NOT SET DATE TIME NOT SET YY MM DD YY MM DD 1 1 1...

Page 27: ...rs even if both sources of power are removed When the Auto power off function is active if the camera is left unused for 2 or 5 minutes this function turns the camera off p 120 To turn the camera back on slide the Power switch To playback images press w for about 1 second SET SET NO NO AM AM 3 31 2007 10 00 3 31 2007 10 00 DD MM YY DD MM YY YY MM DD YY MM DD MM MM DD DD YY YY DATE TIME NOT SET DAT...

Page 28: ...IGH SPEED SHOOTING HIGH SPEED SHOOTING OFF OFF SET UP SET UP APress p or q to select BPress o to move to menu item CPress n or o to select DATE TIME DPress q See 2 Set the date and time p 26 SET SET UP UP FORMAT FORMAT PLAYBACKVOLUME PLAYBACKVOLUME LCD BRIGHTNESS LCD BRIGHTNESS BEEPVOLUME BEEPVOLUME SHUTTERVOLUME SHUTTERVOLUME DATE TIME DATE TIME Downloaded from ManualsCamera com Manuals ...

Page 29: ...SPEED SHOOTING OFF OFF SET UP SET UP APress p or q to select BPress o to move to menu item CPress n or o to select DPress q See 1 screen appears when turning the camera on p 26 SET SET UP UP DISCHARGE DISCHARGE VIDEO SYSTEM VIDEO SYSTEM 2 MIN 2 MIN ENGLISH ENGLISH AUTO POWER OFF AUTO POWER OFF TIME DIFFERENCE TIME DIFFERENCE BACKGROUND COLOR BACKGROUND COLOR NTSC NTSC Downloaded from ManualsCamera...

Page 30: ...nity Telephoto approx 1 m 3 3 ft to infinity Select e Macro mode to take close up shots p 66 2 Switch the display Press the EVF LCD to alternate the display between the viewfinder EVF and the LCD monitor MEMO The EVF LCD selection is retained even when the camera is off or the mode setting is changed BSet the Mode dial to B LCD EVF 30 Downloaded from ManualsCamera com Manuals ...

Page 31: ...ss the shutter button down halfway CHECK Focus on the subject Double beep is heard Indicator lamp lit green Not focus on the subject No sound indicated Indicator lamp blinking green MEMO The shutter button has a halfway point at which focus and exposure are automatically optimized before taking the picture by pressing fully down When pressing the shutter button halfway a lens operation sound may b...

Page 32: ...nks orange during charging MEMO When the subject is not in the AF frame use AF AE lock to take the picture p 34 When pressing the shutter button down fully in one motion the camera takes the picture without the AF frame changing Pressing the shutter button halfway when the flash is not popped up camera pops the flash up as required by the shooting conditions 60 60 60 60 F 3 F 3 5 F 3 F 3 5 b appea...

Page 33: ...159 for more information Z Indicator lamp display The indicator lamp lights or blinks when pressing the shutter button etc The indicator lamp shows the camera status MEMO Detailed warning messages appear on the screen p 149 152 Display Status Lit green Locking the focus Blinking green Camera shake warning AF warning or AE warning ready to shoot Blinking green and orange alternately Recording to Me...

Page 34: ...hooting a subject that is not suited to autofocusing p 35 1 Move the camera slightly so that one of the subjects is in the AF frame 2 Press the shutter button down halfway to focus on the subject N 16 16 N 16 16 AUTO AUTO 3 31 31 2007 2007 10 10 00 00 AM AM 3 31 31 2007 2007 10 10 00 00 AM AM Using AF AE lock N 16 16 N 16 16 AUTO AUTO 3 31 31 2007 2007 10 10 00 00 AM AM 3 31 31 2007 2007 10 10 00 ...

Page 35: ...he following Subjects photographed through glass Subjects that do not reflect well such as hair or fur Subjects with no substance such as smoke or flames Dark subjects Subjects with little or no contrast between the subject and the background such as subjects dressed in the same color as the background Shots where another high contrast object not the subject is close to the AF frame and is either ...

Page 36: ...anger to safety do not expose it directly in someone s eyes When using the AF assist illuminator in Macro mode the camera may have difficulty focusing to take close up shots See p 113 for information on turning the AF assist illuminator off AF assist illuminator does not fire in or mode Using zoom function Use the zoom dial to take pictures with zoom function The zoom bar appears on the screen whi...

Page 37: ...lay Press DISP BACK to change the screen display Continued Q 3 31 31 2007 2007 10 10 00 00 AM AM 3 31 31 2007 2007 10 10 00 00 AM AM N 16 16 N 16 16 AUTO AUTO AUTO AUTO N 16 16 N 16 16 3 31 31 2007 2007 10 10 00 00 AM AM 3 31 31 2007 2007 10 10 00 00 AM AM Text displayed No text displayed Framing guideline displayed Post shot assist window displayed Downloaded from ManualsCamera com Manuals ...

Page 38: ...d Up to the last 3 photographed images appear on the post shot assist window This serves as a guide for taking other shots with similar compositions Z Format of post shot assist window MEMO Any of the following clears the image in the post shot assist window Setting the camera to Playback mode Turning the camera off Using the PictBridge function p 125 Connecting to a PC p 135 etc Best framing Post...

Page 39: ...nePix S800 or still images excluding some uncompressed images recorded on any FUJIFILM digital camera that supports xD Picture Cards or SD Memory Cards Clear playback or playback zooming may not be possible for still images shot on cameras other than FinePix S5700 FinePix S700 FinePix S5800 FinePix S800 When playing back images shot with a camera other than FinePix S5700 FinePix S700 FinePix S5800...

Page 40: ... images 3 31 31 2007 2007 10 10 00 00 AM AM 3 31 31 2007 2007 10 10 00 00 AM AM 100 100 0001 0001 100 100 0001 0001 N N To select images on the thumbnail lists screen hold down p or q for 1 second during playback When releasing p or q camera returns to single frame playback Playback zoom W wide zoom dial zoom out T tele zoom dial zoom in Turn to W or T to zoom in or out of an image Zoom bar Downlo...

Page 41: ...he image Quality mode Max zoom scale F 3072 2304 pixels Approx 4 8 N 3072 2304 pixels Approx 4 8 3072 2048 pixels Approx 4 8 4 2304 1728 pixels Approx 3 6 2 1600 1200 pixels Approx 2 5 Navigation screen Current displayed image Quality mode Max zoom scale i F 3264 2448 pixels Approx 5 1 i N 3264 2448 pixels Approx 5 1 3264 2176 pixels Approx 5 1 4 2304 1728 pixels Approx 3 6 2 1600 1200 pixels Appr...

Page 42: ...ress n o p or q to move the cursor colored frame to on the upper left frame BPress p to display the selecting date CPress n or o to move the cursor colored frame to select the date Press n or o repeatedly to jump to the next page DPress q 2007 2007 11 11 3 30 30 3 29 29 3 31 31 100 0001 100 0001 3 31 31 2007 10 2007 10 00 00 AM AM 3 3 31 31 2007 10 2007 10 00 00 AM AM 100 0001 100 0001 N N Downloa...

Page 43: ...pare such as the images taken in NATURAL d mode BPress MENU OK to enlarge the image 9 frames playback APress n o p or q to change the colored frame and select an image Press n or o repeatedly to jump to the next page BPress MENU OK to enlarge the image Downloaded from ManualsCamera com Manuals ...

Page 44: ...o select the erasing image BPress n CPress p or q to select OK DPress MENU OK to erase the displayed image ERASE OK ERASE OK SET SET OK OK CANCEL CANCEL APress MENU OK to open the PLAYBACK MENU BPress n or o to select ERASE CPress q DPress n or o to select FRAME or ALL FRAMES EPress MENU OK to confirm the setting ERASE ERASE PROTECT PROTECT IMAGE ROTATE IMAGE ROTATE VOICE MEMO VOICE MEMO COPY COPY...

Page 45: ...e erasing frame file BPress MENU OK to erase the currently displayed frame file ERASE OK ERASE OK YES YES CANCEL CANCEL Erasing all frames ALL FRAMES APress p or q to select OK BPress MENU OK to erase all the frames files Press DISP BACK to cancel erasing of all the frames files Some unprotected frames files will be left unerased ERASE ALL OK ERASE ALL OK IT MAYTAKE AWHILE IT MAYTAKE AWHILE OK OK ...

Page 46: ...annot be erased Unprotect the frames files before erasing them p 98 If DPOF SPECIFIED ERASE OK or DPOF SPECIFIED ERASE ALL OK appears press MENU OK again to erase the frames files CAUTION Erased frames files cannot be recovered Back up important frames files onto your PC or another media Setting the camera to w playback mode p 39 Erasing the Images Movies Downloaded from ManualsCamera com Manuals ...

Page 47: ...speed that reduces camera shake and moving subject blurring p 51 Natural light This mode produces beautiful images that retain the natural ambience when shots are taken in low light conditions p 52 NATURAL d This mode shoots 2 images continuously without flash and with flash Shooting with flash allows you to take a picture of a main subject brightly This mode is useful for shooting 2 different typ...

Page 48: ...d q Flash button o Self timer button f Continuous shooting button e Macro Used for close up shots p 66 d Flash Used for shots in dark locations or for backlit subjects etc p 67 Self timer Used in situations such as group shots where the photographer is included in the shot p 69 f Continuous Used to take a series of continuous shots or to use auto bracketing with exposure compensation p 71 D Exposu...

Page 49: ...d sensitivity setting p 79 QUALITY Use to specify required image size p 80 FinePix COLOR Use to specify required color tone p 81 ISO ISO MODE MENU MODE MENU AUTO AUTO STD STD N QUALITY QUALITY COLOR COLOR SHOOTING MENU SHOOTING MENU PHOTOMETRY PHOTOMETRY HIGH HIGH SPEED SHOOTING SPEED SHOOTING OFF OFF STD STD WHITE BALANCE WHITE BALANCE AUTO AUTO AF MODE AF MODE FOCUSING FOCUSING SHARPNESS SHARPNE...

Page 50: ... specify focusing mode set the Mode dial to N M or p 85 AF MODE Use to specify focusing area set the mode dial to N M or p 87 G SHARPNESS Use this setting to soften or emphasize the outline and quality of an image only N M p 89 FLASH Brightness Adjustment Use this setting to adjust the amount of light emitted by the flash to suit the photography conditions or to achieve a desired effect only N M p...

Page 51: ...pecifies all settings other than p MODE Quality and FinePix COLOR automatically Set the Mode dial to B CHECK Available flash modes AUTO b d C Only AUTO can be selected for the ISO sensitivity setting Picture Stabilization Use this mode to select a fast shutter speed that reduces camera shake and moving subject blurring CHECK Available flash modes AUTO b d C Only AUTO can be selected for the ISO se...

Page 52: ...ubject brightly Shooting without flash produces beautiful images that retain the natural ambience This mode is useful for shooting 2 different types of pictures at the same time When pressing the shutter button first picture is taken without flash and next picture is taken with flash Always 2 pictures are taken per 1 shot Do not move the camera until the shooting ended MEMO This mode helps to avoi...

Page 53: ... both and MEMO and are set to H and as factory default settings See p 68 for information on the available flash modes p CHROME p 81 cannot be set AF assist illuminator does not fire in and mode Only AUTO can be selected for the ISO sensitivity setting Z Selecting Scene position setting Set the Mode dial to or APress MENU OK to open the menu BPress n or o to select SCENE POSITION CPress q DPress n ...

Page 54: ...ape mode Use this mode to take pictures of a moving subject It gives priority to faster shutter speeds CHECK When setting Sport mode the camera sets to High speed shooting mode p 84 automatically Use this mode for shooting evening and night scenes A picture is taken with a slow shutter of up to 3 seconds CHECK Use a tripod to prevent camera shake because a picture is taken with a slow shutter m PO...

Page 55: ... Use this mode to shoot sunset making the colors more vivid Use this mode to prevent darkening images and provide crisp clear shots when shooting at snowy scene where the whole screen appears white Use this mode to prevent darkening images and provide crisp clear shots when shooting at beach under strong sunlight Continued Q FIREWORKS APress D to open the setting screen BPress n or o to select the...

Page 56: ...tiful images that retain the natural ambience when shots are taken in low light conditions Use this mode to take clear close up shots when zooming up a flower It is effective for taking more vivid shots of flower petal CHECK Flash cannot be used in the Flower mode Focal range Wide angle Approx 4 cm to 3 0 m 1 6 in to 9 8 ft Telephoto Approx 60 cm to 3 0 m 2 0 ft to 9 8 ft Use this mode to shoot do...

Page 57: ...utter speed and aperture setting appear in yellow when the camera is in Program shift mode Any of following cancels Program shift Changing the Mode dial setting Switching the flash setting Setting the camera to Playback mode Turning the camera off CAUTION Set the Mode dial to N PROGRAM SHIFT PROGRAM SHIFT N 16 16 ISO 100 ISO 100 F3 F3 5 60 60 APress D to open the setting screen BSelect different s...

Page 58: ...ALANCE p 83 H FOCUSING p 85 AF MODE p 87 G SHARPNESS p 89 FLASH p 89 BRACKETING p 90 CHECK Available flash modes b d C c n Z Setting the aperture CHECK Aperture settings F3 5 to F6 8 in 1 3 EV increments F6 8 F13 6 in 2 EV increments Set the Mode dial to APress D to open the setting screen BPress n or o to select the aperture CPress the shutter button to take pictures N 16 16 1000 1000 F3 F3 5 ISO...

Page 59: ...not be obtained with selected aperture setting the shutter speed appears in red When this occurs adjust the aperture setting again When d FORCED FLASH is set you can take a picture with a shutter speed of up to 1 45 sec Lit red ISO 100 ISO 100 N 16 16 F8 F8 SET SET When the brightness of the subject is outside the camera s brightness metering range appears as the shutter speed The area in front of...

Page 60: ...USING p 85 AF MODE p 87 G SHARPNESS p 89 FLASH p 89 BRACKETING p 90 CHECK Available flash modes b d C Z Setting the shutter speed CHECK Shutter speed setting 4 sec to 1 1000 sec in 1 3 EV increments Set the Mode dial to M APress D to open the setting screen BPress n or o to select the shutter speed CPress the shutter button to take pictures N 16 16 1000 1000 F3 F3 5 ISO 100 ISO 100 SETTING SHUTTER...

Page 61: ...th selected shutter speed the aperture setting appears in red When this occurs adjust the shutter speed again Lit red ISO 100 ISO 100 N 16 16 50 50 F SET SET When the brightness of the subject is outside the camera s brightness metering range F appears as the aperture setting When this occurs press the shutter button down halfway to measure the light level again Freezes the motion of the subject F...

Page 62: ...speed CHECK Shutter speed setting 4 sec to 1 1000 sec in 1 3 EV increments MEMO Use a tripod to prevent camera shake In shots with long exposures noise dots may appear on the image CAUTION If the shutter speed is set to a speed 1 1000 sec smearing white stripes may appear in the image p 167 Set the Mode dial to APress D to open the setting screen BPress n or o to select the shutter speed CPress th...

Page 63: ... the aperture CPress the shutter button to take pictures SET SHUTTERSPEED APERTURE SET SHUTTERSPEED APERTURE ISO 100 ISO 100 N 16 16 1000 1000 F3 F3 5 Aperture SET SET ISO 100 ISO 100 N 16 16 1000 1000 F3 F3 5 Use the exposure indicator on the screen as a guide when setting the exposure When the brightness of the subject is outside the camera s brightness metering range the exposure indicator disa...

Page 64: ... N or M in Shooting mode CHECK The symbol indicating the compensation direction or turns yellow The S icon also turns yellow while exposure compensation is being set and then turns blue after setting is completed The screen brightness will increase or decrease depending on the exposure compensation setting APress D to open the setting screen BPress p or q to set the compensation value CPress D to ...

Page 65: ...ure compensation Using the flash in AUTO or b mode Shooting dark scenes in d mode Guide to compensation Backlit portraits 2 steps to 4 steps 2 3 EV to 1 1 3 EV Very bright scenes such as snowfields and highly reflective subjects 3 steps 1 EV Shots made up predominantly of sky 3 steps 1 EV Spotlit subjects particularly against dark backgrounds 2 steps 2 3 EV Scenes with low reflectivity such as sho...

Page 66: ...de angle only Effective flash range Approx 30 cm to 3 0 m 1 0 ft to 9 8 ft MEMO Use a tripod to prevent camera shake in Macro mode Any of the following cancels Macro mode Changing the Mode dial to or r mode Turning the camera off If the flash is too bright use flash brightness adjustment P 89 Even if MULTI p 87 in the AF MODE is set the camera focuses near the center of the screen AF assist may no...

Page 67: ... the picture This is caused by the light of the flash reflecting off the inside of the eye Use this mode in backlit scenes or to get the correct colors when taking a picture under bright lighting In this mode the flash fires in bright as well as dark conditions This mode is suitable for situations where the flash cannot be used Use a tripod to prevent camera shake when shooting in Suppressed flash...

Page 68: ...icator lamp blinking orange the picture will be taken without the flash when using AUTO and b The flash charging time may increase when the batteries are low on charge When taking a picture using the flash the image may disappear and go dark briefly due to flash charging The indicator lamp blinks orange during charging The flash fires several times pre flashes and the main flash Do not move the ca...

Page 69: ...halfway to focus on the subject and press the shutter button fully Pressing the shutter button down halfway that focuses on the subject Without releasing the shutter button press the button all the way down fully pressed to start the self timer Continued Q AUTO AUTO OFF N 16 16 N 16 16 The last displayed setting is the selected mode The picture is taken after 10 seconds The picture is taken after ...

Page 70: ...ng Changing the Photography mode setting Setting the camera to Playback mode Turning the camera off Take care not to stand in front of the lens when pressing the shutter button as this can prevent the correct focus or brightness exposure from being achieved A picture is taken after the self timer lamp changes from lit to blinking only blinks with the 2 second self timer 99 A countdown appears on t...

Page 71: ...termined in the first frame but in LONG PERIOD continuous shooting the exposure is adjusted for the scene being shot The speed of continuous shooting varies depending on the shutter speed The flash cannot be used as the flash mode is set to C SUPPRESSED FLASH p 67 However when the mode is changed back to normal photography the flash setting specified before continuous shooting was selected is rest...

Page 72: ...down This mode shoots up to 3 frames FinePix S5700 FinePix S700 max 1 4 frames sec FinePix S5800 FinePix S800 max 1 3 frames sec STORING STORING j Auto bracketing This mode shoots the same image with different exposure settings Bracketing shoots 3 continuous frames each with a different exposure setting is correctly exposed is overexposed and is underexposed The exposure range settings can be chan...

Page 73: ... shutter button is held down max 0 6 frames sec This mode shoots up to Memory Card or internal memory end MEMO Continuous shooting mode and assist window p 38 can be used together h LONG PERIOD continuous shooting Press shutter button Release shutter button All frames Downloaded from ManualsCamera com Manuals ...

Page 74: ... active it will increase the amount of speckling in images on the screen This is normal and does not affect the photographed image This function is purely for checking the composition of your shot It does not increase the brightness of the image Even if you increase the brightness in low light conditions you cannot check the subject The color tones may vary depending on the subjects blinks on the ...

Page 75: ...the setting EPress MENU OK to confirm the setting QUALITY QUALITY MODE MENU MODE MENU ISO ISO 8 18 18 28 28 45 45 219 219 16 16 FRAMES FRAMES F N APress MENU OK to open the SHOOTING MENU BPress n or o to select the menu CPress q DPress n or o to change the setting EPress MENU OK to confirm the setting SHOOTING MENU SHOOTING MENU PHOTOMETRY PHOTOMETRY WHITE BALANCE WHITE BALANCE HIGH HIGH SPEED SHO...

Page 76: ...cifies required color tone This mode is effective for taking more vivid shots or black and white shots STD STD Menu Functions Settings Factory default SCENE POSITION p 53 This setting can be used when the Mode dial is set to or Use this setting to provide the best photography menu setting for the scene being shot H 8 H PHOTOMETRY p 82 This setting can be used when the Mode dial is set to N M or Us...

Page 77: ...soften or emphasize the outline of an image HARD STANDARD SOFT STANDARD FLASH p 89 This setting can be used when the Mode dial is set to N M or Use this setting to adjust the amount of light emitted by the flash to suit the photography conditions or to achieve a desired effect 2 3 EV to 2 3 EV in approx 1 3 EV increments 0 BRACKETING p 90 This setting can be used when the Mode dial is set to N M o...

Page 78: ... MENU SET UP SET UP HIGH SPEED SHOOTING HIGH SPEED SHOOTING OFF OFF SHOOTING MENU SHOOTING MENU SCENE POSITION SCENE POSITION HIGH SPEED SHOOTING HIGH SPEED SHOOTING SET UP SET UP OFF OFF SHOOTING MENU SHOOTING MENU PHOTOMETRY PHOTOMETRY HIGH HIGH SPEED SHOOTING SPEED SHOOTING OFF OFF STD STD WHITE BALANCE WHITE BALANCE AUTO AUTO FOCUSING FOCUSING AF MODE AF MODE SHARPNESS SHARPNESS Downloaded fro...

Page 79: ...or AUTO 800 AUTO 400 sensitivity is automatically set in the same way as for AUTO but the highest sensitivity is limited Select AUTO 800 AUTO 400 depending on the scene MEMO When anything other than N M and in the Photography mode is selected only AUTO can be selected for the ISO sensitivity setting When N M and in the Photography mode is selected AUTO cannot be selected for the ISO sensitivity se...

Page 80: ...ng the number of available frames also changes p 164 165 The numbers to the right of setting show the number of available frames Quality mode Sample uses F 3072 2304 N 3072 2304 Printing at up to 10R 25 4 30 5 cm 10 12 in A4 size For better quality select F 3072 2048 4 2304 1728 Printing at up to 6R 15 2 20 3 cm 6 8 in A5 size 2 1600 1200 Printing at up to 4R 10 2 15 2 cm 4 6 in A6 size 640 480 To...

Page 81: ...d p CHROME may have little visible effect with some subjects or the scene being shot You may not be able to see any difference on the screen STD p STANDARD The contrast and color saturation are set to standard Use this mode for normal photography p CHROME The contrast and color saturation are set to high This mode is effective for taking more vivid shots of subjects such as flowers p B W This mode...

Page 82: ... the subject and provide optimum exposure in a wide range of shooting conditions SPOT This mode is useful for subjects with strongly contrasting light and dark areas where you want to achieve the correct exposure for a particular feature AVERAGE The advantage of this mode is that the exposure tends not to change for different compositions or subjects This mode is particularly effective for shots o...

Page 83: ...scent lamps 8 Shooting in incandescent light ASelect custom white balance p 75 BHold a piece of white paper under the light source for setting the white balance so that it fills entire the screen Then press the shutter button to set the white balance MEMO To use the white balance set previously press the MENU OK without pressing the shutter button CWhen the correct exposure is measured COMPLETED a...

Page 84: ...SPEED SHOOTING Available Photography modes All Use this mode to reduce the time required for focusing when pressing the shutter button down halfway It is useful to avoid missing snapshot opportunities CAUTION EVF LCD MODE in the U SET UP menu is automatically set to 60fps p 167 MEMO Focal range With High speed shooting set to OFF Wide angle approx 30 cm 1 ft to infinity Telephoto approx 1 0 m 3 3 ...

Page 85: ...n increases when using CONTINUOUS Because the camera focuses continuously without pressing the shutter button When using CONTINUOUS AF MODE is set to CENTER automatically Continued Q CONTINUOUS SINGLE AF MF SHOOTING MENU SHOOTING MENU AUTO AUTO OFF OFF PHOTOMETRY PHOTOMETRY WHITE BALANCE WHITE BALANCE HIGH SPEED SHOOTING HIGH SPEED SHOOTING FOCUSING FOCUSING SHARPNESS SHARPNESS CONTINUOUS AF CONTI...

Page 86: ...ionally out of focus shots SINGLE AF N N 16 16 N 16 16 60 60 F3 F3 5 ISO 100 ISO 100 ISO 100 PROGRAM SHIFT PROGRAM SHIFT MF AWhile pressing D turn the zoom lever towards W or T to focus The mark changes to yellow when the subject is in focus BPress the shutter button to take pictures 60 60 F3 F3 5 N 16 16 ISO 100 ISO 100 FOCUSING FOCUSING Setting the menu p 75 Downloaded from ManualsCamera com Man...

Page 87: ...the camera focuses on the center of the screen MEMO When the AF frame does not appear in the focusing position select CENTER in the AF mode and use AF AE lock p 34 Continued Q CENTER MULTI AREA CENTER SHARPNESS SHARPNESS AF MODE AF MODE PHOTOMETRY PHOTOMETRY WHITE BALANCE WHITE BALANCE AUTO AUTO HIGH SPEED SHOOTING HIGH SPEED SHOOTING OFF OFF SHOOTING MENU SHOOTING MENU FOCUSING FOCUSING AREA AREA...

Page 88: ...the screen To expose the shot for your main subject use AF AE lock p 34 AREA APress n o p or q to move the target point to the focusing position BThe AF frame appears in the location to which the target point was moved when you press MENU OK SELECT AF AREA SELECT AF AREA SET SET CANCEL CANCEL Before moving After moving Target point N 16 16 60 60 F3 F3 5 ISO 100 ISO 100 PROGRAM SHIFT PROGRAM SHIFT ...

Page 89: ...justment may have no effect The image may appear dark when setting the shutter speed to higher than 1 1000 sec HARD Emphasizes the outlines Best for shots of subjects such as buildings or text where sharp images are desirable STANDARD Best for ordinary photography Provides edge sharpness that is ideal for most picture taking situations SOFT Softens the outlines Best for shots of subjects such as p...

Page 90: ... or overexposed frame is outside the camera s control range the picture is not taken with the specified setting increments Flash photography cannot be used This feature always takes 3 shots However if there is insufficient space on the Memory Card or internal memory for 3 shots no picture will be taken MEMO Auto bracketing SHOOTING MENU SHOOTING MENU SET SET UP UP FLASH FLASH 0 BRACKETING BRACKETI...

Page 91: ...Quality mode BSensitivity CShutter speed Aperture DFinePix COLOR EFlash FWhite balance GExposure compensation setting HFrame number IHistogram 100 100 0002 0002 F ISO ISO 400 400 3 31 31 2007 2007 10 10 00 00 AM AM STD STD OFF OFF AUTO AUTO 1 1 60 1 60 F3 5 F3 5 Overexposed area blinks in black Highlight warning Pixels Shadows Highlights Brightness A Optimal exposure There is an ample distribution...

Page 92: ... select the menu DPress q EPress n or o to change the setting FPress MENU OK to confirm the setting MODE MENU MODE MENU PRINT ORDER PRINT ORDER DPOF DPOF SLIDE SHOW SLIDE SHOW BPress MENU OK to open the PLAYBACK MENU CPress n or o to select the menu DPress q EPress n or o to change the setting FPress MENU OK to confirm the setting PLAYBACK MENU PLAYBACK MENU ERASE ERASE COPY COPY PROTECT PROTECT I...

Page 93: ...BACK once during playback to display on screen help DPOF set frame PRINT ORDER DPOF You can specify the image number of prints with or without date of printing with a DPOF compatible printer Continued Q PRINT ORDER DPOF PRINT ORDER DPOF MODE MENU MODE MENU SLIDE SHOW SLIDE SHOW FADE IN FADE IN MULTIPLE MULTIPLE CLOCK CLOCK FADE IN FADE IN NORMAL NORMAL NORMAL NORMAL WITH DATEE The date will be imp...

Page 94: ...eps D and E Always press MENU OK to complete the settings RESET ALL p 95 WITH DATE WITHOUT DATE APress p or q to display the frame file for specifying DPOF setting BPress n or o to set a value Up to 99 sheets are printed For frames files that you do not want printed set the number of prints to 0 zero To specify more DPOF settings repeat steps A and B CAlways press MENU OK after the settings are co...

Page 95: ...he modifications are canceled When selecting the WITH DATE E setting the date is imprinted on your shots using the Print Service or a DPOF compatible printer depending on the printer specifications the date may not be printed in some cases Images photographed with a camera other than FinePix S5700 FinePix S700 FinePix S5800 FinePix S800 may not be specified DPOF settings To cancel all DPOF setting...

Page 96: ...ification of the number of prints The warnings shown below may appear while specifying the prints DPOF SPECIFIED ERASE OK DPOF SPECIFIED ERASE ALL OK p 46 When erasing the image the DPOF setting for that image is deleted at the same time RESET DPOF OK p 95 When inserting a Memory Card that contains images specified for printing by another camera those print specifications are all reset and replace...

Page 97: ...may not be able to rotate images that were shot with a camera other than the FinePix S5700 FinePix S700 FinePix S5800 FinePix S800 APress p or q to select the rotating frame file BPress MENU OK to open the PLAYBACK MENU CPress n or o to select IMAGE ROTATE DPress MENU OK EPress n or o to rotate the image o Rotates the image clockwise at a 90 degree angle n Rotates the image counterclockwise at a 9...

Page 98: ...ted reset frame file To protect another frame file repeat steps A and B When protecting frames files is completed press DISP BACK PROTECT OK PROTECT OK YES YES CANCEL CANCEL Unprotected UNPROTECT OK UNPROTECT OK YES YES CANCEL CANCEL Protected F appears SET ALL Press MENU OK to protect all the frames files RESET ALL Press MENU OK to unprotect all the frames files SET ALL OK SET ALL OK IT MAYTAKE A...

Page 99: ... files including protected frames files p 120 Copying the images V COPY It is possible to transfer saved images between the internal memory and a Memory Card Your camera calls images frames Z Selecting COPY Continued Q CANCEL CANCEL APress n or o to select Y INTERNAL MEMORY Q CARD or CARD Q Y INTERNAL MEMORY BPress q COPY COPY NEXT NEXT CANCEL CANCEL CARD CARD INTERNALMEMORY INTERNALMEMORY INTERNA...

Page 100: ... MENU OK COPY COPY YES YES CANCEL CANCEL CARD CARD INTERNALMEMORY INTERNALMEMORY INTERNALMEMORY INTERNALMEMORY CARD CARD FRAME FRAME ALL FRAMES ALL FRAMES CPress p or q to select the copying frame file DPress MENU OK to copy the currently displayed frame file COPY OK COPY OK 100 0001 100 0001 100 0001 100 0001 YES YES CANCEL CANCEL Setting the menu p 92 Downloaded from ManualsCamera com Manuals ...

Page 101: ...s ALL FRAMES APress n or o to select ALL FRAMES BPress MENU OK COPY COPY YES YES CANCEL CANCEL CARD CARD INTERNALMEMORY INTERNALMEMORY INTERNALMEMORY INTERNALMEMORY CARD CARD FRAME FRAME ALL FRAMES ALL FRAMES CPress MENU OK to copy all the frames files IT MAYTAKE IT MAYTAKE AWHILE AWHILE 100 0001 100 0001 100 0001 100 0001 COPY ALL OK COPY ALL OK YES YES CANCEL CANCEL Setting the menu p 92 Downloa...

Page 102: ...t 20 cm 7 9 in away for the best results Recording voice memos APress p or q to select the image to add a voice memo BPress MENU OK to open the PLAYBACK MENU CPress n or o to select VOICE MEMO DPress q EPress MENU OK to start recording REC STANDBY REC STANDBY START START CANCEL CANCEL 30s 30s RECORDING RECORDING REC RE REC RE REC REC 28s 28s Remaining time Blinking red Microphone Setting the menu ...

Page 103: ...CT PROTECT IMAGE ROTATE IMAGE ROTATE VOICE MEMO VOICE MEMO COPY COPY TRIMMING TRIMMING RE RE REC REC BACK BACK If you select an image that already has a voice memo a screen appears in which you can select whether to rerecord the memo Playing back voice memo APress p or q to select an image file with a voice memo appears on the screen BPress o to start playing back the voice memo 15s 15s STOP PAUSE...

Page 104: ...ess o again to resume playback Stop Stops playback Press p or q while voice memo playback is stopped to go back to the previous file or advance to the next file respectively Fast forward Rewind Press p or q during playback to skip forwards or backwards through the voice memo These buttons do not function while playback is paused Adjusting volume of voice memos APress MENU OK while playing back voi...

Page 105: ...ING TRIMMING YES CANCEL YES CANCEL W wide zoom dial Zoom out T tele zoom dial Zoom in ATurn to W or T to zoom in or out on an image Zoom bar BPress n o p or q to move to another part of the image CPress MENU OK DCheck the saved image size and press MENU OK The trimmed image is added as a separate file in the final frame YES CANCEL YES CANCEL TRIMMING TRIMMING Navigation screen Current displayed im...

Page 106: ...mage is trimmed to normal size 4 3 aspect ratio CAUTION You may not be able to trim images that were shot with a camera other than FinePix S5700 FinePix S700 FinePix S5800 FinePix S800 4 Printing at up to 6R 15 2 20 3 cm 6 8 in A5 size 2 Printing at up to 4R 10 2 15 2 cm 4 6 in A6 size To use for e mail or web site Setting the menu p 92 Downloaded from ManualsCamera com Manuals ...

Page 107: ...e screen MEMO There is no need to hold down the shutter button during recording Continued Q The available recording time appears on the screen STANDBY STANDBY 999m13s 999m13s 30s 30s 8 24 24 2006 2006 10 10 00 00 AM AM 3 31 31 2007 2007 10 10 00 00 AM AM 999m12s 999m12s 30s 30s REC REC Fully pressed Recording ends when pressing the shutter button down halfway during recording or the remaining time...

Page 108: ...alance will be automatically adjusted to the scene being shot even after recording has started If recording is stopped immediately after it begins 1 second of the movie is recorded onto the Memory Card or internal memory CAUTION Because a movie is recorded onto the Memory Card or internal memory as it is saved it cannot be recorded correctly if the camera suddenly loses power if the batteries run ...

Page 109: ...th ON selected in this case may result in an image that looks unnatural Changing movie size Press p to open the p MODE MENU Z Quality settings in Movie mode 640 480 pixels For better quality 320 240 pixels To record longer movies Continued Q APress q BPress n or o to change the setting CPress MENU OK to confirm the setting SHOOTING MENU SHOOTING MENU SET UP SET UP IMAGE STABILIZATION IMAGE STABILI...

Page 110: ...s with model numbers containing M such as DPC M1GB movie recording time may be reduced if you repeatedly record and erase frame erase image files In such a case erase all frames or format the xD Picture Card before use Back up important frames files onto your PC or another media A movie recording will stop automatically when a movie file becomes approx 2GB If you want to continue recording another...

Page 111: ...ith a progress bar Progress bar Control Description Playback Playback begins Playback stops when the end of the movie is reached Pause Resume Pauses the movie during playback Press o again to resume playback Stop Stops playback Press p or q while playback is stopped to go back to the previous file or advance to the next file respectively Fast forward Rewind Press p or q during playback to skip for...

Page 112: ... Memory Card or internal memory to the PC s hard disk and then playback the saved file Uncover the speaker The sound is difficult to hear Volume can be adjusted while playing back movies Adjusting volume of movies APress MENU OK while playing back movie The movie is paused during playback BPress n or o to adjust the volume CPress MENU OK to confirm the setting Camera starts to playback the movie V...

Page 113: ...ME LCD BRIGHTNESS LCD BRIGHTNESS BEEPVOLUME BEEPVOLUME SHUTTERVOLUME SHUTTERVOLUME DATE TIME DATE TIME APress n or o to select the menu BPress q Different type of screen appears depending on selected item CPress n or o to change the setting DPress MENU OK to confirm the setting OFF OFF SET SET UP UP BEEPVOLUME BEEPVOLUME SHUTTERVOLUME SHUTTERVOLUME PLAYBACKVOLUME PLAYBACKVOLUME LCD BRIGHTNESS LCD ...

Page 114: ... Specifies whether the AF assist illuminator is ON or OFF 36 DIGITAL ZOOM ON OFF OFF Specifies whether digital zoom is used 118 EVF LCD MODE 30fps 60fps 60fps Sets the screen display to the fine mode DATE TIME Corrects the date or time 28 BEEP VOLUME OFF Sets the volume of the tone emitted when the camera controls are used SHUTTER VOLUME OFF Sets the volume of the sound emitted when the shutter op...

Page 115: ... Discharges Ni MH batteries 146 VIDEO SYSTEM NTSC PAL Specifies whether video output is set to NTSC or PAL RESET Resets all the camera settings other than the DATE TIME TIME DIFFERENCE BACKGROUND COLOR and VIDEO SYSTEM to the factory default values set at shipment A confirmation message appears when you press q To reset the camera settings press p or q to select OK and press MENU OK Setting Displa...

Page 116: ...shooting This function is disabled when selecting IMAGE DISP CONTINUOUS The results are always displayed after you shoot Press the MENU OK to take another picture 3 SEC 1 5 SEC The image appears for about 3 or 1 5 seconds and is then recorded ZOOM CONTINUOUS The image appears enlarged Use this mode to check details of image OFF The results are not displayed ATurn to W or T to zoom in or out of an ...

Page 117: ... Card The displayed frame number may differ for images photographed on other cameras FRAME NO Formatted Memory Card or internal memory used for both A and B CONTINUOUS Pictures are stored beginning from the highest file number stored on the last Memory Card or internal memory used RENEW Pictures are stored on each Memory Card beginning with a file number 0001 Each image will be numbered consecutiv...

Page 118: ...een optical and digital the position of the indicator stops Press the same Zoom button again to start the indicator moving again CAUTION Using the digital zoom allows you to enlarge your subject and shoot it However it will lower your image quality Set the digital zoom when requiring it DIGITAL ZOOM N 16 16 3 31 31 2007 2007 10 10 00 00 AM AM AUTO AUTO Zoom bar OFF ON Digital zoom approx 4 8 Optic...

Page 119: ... emitted 0 zero indicates a sound deadening BPress MENU OK to confirm the setting VOLUME VOLUME SET SET CANCEL CANCEL 7 LCD BRIGHTNESS APress n or o to adjust the screen brightness The indicator moves to the to display the screen brightly or to the to darken the screen BPress MENU OK to confirm the setting LCD LCD BRIGHTNESS BRIGHTNESS SET SET CANCEL CANCEL 0 How to use the SET UP menu p 113 Downl...

Page 120: ...n when you want to get the maximum possible running time from your batteries CAUTION The Auto power off function is disabled during slide show p 93 discharging rechargeable batteries p 146 and when a printer or a PC connection p 125 135 is being used MEMO To restore power to the camera Refer to Turning On and Off p 25 FORMAT APress p or q to select OK BPressing MENU OK initializes the Memory Card ...

Page 121: ... DIFFERENCE TIME DIFFERENCE BACKGROUND COLOR BACKGROUND COLOR DISCHARGE DISCHARGE VIDEO SYSTEM VIDEO SYSTEM SET SET UP UP 2 MIN 2 MIN ENGLISH ENGLISH NTSC NTSC HOME HOME LOCAL LOCAL Press q APress p or q to select hour and minute BPress n or o to change the setting CAlways press MENU OK after the settings are completed AUTO POWER OFF AUTO POWER OFF TIME DIFFERENCE TIME DIFFERENCE BACKGROUND COLOR ...

Page 122: ...to N HOME and then check the date and time again 3 31 31 2007 2007 11 11 00 00 AM AM 60 60 F3 F3 5 N 16 16 ISO 100 ISO 100 PROGRAM SHIFT PROGRAM SHIFT In the time difference setting when you change to the Photography mode I and the date is displayed for 3 seconds the date display turns yellow How to use the SET UP menu p 113 Downloaded from ManualsCamera com Manuals ...

Page 123: ...ation of the AC power adapter MEMO When connecting the A V cable included to TV the camera s screen is turned off The image quality for movie playback is lower than for still images When connecting to a TV even if you adjust the volume from the PLAYBACK VOLUME the TV volume cannot be changed Refer to the instructions provided with your TV for more information on audio video input for your TV Use t...

Page 124: ...mera is on temporarily interrupts the power supply to the camera which will stop the recording of any images or movies being shot Failing to turn the camera off before connecting disconnecting can also result in damage to the Memory Card or malfunction during PC connection The socket outlet shall be installed near the equipment and shall be easily accessible The shape of the plug and socket outlet...

Page 125: ...x S5700 FinePix S700 FinePix S5800 FinePix S800 is connected to a printer BConnect the camera to a printer and turn the printer on Press w for about 1 second to turn the camera on CThe following screen appears on the screen after a moment MEMO Depending on the printer some functions are disabled USB socket AC 5VX sold separately USB USB USB appears on the screen OK SET OK SET PICTBRIDGE PICTBRIDGE...

Page 126: ...ng BPress n or o to set a value Up to 99 sheets are printed To specify more PRINT settings repeat steps A and B CPress MENU OK to display the confirm setting PICTBRIDGE PICTBRIDGE TOTAL 00002 TOTAL 00002 02 02 OK SET OK SET FRAME FRAME SHEETS SHEETS DPress MENU OK again to download the data to the printer and start printing the specified number of prints PRINTTHESE FRAMES PRINTTHESE FRAMES YES YES...

Page 127: ...at do not support date printing Continued Q APress DISP BACK to open the menu BPress n or o to select u PRINT DPOF CPress MENU OK to display the confirm setting PRINT DPOF PRINT DPOF PRINTWITHOUT DATE PRINTWITHOUT DATE PICTBRIDGE PICTBRIDGE PRINTWITH DATE PRINTWITH DATE DPress MENU OK again to download the data to the printer and start printing the specified frames files continuously YES YES CANCE...

Page 128: ...n be specified for images on internal memory CAUTION In PictBridge function images photographed on other than a camera may not be printed The camera cannot be used to specify printer settings such as the paper size and print quality Please connect the AC Power Adapter AC 5VX sold separately to your camera Use internal memory or a Memory Card that was formatted on FinePix S5700 FinePix S700 FinePix...

Page 129: ...ws XP Home Edition 2 Windows XP Professional 2 Windows Vista 2 CPU 200 MHz Pentium minimum Windows XP Vista users 800MHz Pentium 4 or better recommended RAM 128 MB minimum 512 MB minimum for Windows Vista 256 MB or better recommended 512 MB or better recommended for Windows Vista users Hard disk space Amount required for installation 450 MB minimum Amount required for operation 600 MB minimum When...

Page 130: ...s not guaranteed on home built PCs or on PCs running updated operating system software When you reinstall or remove FinePixViewer the Internet menu and your user ID and password for the FinePix Internet Service are deleted from your PC Click the Register now button enter your registered user ID and password and download the menu again Operating System Windows XP Windows Vista CPU 2 GHz Pentium 4 o...

Page 131: ...idden e g Setup exe or Setup Text may be shown normally or all in uppercase e g Setup or SETUP CHECK For Windows Vista users When loading the bundled CD ROM on your PC the AutoPlay window may appear In this case click SETUP exe When User Account Control window appears click Allow Installing other applications You may see messages for installing ImageMixer VCD2 LE for FinePix Install this applicati...

Page 132: ...The software may not operate correctly if the connection is faulty Additional USB interface board is not guaranteed Compatible Mac 1 Power Macintosh G3 2 PowerBook G3 2 Power Macintosh G4 iMac iBook Power Macintosh G4 Cube PowerBook G4 Power Macintosh G5 MacBook MacBook Pro or Mac mini Operating System Mac OS X compatible with version 10 3 9 to 10 4 8 RAM 256 MB minimum Hard disk space Amount requ...

Page 133: ...utton and Using FinePixViewer button 5 The Authenticate dialog appears Enter the name and password for the administrator account and then click the OK button The administrator account is the user account used for Mac OS X installation and you can confirm the user account in the Accounts dialog in the System Preferences 6 The License dialog appears Read the agreement carefully and then if you agree...

Page 134: ...nd the CD ROM may not be removed If this happens click the Safari icon in the Dock to make Safari the active application and then select Quit Safari in the Safari menu to shut down Safari 11Launch Image Capture from the Applications folder 12Change the Image Capture settings Select Preferences from the Image Capture menu 13Select Other from When a camera is connected open 14Select FPVBridge from F...

Page 135: ...images may not be stored In these cases use the Image Memory Card Reader sold separately etc Note that the Image Memory Card Reader DPC R1 is not compatible with the SD Memory Card Continued Q AInsert the Memory Card with images into the camera p 22 You can use the xD Picture Card and the SD Memory Card with the FinePix S5700 FinePix S700 FinePix S5800 FinePix S800 In this Owner s Manual these car...

Page 136: ...ard always disconnect the camera from the PC See p 137 138 for information on the disconnection procedure The camera and PC may be exchanging data even when Copying disappears on your PC screen Before disconnecting the USB cable always check that the indicator lamp is off Always use FinePixViewer to transfer images with voice memos to a PC When Windows 98 SE is used the supplied software must be i...

Page 137: ...oceed without saving the images click the Cancel button MEMO You can only see images saved on a PC Save images on a PC If you cancel saving by clicking the Cancel button set the Power switch to OFF to turn off the camera and then disconnect it from the PC 1 Windows Once the image has been saved the window below appears Save Image Wizard window To disconnect the camera click the Remove button Macin...

Page 138: ... ordering prints Example Looking up slide shows AClick How to Use FinePixViewer in the FinePixViewer Help menu BClick Basic Operation and then click Slide Show in the menu that appears CThe Slide Show information appears Press the key to view the previous page or the key to view the next page 2 ASlide the Power switch to turn the camera off BUnplug the USB cable from the camera USB socket AC 5VX s...

Page 139: ...emove Programs Properties Windows Vista users Programs and Features window appears Select the software to be uninstalled FinePixViewer or the driver and then click the Add Remove button Windows Vista users Uninstall Change button EWhen the message appears click the OK button Check your selection carefully since the process cannot be canceled once you click the OK button FAutomatic uninstallation b...

Page 140: ...DPC C F TM for xD P icture Card CARD ADAPTER Z Audio Visual output TV monitor commercially available Audio Visual output Z Printing USB PictBridge compatible printer commercially available Printer commercially available xD Picture Card Z Image input output to the PC Personal Computer commercially available PC Card Adapter DPC AD CompactFlash Card Adapter DPC CF PC card slot This will not work with...

Page 141: ...etc AC Power Adapter AC 5VX Use the AC 5VX when taking pictures or play back images for long periods or when FinePix S5700 FinePix S700 FinePix S5800 FinePix S800 is connected to a PC The shape of the AC power adapter the plug and power outlet depend on the country PC Card Adapter DPC AD The PC Card Adapter allows the xD Picture Card and SmartMedia to be used as a PC Card Standard ATA compliant PC...

Page 142: ...142 MEMO Downloaded from ManualsCamera com Manuals ...

Page 143: ...ocation into a warm place water droplets condensation may form on the inside of the camera or on the lens When this occurs turn the camera off and wait an hour before using the camera Condensation may also form on the Memory Card In this event remove the Memory Card and wait a short time Z When the Camera is Not Used or is stored Periods of Time If you do not intend to use the camera for a long pe...

Page 144: ...hat the battery polarity and is correct Do not use new with used batteries Do not use charged and discharged batteries together Do not use different types or brands of batteries at the same time If you do not intend to use the camera for a long period of time remove the batteries from the camera Note if the camera is left with the batteries removed the time and date settings are cleared The batter...

Page 145: ...procedure for Discharging rechargeable batteries CAUTION Do not use the Discharging rechargeable batteries function when alkaline batteries being used To charge Ni MH batteries use the quick battery charger sold separately Refer to the instructions supplied with the charger to make sure that the charger is used correctly Do not use the battery charger to charge other batteries Note that the batter...

Page 146: ...apter AC 5VX with the camera The use of an AC power adapter other than AC 5VX can be damaged to your digital camera Use the AC power adapter for indoor use only Plug the connection cord plug securely into the DC input terminal of the FUJIFILM Digital camera Turn off the FUJIFILM Digital camera before disconnecting the cord from the FUJIFILM Digital camera s DC input terminal To disconnect pull out...

Page 147: ... AUTO POWER OFF TIME DIFFERENCE TIME DIFFERENCE BACKGROUND COLOR BACKGROUND COLOR DISCHARGE DISCHARGE VIDEO SYSTEM VIDEO SYSTEM 2 MIN 2 MIN ENGLISH ENGLISH NTSC NTSC GPress q HPress MENU OK IPress p or q to select OK JThe screen changes and discharging begins When the battery level indicator blinks red and discharging ends the camera turns off IT MAY TAKE A WHILE IT MAY TAKE A WHILE DISCHARGE OK D...

Page 148: ...and M share the same compatibility Usable USB drive Type H cannot be used with xD Picture Card USB drive DPC UD1 while Type M can Z Internal Memory Images held in the camera s internal memory may be corrupted or erased due to problems such as camera faults Save your important data to another media i e DVD R CD R CD RW hard disk etc Data stored in the camera s internal memory cannot be guaranteed i...

Page 149: ...s due to too bright or dark shooting condition The picture can be taken but the correct brightness exposure will not be obtained FOCUS ERROR ZOOM ERROR Camera malfunction or fault Turn the camera on again taking care not to touch the lens Turn the camera off and on again If the message still appears contact your FUJIFILM dealer NO CARD Memory Card is not inserted when transferring images Insert a ...

Page 150: ...ory Card or internal memory is not formatted Re insert the Memory Card or turn the camera off and then on again If the message still appears contact your FUJIFILM dealer Use a new Memory Card Format the Memory Card or internal memory on the camera p 120 PROTECTED CARD The SD Memory Card switch is slide to the Lock side Unlock the protection by sliding it back p 23 INTERNAL MEMORY IS FULL INSERT A ...

Page 151: ... 98 Protected files cannot be added to voice memos Remove the protection p 98 Protected files cannot be rotated Remove the protection p 98 ERROR The voice memo file is faulty Camera fault The voice memo cannot be played back Contact your FUJIFILM dealer NO IMAGE Y NO IMAGE An attempt was made to transfer images from the Memory Card or internal memory that memory was empty It is impossible to copy ...

Page 152: ...f paper or out of ink Turn the printer off briefly and then turn it back on Refer to the user manual supplied with your printer PRINTER ERROR RESUME Displayed for PictBridge Check that the printer is not out of paper or out of ink Printing automatically restarts when the error is cleared If the message still appears after checking press MENU OK to restart printing CANNOT BE PRINTED Displayed for P...

Page 153: ...he camera on 19 25 124 Batteries run out quickly Camera is used in extremely cold conditions Put the batteries in your pocket or another warm place to heat it and then load it into the camera just before you take a picture 19 21 144 The battery terminals are soiled Wipe the battery terminals with a clean dry cloth 21 144 Same batteries have been used for a long period The batteries can no longer b...

Page 154: ...Card contact area is soiled Wipe the Memory Card contact area with a soft dry cloth 22 148 The Memory Card is damaged Insert a new Memory Card 22 The batteries have run out Load new or fully charged batteries 19 21 144 The Auto power off function has turned the camera off Turn the camera on 25 The screen darkens after taking a picture You took pictures with flash The screen may darken for charging...

Page 155: ...not pop up the flash The flash is set to C SUPPRESSED FLASH mode Set to another flash mode excluding the C SUPPRESSED FLASH mode 67 The shooting condition is bright enough not to need flash Set to d FORCED FLASH mode when you want to take pictures with flash 67 The flash settings are restricted and cannot be selected The Shooting mode is set to anything other than m and N The flash settings are re...

Page 156: ...es Photographed images or movies are not recorded AC power adapter was connected or disconnected during turning the camera on Connect or disconnect the AC power adapter only when the camera is off Failing to turn the camera off first can result in damage to the Memory Card or malfunctions during PC connection 124 146 Continuous shooting Only 1 frame can be shot even thoughcontinuous shooting mode ...

Page 157: ... uncovered 14 103 112 Erasing Erasing FRAME does not erase the frame Some frames may be protected Unprotect frames using the camera on which the protection was first applied 98 Erasing ALL FRAMES does not erase all the frames Frame No CONTINUOUS in the frame number setting does not function You opened the battery cover without turning the camera off when replacing the batteries or Memory Card Alwa...

Page 158: ... is incorrect Change the setting to NTSC or PAL 113 115 The TV volume is turned down Adjust the volume The TV image is black and white The video output setting is incorrect Change the setting to NTSC or PAL 113 115 Connecting to PC PC does not recognize the camera The USB cable is not correctly connected to the PC or camera Set up the camera and connect the USB cable correctly 135 Connecting to pr...

Page 159: ...atteries or reconnect the AC power adapter and try again 19 20 124 146 The batteries have run out Load new or fully charged batteries 19 21 144 The camera no longer works correctly Camera malfunction may be caused temporarily Briefly remove the batteries or disconnect the AC power adapter Then reload the batteries or reconnect the AC power adapter and try again If you think the camera is faulty co...

Page 160: ... pixels 2304 1728 pixels 1600 1200 pixels 640 480 pixels i 4 2 File size See the table on the p 164 See the table on the p 165 Lens Fujinon 10 optical zoom lens F3 5 F3 7 Focal length f 6 33 mm 63 3 mm Equivalent to approx 38 mm 380 mm on a 35 mm camera Digital zoom Approx 4 8 10 optical zoom lens is used together Max zoom scale approx 48 Approx 5 1 10 optical zoom lens is used together Max zoom s...

Page 161: ... 1 2 sec 1 4 sec to 1 1000 sec flash only N M 4 sec to 1 1000 sec 4 sec to 1 1000 sec depend on Exposure mode Continuous shooting Top 3 Number of recorded frames up to 3 frames FinePix S5700 FinePix S700 max 1 4 frames sec FinePix S5800 FinePix S800 max 1 3 frames sec Long period Number of recorded frames FinePix S5700 FinePix S700 Depend on memory size 1 7 sec interval at N depending on quality l...

Page 162: ...nding on the available space on an Memory Card or internal memory A movie recording will stop automatically when a movie file becomes approx 2GB If you want to continue recording another movie press the shutter button again The available recording time is displayed based on approx 2GB Photography functions High speed shooting Best framing Post shot assist window Frame No memory Histograms Playback...

Page 163: ...of available shots varies depending on the capacity of alkaline batteries or the level of charge in Ni MH batteries the figures shown here for the number of available shots using batteries are not guaranteed The number of available shots will also decline at low temperatures Camera dimensions W H D 106 1 mm 75 7 mm 80 7 mm 4 2 in 3 0 in 3 2 in not including accessories and attachments Camera mass ...

Page 164: ...rded pixels 3072 2304 3072 2048 2304 1728 1600 1200 640 480 640 480 320 240 Image data size 3 5 MB 1 8 MB 1 6 MB 980 KB 630 KB 130 KB Internal memory approx 27 MB 7 15 17 27 44 215 30 sec 47 sec xD Picture Card 16 MB 4 9 10 16 25 124 17 sec 27 sec 32 MB 9 18 20 32 51 249 34 sec 55 sec 64 MB 18 36 41 64 102 499 70 sec 1 8 min 128 MB 36 73 82 128 204 999 2 3 min 3 7 min 256 MB 73 146 164 257 410 199...

Page 165: ...d pixels 3264 2448 3264 2176 2304 1728 1600 1200 640 480 640 480 320 240 Image data size 3 9MB 2 0MB 1 8MB 980 KB 630 KB 130 KB Internal memory approx 26 MB 6 13 15 27 43 211 29 sec 46 sec xD Picture Card 16 MB 4 8 9 16 25 124 17 sec 27 sec 32 MB 8 16 18 32 51 249 34 sec 55 sec 64 MB 16 32 36 64 102 499 70 sec 1 8 min 128 MB 32 64 72 128 204 999 2 3 min 3 7 min 256 MB 65 130 145 257 410 1999 4 7 m...

Page 166: ...ulting from errors in this Owner s Manual The LCD monitor on your digital camera is manufactured using advanced high precision technology Even so small bright points and anomalous colors particularly around text may appear on the monitor These are normal display characteristics and do not indicate a fault with the monitor This phenomenon will not appear on the recorded image The operation error ma...

Page 167: ...rval the frame rate is expressed as 10 fps For reference TV images are displayed at 30 fps NTSC JPEG Joint Photographic Experts Group A file format used for compressing and saving color images The higher the compression rate the greater the loss of quality in the decompressed restored image Memory effect If an Ni MH battery is repeatedly charged without first being fully discharged its performance...

Page 168: ...as digital cameras see a white subject as white by first adjusting the color balance to suit the color of the ambient light around the subject This adjustment is called matching the white balance Exif Print Format is a newly revised digital camera file format that contains a variety of shooting information for optimal printing Downloaded from ManualsCamera com Manuals ...

Page 169: ...hnical support Repair service 94 468 Akoki Street Waipahu HI 96797 TEL 1 808 677 3854 ext 209 FAX 1 808 677 1443 kurt_kmett fujifilmhawaii com CENTRAL SOUTH AMERICA Argentina Imagen e informacion S A Technical support Repair service Fondo de la Legua 936 San Isidro Pcia de Buenos Aires TEL 54 11 4836 1000 FAX 54 11 4836 1144 servtec imageneinformacion com ar Bolivia Reifschneider Bolivia Ltda Tech...

Page 170: ...im 1439 montevideo Uruguay TEL 598 2 9002004 FAX 598 2 9008430 fotocam adinet com uy Uruguay Kiel S A Technical support Repair service Maldonado 1787 Montevideo Uruguay TEL 05982 419 4542 FAX 05982 412 0046 kiel fujifilm com uy Venezuela C Hellmund Cia Sa Technical support Repair service Av Ppal Diego Cisneros Caracas Venezuela Edf Oficentro TEL 0212 2022300 FAX 0212 2399796 hellmund hellmund com ...

Page 171: ...urope GmbH Technical support Repair service Heesenstr 70 40549 Düsseldorf International call TEL 49 211 50890 FAX 49 211 5089668 service fujifilm de National call TEL 0180 5898980 FAX 0180 5898982 12 Cent Min aus dem deutschen Festnetz Greece FUJIFILM HELLAS S A Technical support Repair service 1 Ihous Ag Anargiron str 175 64 P Phaliro Athens Greece TEL 0030 210 9404100 FAX 0030 210 9404397 fujifi...

Page 172: ...ugal Lda Technical support Av Fontes Pereira de Melo 342 4100 259 Porto Portugal TEL 351 226194200 FAX 351 226194213 finepix fujifilm pt Repair service Av Fontes Pereira de Melo 342 4100 259 Porto Portugal TEL 351 226194200 FAX 351 225194662 cameras fujifilm pt Romania CTS Cardinal Top Systems Ltd Technical support Repair service 112 Calea Dorobanti street 4 flat 1sector Bucharest Romania TEL 4021...

Page 173: ...St Martins Business Centre Bedford MK42 0LF TEL 44 0 123 421 8388 FAX 44 0 123 424 5285 fujitec fuji co uk Ukraine Image Ukraine CJSC Technical support Repair service 12 Kontraktova ploshcha Kyiv 04070 Ukraine TEL 380 44 4909075 FAX 380 44 4909076 d fujifilm ua MIDDLE EAST Iran Tehran Fuka Co Technical support Repair service 229 Fuji Bldg Mirdamad Blvd Tehran 19189 Iran TEL 98 21 2254810 19 FAX 98...

Page 174: ...com eg Kenya Fuji Kenya Ltd Repair service P O Box 41669 00100 Fuji Plaza Chiromo Road Nairobi Kenya TEL 254 20 4446265 8 FAX 254 20 4448515 7 info fujifilm co ke OCEANIA Australia FUJIFILM Australia Pty Ltd Technical support Repair service Locked Bag 5100 Brookvale NSW 2100 TEL 1800 226 355 FAX 61 2 9466 2854 digital fujifilm com au Fiji Brijlal Co Ltd Technical support Repair service 70 72 Cummi...

Page 175: ...echnical support Repair service 10 New Industrial Road Fujifilm Building Singapore 536201 TEL 65 6380 5557 FAX 65 6281 3594 service fujifilm com sg South Korea Korea Fujifilm Co Ltd Technical support 30 1 Mukjeung dong Jung gu Seoul Korea TEL 82 2 3282 7363 FAX 82 2 2269 7435 photo fujifilm co kr South Korea Yonsan AS Center Fujidigital Repair service 301 3F Jeonjaland 16 9 Hangangro3 ga Yongsan g...

Page 176: ...ted is prohibited Prohibited Filled circles with an exclamation mark tell you an action that must be performed Required WARNING If a problem arises turn the camera off remove the batteries disconnect and unplug the AC power adapter Continued use of the camera when it is emitting smoke is emitting any unusual odor or is in any other abnormal state can cause a fire or electric shock Contact your FUJ...

Page 177: ...o not drop or subject the batteries to impacts Do not attempt to recharge lithium or alkaline batteries Do not store the batteries with metallic products Do not use chargers other than the specified model to charge the batteries Any of these actions can cause the batteries to burst or leak and cause fire or injury as a result Use only the batteries or AC power adapters specified for use with this ...

Page 178: ...mperatures Do not leave the camera in locations such as a sealed vehicle or in direct sunlight This can cause a fire Keep out of the reach of small children This product could cause injury in the hands of a child Do not place heavy objects on the camera This can cause the heavy object to tip over or fall and cause injury Do not move the camera while the AC power adapter is still connected Do not p...

Page 179: ...o close to a person s eyes may temporarily affect the eyesight Take particular care when photographing infants and young children When a Memory Card is removed the card could come out of the slot too quickly Use your finger to hold it and gently release the card Request regular internal testing and cleaning for your camera Build up of dust in your camera can cause a fire or electric shock Contact ...

Page 180: ...7 3 AKASAKA 9 CHOME MINATO KU TOKYO 107 0052 JAPAN http www fujifilm com products digital Printed in Indonesia Y Y 709107 1AG6P1P3529 Downloaded from ManualsCamera com Manuals ...

Reviews: