background image

18

First Steps

 Basic Setup

 Basic  Setup

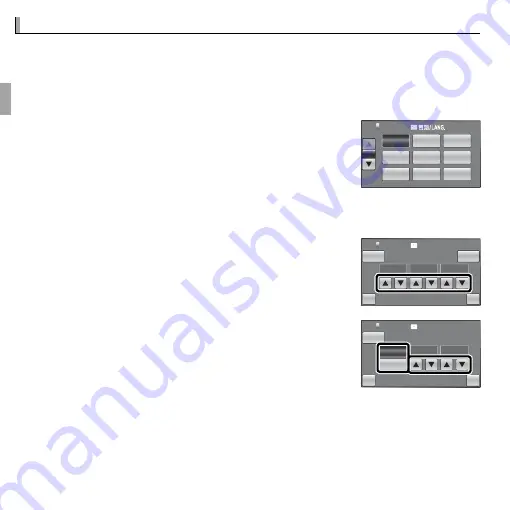
 A language-selection dialog is displayed the fi rst time the camera is turned 
on.  Set up the camera as described below (you can reset the clock or change 
languages at any time using the 

F


DATE/TIME

 or 

L


a

 options in 

the setup menu; for information on displaying the setup menu, see page 80).

  1

 Tap to select a language.  Tap 

6

 or 

7

 to view ad-

ditional languages.


R

R

“NO” and “BACK”

“NO” and “BACK”

Tap 

BACK

 to return to the previous step, 

NO

 to skip the 

current step.  Any steps you skip will be displayed the next 
time the camera is turned on.

START MENU

ENGLISH

FRANCAIS

1 / 3

DEUTSCH

ESPAÑOL

PORTUGUÊS

ITALIANO

NEDERLANDS

РУССКИЙ

ﻲﺑﺮﻋ

  2

 The date will be displayed.  Tap the 

6

 or 

7

 arrows to 

set the date and then tap 

OK

.  To change the order 

in which the year, month, and day are displayed, tap 

YY.MM.DD

.

DATE/TIME

NO

BACK

2010

01

01

YY

MM

DD

START MENU

OK

YY.MM.DD

  3

 The time will be displayed.  Select 

AM

 or 

PM

, tap the 

6

 or 

7

 arrows to set the time, and tap 

OK

.

DATE/TIME

NO

AM

PM

12

00

hh

mm

START MENU

BACK

OK

Summary of Contents for FinePix Z85

Page 1: ... you have read and understood its contents and the warnings in ForYour Safety Pii before us ing the camera For information on related products visit our website at http www fujifilm com products digital_cameras index html EN BeforeYou Begin First Steps Basic Photography and Playback More on Photography More on Playback Movies Connections Menus Technical Notes Troubleshooting Appendix BL01256 201 ...

Page 2: ...on cords as this can result in a risk of fire or electric shock Ventilation Slots and openings in the cabinet are provided for ventilation to ensure reliable operation of the video product and to pro tect it from overheating and these openings must not be blocked or covered The open ings should never be blocked by placing the video product on a bed sofa rug or other similar surface This video produ...

Page 3: ...n the video product Lightning For added protection for this video product receiver during a lightning storm or when it is left unattended and unused for long periods of time unplug it from the wall outlet and disconnect the antenna or cable system This will prevent damage to the video product due to lightning and power line surges Service Service Servicing Do not attempt to service this video prod...

Page 4: ...ra in the bathroom or shower This can cause a fire or electric shock Donot disassemble Never attempt to change or take apart the camera never open the case Failure to observe this precaution can cause fire or electric shock Donottouch internalparts Should the case break open as the result of a fall or other accident do not touch the exposed parts Failure to observe this precau tion could result in e...

Page 5: ...jects on the camera This can cause the heavy object to tip over or fall and cause injury Do not move the camera while the AC power adapter is still connect ed Do not pull on the connection cord to disconnect the AC power adapter This can damage the power cord or cables and cause a fire or electric shock Do not use the AC power adapter when the plug is damaged or the plug socket connection is loose ...

Page 6: ...touch imme diately after charging or use This is normal Battery Life At normal temperatures the battery can be recharged about 300 times A noticeable de crease in the length of time the battery will hold a charge indicates that it has reached the end of its service life and should be re placed Storage Performance may be impaired if the battery is left unused for extended periods when fully charged...

Page 7: ...battery charger Q CAUTION Do not use the discharge option with alkaline batteries The camera draws a small amount of current even when off Ni MH batteries that have been left in the camera for an extended pe riod may be drawn down to the point that they no longer hold a charge Battery perfor mance may also drop if the batteries are run down in a device such as a flashlight Use the discharge option i...

Page 8: ...owed rinse your mouth thoroughly with water Drink large quantities of water and induce vomiting then seek medical assistance Although the display is manufactured using extremely high precision technology it may contain pixels that are always lit or that do not light This is not a malfunction and images re corded with the product are unaffected TrademarkInformation TrademarkInformation xD Picture Ca...

Page 9: ...e of Contents gives an overview of the entire manual The principal camera operations are list ed here Having a specific problem with the camera Find the answer here WarningMessagesandDisplays WarningMessagesandDisplays P P96 96 Find out what s behind that flashing icon or error message in the display Memory Cards Memory Cards Pictures can be stored in the camera s internal memory or on optional SD S...

Page 10: ...ton when playback switches to the shooting mode Frequently Used Buttons Frequently Used Buttons Taking Pictures During Playback Taking Pictures During Playback y To return instantly to shoot ing mode press the shutter button halfway View Shoot Recording Movies Recording Movies y Press the F button to shoot a movie To end recording press the F button again ...

Page 11: ...s Charging the Battery 10 Inserting the Battery and a Memory Card 11 Compatible Memory Cards 14 Turning the Camera on and Off 16 Shooting Mode 16 Playback Mode 16 Basic Setup 18 Basic Photography and Playback Basic Photography and Playback Taking Pictures in Q Scene Recognition Mode 20 Viewing Pictures 24 More on Photography More on Photography Shooting Mode 25 B AUTO 26 JTOUCH SHOOT 26 xTOUCH TRAC...

Page 12: ... Viewing Panoramas 55 Movies Movies Recording Movies 56 Movie Frame Size 57 Viewing Movies 58 Connections Connections Printing Pictures via USB 59 Viewing Pictures on a Computer 61 Windows Installing MyFinePix Studio 61 Macintosh Installing FinePixViewer 63 Connecting the Camera 65 Menus Menus Using the Menus Shooting Mode 68 Using the Shooting Menu 68 Shooting Menu Options 69 d EXP COMPENSATION 6...

Page 13: ...T 76 E COPY 77 A ERASE 77 j MARK FOR UPLOADTO 78 o SILENT MODE 79 M SET UP 79 The Setup Menu 80 Using the Setup Menu 80 Setup Menu Options 80 A IMAGE DISP 80 B FRAME NO 81 L DIGITAL IS 81 D DIGITAL ZOOM 82 F DATE TIME 82 IVOLUME 83 b SOUND 83 JLCD BRIGHTNESS 83 K FORMAT 83 L a 84 M AUTO POWER OFF 84 NTIME DIFFERENCE 84 m AUTOROTATE PB 85 O BACKGROUND COLOR 85 E LCD MODE 85 R RESET 85 h CALIBRATION...

Page 14: ...l 86 Accessories from FUJIFILM 87 Caring for the Camera 88 Storage and Use 88 Water and Sand 88 Condensation 88 Cleaning 89 Traveling 89 Troubleshooting Troubleshooting Problems and Solutions 90 Warning Messages and Displays 96 Appendix Appendix Tips andTricks 100 Internal Memory Memory Card Capacity 103 Specifications 104 ...

Page 15: ...ther pages in this manual on which related information may be found Menus and other text in the LCD monitor are shown in bold In the illustra tions in this manual displays may be simplified for explanatory purposes Supplied Accessories Supplied Accessories The following items are included with the camera NP 45Arechargeable battery BC 45B battery charger USB cable CD ROM contains this manual Strap U...

Page 16: ...cording button x 56 4 Flash 35 5 Microphone 56 6 Lens 104 7 Speaker 58 8 On off switch and lens cover 16 9 Self timer lamp 37 10 LCD monitor 106 Touch panel display 3 5 6 11 a playback button 24 40 12 B shooting button 16 24 13 Strap eyelet 1 14 Battery chamber cover 11 15 Tripod mount 16 Connector for USB cable 59 65 17 Battery chamber 11 18 Memory card slot 12 19 Battery latch 11 13 ...

Page 17: ...attery level 4 2 Intelligent Face Detection indicator 39 3 Silent mode indicator 73 4 White balance 72 5 Continuous shooting mode 72 6 Focus warning 96 7 Blur warning 36 96 8 Focus frame 32 9 FINPIX COLOR 71 10 Internal memory indicator 11 Image size quality 70 12 Movie quality 73 13 Number of available frames 103 14 Sensitivity 69 15 Date and time 18 16 Exposure compensation 34 a indicates that n...

Page 18: ...oad to 78 Battery Level Battery Level Battery level is shown as follows Indicator Indicator Description Description D white Battery partially discharged C white Battery more than half discharged B red Low battery Charge as soon as possible A blinks red Battery exhausted Turn camera off and charge battery Hiding andViewing Indicators Hiding andViewing Indicators Tap DISP to cycle through shooting an...

Page 19: ... pictures during playback MENU DISP Q Note that some monitor covers may affect the visibility of the image in the monitor or make the monitor less responsive To avoid damaging the monitor and touch panel display ob serve the following precautions Use only your fingers to operate the panel Do not use excessive force Do not sit on the camera by for ex ample leaving it in a back pocket when sitting dow...

Page 20: ...Before You Begin The Touch Panel Display RotatingtheCamera RotatingtheCamera With some exceptions the display in the monitor rotates 90 when the cam era is in tall orientation Shooting MENU DISP MENU DISP ...

Page 21: ...7 Before You Begin The Touch Panel Display Playback MENU MENU DISP MENU DISP ...

Page 22: ...rform the operations listed below The icons displayed vary with the options currently selected MENU DISP P Macro mode Shoot in mac ro mode P38 Display Turn indicators on or off P4 Shooting mode Choose a shooting mode P25 Shooting menu View the shooting menu P68 Flash mode Choose a flash mode P35 Self timer Use the self timer P37 ...

Page 23: ...th the type of picture and the current playback mode MENU DISP Previous View the previ ous picture P24 Next View the next pic ture P24 Multi frame View multiple pictures P42 Display Turn indicators on or off P4 Delete Delete the current picture P44 Playback menu View the playback menu P74 Image search Find pictures P45 Photobook assist Create photobooks P47 ...

Page 24: ...dicator The Charging Indicator The charging indicator shows battery charge status as follows Charging indicator Charging indicator Battery status Battery status Action Action Off Off Battery not inserted Battery not inserted Insert the battery Insert the battery On green On green Battery fully charged Battery fully charged Remove the battery Remove the battery On yellow On yellow Battery charging Ba...

Page 25: ...chamber cover Q Do not open the battery chamber cover when the camera is on Failure to observe this precaution could result in damage to image files or memory cards Q Do not use excessive force when handling the battery chamber cover 2 Insert the battery Align the orange stripe on the battery with the orange battery latch and slide the bat tery into the camera keeping the battery latch pressed to o...

Page 26: ... an angle or use force If the memory card is not correctly inserted or no memory card is inserted a will appear in the LCD monitor and internal memory will be used for recording and playback Q SD SDHC SDXC memory cards can be locked making it impossible to format the card or to record or delete images Before inserting an SD SDHC SDXC memory card slide the write protect switch to the unlocked posit...

Page 27: ... off and open the battery chamber cover To remove the battery press the battery latch to the side and slide the battery out of the camera as shown Battery latch To remove the memory card press it in and release it slowly The card can then be removed by hand When a memory card is removed the card could come out of the slot too quickly Use your finger to hold it and gently release the card ...

Page 28: ...ld damage the card Format SD SDHC SDXC memory cards before first use and be sure to reformat all memory cards after using them in a computer or other device For more information on formatting memory cards see K FORMAT P83 Memory cards are small and can be swallowed keep out of reach of children If a child swallows a memory card seek medical assistance immediately miniSD or microSD adapters that are...

Page 29: ...ame the copies not the originals Q Q Batteries Batteries Remove dirt from the battery terminals with a clean dry cloth Failure to observe this precaution could prevent the battery from charging Do not affix stickers or other objects to the battery Failure to observe this precaution could make it impossible to remove the battery from the camera Do not short the battery terminals The battery could ove...

Page 30: ...n the lens cover is closed Camera on Camera off PlaybackMode PlaybackMode If the lens cover is closed the camera can be turned on in playback mode by pressing the a button for about a second To turn the camera off press and hold the a button R R Switching to Shooting Mode Switching to Shooting Mode To exit to shooting mode press the shut ter button halfway or the B button ...

Page 31: ...lens can affect pictures Keep the lens clean Q Turning the camera off does not completely end the supply of power to the cam era R R Auto Power Off Auto Power Off The camera will turn off automatically if no operations are performed for the length of time selected for MAUTO POWER OFF P84 ...

Page 32: ...and BACK Tap BACK to return to the previous step NO to skip the current step Any steps you skip will be displayed the next time the camera is turned on START MENU ENGLISH FRANCAIS 1 3 DEUTSCH ESPAÑOL PORTUGUÊS ITALIANO NEDERLANDS РУССКИЙ ﻋﺮﺑﻲ 2 The date will be displayed Tap the 6 or 7 arrows to set the date and then tap OK To change the order in which the year month and day are displayed tap YY M...

Page 33: ...K to enter shooting mode when setup is com plete MENU DISP R R The Camera Clock The Camera Clock If the battery is removed for an extended period the camera clock will be reset and the language selection dialog will be displayed when the camera is turned on ...

Page 34: ...camera on Fully open the lens cover Q shooting indicators will be displayed MENU DISP The The g g Icon Icon This icon indicates that the camera continuously searches for faces to select the appropriate scene increasing the drain on the battery The Scene Icon The Scene Icon The camera selects the scene according to shooting conditions and the type of subject bPORTRAIT portraits c LANDSCAPE landscap...

Page 35: ...splay MENU DISP Zoom indicator MENU DISP Zoom out Zoom in Holding the Camera Holding the Camera Hold the camera steady with both hands and brace your elbows against your sides Shaking or unsteady hands can blur your shots To prevent pictures that are out of focus or too dark underexposed keep your fingers and other objects away from the lens and flash ...

Page 36: ... the shutter button halfway to focus R The lens may make a noise when the camera focuses this is normal If the camera is able to focus it will beep twice If the camera is unable to focus the focus frame will turn red s will be displayed Change the composition or use focus lock P32 Double beep ...

Page 37: ... the subject is poorly lit the flash may fire when the pic ture is taken For information on using the flash when lighting is poor see N Using the Flash Intelligent Flash P35 Click The Shutter Button The Shutter Button The shutter button has two positions Pressing the shutter button halfway sets focus and exposure to shoot press the shutter button the rest of the way down ...

Page 38: ...e LCD monitor When taking important photo graphs take a test shot and check the results 1 Press the a button The most recent picture will be displayed 2 View additional pictures Scroll left or right or tap 8 or 9 MENU DISP MENU DISP Press the shutter button or the B button to exit to shooting mode ...

Page 39: ...e See Mode Mode See See SCENE RECOGNITION SCENE RECOGNITION 20 MOTION PANORAMA MOTION PANORAMA 28 AUTO AUTO 26 NATURAL LIGHT NATURAL LIGHT NATURAL NATURAL N N 30 TOUCH SHOOT TOUCH SHOOT 26 TOUCH TRACK TOUCH TRACK 26 PROGRAM AE PROGRAM AE 31 SP SP SCENE POSITION SCENE POSITION 27 MENU DISP A description of the selected mode will be displayed tap the description to continue or wait for it to clear f...

Page 40: ...s on the selected subject and take a picture MENU DISP x xTOUCH TRACK TOUCH TRACK Touch the subject in the display Focus will track the subject as it moves through the frame R The camera focuses continuously increasing the drain on the battery and that the sound of the camera focusing may be audible R Focus will be fixed at the center of the display when macro is on P SHOOTING MODE BACK HOME Progra...

Page 41: ...ose for daylight shots of buildings and landscapes N N SPORT SPORT Choose when photographing moving subjects O O NIGHT NIGHT Choose this mode for poorly lit twilight or night scenes H H NIGHT TRIPOD NIGHT TRIPOD Choose this mode for slow shutter speeds when shooting at night Q Q SUNSET SUNSET Choose this mode to record the vivid colors in sunrises and sunsets R R SNOW SNOW Choose for crisp clear s...

Page 42: ...a Natural Light Natural Flash AUTO Scene Recognition Touch Track 1 Tap y and select the pan direction BACK 2 3 1 2 1 3 2 Take a photograph Exposure and white balance for the panorama are set with the first shot 3 Frame the next shot to overlap with the previous picture by superimpos ing y on so that they form a solid circle z The camera will release the shutter automatically BACK OK 2 3 1 BACK OK 2...

Page 43: ... to the camera unvarying subjects such as the sky or a field of grass subjects that are in constant motion such as waves and waterfalls or subjects that undergo marked changes in brightness Panoramas may be blurred if the subject is poorly lit For Best Results For Best Results For best results be careful not to tilt the camera backward or forward or to either side and try not to move the camera whi...

Page 44: ...URAL LIGHT NATURAL LIGHT Capture natural light indoors under low light or where the flash can not be used The flash turns off and sensitivity is raised to reduce blur C CNATURAL NATURAL N N This mode helps ensure good results with backlit subjects and in other situ ations with difficult lighting Each time the shutter button is pressed the camera takes two shots one shot without the flash to preserve nat...

Page 45: ...hy Shooting Mode P PPROGRAMAE PROGRAMAE The camera sets exposure automatically P SHOOTING MODE BACK HOME Program AE Scene Position Touch Shoot Motion Panorama Natural Light Natural Flash AUTO Scene Recognition Touch Track ...

Page 46: ...us Position the subject in the focus frame U and press the shutter button halfway to lock fo cus and exposure Focus and exposure will remain locked while the shutter button is pressed halfway AF AE lock MENU DISP 2 Recompose Keep the button pressed halfway 3 Shoot Press the button all the way down ...

Page 47: ...or car bodies Fast moving subjects Subjects photographed through a window or other re flective object Darksubjectsandsubjectsthatabsorbratherthanreflect light such as hair or fur Insubstantial subjects such as smoke or flame Subjects that show little contrast with the background for example subjects in clothing that is the same color as the background Subjects positioned in front of or behind a high ...

Page 48: ...re compensation value and then tap OK MENU DISP P Choose positive values 6 to increase exposure Choose negative values 7 to reduce exposure R A d icon and exposure indicator are displayed at settings other than 0 Exposure compensation is not reset when the camera is turned off to restore normal expo sure control choose a value of 0 R Turn the flash off when using exposure compensation R Exposure comp...

Page 49: ... is poor for example when shooting at night or indoors under low light Tap the flash icon and choose from the following flash modes MENU DISP P MENU DISP P Option Option Description Description Q Q K K AUTO FLASH AUTO FLASH The flash fires when required Recommended in most situations N N L L FORCED FLASH FORCED FLASH The flash fires whenever a picture is taken Use for backlit subjects or for natural col...

Page 50: ...is recommended R The flash may fire several times with each shot Do not move the camera until shooting is complete R The flash may cause vignetting Red Eye Removal Red Eye Removal WhenIntelligentFaceDetectionandred eyeremoval P39 areon red eyeremoval is available in auto K RED EYE REDUCTION flash on L FORCED FLASH and slow sync M RED EYE SLOW modes Red eye removal minimizes red eye caused when light f...

Page 51: ... taken press the shutter button halfway g GROUPTIMER The camera will start the timer when it detects the selected number of portrait subjects Tap g or h to choose the number of subjects R To stop the timer before the picture is taken press the shutter button halfway S 10 SEC The shutter is released ten seconds after the shutter button is pressed Use for self portraits The self timer lamp on the fr...

Page 52: ...de icon and select F When macro mode is in effect the camera focuses on subjects near the center of the frame Use the zoom control to compose pictures P21 MENU DISP MENU DISP To exit macro mode tap the macro mode icon and select H R Use of a tripod is recommended to prevent blur caused by camera shake ...

Page 53: ...r b FACE DETEC TION P73 Faces can be detected with the camera in vertical or horizontal orientation if a face is detected it will be indicated by a green border If there is more than one face in the frame the camera will select the face closest to the center other faces are indicated by white borders Q In some modes the camera may set exposure for the frame as a whole rather than the portrait subj...

Page 54: ...ayback Options To view the most recent picture in the LCD monitor press the a button MENU DISP Scroll left or right or tap 8 or 9 to view additional pic tures MENU DISP R Pictures taken using other cameras are indicated by a m gift image icon during playback ...

Page 55: ...oom out you can also select i with the camera zoom control to display the zoom slider and use the zoom control to zoom in and out or tap the display to zoom in on the se lected area Tap 6 7 8 or 9 to scroll the display BACK DISP Navigation window shows portion of image currently visible in the display Tap BACK to exit zoom R The maximum zoom ratio varies with image size Playback zoom is not availa...

Page 56: ...ctures nine at a time tap G in single frame view The number of pictures displayed changes each time you tap G you can also select j with the camera zoom control to increase the number of pictures displayed or i to decrease the number of pictures MENU DISP BACK 1 frame 9 frames BACK 16 frames ...

Page 57: ...re pictures BACK BACK Tap a picture to view it full screen Rotating the Camera Rotating the Camera When the camera is held in tall portrait orientation the highlighted picture appears at the top of the display Tap 8 or 9 to highlight pic tures and tap the picture at the top of the display to view it full screen ...

Page 58: ...rn to playback when all the desired pictures have been deleted SELECTED SELECTED FRAMES FRAMES Tap pictures to select or deselect pictures that are protected or in a print order are shown by S When the operation is complete tap OK to display a confirmation dialog and tap OK to delete the selected pictures ALL FRAMES ALL FRAMES A confirmation dialog will be displayed tap OK to delete all unprotected ...

Page 59: ...S FAVORITES Search by rating P74 BY SCENE BY SCENE Search by scene BYTYPE OF DATA BYTYPE OF DATA Find all still pictures all movies or edited pictures BY UPLOAD MARK BY UPLOAD MARK Find all pictures selected for upload to a specified destination P78 R Searches can also be performed from the playback menu P75 3 Select a search condition Only pictures that match the search condition will be displayed...

Page 60: ... 2050 08 20 2050 06 03 2050 08 22 2050 05 31 2050 BACK DISP OK 05 31 2050 Tap g or h to scroll through the pictures that match the search condi tions or tap I to view them in a slide show P75 To delete P44 or protect P76 the pictures tap e or D respectively 5 To exit tap OK when the current picture is shown full frame Tap OK to end the search BACK DISP OK 05 31 2050 BACK OK EXIT SEARCH ...

Page 61: ... new book SELECT FROM ALL Choose from all available pictures SELECT BY IMAGE SEARCH Choose from pictures matching selected search conditions P45 R Neither photographs a or smaller nor movies can be selected for photobooks 4 Scroll through the images and tap K to select or deselect the current im age for inclusion in the book To display the current image on the cover tap J R The first picture select...

Page 62: ...ain no photos are automatically deleted ViewingPhotobooks ViewingPhotobooks To view a book tap it in the photobook assist menu and then tap 8 and 9 to scroll through the pictures EditingandDeletingPhotobooks EditingandDeletingPhotobooks Display the photobook and tap MENU The following options will be dis played select the desired option and follow the on screen instructions EDIT Edit the book as d...

Page 63: ... RATIO ASPECT RATIO Choose the aspect ratio c c BRIGHTNESS BRIGHTNESS Adjust brightness c c FACE MOSAIC FACE MOSAIC If the original was taken with Intelligent Face Detection a mosaic effect can be applied to up to four faces If Intelligent Face Detection was off or no faces were detected the mosaic effect will be applied to the center of the image L L MOVIETRIMMING MOVIETRIMMING Remove opening or end...

Page 64: ... more pictures R To rotate or crop an image for display in a collage tap its frame in the collage template Rotation and crop tools will appear at the edges of the display To rotate the picture tap n The picture is rotated 90 clockwise each time you tap the icon Tap k or n to zoom the selected picture in or out and tap 6 7 8 or 9 to position it in the frame Tap OK when the operation is complete Not...

Page 65: ...p OK The next time the picture is played back the rotated one will be displayed R The camera may not be able to rotate pictures created with other devices G GCROP CROP Create cropped copies of pictures 1 Tap the left and right arrows 8 and 9 to select the picture you wish to crop 2 Tap k or n to zoom in and out and tap 6 7 8 or 9 to scroll the pic ture until the desired portion is displayed Higher...

Page 66: ...tion to cre ate copies that have been processed to remove red eye 1 Tap the left and right arrows 8 and 9 to select a picture 2 Tap OK to create a copy with reduced red eye R Red eye may not be removed if the camera is unable to detect a face or the face is in profile Results may differ depending on the scene Red eye can not be removed from pictures that have already been processed using red eye rem...

Page 67: ...ge from the start of the copy proceed to Step 3 otherwise proceed to Step 4 3 Tap x to begin playback and tap y to pause when the new opening frame is reached 4 Tap IN POINT To remove footage from the end of the copy proceed to Step 5 otherwise proceed to Step 6 to exit without creating an edited copy tap BACK 5 Tap x to begin playback and tap y to pause when the new closing frame is reached 6 Tap...

Page 68: ...movie 2 Select PMOVIE JOIN in the playback menu 3 Tap g or h to highlight a movie 4 Tap OK to add the highlighted footage to the end of the current movie and save the resulting copy or tap BACK to exit without creating a copy R Both movies must have been recorded at the same frame size and frame rate and have a combined file size of no more than 2 GB ...

Page 69: ...d tap MENU DISP 100 0001 100 0001 Horizontal panoramas are displayed from left to right The following opera tions can be performed during playback Operation Operation Description Description End playback End playback Tap z to end playback Pause playback Pause playback Tap y to pause playback Tap x to resume ...

Page 70: ... REC 999m59s 999m59s N N Time remaining To end recording press the F button again Recording ends automatically when the movie reaches maximum length or memory is full R Zoom can be adjusted while recording is in progress R Focus is fixed when F is pressed Exposure and white balance are adjusted auto matically throughout recording The color and brightness of the image may vary from that displayed be...

Page 71: ...ry bright subjects This is normal and does not indicate a malfunction Q The temperature of the camera may rise if it is used to record movies for an ex tended period or if the ambient temperature is high This is normal and does not indicate a malfunction MovieFrameSize MovieFrameSize Before recording select a frame size using the VMOVIE QUALITY option in the shooting menu P73 Option Option Descrip...

Page 72: ... begin playback The following operations can be performed Operation Operation Description Description End playback End playback Tap z to end playback Pause playback Pause playback Tap y to pause playback Tap x to resume W mode icon DISP 100 0011 100 0011 MENU Q Do not cover the speaker during playback ...

Page 73: ...mputer Note that depending on the printer not all the functions described below may be supported 1 Connect the supplied USB cable as shown and turn the printer on 2 Press the a button for about a second to turn the camera on 3 Tap 8 or 9 to select a picture you wish to print 4 Tap or to choose the number of copies up to 99 5 Repeat steps 3 4 to select additional pictures Tap PRINT to display a con...

Page 74: ...a off and disconnect the USB cable R Pictures can be printed from internal memory or a memory card that has been formatted in the camera R If no pictures are selected the camera will print one copy of the current picture R Page size print quality and border selections are made using the printer Printing the Date of Recording Printing the Date of Recording To print the date of recording on pictures ...

Page 75: ...GB or more 1GB or more 512MB or more 512MB or more Free disk space Free disk space 15GB or more 15GB or more 2GB or more 2GB or more Video Video 1024 768 pixels or more with 24 bit color or better A graphics processing unit GPU that supports DirectX 7 or later Other Other Built in USB port recommended Operation is not guaranteed with other USB ports Internet connection broadband recommended requir...

Page 76: ...he Installer Does Not Start Automatically If the Installer Does Not Start Automatically If the installer does not start automatically select Computer or My Computer from the Start menu then double click the FINEPIX CD icon to open the FINEPIX CD window and double click setup or SETUP EXE 4 If prompted to install Windows Media Player DirectX or NET Framework follow the on screen instructions to com...

Page 77: ...400MB available when FinePixViewer is running Video Video 800 600 pixels or more with thousands of colors or better Other Other Built in USB port recommended Operation is not guaranteed with other USB ports 2 After starting the computer and quitting any applications that may be run ning insert the installer CD in a CD ROM drive and double click Installer for Mac OS X 3 An installer dialog will be ...

Page 78: ...d select Preferences from the Image Capture application menu The Image Capture preferences dialog will be displayed choose Other in the When a camera is connected open menu then select FPVBridge in the Applications FinePixViewer folder and click Open Quit Image Cap ture Mac OS X 10 6 Connect the camera and turn it on Open the Applications folder and start Image Capture The camera will be listed un...

Page 79: ...attery before connecting the cam era 2 Turn the camera off and connect the sup plied USB cable as shown making sure the connectors are fully inserted Connect the camera directly to the computer do not use a USB hub or keyboard 3 Press the a button for about a second to turn the camera on MyFinePix Studio or FinePixViewer will start automatically follow the on screen in structions to copy pictures t...

Page 80: ...r does not display a message stating that copying is in progress before turning the camera off or disconnecting the USB cable Failure to observe this precaution could result in loss of data or damage to internal memory or the memory card Q Disconnect the camera before inserting or removing memory cards Q In some cases it may not be possible to access pictures saved to a network server using the sup...

Page 81: ...r quitting the software and disconnecting the camera drag the FinePixViewer folder from Applications into the Trash and select Empty Trash in the Finder menu Macintosh or open the control panel and use Programs and Features Windows 7 Windows Vista or Add or Remove Programs Windows XP to uninstall MyFinePix Studio Under Windows one or more confirmation dialogs may be displayed read the contents care...

Page 82: ...menu to adjust shooting settings The options available vary with the shooting mode selected UsingtheShootingMenu UsingtheShootingMenu 1 To view the shooting menu tap the MENU icon when the camera is in shooting mode MENU DISP P 2 Tap the icon for the desired menu item 3 Tap the desired option ...

Page 83: ...ur note however that mot tling may appear in pictures taken at high sensitivities 100 100 ISO ISO 3200 3200 Bright Bright Scene Scene Dark Dark Less noticeable Less noticeable Noise mottling Noise mottling More noticeable More noticeable Option Option Description Description AUTO AUTO Sensitivity is adjusted automatically in response to shooting conditions 3200 1600 800 400 3200 1600 800 400 200 1...

Page 84: ...l pictures require less memory allowing more pictures to be recorded O O4 3 4 3 Size Aspect ratio SizeVersus Aspect Ratio SizeVersus Aspect Ratio Size Size Option Option Prints at sizes up to Prints at sizes up to O O 34 25cm 13 5 10in P P 24 18cm 9 5 7in Q Q 17 13cm 7 5in Aspect ratio Aspect ratio 4 3 Pictures have the same proportions as the camera display 16 9 Suited for display on High Definiti...

Page 85: ...ite Option Option Description Description c cSTANDARD STANDARD Standard contrast and saturation Recommended in most situations a aCHROME CHROME Vivid contrast and color Choose for vivid shots of flowers or enhanced greens and blues in landscapes b bB W B W Take pictures in black and white f fSEPIA SEPIA Take pictures in sepia R R Settings other than Settings other than c cSTANDARD STANDARD are show...

Page 86: ...lay R RCONTINUOUS CONTINUOUS defaults to defaults to OFF OFF Capture motion in a series of pictures Option Option Description Description ON ON The camera takes up to 3 pictures while the shutter button is pressed OFF OFF One photograph is taken each time the shutter button is pressed R R Focus and exposure are determined by the first frame in each series Focus and exposure are determined by the fir...

Page 87: ...efaults to defaults to f f Choose a frame size for movies P 57 c c BEST FRAMING BEST FRAMING defaults to defaults to OFF OFF Choose ON to display a framing guide o o SILENT MODE SILENT MODE defaults to defaults to OFF OFF Select ON to disable the speaker and flash in situations in which camera sounds or lights may be unwelcome note that the flash will still fire in C mode M M SET UP SET UP Display th...

Page 88: ...tions PlaybackMenuOptions k k PHOTOBOOK ASSIST PHOTOBOOK ASSIST Create books from your favorite photos P47 l l FAVORITES FAVORITES To rate the picture currently displayed in full frame playback tap I A ratings dialog will be displayed tap to select a rating of from zero to five stars h h PICTURE COMPARE PICTURE COMPARE Compare two pictures side by side Tap a frame to highlight it and scroll left or...

Page 89: ...o back or skip ahead one frame Select FADE IN for fade transitions between frames FADE IN NORMAL g As above except that camera automatically zooms in on faces selected with Intelligent Face detection FADE IN g MULTIPLE Display several pictures at once SCRAP BOOKVIEW Display multiple pictures in random positions and sizes SELECT BGM Choose background music R R The camera will not turn off automatica...

Page 90: ...icture Tap D to protect the picture If the picture is already protected tapping E will remove protection from the image SET ALL Protect all pictures RESET ALL Remove protection from all pictures 3Tap BACK to exit when the operation is complete Q Q Protected pictures will be deleted when the memory card or internal memory is formatted Protected pictures will be deleted when the memory card or inter...

Page 91: ... from internal memory to a memory card b CARD y a INTERNAL MEMORY Copy pictures from a memory card to internal memory 3Select one of the following FRAME Copy selected pictures Tap 8 or 9 to view pictures ALL FRAMES Copy all pictures 4Tap OK to copy the current picture R R Copying ends when the destination is full Copying ends when the destination is full A A ERASE ERASE Delete all or selected pict...

Page 92: ...ted for upload to YouTube R R During playback selected pictures are indicated by During playback selected pictures are indicated by j j YouTube YouTube or or j j FACEBOOK FACEBOOK icons icons RESET ALL Deselecting All Pictures RESET ALL Deselecting All Pictures To deselect all pictures tap RESET ALL and tap OK or tap BACK to exit without changing pic ture status If the number of pictures affected i...

Page 93: ...ENT MODE SILENT MODE defaults to defaults to OFF OFF Select ON to disable the speaker and flash in situations in which camera sounds or lights may be unwelcome note that the flash will still fire in C mode M M SET UP SET UP Display the setup menu P80 ...

Page 94: ... to defaults to 1 5 SEC 1 5 SEC Choose how long pictures are displayed in the LCD monitor after shooting Option Option Description Description 3 SEC 3 SEC Pictures are displayed for three seconds 3 SEC or 1 5 seconds 1 5 SEC Colors may differ slightly from those in the final image 1 5 SEC 1 5 SEC ZOOM CONTINUOUS ZOOM CONTINUOUS Pictures are displayed until you tap OK OFF OFF Pictures are not display...

Page 95: ... to reduce the num ber of pictures with duplicate file names RENEW RENEW Numbering is reset to 0001 after formatting or when a new memory card is inserted R R If the frame number reaches 999 9999 the shutter release will be disabled If the frame number reaches 999 9999 the shutter release will be disabled P98 98 R R Selecting Selecting R R RESET RESET P85 sets 85 sets B B FRAME NO FRAME NO to to CO...

Page 96: ... digital zoom further magnifying the image The Zoom Indicator The Zoom Indicator DIGITAL ZOOM DIGITAL ZOOM on on j i Optical zoom Digital zoom DIGITAL ZOOM DIGITAL ZOOM off off j i Optical zoom Q Q Digital zoom produces lower quality images than optical zoom Digital zoom produces lower quality images than optical zoom F F DATE TIME DATE TIME Set the camera clock P18 ...

Page 97: ...tically adjusted during shooting in response to ambi ent lighting conditions Brightness is not adjusted during playback MANUAL MANUAL Tap 6 or 7 to adjust brightness and then tap OK Choose from values between 5 and 5 K K FORMAT FORMAT If a memory card is inserted in the camera this option will format the memory card If no mem ory card is inserted this option will format internal memory Select OK t...

Page 98: ...s to defaults to h h Switch the camera clock instantly from your home time zone to the local time at your destina tion when traveling To specify the difference between local time and your home time zone 1Tap g LOCAL 2Tap the 6 and 7 icons to choose the time difference The minimum increment is 15minutes Tap OK when settings are complete To switch between local time and your home time zone tap g LOCAL...

Page 99: ...to defaults to U UON ON Choose whether the display automatically dims to save power R R RESET RESET Tap OK to reset all settings except F DATE TIME and N TIME DIFFERENCE to default values h h CALIBRATION CALIBRATION Calibrate the touch panel Using your finger tap the symbols in the order if you tap too far from the correct symbol an error will be displayed tap the correct symbol again and tap OK i ...

Page 100: ...ILM and other manufacturers USB cable supplied SD card slot or card reader Computer HDTV Computer Related Printing Printer PictBridge compatible printer USB cable Audio Visual supplied DIGITAL CAMERA FINEPIX Z85 Z90 Series Available separately SDXC cards not supported HDMI cable sold separately HDP L1 HD player SD SDHC SDXC memory card ...

Page 101: ..._ cameras index html Rechargeable Rechargeable Li ion batteries Li ion batteries NP 45A Additional large capacity NP 45A recharge able batteries can be purchased as required Battery Battery chargers chargers BC 45W Replacement battery chargers can be pur chased as required The BC 45W charges an NP 45A battery in about 120 minutes at 20 C 68 F HD players HD players HDP L1 requiresHDMIcable availabl...

Page 102: ...ds such as near a broadcasting anten na power line radar emitter motor transformer or magnet in contact with volatile chemicals such as pesticides next to rubber or vinyl products Water and Sand Exposure to water and sand can also damage the camera and its internal circuitry and mechanisms When using the camera at the beach or seaside avoid exposing the camera to water or sand Do not place the cam...

Page 103: ...with a piece of FUJIFILM lens cleaning paper to which a small amount of lens cleaning fluid has been applied Care should be taken to avoid scratching the lens or LCD monitor The camera body can be cleaned with a soft dry cloth Do not use alcohol thinner or other volatile chemicals Traveling Traveling Keep the camera in your carry on baggage Checked baggage may suffer violent shocks that could damage...

Page 104: ...n charged many times The battery has been charged many times The battery has reached the end of its charging The battery has reached the end of its charging life Purchase a new battery life Purchase a new battery The camera turns off The camera turns off suddenly suddenly Charge the battery Charge the battery P P10 or insert a fully charged spare battery 10 or insert a fully charged spare battery P ...

Page 105: ...e battery Charge the battery P P10 or insert a fully charged spare battery 10 or insert a fully charged spare battery P P11 11 The camera has turned off automatically The camera has turned off automatically Turn the camera on Turn the camera on P P16 16 The LCD monitor goes The LCD monitor goes dark after shooting dark after shooting The LCD monitor may darken while the flash charges Wait for the flas...

Page 106: ...n off and frame the picture using focus lock P P32 32 The flash does not fire The flash does not fire Theflashisnotavailableinthecurrentshootingmode Theflashisnotavailableinthecurrentshootingmode Chooseadifferentshootingmode Chooseadifferentshootingmode P P25 25 The battery is exhausted The battery is exhausted Charge the battery Charge the battery P P10 or insert a fully charged spare battery 10 or insert...

Page 107: ...atures Turn the camera off and wait for it to cool down to cool down Smear in the form of Smear in the form of vertical purple or white vertical purple or white lines appears in the lines appears in the display display Vertical purple or white lines may appear after the camera has been used continuously at high Vertical purple or white lines may appear after the camera has been used continuously at...

Page 108: ...Hold the camera correctly during recording Hold the camera correctly during recording P P21 56 21 56 The speaker is obstructed The speaker is obstructed Hold the camera correctly during playback Hold the camera correctly during playback P P58 58 Selected pictures are not Selected pictures are not deleted deleted Some of the pictures selected for deletion are protected Remove protection using the d...

Page 109: ... is exhausted The battery is exhausted Charge the battery Charge the battery P P10 or insert a fully charged spare battery 10 or insert a fully charged spare battery P P11 11 The camera does not The camera does not function as expected function as expected Remove and reinsert the battery Remove and reinsert the battery P P11 If the problem persists contact your FUJIFILM dealer 11 If the problem pe...

Page 110: ...35 35 LENS COVER LENS COVER Attempted to take photograph with lens cover closed Open lens cover before taking photo Attempted to take photograph with lens cover closed Open lens cover before taking photo graphs graphs FOCUS ERROR FOCUS ERROR Camera malfunction Turn the camera off and then on again If the message persists contact Camera malfunction Turn the camera off and then on again If the message...

Page 111: ...RY IS FULL FULL INSERT A NEW CARD INSERT A NEW CARD WRITE ERROR WRITE ERROR Memory card error or connection error Memory card error or connection error Reinsert the card or turn the camera off and then Reinsert the card or turn the camera off and then on again If the message persists contact a FUJIFILM dealer on again If the message persists contact a FUJIFILM dealer Not enough memory remaining to r...

Page 112: ...de to delete or rotate to a protected picture Remove protection and try again again P P76 76 a a CAN NOT CROP CAN NOT CROP a a pictures can not be cropped pictures can not be cropped CAN NOT CROP CAN NOT CROP The picture is damaged or was not created with the camera The picture is damaged or was not created with the camera P P CANNOT EXECUTE CANNOT EXECUTE An attempt was made to create a resized c...

Page 113: ...fpaperorink orotherprintererror Printeroutofpaperorink orotherprintererror Checkprinter seeprintermanualfordetails If Checkprinter seeprintermanualfordetails If printing does not resume automatically tap printing does not resume automatically tap OK OK to resume to resume CANNOT BE PRINTED CANNOT BE PRINTED An attempt was made to print a movie a picture not created with the camera or a picture in ...

Page 114: ... MODE P25 AUTO b FACE DETECTION P73 OFF E LCD MODE P85 POWER SAVE ON The Silent Mode The Silent Mode Turning on the silent mode P73 79 disables the speaker and flash in situations in which camera sounds or lights may be un welcome The Self timer The Self timer To prevent blur caused by the camera moving when the shutter button is pressed use the two second timer To turn the timer off tap BACK S and ...

Page 115: ...NTINUOUS is selected for A IM AGE DISP P80 Remove red eye by selecting ON for Face Detection and red eye re moval Playback Playback Zoominonfacesduringslideshows P75 orbytappinggduringplay back Search for faces using b IMAGE SEARCH P45 Crop the background from portraits using G CROP P51 Quick Deletion Quick Deletion Tap e to delete a currently viewing photograph in the playback mode ...

Page 116: ... for BSHOOTING MODE P30 Use hPICTURE COMPARE P74 to compare the two shots To photograph subjects that are in motion select xTOUCH TRACK for BSHOOTING MODE P26 To fine tune brightness of a photograph select PPROGRAM AE P31 for BSHOOTING MODE choose an appropriate white balance option P72 and adjust exposure compensa tion P34 ...

Page 117: ...INE FINE NORMAL NORMAL FINE FINE NORMAL NORMAL FINE FINE NORMAL NORMAL Photographs Photographs O O4 3 4 3 6 6 10 10 320 320 550 550 640 640 1100 1100 1290 1290 2210 2210 O O16 9 16 9 8 8 15 15 410 410 780 780 830 830 1570 1570 1680 1680 3160 3160 P P4 3 4 3 12 12 21 21 630 630 1100 1100 1260 1260 2200 2200 2540 2540 4420 4420 P P16 9 16 9 16 16 30 30 820 820 1540 1540 1640 1640 3090 3090 3290 3290...

Page 118: ...P 16 9 16 9 3 072 1 728 3 072 1 728 Q Q 4 3 4 3 2 048 1 536 2 048 1 536 Q Q 16 9 16 9 1 920 1 080 1 920 1 080 Lens Lens Fujinon 5 optical zoom lens F3 9 Fujinon 5 optical zoom lens F3 9 wide angle wide angle F4 9 F4 9 telephoto telephoto Focal length Focal length f 5 0mm 25 0mm f 5 0mm 25 0mm 35 mm format equivalent 28mm 140mm 35 mm format equivalent 28mm 140mm Digital zoom Digital zoom 4 3 4 3 Ap...

Page 119: ...and combined mechanical and electronic shutter electronic shutter AUTO mode AUTO mode s s s s Other modes Other modes 4 s 4 s s s Continuous Continuous Up to 0 8 fps max 3 frames Up to 0 8 fps max 3 frames Focus Focus Focus area selection Focus area selection AF CENTER focus areas selected in AF CENTER focus areas selected in J J TOUCH SHOOT TOUCH SHOOT and and x x TOUCH TRACK TOUCH TRACK modes mo...

Page 120: ...l on red eye removal on LCD monitor LCD monitor 3 0 in 230k dot color LCD monitor frame coverage approx 96 3 0 in 230k dot color LCD monitor frame coverage approx 96 Movies Movies Frame size Frame size h h1280 1280 1 280 720 or 1 280 720 or f f 640 480 30fps monaural sound 640 480 30fps monaural sound Languages Languages Arabic Bulgarian Simplified Chinese Traditional Chinese Czech Danish Dutch Eng...

Page 121: ...aken with battery varies with battery charge level and will Number of shots that can be taken with battery varies with battery charge level and will decline at low temperatures decline at low temperatures Camera dimensions Camera dimensions W H D W H D 95 4mm 56 9mm 20 1mm 3 7in 2 2in 0 7in 95 4mm 56 9mm 20 1mm 3 7in 2 2in 0 7in excluding projections excluding projections minimum depth 17 45mm 0 6...

Page 122: ... 60Hz Input capacity Input capacity 6 0V 100V 240VA 6 0V 100V 240VA Rated output Rated output 4 2V DC 550mA 4 2V DC 550mA Supported batteries Supported batteries NP 45A rechargeable batteries NP 45A rechargeable batteries Charging time Charging time Approx 120 minutes Approx 120 minutes 20 C 68 F 20 C 68 F Operating temperature Operating temperature 0 C 40 C 32 F 104 F 0 C 40 C 32 F 104 F Dimensio...

Page 123: ...chnol ogy small bright points and anomalous colors may appear particularly in the vicinity of text This is normal for this type of LCD monitor and does not indicate a malfunc tion images recorded with the camera are unaffected Digital cameras may malfunction when exposed to strong radio interference e g electric fields static electricity or line noise Due to the type of lens used some distortion may...

Page 124: ...7 3 AKASAKA 9 CHOME MINATO KU TOKYO 107 0052 JAPAN http www fujifilm com products digital_cameras index html ...

Page 125: ... N O O H HQ QR R S S U U V V W W N N B BOFF OFF Q Q 2 2 N N 2 2 O O B BON ON K K 2 2 L L 2 2 M M P P 2 2 2 2 2 2 2 2 h h S S R R a a g g F F F F 1 1 2 2 2 2 H H 1 1 2 2 2 2 2 2 2 2 2 2 2 2 2 2 2 2 2 2 2 2 2 2 d d N N AUTO AUTO 2 2 2 2 2 2 2 2 2 2 2 2 2 2 2 2 2 2 2 2 2 2 2 2 2 2 2 2 2 2 2 2 2 2 2 2 2 2 3200 3200 1600 1600 800 800 400 400 200 200 100 100 O O O O P P Q Q V V h h1280 1280 f f ...

Page 126: ...S U U V V W W T T FINE FINE NORMAL NORMAL 2 2 P P c c a a b b f f D D R R ON ON OFF OFF b b B BON ON B BOFF OFF OFF OFF 2 2 2 2 2 2 2 2 2 2 2 2 2 2 c c L L AUTO AUTO OFF OFF D D M M E E ON ON OFF OFF 1 The camera automatically analyzes and selects macro mode ON OFF 2 Automatically optimized for selected shooting mode ...

Reviews: