background image

16

Taking Pictures in 

SR

C

 (SCENE RECOGNITION) Mode

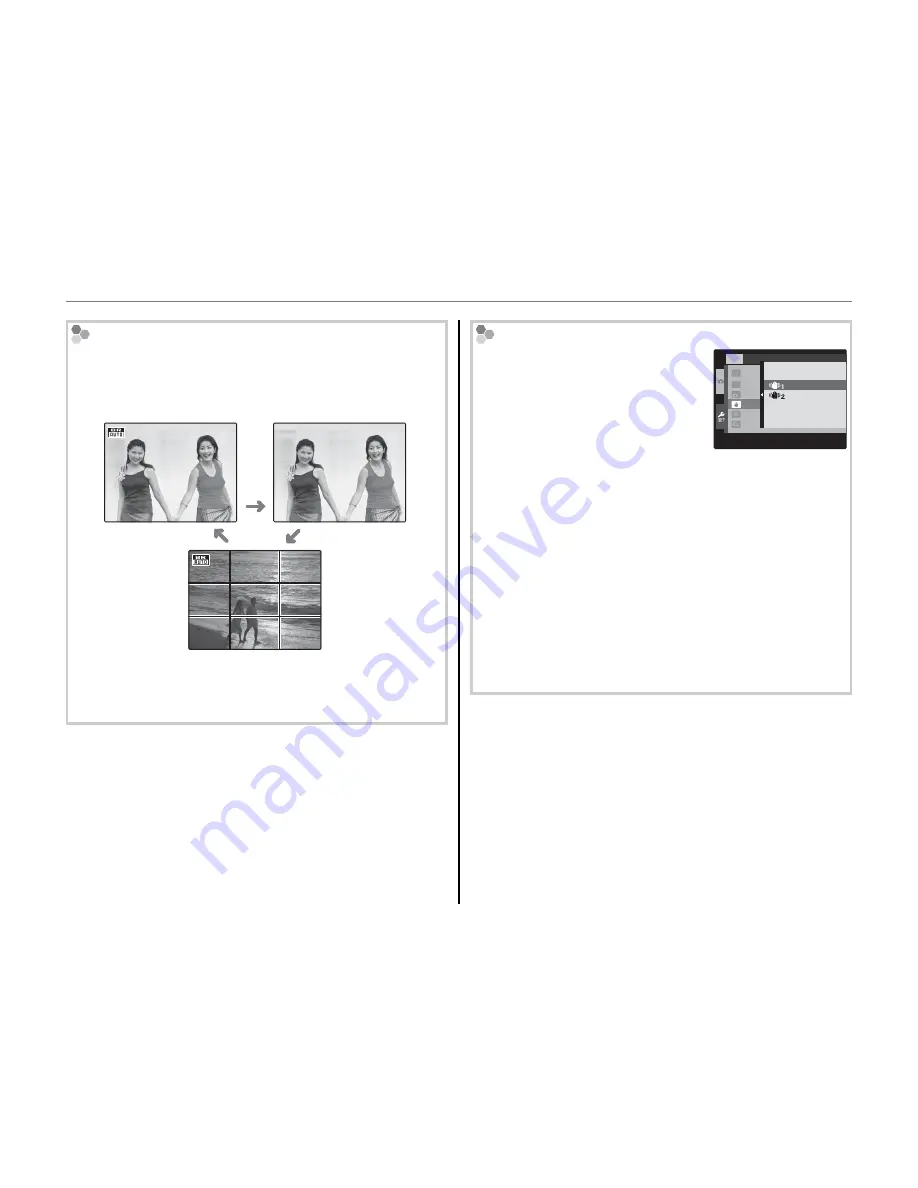
 Framing Guideline (Best Framing)

In shooting mode, press 

DISP/BACK

 to select a 

shooting display format.  The selection changes 
each time 

DISP/BACK

 is pressed.

INFORMATION 

OFF

BEST FRAMING

INFORMATION 
ON

• 

Best Framing

: To use the best framing, position the 

main subject at the intersection of two lines or 
align one of the horizontal lines with the horizon.

 Avoiding Blurred Pictures

If the subject is poorly lit, 
blurring caused by camera 
shake can be reduced by 
activating the 

Z


DUAL IS 

MODE

.  

k


CONTINUOUS

l


SHOOTING ONLY

 or 

OFF


can be set in the setup menu 
(pg. 79).

3

/4

SET-UP

LCD MODE

LCD BRIGHTNESS

DIGITAL ZOOM

DUAL IS MODE

RED EYE REMOVAL

AUTO POWER OFF

OFF

2

ON

ON

OFF

CONTINUOUS

SHOOTING ONLY

OFF

B

 Tip

When using the camera with a tripod, 

Z


DUAL IS 

MODE

 is recommended to be 

OFF

.

A

 Note

Sensitivity is raised when dual IS is in effect.  Note 
that blurring may still occur depending on the scene 
or shooting conditions.

Summary of Contents for FINEPIX JZ300 series

Page 1: ...ITAL CAMERA FINEPIX JZ500 JZ51 0 Series FINEPIX JZ300 JZ31 0 Series User Guide IRestrictions IWorldwide Network For information on related products visit our website at http www fujifilm com products digitoLcomeros index html ...

Page 2: ... 45A rechargeable battery User Guide takes you through the basic steps in using the camera for the first time For more information see the supplied Owner s Manual CD or visit http www fujifilm com products digital_cameros index html 0Troubleshooting Perform the following steps before any trou bleshooting 1Turn the camera off and remove the battery After approx one minute insert the battery again a...

Page 3: ...nals first and the orange stripe aligned with the orange battery latch Slide the battery into the camera keeping the battery latch pressed to one side as shown below Confirm that the battery is securely latched Orange stripe IJl Battery latch I Inserting a Memory Card 1Turn the camera off and open the battery chamber cover 2Insert the memory card firmly until you hear feel a click Holding the memo...

Page 4: ...o highlight a language 2 1 Press the selector left or right to highlight the year month day hour or minute and press up or down to change To change the order in which the year month and day are displayed highlight the date format and press the selector up or down 21H t 2Ml Yr DO 1 1 12 00 20C AM Qa 2Set the date and time JI I t l l 1Turn the camera on Hold the camera steady with both hands and bra...

Page 5: ...he display Zoom indicator ilI N d aVlgatlOn Win ow shows portion of image currently displayed in monitor Press DISP BACK to exit zoom OK To delete the picture highlight OK and press MENU OK To exit without deleting the picture highlight CANCEL and press MENU OK f Copying Pictures to aComputer The supplied software can be used to copy pictures to a computer where they can be stored viewed organized...

Page 6: ...I S l __ sTA I Zoom indicator 3Press the shutter button all the way down to start recording 4 Press the shutter button halfway to end recording Recording ends automatically when the movie reaches maximum length or memory is full Tip There is no need to keep the shutter button pressed during recording Display shows time available S 12 I STA m EI Subject Icon Description PORTRAIT 0 For soft toned po...

Page 7: ... pause a j jiiiiiiiiii l t5 D Progress bar y Press the selector up to end playback Press the selector right to advance left to rewind Press MENU OK to pause playback and display volume controls Press the selector up or down to adjust the volume press MENU OK again to resume playback l Caution Do not cover the speaker during playback EN 6 ENGLISH ...

Page 8: ...undesired operation CAUTION This equipment has been tested and found to comply with the limits for a Class B digital device pursuant to Part 15 of the FCC Rules These limits are designed to provide reasonable protection against harmful interference in a residential installation This equipment generates uses and can radiate radio frequency energy and if not installed and used in accordance with the...

Page 9: ...he camera while you are walking or driving avehicle This can result in you falling down or being involved in atraffic accident Ifaproblemarises turnthe camera off removethe battery disconnectand unplug theACpoweradapter Continued use ofthe camera when it is emitting smoke is emitting any unusual odor or IS In any other abnormal state can cause afire orelectric shock Contact your FUJIFILM dealer Ne...

Page 10: ...ical ElectronicEquipment Applicable in the European Union Norway IcelandandLiechtenstein This symbol on the product or in the manual and in the warranty and or on Its packaging indicates that thiS product shall not be treated as household waste Instead it should be taken to an applicable collection point for the recycling of _ electrical and electronic eqUipment By ensuring thiS product is dispose...

Page 11: ...V V II V V V V V II II tji Exposure compensation V I LBllntelligent OFF fi V V V V II V 0 II II II V V V V V II V Face Detection ON V V V V V V V I V V V v V V V V mD FACE RECOGNITIONs V V V V II II II I V V V V V V r r reo Il RED EYE REMOVAL V V V V II II I V V V V V V D1IMAGE SIZE V V V V V II II V V V V V V V V V V V V II 13 mil ISO fI DUALIS MODE Vi V V V V II II V V V V II 11 V V II V V V II ...

Page 12: ...aciones TSR TEL 593 783 5526 portiz fujifilm com ec Espacri Cia Ltda Mexico Fujifilm de Mexico TS TEL 52 55 5263 55000 eizquierdo fujifilm com mx S A de c v RS TEL 52 55 5366 5150 56 57 cpalma fujifilm com mx Paraguay Errece S R L TSR TEL 59521 444256 jmarbulo fujifilm com py Peru Procesos de Color S A TSR TEL 51 14335563 jalvarado fujifilm com pe Uruguay Fotocamara S R L TSR TEL 598 2 9002004 fot...

Page 13: ...Z310 Series For information on related products visit our website at http www fujifilm com products digital_cameras index html Owner s Manual Thank you for your purchase of this product This manual describes how to use your FUJIFILM FinePix JZ500 JZ510 series FinePix JZ300 JZ310 series digital camera and the supplied software Be sure that you have read and understood its contents before using the ...

Page 14: ...The openings should never be blocked by placing the video product on a bed sofa rug or other similar surface This video product should not be placed in a built in installation such as a bookcase or rack unless proper ventilation is provided or the manufacturer s instructions have been adhered to This video product should never be placed near or over a radiator or heat register Attachments Do not u...

Page 15: ...tning and power line surges Service Service Servicing Do not attempt to service this video product yourself as opening or removing covers may expose you to dangerous voltage or other hazards Refer all servicing to qualified service personnel Damage Requiring Service Unplug this video product from the wall outlet and refer servicing to qualified service personnel under the following conditions When...

Page 16: ...ormal state can cause a fire or electric shock Contact your FUJIFILM dealer Do not allow water or foreign objects to enter the camera If water or foreign objects get inside the camera turn the camera off remove the battery and disconnect and unplug the AC power adapter Continued use of the camera can cause a fire or electric shock Contact your FUJIFILM dealer Do not use in the bathroom or shower D...

Page 17: ...mes steam humidity or dust This can cause a fire or electric shock Do not leave this camera in places subject to extremely high temperatures Do not leave the camera in locations such as a sealed vehicle or in direct sunlight This can cause a fire CAUTION CAUTION Keep out of the reach of small children This product could cause injury in the hands of a child Do not place heavy objects on the camera ...

Page 18: ...after it has been charged or immediately after being used This is perfectly normal Do not recharge a fully charged battery Battery Life At normal temperatures the battery can be used at least 300 times If the time for which the battery provides power shortens markedly this indicates that the battery has reached the end of its effective life and should be replaced Notes on storage If a battery is s...

Page 19: ...ng the camera s Discharging rechargeable batteries function Deactivation and memory are specific to Ni MH batteries and are not in fact battery faults See OWNER S MANUAL for the procedure for Discharging rechargeable batteries CAUTION CAUTION Do not use the Discharging rechargeable batteries function when alkaline batteries being used To charge Ni MH batteries use the quick battery charger sold se...

Page 20: ...e the urgent action indicated If liquid crystal comes in contact with your skin Wipe the area with a cloth and then wash thoroughly with soap and running water If liquid crystal gets into your eye Flush the affected eye with clean water for at least 15 minutes and then seek medical assistance If liquid crystal is swallowed Flush your mouth thoroughly with water Drink large quantities of water and ...

Page 21: ...answer here Glossary Glossary pg 100 pg 100 The meanings of some technical terms may be found here TableofContents TableofContents pg xiii pg xiii The Table of Contents gives an overview of the entire manual The principal camera operations are listed here WarningMessagesandDisplays WarningMessagesandDisplays pg 96 pg 96 Find out what s behind that flashing icon or error message in the monitor Came...

Page 22: ...cking Operation and shutter volume 78 Silent mode 32 Can I change the sound the shutter makes Shutter sound 78 What are the parts of the camera called Parts of the camera 2 What do the icons in the display mean Displays 3 How do I use the menus Menus 57 What s behind that flashing icon or error message Messages and displays 96 How much charge is left in the battery Battery level 13 Sharing Picture...

Page 23: ...d pictures of dogs or cats YDOG TCAT 22 Can I prioritize to focus the specified person s face FACE RECOGNITION 62 How do I shoot close ups Close ups macro mode 30 How do I keep the flash from firing Flash mode 31 How do I stop my subjects eyes glowing red when I use the flash How do I fill in shadows on back lit subjects How do I take a series of pictures in a single burst Continuous shooting mode...

Page 24: ...es at once Multi frame playback 37 How do I find pictures Image search 38 Can I protect my pictures from accidental deletion Protect 70 Can I hide the icons in the display when viewing my pictures Choosing a display format 35 Can I view my pictures in a slide show Slide show 69 Can I add a short voice memo to my pictures Voice memo 75 Can I crop unwanted elements out of my pictures Crop 71 Can I m...

Page 25: ...e on Photography y Shooting Mode 20 SRC SCENE RECOGNITION 20 k AUTO 20 P PROGRAM AE 20 A NATURAL K 20 B NATURAL LIGHT 21 D E SCENE POSITION 21 B Intelligent Face Detection 24 Focus Lock 26 5 Exposure Compensation 28 L Macro Mode Close ups 30 K Using the Flash Super Intelligent Flash 31 J Using the Self Timer 33 More on Playbac More on Playback k Playback Options 35 Playback Zoom 36 Multi Frame Pla...

Page 26: ...OW 69 a RED EYE REMOVAL 69 O PROTECT 70 R CROP 71 j RESIZE 72 N IMAGE ROTATE 72 P COPY 73 Q VOICE MEMO 75 S ERASE FACE RECOG FinePix JZ500 JZ510 series only 76 The Setup Menu 77 Using the Setup Menu 77 Setup Menu Options 78 p TIME DIFFERENCE 80 m FORMAT 81 a IMAGE DISP 81 b FRAME NO 82 g PLAYBACK VOLUME 83 g LCD BRIGHTNESS 83 d LCD MODE 83 o AUTO POWER OFF 83 c DIGITAL ZOOM 84 Technical Note Techn...

Page 27: ...that may be helpful when using the camera Menus and other text in the camera monitor are shown in bold In the illustrations in this manual the monitor display may be simplified for explanatory purposes Supplied Accessories Supplied Accessories The following items are included with the camera CD ROM NP 45A rechargeable battery BC 45W battery charger USB cable Attaching the Strap Attach the strap as...

Page 28: ...r button pg 33 15 14 13 12 20 22 16 17 18 8 9 10 11 21 19 1 7 2 3 4 5 6 17 D playback button 35 18 DISP display BACK button 16 35 U silent mode button 32 19 Memory card slot 9 20 Battery latch 6 7 21 Battery chamber 6 22 Connector for USB cable 46 55 9 Speaker 76 10 Tripod mount 11 Battery chamber cover 6 12 DC coupler cable cover 86 13 Strap eyelet 1 14 Terminal cover 45 46 55 15 Mode dial 4 16 I...

Page 29: ... COLOR 60 20 White balance 61 21 Battery level 13 22 Dual IS mode 16 23 Exposure compensation 28 1 Internal memory indicator 2 Focus frame 14 3 Silent mode indicator 32 4 Continuous shooting mode 61 5 Intelligent Face Detection indicator 24 6 Shooting mode 20 7 Flash mode 31 8 Macro close up mode 30 9 Self timer indicator 33 10 Focus warning 17 11 Blur warning 32 Playback Playback 2 2 3 3 1 1 400 ...

Page 30: ...ance and ISO sensitivity The mode automatically sets both shutter speed and lens aperture pg 20 SRC SCENE RECOGNITION Select for letting the camera automatically adjust settings to suit the scene pg 13 D E SCENE POSITION Choose a scene suited to the subject or shooting conditions and let the camera do the rest pg 21 A MOVIE Record movies with sound pg 42 A NATURAL K Helps ensure good results in si...

Page 31: ...light C Cautions Unplug the charger when it is not in use Remove dirt from the battery terminals with a clean dry cloth Failure to observe this precaution could prevent the battery from charging Charging times increase at low temperatures The Charging Indicator The charging indicator shows battery charge status as follows Chargingindicator Chargingindicator Battery status Battery status Action Act...

Page 32: ...cards Do not use excessive force when handling the battery chamber cover 2 Insert the battery Insert the battery with the terminals first and the orange stripe aligned with the orange battery latch Slide the battery into the camera keeping the battery latch pressed to one side as shown below Confirm that the battery is securely latched Battery latch Orange stripe C Caution Insert the battery in th...

Page 33: ...d by an AC adapter demo mode instructions will be displayed when the camera is turned on Selecting this option starts a slide show To cancel press the shutter button C Cautions Do not affix stickers or other objects to the battery Failure to observe this precaution could make it impossible to remove the battery from the camera Do not short the battery terminals The battery could overheat Use only ...

Page 34: ... be sure to delete pictures when they are no longer needed When a memory card is inserted as described below the card will be used for recording and playback CompatibleMemoryCards CompatibleMemoryCards SanDisk SD and SDHC memory cards have been tested and approved for use in the camera Use a card with a class 4 write speed 4 MB s or better when shooting HD movies A complete list of approved memory...

Page 35: ...e memory card in the orientation shown below slide it all the way in Click Battery C Caution Be sure card is in correct orientation do not insert at an angle or use force If the memory card is not inserted correctly d will appear in the monitor and images will be recorded to internal memory 3 Close the battery chamber cover InsertingaMemoryCard InsertingaMemoryCard ...

Page 36: ...t of reach of children If a child swallows a memory card seek medical assistance immediately miniSD or microSD adapters that are larger or smaller than the standard dimensions of an SD card may not eject normally if the card does not eject take the camera to an authorized service representative Do not forcibly remove the card Do not affix labels to memory cards Peeling labels can cause camera malf...

Page 37: ... Keep the lens clean The n button does not completely disconnect the camera from its power supply Playback Mode Playback Mode To turn the camera on and begin playback press the D button for about a second Press the n button to turn the camera off B Tip Switching to Shooting Mode To exit to shooting mode press the shutter button halfway Press the D button to return to playback ANote The n button li...

Page 38: ...M DD 2 1 Press the selector left or right to highlight the year month day hour or minute and press up or down to change To change the order in which the year month and day are displayed highlight the date format and press the selector up or down 2 2 Press MENU OK B Tip The Camera Clock If the battery is removed for an extended period eDATE TIME will be cleared and the language selection dialog wil...

Page 39: ... SCENE RECOGNITION Simply by pointing the camera to the subject the camera automatically analyzes and selects the most appropriate setting using scene recognition 3 Check the battery level Check the battery level in the display q w e r Indicator Indicator Description Description Q white Battery partially discharged P white Battery more than half discharged O red Low battery Charge as soon as possi...

Page 40: ...uildings and landscapes NIGHT J For night and twilight scenes a using high sensitivity setting to minimize blurring MACRO K For clear close ups of flowers etc BACKLIT PORTRAIT T For a subject backlit against the sun preventing the background from becoming dim NIGHT PORTRAIT Z For a subject in a dim place reducing blur B Tip When a subject can not be analyzed by the camera LAUTO mode will be set AN...

Page 41: ... B to zoom out Select A to zoom in Zoom indicator Holding the Camera Hold the camera steady with both hands and brace your elbows against your sides Shaking or unsteady hands can blur your shots To prevent pictures that are out of focus or too dark underexposed keep your fingers and other objects away from the lens and flash ...

Page 42: ...s with the horizon Avoiding Blurred Pictures If the subject is poorly lit blurring caused by camera shake can be reduced by activating the Z DUAL IS MODE k CONTINUOUS l SHOOTING ONLY or OFF can be set in the setup menu pg 79 3 4 SET UP LCD MODE LCD BRIGHTNESS DIGITAL ZOOM DUAL IS MODE RED EYE REMOVAL AUTO POWER OFF OFF 2 ON ON OFF CONTINUOUS SHOOTING ONLY OFF B Tip When using the camera with a tri...

Page 43: ...nitor and the indicator lamp will blink green Change the composition or use focus lock pg 26 6 Shoot Smoothly press the shutter button the rest of the way down to take the picture B Tip The Shutter Button The shutter button has two positions Pressing the shutter button halfway q sets focus and exposure to shoot press the shutter button the rest of the way down w q w Press halfway Press the rest of...

Page 44: ... Blinks green Blur focus or exposure warning Picture can be taken Blinks green and orange Recording pictures Additional pictures can be taken Glows orange Recording pictures No additional pictures can be taken at this time Blinks orange Flash charging flash will not fire when picture is taken Blinks red Lens or memory error B Tip Warnings Detailed warnings appear in the display See pages 96 99 for...

Page 45: ...additional pictures Press the selector right to view pictures in the order recorded left to view pictures in reverse order Press the shutter button to exit to shooting mode Deleting Pictures To delete the picture currently displayed in the monitor press the selector up I The following dialog will be displayed SET ERASE OK CANCEL OK To delete the picture highlight OK and press MENU OK To exit witho...

Page 46: ...d in most situations P P PROGRAM AE PROGRAM AE Program AE sets both shutter speed and lens aperture The camera lets you control camera settings such as exposure compensation pg 28 white balance pg 61 and ISO sensitivity pg 59 A A NATURAL NATURAL K K This mode helps ensure good results with backlit subjects and in other situations with difficult lighting Each time the shutter button is pressed the ...

Page 47: ...l 1 Rotate the mode dial to D E 2 Press MENU OK to display the following menu EXIT 1 2 SHOOTING MENU SCENE POSITION ISO FINEPIX COLOR IMAGE SIZE IMAGE QUALITY AUTO AUTO N WHITE BALANCE 3 Highlight A SCENE POSITION 4 Press the selector right to display shooting mode options 5 Press the selector up or down to highlight a scene pg 23 CANCEL SET PORTRAIT Portrait with soft overall tone and beautiful s...

Page 48: ... CROP pg 71 C Cautions Although the camera detects faces of many kinds of dogs or cats in Y DOG or T CAT some kinds of dogs or cats may not be detected Also some shooting conditions may prevent the camera from detecting the face of a dog or cat If no face is detected when the shutter button is pressed halfway the camera will focus on the subject at the center of the display When a face is not dete...

Page 49: ...orly lit twilight or night scenes Sensitivity is automatically raised to reduce blur caused by camera shake U NIGHT TRIPOD Choose this mode for slow shutter speeds when shooting at night Use a tripod to prevent blur W FIREWORKS Slow shutter speeds are used to capture the expanding burst of light from a firework Use a tripod to prevent blur E SUNSET Record the vivid colors in sunrises and sunsets F...

Page 50: ...FINEPIX COLOR IMAGE SIZE IMAGE QUALITY AUTO AUTO N WHITE BALANCE PROGRAM AE 1 2 Press the selector up or down to highlight 3 FACE DETECTION 1 3 Press the selector right to display Intelligent Face Detection options 1 4 Press the selector up or down to highlight the desired option 1 5 Press MENU OK to select the highlighted option and return to shooting mode B icon appears in monitor when Intellige...

Page 51: ...r face may not be in the area indicated by the green border when the picture is taken B Tip Red Eye Removal Select ON for the R SAVE ORG IMAGE option in the setup menu pg 79 to save unprocessed copies of pictures created with red eye removal Intelligent Face Detection Intelligent Face Detection is recommended when using the self timer for group or self portraits pg 33 If a face has been registered...

Page 52: ...l remain locked while the shutter button is pressed halfway AF AE lock 250 250 F3 3 F3 3 Press halfway Repeat steps 1 and 2 as desired to refocus before taking the picture 3 Recompose the picture Keeping the shutter button pressed halfway recompose the picture 250 250 F3 3 F3 3 4 Shoot Press the shutter release button the rest of the way down to take the picture Press the rest of the way down ...

Page 53: ...ors or car bodies Fast moving subjects Subjects photographed through a window or other reflective object Dark subjects and subjects that absorb rather than reflect light such as hair or fur Insubstantial subjects such as smoke or flame Subjects that show little contrast with the background for example subjects in clothing that is the same color as the background Subjects positioned in front of or ...

Page 54: ... selector button The effect is visible in the display Choose positive values to increase exposure Choose negative values to reduce exposure 3 Return to shooting mode Press MENU OK to return to shooting mode 4 Take pictures ANote A 5 icon and exposure indicator are displayed at settings other than 0 Exposure compensation is not reset when the camera is turned off to restore normal exposure control ...

Page 55: ...planation of the term EV see the Glossary on page 100 Highly reflective subjects or very bright scenes e g snowfields 1EV Scenes that are mostly sky 1EV Spotlit subjects particularly if photographed against dark backgrounds 2 3 EV Subjects with low reflectivity pine trees or dark colored foliage 2 3 EV 5 Exposure Compensation ...

Page 56: ...er of the frame Use the zoom control to compose pictures To exit macro mode press the selector left L and select OFF Macro mode can also be cancelled by turning the camera off or selecting another shooting mode ANotes Use of a tripod is recommended to prevent blur caused by camera shake The flash may fail to light the entire subject at very short ranges Increase the distance to the subject and try...

Page 57: ... mode Press the selector right K The flash mode changes each time the selector is pressed in modes other than 4 the current mode is indicated by an icon in the display Choose from the following options Mode Mode Description Description 4 AUTO FLASH The flash fires when required Recommended in most situations K FORCED FLASH The flash fires whenever a picture is taken Use for backlit subjects or for...

Page 58: ...YE REMOVAL in the setup menu pg 79 red eye removal is available in V U and Z Red eye removal minimizes red eye caused when light from the flash is reflected from the subject s retinas as shown in the illustration at right U Silent Mode In situations in which camera sounds or light from the flash may be unwelcome press the DISP BACK button until U is displayed in the monitor The camera speaker shoo...

Page 59: ...ch time the selector is pressed The current self timer mode is displayed in the monitor OFF OFF Choose from y self timer off c 10s delay or b 2s delay 2 Focus Press the shutter button halfway to focus C Caution Stand behind the camera when using the shutter button Standing in front of the lens can interfere with focus and exposure 3 Start the timer Press the shutter button the rest of the way down...

Page 60: ...self portraits To use the self timer with Intelligent Face Detection turn Intelligent Face Detection on set the timer as described in Step 1 and then press the shutter button all the way down to start the timer The camera will detect faces while the timer is counting down and adjust focus and exposure immediately before the shutter is released Be careful not to move until the picture has been reco...

Page 61: ... to view pictures in reverse order Keep the selector pressed to scroll rapidly to the desired frame Choosing a Display Format In playback mode press DISP BACK to select a playback display format The selection changes each time DISP BACK is pressed INFORMATION ON INFORMATION OFF 12 31 2050 12 31 2050 10 00 AM 10 00 AM 1 250 1 250 F3 3 F3 3 100 0001 100 0001 400 400 N N ANote Pictures taken using ot...

Page 62: ... shows portion of image currently displayed in monitor Zoom indicator Press DISP BACK to exit zoom ANote Playback zoom is not available with images saved or cropped at the size of t or copies created with j RESIZE pg 72 Intelligent Face Detection Pictures taken with Intelligent Face Detection pg 24 are indicated by a B icon Press the F button to zoom in on the subject selected with Intelligent Fac...

Page 63: ...to increase the number of pictures displayed to one frame with previous and next two nine and a hundred Select A to reduce the number of images displayed Use the selector to highlight images and press MENU OK to view the highlighted image full frame In the nine and hundred frame displays press the selector up or down to view more pictures B Tip Two Frame Display Two frame display can be used to co...

Page 64: ...s the selector up or down to highlight the desired search category Option Option Description Description BY DATE Show images based on the specified date BY FACE Show images based on specified face information BY SCENE Show images based on the specified scene mode BY TYPE OF DATA Show images based on whether still pictures or movies 5 Press MENU OK to select the highlighted search category A detail...

Page 65: ...le the search results are displayed The playback menu will be displayed 2 Press the selector up or down to highlight the desired menu item 3 Press MENU OK to select the highlighted menu B Tips For each operation refer to the page listed Option Option See Page See Page MERASE 40 OPROTECT 70 qSLIDE SHOW 69 Select EXIT SEARCH to go back to the normal playback mode V Image Search ...

Page 66: ... Press the selector up or down to highlight M ERASE 3 Press the selector right to display delete options 1 2 PLAYBACK MENU RED EYE REMOVAL ERASE IMAGE SEARCH SLIDE SHOW PROTECT CROP BACK FRAME ALL FRAMES 4 Press the selector up or down to highlight FRAME or ALL FRAMES 5 Press MENU OK to display options for the selected item see following page B Tips Deleting Pictures When a memory card is inserted...

Page 67: ...ure Press DISP BACK to exit when all the desired pictures have been deleted ALL FRAMES ALL FRAMES DeletingAllImages DeletingAllImages Selecting ALL FRAMES displays the confirmation shown at right ERASE ALL OK IT MAY TAKE A WHILE SET CANCEL OK Highlight OK and press MENU OK to delete all unprotected pictures The dialog shown at right is displayed during deletion Press DISP BACK to cancel before all...

Page 68: ...o need to keep the shutter button pressed during recording ANotes Focus exposure and white balance are adjusted automatically throughout recording The color and brightness of the image may vary from that displayed before recording begins Vertical or horizontal streaks may appear in movies containing very bright subjects This is normal and does not indicate a malfunction A Recording Movies Shoot sh...

Page 69: ...recorded as monaural motion JPEG files Choosing the Frame Size To choose the frame size press MENU OK and select o QUALITY Choose a pixel size in the following 1280 1280 720 for high definition movies 640 480 for standard definition movies 9 320 240 for longer movies 1 2 SHOOTING MENU AF MODE QUALITY 10m59s 15m00s 5m00s 1280 Selecting focus mode Select F AF MODE in the shooting menu w CENTER When ...

Page 70: ...ack is not in progress pressing the selector up will delete the current movie Advance rewind Press the selector right to advance left to rewind If playback is paused the movie will advance or rewind one frame each time the selector is pressed Adjust volume Press MENU OK to pause playback and display volume controls Press the selector up or down to adjust the volume press MENU OK again to resume pl...

Page 71: ...n The camera monitor turns off and pictures and voice memos are played back on the TV Note that the camera volume controls have no effect on sounds played on the TV use the television volume controls to adjust the volume ANote Image quality drops during movie playback C Cautions When connecting the cable be sure the connectors are fully inserted HD movies are played back as standard definition mov...

Page 72: ...econd to turn the camera on w USB will be displayed in the monitor followed by the PictBridge display shown below at right USB 00 OK SET FRAME PICTBRIDGE TOTAL 00000 SHEETS Printing Selected Pictures Printing Selected Pictures 1 Press the selector left or right to display a picture you wish to print ANote To print one copy of the current picture proceed directly to Step 3 2 Press the selector up o...

Page 73: ...ers that support date printing ANotes Use an optional AC adapter and DC coupler to power the camera for extended periods Print pictures from internal memory or a memory card that has been formatted in the camera When pictures are printed via direct USB connection page size print quality and border selections are made using the printer During Printing The message shown at right is displayed during ...

Page 74: ... DPOF in the playback menu pg 49 1 In the PictBridge display press DISP BACK to open the PictBridge menu PRINT DPOF PRINT WITH DATE PRINT WITHOUT DATE PICTBRIDGE 2 Press the selector up or down to highlight x PRINT DPOF 3 Press MENU OK to display a confirmation dialog YES CANCEL PRINT DPOF OK TOTAL 9 SHEETS 4 Press MENU OK to start printing ...

Page 75: ...ht WITH DATE y or WITHOUT DATE 2 2 PLAYBACK MENU VOICE MEMO RESIZE COPY PRINT ORDER WITH DATE WITHOUT DATE RESET ALL WITH DATE y Print date of recording on pictures WITHOUT DATE Print pictures without date Press MENU OK and follow the steps below 1 Press the selector left or right to display a picture you wish to include in or remove from the print order 2 Press the selector up or down to choose t...

Page 76: ...rders can contain a maximum of 999 pictures If a memory card is inserted containing a print order created by another camera the message shown at right will be displayed Pressing MENU OK cancels the print order a new print order must be created as described above Whether WITH DATE y WITHOUT DATE is available may depend on the printer setting Check the printer RESET ALL RESET ALL To cancel the curre...

Page 77: ...following system requirements Windows 7 Windows 7 Windows Vista Windows Vista Windows XP Windows XP CPU CPU 3 GHz Pentium 4 or better 2 GHz Pentium 4 or better RAM RAM 1 GB or more 512 MB or more Free disk space Free disk space 15 GB or more 2 GB or more Video Video 1 024 768 pixels or more with 24 bit color or better A graphics processing unit GPU that supports DirectX 7 or later Other Other Buil...

Page 78: ...staller Does Not Start Automatically If the installer does not start automatically select Computer or My Computer from the Start menu then double click the FINEPIX CD icon to open the FINEPIX CD window and double click SETUP or SETUP EXE 4 If prompted to install Windows Media Player or DirectX follow the on screen instructions to complete installation 5 Remove the installer CD from the CD ROM driv...

Page 79: ...sands of colors or better Other Other Built in USB port recommended Operation is not guaranteed other USB ports Internet connection 56kbps or faster recommended required to use FinePix Internet Service Internet connection and e mail software required to use e mail option 2 After starting the computer and quitting any applications that may be running insert the installer CD in a CD ROM drive and do...

Page 80: ...rlier Open the Applications folder start Image Capture and select Preferences from the Image Capture application menu The Image Capture preferences dialog will be displayed Choose Other in the When a camera is connected open menu then select FPVBridge in the Applications FinePixViewer folder and click Open Quit Image Capture Mac OS X 10 6 Connect the camera and turn it on Open the Applications fol...

Page 81: ...the supplied USB cable as shown making sure the connectors are fully inserted Connect the camera directly to the computer do not use a USB hub or keyboard 3 Press the D button for about a second to turn the camera on MyFinePix Studio or FinePixViewer will start automatically follow the on screen instructions to copy pictures to the computer To exit without copying pictures click Cancel C Caution I...

Page 82: ... access pictures saved to a network server using the supplied software in the same way as on a standalone computer The user bears all applicable fees charged by the phone company or Internet service provider when using services that require an Internet connection Disconnecting the Camera After confirming that the indicator lamp is out follow the on screen instructions to turn the camera off and di...

Page 83: ...OGRAM AE 2 Press the selector up or down to highlight the desired menu item 3 Press the selector right to display options for the highlighted item 1 2 SHOOTING MENU IMAGE QUALITY AUTO STD F AUTO AUTO AUTO NORMAL FINE 4 Press the selector up or down to highlight the desired option 5 Press MENU OK to select the highlighted option 6 Press DISP BACK to exit from the menu ANote Some options are not ava...

Page 84: ... series i y3 2 16 9 7 n m16 9 m t i FinePix JZ300 JZ310 series y 3 2 g16 9 0 n m16 9 m t y TIMAGE QUALITY Choose image quality pg 60 FINE NORMAL NORMAL WFINEPIX COLOR Shoot pictures in standard or saturated color or in black and white pg 60 c M N f c CWHITE BALANCE Adjust color for different light sources pg 61 AUTO p q s t u r AUTO 2 2 2 2 ECONTINUOUS Shoot a series of pictures pg 61 m OFF OFF 3F...

Page 85: ...re shown by an icon in the display o o IMAGE SIZE IMAGE SIZE Choose the size at which still pictures are recorded Large pictures can be printed at large sizes with no drop in quality small pictures require less memory allowing more pictures to be recorded Option Option Prints at sizes up to Prints at sizes up to i y g 31 23cm 12 9in or 31 21cm 12 8in 7 0 22 16cm 8 5 6 5in n 17 13cm 7 5in m 14 10cm...

Page 86: ... Choose how much image files are compressed Select FINE low compression for higher image quality NORMAL high compression to increase the number of pictures that can be stored W W FINEPIX COLOR FINEPIX COLOR Enhance contrast and color saturation or take pictures in black and white Option Option Displayed in Displayed in cv STANDARD Standard contrast and saturation Recommended in most situations Mv ...

Page 87: ...hts u Use under cool white fluorescent lights r Use under incandescent lighting If AUTO does not produce the desired results for example when taking close ups choose the option that matches the light source ANote Results vary with shooting conditions Play pictures back after shooting to check colors in the monitor E E CONTINUOUS CONTINUOUS Capture motion in a series of pictures The camera takes up...

Page 88: ...oving subject keeping it in focus START TRACKING CANCEL ANote TRACKING may not work depending on the subject S S FACE RECOGNITION FACE RECOGNITION FinePix JZ500 JZ510 FinePix JZ500 JZ510 series only series only Once personal information is registered with a face the camera recognizes the registered face and prioritizes focus and exposure to that face When playing back the face the registered infor...

Page 89: ...shoot Capture a front face CANCEL REGISTER FACE CAPTURE THE FACE ALONG WITH THE GUIDLINE 4 Press MENU OK to display PERSONAL INFO NAME BIRTHDAY CATEGORY 2050 12 31 NONE PERSONAL INFO PERSONAL INFO BACK BACK ANote When the message CANNOT REGISTER is displayed the camera has failed to register the face Take a shot again Registering a name Registering a name 1 Press the selector up or down to highlig...

Page 90: ...ring a birthday Registering a birthday 1 Press the selector up or down to highlight BIRTHDAY in PERSONAL INFO 2 Press MENU OK to display BIRTHDAY 3 Input the date of birthday in the same way as setting e DATE TIME pg 12 4 Press MENU OK to register ANote If shooting date matches the birthday of the person with the green border during face zoom Happy Birthday will be displayed with the name Register...

Page 91: ...FO NAME BIRTHDAY CATEGORY 2050 12 31 NONE PERSONAL INFO BACK REPLACING IMAGE 4 View the registration or edit as the same way of REGISTER pg 63 ANote Select REPLACING IMAGE to take another face image and replace the registered image with it ERASE ERASE 1 Select ERASE from S FACE RECOGNITION 2 Press the selector left or right to highlight a face to erase 3 Press MENU OK to display ERASE window SET E...

Page 92: ...on can be registered If 8 people s information has already been registered the confirmation window appears when trying to add a new one Delete a registered person from VIEW EDIT and register the new person When 8 people s information has already been registered AUTO REGISTRATION does not function If the camera detects two or more faces registered by S FACE RECOGNITION a green border and orange bor...

Page 93: ...OVAL ERASE IMAGE SEARCH SLIDE SHOW PROTECT CROP EXIT 3 Press the selector up or down to highlight the desired menu item 4 Press the selector right to display options for the highlighted item 1 2 PLAYBACK MENU RED EYE REMOVAL ERASE IMAGE SEARCH SLIDE SHOW PROTECT CROP BACK FRAME ALL FRAMES 5 Press the selector up or down to highlight the desired option 6 Press MENU OK to select the highlighted opti...

Page 94: ...ced red eye pg 69 OPROTECT Protect pictures from accidental deletion pg 70 RCROP Create cropped copies of pictures pg 71 2 2 2 2 jRESIZE Create small copies of pictures pg 72 NIMAGE ROTATE Rotate pictures pg 72 PCOPY Copy pictures between internal memory and a memory card pg 73 QVOICE MEMO Add voice memos to pictures pg 75 SERASE FACE RECOG FinePix JZ500 JZ510 series only Erase personal informatio...

Page 95: ...MULTIPLE Display several pictures at once ANote The camera will not turn off automatically while a slide show is in progress a a RED EYE REMOVAL RED EYE REMOVAL If the current picture is marked with a B icon to indicate that it was taken with Intelligent Face Detection this option can be used to remove red eye The camera will analyze the image if red eye is detected the image will be processed to ...

Page 96: ...ges Press DISP BACK to exit when the operation is complete SET ALL SET ALL Press MENU OK to protect all pictures or press DISP BACK to exit without changing picture status YES CANCEL SET ALL OK IT MAY TAKE A WHILE RESET ALL RESET ALL Press MENU OK to remove protection from all pictures or press DISP BACK to exit without changing picture status YES CANCEL RESET ALL OK IT MAY TAKE A WHILE If the num...

Page 97: ... of image currently displayed in monitor Zoom indicator If the size of the final copy will be t OK will be displayed in yellow B Tip Intelligent Face Detection If the picture was shot with Intelligent Face Detection pg 24 B will be displayed in the monitor Press the F button to zoom in on the selected face 2 Press MENU OK A confirmation dialog will be displayed CANCEL REC REC OK Copy size is shown...

Page 98: ...MAGE ROTATE By default pictures taken in tall orientation are displayed in wide orientation Use this option to display pictures in the correct orientation in the monitor It has no effect on pictures displayed on a computer or other device ANotes Protected pictures can not be rotated Remove protection before rotating pictures pg 70 The camera may not be able to rotate pictures created with other de...

Page 99: ...be rotated P P COPY COPY Copy pictures between internal memory and a memory card 1 Press the selector up or down to highlight d INTERNAL MEMORY g x CARD copy pictures from internal memory to the memory card or x CARD g d INTERNAL MEMORY copy pictures from a memory card to internal memory 2 Press the selector right to display options for the highlighted item CARD INTERNAL MEMORY INTERNAL MEMORY CAR...

Page 100: ...rames 100 0001 100 0001 YES CANCEL COPY OK 1 Press the selector left or right to display the desired picture 2 Press MENU OK to copy the picture 3 Repeat steps 1 2 to copy additional images Press DISP BACK to exit when the operation is complete ALL FRAMES ALL FRAMES Press MENU OK to copy all pictures or press DISP BACK to exit without copying pictures 100 0001 100 0001 IT MAY TAKE A WHILE COPY ALL...

Page 101: ...s MENU OK to start recording 28s RECORDING REC RE REC Time remaining Blinks red 3 Press MENU OK again to end recording Recording ends automatically after 30 seconds REC RE REC FINISH ANotes If a voice memo already exists for the current picture the options at right will be displayed Select RE REC to replace the existing memo Voice memos are recorded as PCM format WAV files pg 100 30s REC STANDBY S...

Page 102: ... OK again to resume playback 15s 15s STOP PAUSE Progress bar Progress is shown in the monitor ANote The camera may not play voice memos recorded with other devices C Caution Do not cover the speaker during playback Speaker S S ERASE FACE RECOG ERASE FACE RECOG FinePix JZ500 JZ510 FinePix JZ500 JZ510 series only series only While playing back an image including faces registered with personal inform...

Page 103: ... RESET SILENT MODE FORMAT TIME DIFFERENCE OFF ENGLISH EXIT 2 Adjust settings 2 1 Press the selector right to activate the setup menu 2 2 Press the selector up or down to highlight a menu item 1 4 SET UP DATE TIME RESET SILENT MODE FORMAT OFF ENGLISH TIME DIFFERENCE EXIT 2 3 Press the selector right to display options for the highlighted item 2 4 Press the selector up or down to highlight an option...

Page 104: ...default values A confirmation dialog will be displayed press the selector left or right to highlight OK and press MENU OK mFORMAT Format internal memory or memory cards pg 81 2 4 2 4 aIMAGE DISP Choose how long pictures are displayed after shooting pg 81 3 SEC 1 5 SEC ZOOM CONTINUOUS OFF 1 5 SEC bFRAME NO Choose how files are named pg 82 CONTINUOUS RENEW CONTINUOUS dOPERATION VOL Adjust the volume...

Page 105: ...era is in the shooting mode k CONTINUOUS only when the shutter button is pressed halfway l SHOOTING ONLY or OFF k CONTINUOUS l SHOOTING ONLY OFF k aRED EYE REMOVAL Remove red eye effects caused by the flash ON OFF ON cDIGITAL ZOOM Enable or disable digital zoom pg 84 ON OFF OFF 4 4 4 4 RSAVE ORG IMAGE Choose whether to save unprocessed copies of pictures taken using red eye removal ON OFF OFF qBAC...

Page 106: ...1 23 00 00 1 3 Press the selector left or right to highlight hours or minutes press up or down to edit The minimum increment is 15 minutes 1 4 Press MENU OK when settings are complete 2 Switch between local time and your home time zone To set the camera clock to local time highlight j LOCAL and press MENU OK To set the clock to the time in your home time zone select k HOME If j LOCAL is selected j...

Page 107: ... Choose how long pictures are displayed in the monitor after shooting 3 SEC Pictures are displayed for about 3s before being recorded to the memory card 1 5 SEC Pictures are displayed for about 1 5s before being recorded to the memory card ZOOM CONTINUOUS Pictures are displayed until the MENU OK button is pressed Pictures can be zoomed in to check fine details When the picture is zoomed in the sel...

Page 108: ...hether file numbering is reset to 0001 when a new memory card is inserted or the current memory card or internal memory is formatted CONTINUOUS Numbering continues from the last file number used or the first available file number whichever is higher Choose this option to reduce the number of pictures with duplicate file names RENEW Numbering is reset to 0001 after formatting or when a new memory c...

Page 109: ...turns off automatically when no operations are performed Shorter times increase battery life if OFF is selected the camera must be turned off manually Note that regardless of the option selected the camera will not turn off automatically when connected to a printer pg 46 or computer pg 51 or when a slide show is in progress pg 69 B Tip Reactivating the Camera To reactivate the camera after it has ...

Page 110: ...gger digital zoom further magnifying the image To cancel digital zoom zoom out to the minimum digital zoom position and select B Zoom indicator Zoom indicator DIGITAL ZOOM on Zoom indicator DIGITAL ZOOM off B B A A Digital zoom Optical zoom Optical zoom C Caution Digital zoom produces lower quality images than optical zoom ...

Page 111: ...UJIFILM and other manufacturers Available from third party suppliers ComputerRelated ComputerRelated Computer USB SD card slot or card reader Audio Visual Audio Visual TV Audio visual output Printer Printing Printing PictBridge compatible printer USB HDMI cable HDTV SD SDHC memory card HD player ...

Page 112: ...city batteries can be purchased as required Battery charger BC 45W supplied Replacement battery chargers can be purchased as required The BC 45 charges an NP 45 battery in about 120 minutes at 25 C 77 F AC power adapter AC 5VX requires CP 45 Use for extended playback or when copying pictures to a computer shape of adapter and plug vary with region of sale DC coupler CP 45 Connect the AC 5VX to the...

Page 113: ...ing the camera at the beach or seaside avoid exposing the camera to water or sand Do not place the camera on a wet surface Condensation Condensation Sudden increases in temperature such as occur when entering a heated building on a cold day can cause condensation inside the camera If this occurs turn the camera off and wait an hour before turning it on again If condensation forms on the memory car...

Page 114: ...nected The battery runs down quickly The battery is cold Warm the battery by placing it in a pocket or other warm place and re insert it in the camera immediately before taking a picture There is dirt on the battery terminals Clean the terminals with a soft dry cloth The camera is in SRC mode Select another shooting mode 20 The battery has been charged many times The battery has reached the end of...

Page 115: ... lights but the battery does not charge There is dirt on the battery terminals Clean the terminals with a soft dry cloth The battery has been charged many times The battery has reached the end of its charging life Purchase a new battery If the battery still fails to charge contact your FUJIFILM dealer The charger is not correctly plugged into a power outlet Plug the charger correctly into the powe...

Page 116: ...The subject is not suited to autofocus Use focus lock 26 Intelligent Face Detection Face detection not available Intelligent Face Detection is not available in the current shooting mode Choose a different shooting mode 20 No face is detected The subject s face is obscured by sunglasses a hat long hair or other objects Remove the obstructions 24 The subject s face occupies only a small area of the ...

Page 117: ...sh mode is not available in the current shooting mode Choose a different shooting mode 20 The camera is in silent mode Turn silent mode off 32 The flash does not fully light the subject The subject is not in range of the flash Position the subject in range of the flash 103 The flash window is obstructed Hold the camera correctly 15 There is a dark part on the fringe of an image The image was taken...

Page 118: ...9 Vertical lines appear in pictures The camera has been used continuously at high temperatures Turn the camera off and wait for it to cool down Smear appears in pictures The sun or another bright object was in the frame White or purple vertical lines may appear when a very bright object is framed in the display This is normal and does not indicate a malfunction Smear is not recorded in photographs...

Page 119: ...rent make or model of camera 35 72 Pictures were saved or cropped at the size of t or copies created with j RESIZE Audio No sound in voice memo and movie playback The camera is in silent mode Turn silent mode off 32 Playback volume is too low Adjust playback volume 83 The microphone was obstructed Hold the camera correctly during recording 75 The speaker is obstructed Hold the camera correctly dur...

Page 120: ...he camera is not set to the correct video standard Match the camera r VIDEO SYSTEM setting to the TV 79 The volume on the television is too low Adjust the volume No color The camera is not set to the correct video standard Match the camera r VIDEO SYSTEM setting to the TV 79 Computer The computer does not recognize the camera The camera is not properly connected Connect the camera correctly 55 Pic...

Page 121: ...mera malfunction Remove and reinsert the battery or disconnect and reconnect the AC adapter DC coupler 6 The battery is exhausted Insert a fresh or fully charged spare battery 6 The camera does not function as expected Temporary camera malfunction Remove and reinsert the battery or disconnect and reconnect the AC adapter DC coupler If the problem persists contact your FUJIFILM dealer 6 ...

Page 122: ...dark use the flash FOCUS ERROR TURN OFF THE CAMERA AND TURN ON AGAIN Camera malfunction Turn the camera off and then on again taking care not to touch the lens If the message persists contact a FUJIFILM dealer The lens barrel is touched NO CARD No memory card inserted when P COPY is selected in the playback menu Insert a memory card CARD NOT INITIALIZED The memory card or internal memory is not fo...

Page 123: ...ictures or insert a memory card with more free space d MEMORY FULL INTERNAL MEMORY IS FULL INSERT A NEW CARD WRITE ERROR Not enough memory remaining to record additional pictures Delete pictures or insert a memory card with more free space The memory card or internal memory is not formatted Format the memory card or internal memory pg 81 Memory card error or connection error Re insert the memory c...

Page 124: ...a protected picture Remove protection before deleting rotating or adding voice memos to pictures 5 ERROR Voice memo file is corrupt The voice memo can not be played back Camera malfunction Contact a FUJIFILM dealer x NO IMAGE The source device selected in the playback P COPY menu contains no pictures Select a different source d NO IMAGE t CAN NOT CROP An attempt was made to crop a t picture These ...

Page 125: ...ere being printed or copied to a computer or other device Confirm that the device is turned on and that the USB cable is connected PRINTER ERROR Printer out of paper or ink or other printer error Check printer see printer manual for details To resume printing turn the printer off and then turn it back on PRINTER ERROR RESUME Check printer see printer manual for details If printing does not resume ...

Page 126: ...t Photographic Experts Group A compressed file format for color images The higher the compression rate the greater the loss of information and more noticeable drop in quality when the picture is displayed Motion JPEG An AVI Audio Video Interleave format that stores sound and JPEG images in a single file Motion JPEG files can be played in Windows Media Player requires DirectX 8 0 or later or QuickT...

Page 127: ...INE Movies Movies i i y y3 2 3 2 16 9 16 9 7 7 n n m m16 9 16 9 m m t t 1 1 2 2 1 1 9 9 1 1 Internalmemory Internalmemory approx 40MB approx 40MB 7 8 9 11 25 38 41 219 26 sec 61 sec 1GB 1GB 170 200 230 280 620 930 1 010 5 160 5 min 12 min 21 min 2GB 2GB 360 400 470 560 1 230 1 870 2 000 10 330 10 min 25 min 43 min 4GB 4GB 720 810 950 1 120 2 480 3 760 4 000 20 680 20 min 50 min 87 min 8GB 8GB 1 44...

Page 128: ...230 270 320 620 930 1 010 5 160 5 min 12 min 21 min 2GB 2GB 410 460 550 650 1 230 1 870 2 000 10 330 10 min 25 min 43 min 4GB 4GB 830 930 1 110 1 310 2 480 3 760 4 000 20 680 20 min 50 min 87 min 8GB 8GB 1 680 1 880 2 240 2 640 4 980 7 540 8 030 41 500 42 min 100 min 176 min 16GB 16GB 3 330 3 740 4 450 5 250 9 880 14 970 15 940 82 360 83 min 200 min 349 min 1 Individual movies cannot exceed 2GB in...

Page 129: ...048 1 536 m16 9 1 920 1 080 m 1 600 1 200 t 640 480 m 1 600 1 200 t 640 480 Lens Fujinon 10 optical zoom lens F3 3 wide angle F5 6 telephoto Focal length f 5 0mm 50 0mm 35 mm format equivalent 28mm 280mm Digital zoom Approx 6 4 up to 64 when combined with optical zoom Approx 6 0 up to 60 when combined with optical zoom Aperture F3 3 F6 4 wide angle F5 6 F11 0 telephoto uses Neutral Density ND filt...

Page 130: ...ePix JZ300 JZ310 series up to 1 1fps max 3 frames Focus Mode Center AF Tracking AF P AUTO Autofocus system Contrast detect TTL AF White balance Automatic scene detection six manual preset modes for direct sunlight shade daylight fluorescent warm white fluorescent cool white fluorescent and incandescent Self timer Off 2sec 10sec Flash Auto flash effective range when sensitivity is set to AUTO is ap...

Page 131: ...n red eye removal micro thumbnail multi frame playback image search crop resize slide show image rotation voice memo Other options PictBridge Exif Print language selection Japanese English French German Spanish Italian Simplified Chinese Korean Dutch Portuguese Russian Thai Turkish Traditional Chinese Czech Hungarian Polish Swedish Slovak Danish Norwegian Finnish Arabic Farsi Greek Lithuanian Ukra...

Page 132: ...sing a battery use the battery supplied with the camera The storage media should be SD memory card Note that the number of shots that can be taken with a fully charged battery varies with temperature and shooting conditions Camera dimensions W H D 97 0mm 57 0mm 28 5 22 0 mm 3 8in 2 2in 1 1 0 9 in excluding projecting parts measured at the thinnest part Camera weight Approx 148g 5 2oz excluding bat...

Page 133: ...15g 0 5oz BC 45W battery charger Rated input 100V 240V AC 50 60Hz Input capacity 8 0VA 100V 12VA 240V Rated output 4 2V DC 550mA Supported batteries NP 45A NP 45 rechargeable batteries Charging time Approx 120 minutes Dimensions W H D 91mm 62mm 23mm 3 6in 2 4in 0 9in Weight Approx 67g 2 4oz excluding battery Operating temperature 0 C 40 C 32 F 104 F The weight and dimensions vary with the country ...

Page 134: ...liable for damages resulting from errors in this manual Although the monitor is manufactured using advanced high precision technology small bright points and anomalous colors particularly in the vicinity of text may appear This is normal for this type of monitor and does not indicate a malfunction images recorded with the camera are unaffected Digital cameras may malfunction when exposed to strong...

Page 135: ...7 3 AKASAKA 9 CHOME MINATO KU TOKYO 107 0052 JAPAN http www fujifilm com ...

Page 136: ...FUJIFILM FinePix CD FINEPIX JZ500 JZ510 Series FINEPIX JZ300 JZ310 Series ...

Page 137: ...ed by visiting our website at www fujifilmusa com If you are experiencing technical problems or need product information please contact our Digital Help Desk at 800 800 FUJI 3854 Option 1 Monday Friday 9 00am to 8 00pm EST digitalinfo fujifilm com For warranty parts or service inquiries please contact our Camera Repair Department at 800 659 3854 Option 1 Monday Friday 9 00am to 8 00pm EST THANK YO...

Page 138: ...ty policy is found on our website at www fujifilm ca Garantie I soutien technique Cette camera est couverte par la garantie de manufacture de FUJIFILM CANADA incluant Ie support technique Votre releve de caisse est requis pour la garantie et I enregistrement en ligne activera Ie service de soutien technique et garantie avotre intention 2 2 Notre politique de garantie peut etre trouvee sur notre si...

Page 139: ...registration include Product Protection o With the information you provide we can confirm the date of purchase of your product This is a benefit to you in the event your original proof of purchase is lost Registration Incentives o By registering your product you will be eligible for special promotions ...

Page 140: ...damage incurred in transit or otherwise in connection with the return of the Product nor will FUJIFILM be responsible for the return of any items that are included with the Product SOME STATES DO NOT ALLOW CERTAIN CONDITIONS ON THE REPAIR OR REPLACEMENT OF WARRANTED PRODUCTS SO THE ABOVE MAY NOT APPLY TO YOU THE FOREGOING LIMITED WARRANTY IS FUJIFILM S ONLY WARRANTY WITH RESPECTTO THE PRODUCT AND ...

Reviews: