background image

81

Men

u

s

Using the Menus: Shooting Mode

5

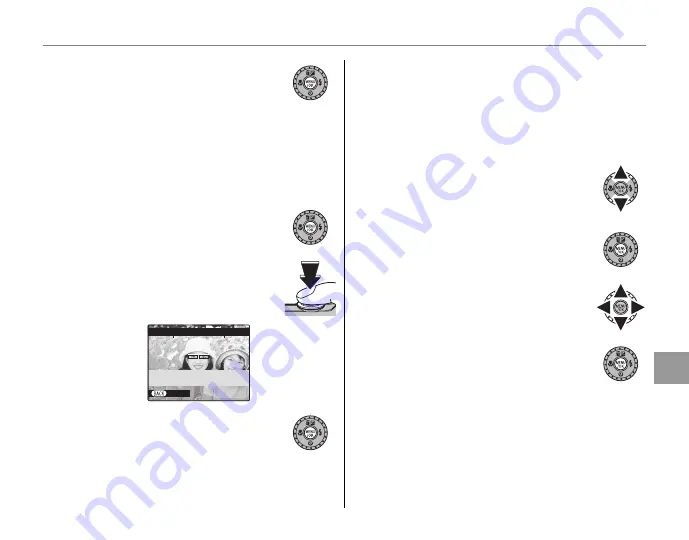
 Press 

MENU/OK

 to activate 

S


FACE 

RECOGNITION

.


REGISTER

REGISTER

Shooting

Shooting

1

 Select 

REGISTER

 from 

S


FACE 

RECOGNITION

.

2

 Press 

MENU/OK

 to turn to shooting 

mode.

3

  Press the shutter button to shoot.

Capture a front face.

CANCEL

REGISTER FACE

CAPTURE THE FACE
ALONG WITH THE GUIDLINE

4

 Press 

MENU/OK

 to display 

PERSONAL 

INFO

.

A

 Note

•  When the message 

!CANNOT REGISTER

 is 

displayed, the camera has failed to register the face. 
Take a shot again.

Registering a name

Registering a name

1

  Press the selector up or down to 

highlight 

NAME

 in 

PERSONAL 

INFO

.

2

 Press 

MENU/OK

 to display 

NAME


window.

3

  Press the selector left, right, up or 

down to highlight a letter.

4

 Press 

MENU/OK

 to input the letter.

5

  Repeat from step 2 to step 4 to input a 

name.

Summary of Contents for FinePix F300EXR

Page 1: ...TAL CAMERA For information on related products visit our website at http www fujifilm com products digital_cameras index html Owner s Manual Thank you for your purchase of this product This manual des...

Page 2: ...he openings should never be blocked by placing the video product on a bed sofa rug or other similar surface This video product should not be placed in a built in installation such as a bookcase or rac...

Page 3: ...ning and power line surges Service Service Servicing Do not attempt to service this video product yourself as opening or removing covers may expose you to dangerous voltage or other hazards Refer all...

Page 4: ...or electric shock Contact your FUJIFILM dealer Do not allow water or foreign objects to enter the camera If water or foreign objects get inside the camera turn the camera off remove the battery and d...

Page 5: ...ory Card seek medical attention or call an emergency number CAUTION CAUTION Do not use this camera in locations affected by oil fumes steam humidity or dust This can cause a fire or electric shock Do...

Page 6: ...fter it has been charged or immediately after being used This is perfectly normal Do not recharge a fully charged battery Battery Life At normal temperatures the battery can be used at least 300 times...

Page 7: ...g the camera s Discharging rechargeable batteries function Deactivation and memory are specific to Ni MH batteries and are not in fact battery faults See OWNER S MANUAL for the procedure for Dischargi...

Page 8: ...action indicated If liquid crystal comes in contact with your skin Wipe the area with a cloth and then wash thoroughly with soap and running water If liquid crystal gets into your eye Flush the affect...

Page 9: ...lossary Glossary pg 122 pg 122 The meanings of some technical terms may be found here TableofContents TableofContents pg xiii pg xiii The Table of Contents gives an overview of the entire manual The p...

Page 10: ...to power off 103 How do I make the display brighter or darker LCD brightness 103 How do I stop the camera beeping and clicking Operation and shutter volume 98 Silent mode 19 Can I change the sound the...

Page 11: ...T CAT 28 Can I prioritize to focus the specified person s face Face Recognition 80 How do I shoot close ups Close ups macro mode 37 How do I keep the flash from firing Flash mode 38 How do I stop my...

Page 12: ...ing pictures 45 Can I mark images with favorite 9 rating 9 Favorites 42 Can I zoom in on pictures during playback Playback zoom 43 How do I view a lot of pictures at once Multi frame playback 44 How d...

Page 13: ...XR 21 Adv ADVANCED 22 SP SCENE POSITION 27 M MANUAL 30 P PROGRAM AE 31 A APERTURE PRIORITY AE 31 S SHUTTER PRIORITY AE 32 Focus Lock 33 5 Exposure Compensation 36 L Macro Mode Close ups 37 K Using the...

Page 14: ...de 85 Using the v Mode Menu 85 v Mode Menu Options 85 q SLIDE SHOW 86 Using the Playback Menu 87 Playback Menu Options 88 a RED EYE REMOVAL 89 O PROTECT 89 R CROP 90 j RESIZE 91 N IMAGE ROTATE 92 P CO...

Page 15: ...on that may be helpful when using the camera Menus and other text in the camera monitor are shown in bold In the illustrations in this manual the monitor display may be simplified for explanatory purp...

Page 16: ...and dial pg 13 19 Tripod mount 20 Speaker 95 21 Connector for USB cable 56 65 Connector for A V cable 54 22 HDMI Micro Connector 54 23 Battery latch 6 7 24 Battery chamber 6 25 Memory card slot 9 10 I...

Page 17: ...de 17 26 Exposure compensation 36 1 Internal memory indicator 2 Focus frame 33 3 Silent mode indicator 19 4 Continuous shooting mode 78 5 Metering 79 6 Intelligent Face Detection indicator 74 7 Shooti...

Page 18: ...ADVANCED Sophisticated techniques made easy pg 22 O Improve clarity reduce noise increase dynamic range or let the camera automatically adjust settings to suit the scene pg 21 SP SCENE POSITION Choose...

Page 19: ...ght C Caution Unplug the charger when it is not in use Remove dirt from the battery terminals with a clean dry cloth Failure to observe this precaution could prevent the battery from charging Charging...

Page 20: ...rds Do not use excessive force when handling the battery chamber cover 2 Insert the battery Insert the battery with the terminals first and the orange stripe aligned with the orange battery latch Slid...

Page 21: ...by an AC adapter demo mode instructions will be displayed when the camera is turned on Selecting this option starts a slide show To cancel press the shutter button C Caution Do not affix stickers or...

Page 22: ...be sure to delete pictures when they are no longer needed When a memory card is inserted as described below the card will be used for recording and playback CompatibleMemoryCards CompatibleMemoryCards...

Page 23: ...orientation shown below slide it all the way in Press firmly until it clicks into place Click Battery C Caution Be sure card is in correct orientation do not insert at an angle or use force If the mem...

Page 24: ...of reach of children If a child swallows a memory card seek medical assistance immediately miniSD or microSD adapters that are larger or smaller than the standard dimensions of an SD card may not ejec...

Page 25: ...y fingerprints and other marks on the lens Keep the lens clean The n button does not completely disconnect the camera from its power supply Playback Mode Playback Mode To turn the camera on and begin...

Page 26: ...PORTUGU S FRANCAIS ESPA OL 1 1 Press the selector up or down to highlight a language 1 2 Press MENU OK 2 Set the date and time SET NO DATE TIME NOT SET 2012 2011 2009 2008 1 1 12 00 AM 2010 YY MM DD...

Page 27: ...Press MENU OK B Tip The Camera Clock If the battery is removed for an extended period the camera clock will be reset and the language selection dialog will be displayed when the camera is turned on S...

Page 28: ...pops up and when turned off it will retract Do not push down the flash when turning on the camera 2 Check the battery level Check the battery level in the display q w e r Indicator Indicator Descript...

Page 29: ...or scene detected Type of subject or scene detected H PORTRAIT Human portrait subject I LANDSCAPE Man made or natural landscape J NIGHT Poorly lit landscape K MACRO Subject close to camera T BACKLIT...

Page 30: ...rol Select B to zoom out Select A to zoom in Zoom indicator Holding the Camera Hold the camera steady with both hands and brace your elbows against your sides Shaking or unsteady hands can blur your s...

Page 31: ...the horizon HD FRAMING Displays the High Definition HD 16 9 crop Avoiding Blurred Pictures If the subject is poorly lit blurring caused by camera shake can be reduced by activating the Z DUAL IS MODE...

Page 32: ...lamp will blink green Change the composition or use focus lock pg 33 6 Shoot Smoothly press the shutter button the rest of the way down to take the picture B Tip The Shutter Button The shutter button...

Page 33: ...layed Silent mode can also be set from the setup menu pg 97 The Indicator Lamp Indicator lamp The indicator lamp shows camera status as follows Indicator lamp Indicator lamp Camera status Camera statu...

Page 34: ...ictures Press the selector right to view pictures in the order recorded left to view pictures in reverse order Press the shutter button to exit to shooting mode Deleting Pictures To delete the picture...

Page 35: ...ODE and press MENU OK 2 Press the selector up or down to highlight one of the following options Option Option Description Description rP AUTO The camera automatically selects the scene and P mode acco...

Page 36: ...e dial to Adv 2 Press MENU OK to display the Adv menu MOTION PANORAMA 360 SET CANCEL Take ultra panoramic image up to 360 by sweeping the camera ANote If the shooting menu is displayed highlight A Adv...

Page 37: ...OK 3 Press the shutter button all the way down to start recording There is no need to keep the shutter button pressed during recording ANote The camera zooms all the way out and zoom remains fixed at...

Page 38: ...t motion such as waves and waterfalls or subjects that undergo marked changes in brightness Panoramas may be blurred if the subject is poorly lit For Best Results For best results move the camera in a...

Page 39: ...NESS in 3 steps before shooting ANote When a subject is too close to the background the camera may not create effect to a picture When the message 5 CANNOT CREATE EFFECT appears during focus lock take...

Page 40: ...ake can be reduced and pictures with low noise can be taken even with high sensitivity ANote When shooting a moving subject the function may not work Pictures may be saved without merged depending on...

Page 41: ...Press MENU OK to display the following menu CANCEL SET PORTRAIT Portrait with soft overall tone and beautiful skin tones ANote If the shooting menu is displayed highlight A SCENE POSITION and press ME...

Page 42: ...he camera detects faces of many kinds of dogs or cats in Y DOG or T CAT some kinds of dogs or cats may not be detected Also some shooting conditions may prevent the camera from detecting the face of a...

Page 43: ...is given to faster shutter speeds D NIGHT Choose this mode for poorly lit twilight or night scenes Sensitivity is automatically raised to reduce blur caused by camera shake U NIGHT TRIPOD Choose this...

Page 44: ...choose the aperture 3 Press the selector up l to highlight shutter speed ANote Highlight changes between the shutter speed and aperture each time the selector l is pressed 4 Rotate the command dial to...

Page 45: ...he metering range of the camera the shutter speed and aperture displays will show Press the shutter button halfway to measure exposure again A A APERTURE PRIORITY AE APERTURE PRIORITY AE You select th...

Page 46: ...SHUTTER PRIORITY AE You choose the shutter speed while the camera adjusts aperture for optimal exposure 1 Rotate the mode dial to S Shutter speed will be displayed 1000 2 Rotate the command dial to ch...

Page 47: ...osure will remain locked while the shutter button is pressed halfway AF AE lock 250 250 F3 5 F3 5 Press halfway Repeat steps 1 and 2 as desired to refocus before taking the picture 3 Recompose the pic...

Page 48: ...cts in clothing that is the same color as the background Subjects positioned in front of or behind a high contrast object that is also in the focus frame for example a subject photographed against a b...

Page 49: ...halfway ANote Avoid shining the AF assist illuminator directly into your subject s eyes See page 97 for information on disabling the AF assist illuminator The camera may be unable to focus using the...

Page 50: ...the display A value can also be selected by rotating the command dial Choose positive values to increase exposure Choose negative values to reduce exposure 3 Return to shooting mode Press MENU OK to r...

Page 51: ...r the center of the frame Use the zoom control to compose pictures To exit macro mode press the selector left L and select OFF Macro mode can also be cancelled by turning the camera off or selecting a...

Page 52: ...e selector right K The flash mode changes each time the selector is pressed in modes other than 4 the current mode is indicated by an icon in the display Choose from the following options Mode Mode De...

Page 53: ...y down to shoot C Caution The flash may fire several times with each shot Do not move the camera until shooting is complete Pressing the flash down turns off the flash Red Eye Removal When Intelligent...

Page 54: ...is pressed The current self timer mode is displayed in the monitor OFF OFF Select from the following options y OFF 8 AUTO RELEASE c 10SEC b 2SEC 8 8 AUTO RELEASE AUTO RELEASE The shutter is released a...

Page 55: ...ay in the monitor shows the number of seconds remaining until the shutter is released To stop the timer before the picture is taken press DISP BACK 99 The self timer lamp on the front of the camera wi...

Page 56: ...picture currently displayed in full frame playback press DISP BACK and press the selector up and down to select from zero to five stars B Tip Favorites Ratings can be used for image search pg 49 Choos...

Page 57: ...lay Navigation window shows portion of image currently displayed in monitor Zoom indicator Press DISP BACK to exit zoom ANote Playback zoom is not available with cropped or resized copies saved at a s...

Page 58: ...e the number of pictures displayed to one frame with previous and next two nine and a hundred Select A to reduce the number of images displayed Use the selector to highlight images and press MENU OK t...

Page 59: ...playback menu 2 Press the selector up or down to highlight M ERASE 3 Press the selector right to display delete options 4 Press the selector up or down to highlight FRAME or ALL FRAMES 5 Press MENU O...

Page 60: ...DISP BACK to exit when all the desired pictures have been deleted ALL FRAMES ALL FRAMES DeletingAllImages DeletingAllImages Selecting ALL FRAMES displays the confirmation shown at right ERASE ALL OK I...

Page 61: ...elected search conditions pg 49 ANote Neither photographs t or smaller nor movies can be selected for photobooks 5 Scroll through the images and press the selector up to select or deselect the current...

Page 62: ...tudio software Viewing Photobooks Viewing Photobooks Highlight a book in the photobook assist menu and press MENU OK to display the book then press the selector left and right to scroll through the pi...

Page 63: ...S Find all pictures with a specified rating pg 42 BY SCENE Show images based on the specified scene mode BY TYPE OF DATA Show images based on whether still pictures or movies 2 Press MENU OK to select...

Page 64: ...vertical panoramas from top to bottom The following operations can be performed during playback Operation Operation Button Button Description Description Start pause playback Press the selector down t...

Page 65: ...yed before recording begins Movies are recorded as motion JPEG files If the subject is poorly lit the AF assist lamp may light to assist the focus operation To turn the AF assist lamp off select OFF f...

Page 66: ...p is lit Failure to observe this precaution could prevent the movie from being played back B Tip 3 Intelligent Face Detection The camera automatically detects faces and optimizes focus and exposure Ch...

Page 67: ...yback is not in progress pressing the selector up will delete the current movie Advance rewind Press the selector right to advance left to rewind If playback is paused the movie will advance or rewind...

Page 68: ...the cable Connect yellow plug to video in jack Connect white plug to audio in jack Insert into A V cable connector Connecting the Camera to High Definition HD TVs An HDMI cable available from third p...

Page 69: ...s are played back on the TV Note that the camera volume controls have no effect on sounds played on the TV use the television volume controls to adjust the volume ANote Image quality drops during movi...

Page 70: ...cond to turn the camera on w USB will be displayed in the monitor followed by the PictBridge display shown below at right USB 00 OK SET FRAME PICTBRIDGE TOTAL 00000 SHEETS Printing Selected Pictures P...

Page 71: ...rs that support date printing ANote Use an optional AC adapter and DC coupler to power the camera for extended periods Print pictures from internal memory or a memory card that has been formatted in t...

Page 72: ...DPOF in the playback menu pg 56 1 In the PictBridge display press DISP BACK to open the PictBridge menu PRINT DPOF PRINT WITH DATE PRINT WITHOUT DATE PICTBRIDGE 2 Press the selector up or down to high...

Page 73: ...or WITHOUT DATE 2 3 PLAYBACK MENU RESIZE PRINT ORDER VOICE MEMO COPY IMAGE ROTATE ERASE FACE RECOG WITH DATE WITHOUT DATE RESET ALL WITH DATE y Print date of recording on pictures WITHOUT DATE Print p...

Page 74: ...ders can contain a maximum of 999 pictures If a memory card is inserted containing a print order created by another camera the message shown at right will be displayed Pressing MENU OK cancels the pri...

Page 75: ...m requirements Windows 7 Windows 7 Windows Vista Windows Vista Windows XP Windows XP CPU CPU 3 GHz Pentium 4 or better 2 GHz Pentium 4 or better RAM RAM 1 GB or more 512 MB or more Free disk space Fre...

Page 76: ...Does Not Start Automatically If the installer does not start automatically select Computer or My Computer from the Start menu then double click the FINEPIX CD icon to open the FINEPIX CD window and do...

Page 77: ...housands of colors or better Other Other Built in USB port recommended Operation is not guaranteed other USB ports Internet connection broadband recommended required to use auto update feature and whe...

Page 78: ...lier Open the Applications folder start Image Capture and select Preferences from the Image Capture application menu The Image Capture preferences dialog will be displayed Choose Other in the When a c...

Page 79: ...he supplied USB cable as shown making sure the connectors are fully inserted Connect the camera directly to the computer do not use a USB hub or keyboard 3 Press the D button for about a second to tur...

Page 80: ...access pictures saved to a network server using the supplied software in the same way as on a standalone computer The user bears all applicable fees charged by the phone company or Internet service pr...

Page 81: ...Menu Mode Menu 1 Press the v button to display the v MODE menu 2 Press the selector up or down to highlight the desired menu item 3 Press the selector right to display options for the highlighted ite...

Page 82: ...ect is poorly lit AUTO AUTO 1600 AUTO 800 AUTO 400 12800 6400 3200 1600 800 400 200 100 AUTO oIMAGE SIZE Choose image size and aspect ratio pg 69 o 4 3 o 3 2 o 16 9 p 4 3 p 3 2 p 16 9 q 4 3 q 3 2 q 16...

Page 83: ...selected when the subject is poorly lit Settings other than AUTO are shown by an icon in the display o o IMAGE SIZE IMAGE SIZE Choose the size and aspect ratio at which still pictures are recorded La...

Page 84: ...when the camera is turned off or another shooting mode is selected W W FILM SIMULATION FILM SIMULATION Simulate the effects of different types of film including sepia and black and white Option Option...

Page 85: ...down to highlight the desired menu item 3 Press the selector right to display options for the highlighted item 4 Press the selector up or down to highlight the desired option 5 Press MENU OK to select...

Page 86: ...vity pg 69 Choose higher values when the subject is poorly lit AUTO AUTO 1600 AUTO 800 AUTO 400 12800 6400 3200 1600 800 400 200 100 AUTO oIMAGE SIZE Choose image size and aspect ratio pg 69 o 4 3 o 3...

Page 87: ...pg 78 R S o m OFF OFF 3FACE DETECTION Turn Intelligent Face Detection on or off pg 74 ON OFF OFF BPHOTOMETRY Choose how the camera meters exposure pg 79 N O P N FAF MODE Choose how the camera selects...

Page 88: ...ye effects caused by the flash B icon appears in monitor when Intelligent Face Detection is on ANote When removing red eye effect select ON for a RED EYE REMOVAL in the setup menu pg 97 1 Frame the pi...

Page 89: ...is taken B Tip Red Eye Removal Select ON for the H SAVE ORIGINAL IMAGE option in the setup menu pg 97 to save unprocessed copies of pictures created with a RED EYE REMOVAL Intelligent Face Detection...

Page 90: ...shooting conditions ANote D 800 is available only when U DYNAMIC RANGE is selected in O mode and an option other than d Velvia VIVID or e ASTIA SOFT is selected for W FILM SIMULATION C C WHITE BALANC...

Page 91: ...a white object so that it fills the monitor and press the shutter button all the way down to measure white balance If COMPLETED is displayed press MENU OK to set white balance to the measured value T...

Page 92: ...recording is in progress ANote The Self Timer If the self timer is used only one picture will be taken when R or o is selected STORING STORING E E CONTINUOUS CONTINUOUS Capture motion in a series of p...

Page 93: ...sure across multiple shots with the same lighting and is particularly effective for landscapes and portraits of subjects dressed in black or white F F AF MODE AF MODE This option controls how the came...

Page 94: ...G button to set TRACKING The focus frame will track the moving subject keeping it in focus START TRACKING CANCEL ANote TRACKING may not work depending on the subject S S FACE RECOGNITION FACE RECOGNI...

Page 95: ...PTURE THE FACE ALONG WITH THE GUIDLINE 4 Press MENU OK to display PERSONAL INFO ANote When the message CANNOT REGISTER is displayed the camera has failed to register the face Take a shot again Registe...

Page 96: ...r down to highlight BIRTHDAY in PERSONAL INFO 2 Press MENU OK to display BIRTHDAY 3 Input the date of birthday in the same way as setting e DATE TIME pg 12 4 Press MENU OK to register ANote If shootin...

Page 97: ...INFO 4 View the registration or edit as the same way of REGISTER pg 81 ANote Select REPLACING IMAGE to take another face image and replace the registered image with it ERASE ERASE 1 Select ERASE from...

Page 98: ...e s information can be registered If 8 people s information has already been registered the confirmation window appears when trying to add a new one Delete a registered person from VIEW EDIT and regis...

Page 99: ...splay the v MODE menu 3 Press the selector up or down to highlight the desired menu item 4 Press the selector right to display options for the highlighted item 5 Press the selector up or down to highl...

Page 100: ...will continue when the movie ends The show can be ended at any time by pressing MENU OK Option Option Displayed in Displayed in NORMAL Press selector left or right to go back or skip ahead one frame S...

Page 101: ...ayback menu 3 Press the selector up or down to highlight the desired menu item 4 Press the selector right to display options for the highlighted item 5 Press the selector up or down to highlight the d...

Page 102: ...TECT Protect pictures from accidental deletion pg 89 RCROP Create cropped copies of pictures pg 90 jRESIZE Create small copies of pictures pg 91 NIMAGE ROTATE Rotate pictures pg 92 PCOPY Copy pictures...

Page 103: ...n processed using red eye removal or pictures created with other devices The amount of time needed to process the image varies with the number of faces detected Copies created with a RED EYE REMOVAL a...

Page 104: ...complete C Caution Protected pictures will be deleted when the memory card or internal memory is formatted pg 101 R R CROP CROP To create a cropped copy of a picture play the picture back and select R...

Page 105: ...s MENU OK to save the cropped copy to a separate file j j RESIZE RESIZE To create a small copy of a picture play the picture back and select j RESIZE in the playback menu 1 Press the selector up or do...

Page 106: ...tures can not be rotated Remove protection before rotating pictures pg 89 The camera may not be able to rotate pictures created with other devices To rotate a picture play the picture back and select...

Page 107: ...t FRAME or ALL FRAMES 4 Press MENU OK B Tip Copying Pictures Between Memory Cards To copy pictures between two memory cards insert the source card and copy the pictures to internal memory then remove...

Page 108: ...pictures Remove protection from pictures before recording voice memos pg 89 1 Hold the camera at a distance of about 20cm 8in and face the microphone Microphone 2 Press MENU OK to start recording 28s...

Page 109: ...menu To end playback press the selector up Press the selector left to rewind right to fast forward Volume controls can be displayed by pressing the MENU OK button press the selector up or down to adj...

Page 110: ...t J J DISP ASPECT DISP ASPECT Choose the aspect ratio used when photographs with at a 4 3 aspect ratio pg 70 are viewed on a High Definition device pg 54 This option is available when an HDMI cable i...

Page 111: ...he selector up or down to select 4 The setup menu appears 2 Adjust settings 2 1 Press the selector right to activate the setup menu 2 2 Press the selector up or down to highlight a menu item 2 3 Press...

Page 112: ...COLOR and VIDEO SYSTEM to default values A confirmation dialog will be displayed highlight OK and press MENU OK mFORMAT Format internal memory or memory cards pg 101 aIMAGE DISP Choose how long pictur...

Page 113: ...cDIGITAL ZOOM Enable or disable digital zoom pg 104 ON OFF OFF bAF ILLUMINATOR Turn the AF assist illuminator on or off pg 35 ON OFF ON HSAVE ORG IMAGE Choose whether to save unprocessed copies of pi...

Page 114: ...r right to highlight hours or minutes press up or down to edit The minimum increment is 15 minutes 1 4 Press MENU OK when settings are complete 2 Switch between local time and your home time zone To s...

Page 115: ...rmatting a a IMAGE DISP IMAGE DISP Choose how long pictures are displayed in the monitor after shooting 3 SEC Pictures are displayed for about 3s before being recorded to the memory card 1 5 SEC Pictu...

Page 116: ...adding one to the last file number used The file number is displayed during playback as shown at right FRAME NO controls whether file numbering is reset to 0001 when a new memory card is inserted or t...

Page 117: ...the selector up or down to choose display brightness and press MENU OK to select o o AUTO POWER OFF AUTO POWER OFF Choose the length of time before the camera turns off automatically when no operatio...

Page 118: ...hooting mode G V Y or T mode is selected in the shooting mode c c DIGITAL ZOOM DIGITAL ZOOM If ON is selected selecting A at the maximum optical zoom position will trigger digital zoom further magnify...

Page 119: ...omatically to save power This option is recommended when the camera is used for extended periods at high temperatures to prevent mottled vertical streaks from appearing in photographs w QUICK AF Reduc...

Page 120: ...facturers Available from third party suppliers FINEPIX F300EXR DIGITAL CAMERA ComputerRelated ComputerRelated Computer USB SD card slot or card reader Audio Visual Audio Visual TV Audio visual output...

Page 121: ...pplied Additional NP 50 large capacity batteries can be purchased as required Battery charger BC 45W supplied Replacement battery chargers can be purchased as required The BC 45W charges an NP 50 batt...

Page 122: ...camera at the beach or seaside avoid exposing the camera to water or sand Do not place the camera on a wet surface Condensation Condensation Sudden increases in temperature such as occur when entering...

Page 123: ...battery by placing it in a pocket or other warm place and re insert it in the camera immediately before taking a picture There is dirt on the battery terminals Clean the terminals with a soft dry clot...

Page 124: ...ut the battery does not charge There is dirt on the battery terminals Clean the terminals with a soft dry cloth The battery has been charged many times The battery has reached the end of its charging...

Page 125: ...a fresh or fully charged spare battery 6 The camera has turned off automatically Turn the camera on 11 The monitor goes dark after shooting The flash has fired The monitor may darken while the flash c...

Page 126: ...a small area of the frame Change the composition so that the subject s face occupies a larger area of the frame The subject s head is at an angle or the subject is not facing the camera Ask the subje...

Page 127: ...essed Do not touch the flash 39 Flash mode not available The desired flash mode is not available in the current shooting mode Choose a different shooting mode 21 The camera is in silent mode Turn sile...

Page 128: ...atures Turn the camera off and wait for it to cool down Smear appears in pictures The sun or another bright object was in the frame White or purple vertical lines may appear when a very bright object...

Page 129: ...e The pictures were taken with a different make or model of camera The pictures were cropped or resized to the size of t Audio No sound in voice memo and movie playback The camera is in silent mode Tu...

Page 130: ...he camera is not set to the correct video standard Match the camera r VIDEO SYSTEM setting to the TV 97 The volume on the television is too low Adjust the volume No color The camera is not set to the...

Page 131: ...era malfunction Remove and reinsert the battery or disconnect and reconnect the AC adapter DC coupler 6 The battery is exhausted Insert a fresh or fully charged spare battery 6 The camera does not fun...

Page 132: ...rk use the flash FOCUS ERROR TURN OFF THE CAMERA AND TURN ON AGAIN Camera malfunction Turn the camera off and then on again taking care not to touch the lens If the message persists contact a FUJIFILM...

Page 133: ...ctures or insert a memory card with more free space d MEMORY FULL INTERNAL MEMORY IS FULL INSERT A NEW CARD WRITE ERROR Not enough memory remaining to record additional pictures Delete pictures or ins...

Page 134: ...e to delete rotate or add a voice memo to a protected picture Remove protection before deleting rotating or adding voice memos to pictures 5 ERROR Voice memo file is corrupt The voice memo can not be...

Page 135: ...ing the volume COMMUNICATION ERROR A connection error occurred while pictures were being printed or copied to a computer or other device Confirm that the device is turned on and that the USB cable is...

Page 136: ...mera can be controlled by adjusting aperture and shutter speed HDMI High Definition Multimedia Interface An interface standard for the transmission of images and sound that adds audio input to the DVI...

Page 137: ...emory approx 40MB 4GB 4GB 8GB 8GB FINE FINE NORMAL NORMAL FINE FINE NORMAL NORMAL FINE FINE NORMAL NORMAL Photographs Photographs o o 4 3 4 3 8 13 830 1 330 1 680 2 670 o o 16 9 16 9 10 17 1 110 1 770...

Page 138: ...20 1 080 Horizontal 5 120 720 W Motion Panorama 120 Vertical 2 560 1 080 Horizontal 2 560 720 Lens Fujinon 15 optical zoom lens F3 5 wide angle F5 3 telephoto Focal length f 4 4mm 66 0mm 35 mm format...

Page 139: ...cal stabilization CCD shift Intelligent Face Detection Available Shutter speed combined mechanical and electronic shutter D 1 4 s 1 1 000 s U 3s 1 1 000 s W 4s 1 2 s S 3s 1 2 000 s Manual selection 8s...

Page 140: ...ng options EXR mode EXR AUTO RESOLUTION PRIORITY HIGH ISO LOW NOISE D RANGE PRIORITY FACE RECOGNITION motion panorama 360 Intelligent Face Detection with red eye removal PRO LOW LIGHT PRO FOCUS Dog Ca...

Page 141: ...ng Products Association standard procedure for measuring digital still camera battery consumption extract When using a battery use the battery supplied with the camera The storage media should be SD m...

Page 142: ...oz BC 45W battery charger Rated input 100V 240V AC 50 60Hz Input capacity 8 0VA 100V 12VA 240V Rated output 4 2V DC 550mA Supported batteries NP 50 rechargeable batteries Charging time Approx 150 minu...

Page 143: ...eld liable for damages resulting from errors in this manual Although the monitor is manufactured using advanced high precision technology small bright points and anomalous colors particularly in the v...

Page 144: ...7 3 AKASAKA 9 CHOME MINATO KU TOKYO 107 0052 JAPAN http www fujifilm com...

Page 145: ...V V Y Y T T K K L L D D U U W W E E F F G G X X I I O O P P L LMacro mode Macro mode K KFlash Flash AUTO AUTO 1 1 K K 1 1 W W 1 1 1 1 1 1 1 1 1 1 1 1 T T V V 1 1 U U 1 1 Z Z J JSelf Self timer timer...

Page 146: ...1 1 1 1 1 1 1 1 1 1 1 1 1 1 1 1 1 1 1 AUTO 1600 AUTO 1600 AUTO 800 AUTO 800 AUTO 400 AUTO 400 12800 128005 5 6400 64005 5 3200 32004 4 1600 1600 800 800 400 400 200 200 8 8 8 8 8 8 100 100 8 8 8 8 8 8...

Page 147: ...1 1 1 1 1 1 1 1 1 x x T T7 7 1 1 X X m mPOWER POWER MANAGEMENT MANAGEMENT v v w w x x Z ZDUAL IS MODE DUAL IS MODE 2 2 3 3 2 2 3 3 b bAF AF ILLUMINATOR ILLUMINATOR 3 3 3 3 3 3 3 3 3 3 3 3 3 3 c cDIGIT...

Reviews: