background image

3

55

a

MACRO (CLOSE-UP) PHOTOGRAPHY

This mode can be selected in the “

5

o

9

0

-

and 

3

” photography modes.

Selecting Macro mode allows you to take close-
up shots.

Effective Photography Range:

Approx. 10 cm to 80 cm (3.9 in. to 2.6 ft.)

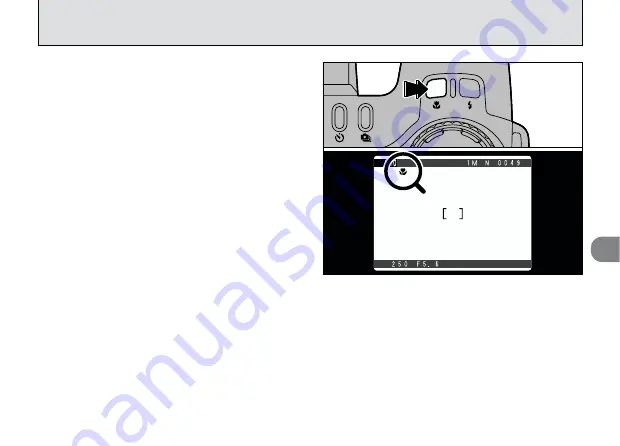
When you press the “

a

” button, the “

a

” icon

appears on the screen and the camera is in Macro
mode. Press the “

a

” button again to cancel Macro

mode.

!

The focal length is equivalent to that of a 35 mm –
80 mm optical zoom on a 35 mm camera. The digital
zoom can also be used (

P.60).

!

Select the appropriate Flash mode for the conditions
(

P.51). Note that the effective flash range is approx.

30 cm to 80 cm (11.8 in. to 2.6 ft.).

!

If the flash is too bright, adjust the flash brightness
(

P.66).

!

When shooting in dark conditions, use a tripod to
prevent camera shake.

!

Macro photography is automatically cancelled in the
following situations:
• When the photography mode is switched to “

4

(excluding 

o

)

• 

u

`

”.

• When you switch to Playback mode.
• When the camera is switched off.

Summary of Contents for FINEPIX 6900 ZOOM

Page 1: ......

Page 2: ...in the U S A FCC Statement This device complies with part 15 of the FCC Rules Operation is subject to the following two conditions 1 This device may not cause harmful interference and 2 this device mu...

Page 3: ...and on the user is encouraged to try to correct the interference by one or more of the following measures Reorient or relocate the receiving antenna Increase the separation between the equipment and r...

Page 4: ...RDING IMAGES 34 PLAYBACK ZOOM 35 Saving Trimmed Images 36 MULTI FRAME PLAYBACK 37 ERASING SINGLE FRAME 38 USING A TV MONITOR 40 ADVANCED FEATURES 41 Photography mode specifications 41 5 AUTO 4 SCENE P...

Page 5: ...K 77 Playback mode menu 77 PLAYBACK INFORMATION 78 MOVIE PLAYBACK 79 Playing Back Movies 80 ERASING SINGLE ALL FRAMES FORMATTING 81 PLAYBACK AUTOMATIC PLAYBACK 83 O SETTING AND REMOVING SINGLE FRAME P...

Page 6: ...e Flush the affected eye with clean water for at least 15 minutes and then seek medical assistance If liquid crystal is swallowed Flush your mouth thoroughly with water Drink large quantities of water...

Page 7: ...shooting modes for different types of shots allow settings that are matched to your subject Convenient preview function so you can quickly check your shots Continuous shooting function even at maximu...

Page 8: ...etails Indicator lamp P 28 Command dial Mode dial P 11 Mode switch P 11 Hot shoe P 74 Focusing ring P 58 Shutter button Self timer lamp P 63 Flash button P 51 Self timer button P 62 Continuous shootin...

Page 9: ...finder monitor selector button P 24 33 Viewfinder EVF DISP button P 32 37 SHIFT button P 97 102 LCD monitor BACK button Tripod mount 4 direction button Battery cover P 16 MENU OK button Command dial S...

Page 10: ...l cover P 17 Flash control sensor Flash P 51 Flash pop up button P 51 Lens Focusing mode selector switch P 24 58 Zoom button P 25 T Telephoto W Wide angle INFO information check button P 64 78 DIGITAL...

Page 11: ...h Shutter priority auto P 44 Aperture priority auto P 44 Manual P 46 Setup P 95 Programed auto P 44 Auto P 24 42 Scene Position P 42 Movie P 48 Photography mode P 24 Playback mode P 33 Mode switch P 2...

Page 12: ...w warning AF warning Camera shake warning Example of Monitor Text Display Shooting Playback frame number Protection DPOF Time Playback mode Example of Monitor Text Display Playback Card access AF fram...

Page 13: ...er speed use the flash P 51 3 If you do not use a flash the shutter speed will be slow and a tripod should be used Photography modes and Responses Photography mode Response Overexposure 5 Auto 4 Scene...

Page 14: ...der and then back through fasteners A and B Pull the lens cap cord through the strap mount Fit and remove the lens cap by squeezing the left and right sides of the cap 2 1 Attach the lens cap cord to...

Page 15: ...tach the lens cap to the lens cap holder Using the Lens Cap Holder Attaching the shoulder strap incorrectly could result in the camera being dropped Attach the shoulder strap to the strap mounts After...

Page 16: ...ery cover without switching the camera off the camera settings may revert to the factory defaults Slide the battery cover and lift it open Insert the battery in the direction indicated by the arrow on...

Page 17: ...he camera on while the battery is charging the charging will stop By using the optional BC 80 Battery Charger you can reduce the charging time to approximately 70 minutes P 110 Check that the camera i...

Page 18: ...y convenient for travelling etc Compatible AC power adapters Model AC 5VS AC 5VH provided as an accessory or sold separately Problems arising through the use of products other than genuine FUJIFILM pr...

Page 19: ...f and open the slot cover Push the SmartMedia firmly into the SmartMedia slot as far as it will go Close the slot cover If you open the slot cover while the camera is switched on the camera is automat...

Page 20: ...pen the SmartMedia slot cover while the camera is switched on This could destroy the image data or damage the SmartMedia itself To protect the SmartMedia always store it in the special anti static cas...

Page 21: ...tends Take care not to press on the lens Check the battery level warning when you switch the camera on Battery has ample charge No indicator displayed The battery is approximately half charged Battery...

Page 22: ...on the setup menu If at least 3 hours have passed since the AC power adapter was connected or the battery inserted and date and time set then those settings will be maintained for roughly 1 hour even...

Page 23: ...o a setting other than to exit the SET UP screen If you hold down a or b the numbers change continuously When the time displayed passes 12 00 00 the AM PM setting automatically switches To set the tim...

Page 24: ...CRO P 55 Check that the lens is clean If it is dirty clean the lens as described on P 113 You can switch between using the viewfinder EVF and the monitor LCD to take pictures by pressing the EVF LCD b...

Page 25: ...ou can use the Zoom button or a and b on the 4 direction button to zoom in and out To zoom in on the subject press the T side of the button To zoom out press the W side When you use the zoom a zoom ba...

Page 26: ...ort double beep and NAF appears on the screen the camera cannot focus When you press the shutter button down halfway the image on the screen freezes temporarily However this image is not the recorded...

Page 27: ...another subject that is roughly the same distance away and has about the same brightness P 30 You can also focus the camera manually An easy solution is to use the one touch AF function to focus on a...

Page 28: ...accurate autofocus mechanism it may have difficulty focusing or not be able to focus at all for the types of subject and situation listed below In such cases the image may be out of focus Very shiny s...

Page 29: ...number of shots tends to be larger when there is more space remaining on the SmartMedia The numbers of available shots are shown for formatted SmartMedia Quality Mode Image Data Size MG 4S 4MB MG 8S...

Page 30: ...y locks the focus and exposure settings AF and AE lock If you want to focus on a subject that is not centered in the frame or change the picture composition after the exposure is set you can obtain go...

Page 31: ...the shutter speed and aperture setting You can reapply the AF AE lock as many times as you like before releasing the shutter The AF AE lock operates in all photography modes and can be used to ensure...

Page 32: ...tically When the image is printed the resulting print may be shifted slightly from the scene frame Text displayed Framing Guideline displayed No text displayed Scene Use this frame when you want to po...

Page 33: ...Viewed on the FinePix6900 ZOOM You can use this camera to view excluding some uncompressed data images recorded on an FinePix6900 ZOOM or images recorded onto a 3 3V SmartMedia using a FUJIFILM FineP...

Page 34: ...r about 1 second during playback During fast forward 3 frames are shown together in miniature on the monitor When you stop fast forward the image enclosed in the frame is displayed on the monitor as a...

Page 35: ...ges Max 13 J 1280 960 pixel images Max 8 K 640 480 pixel images Max 4 After you have zoomed in on your image Press the DISP button Use the ab and dc buttons to zoom in on different parts of the image...

Page 36: ...tions of less than K are not suitable for printing TRIMMING is no longer displayed and trimmed images cannot be saved 1 Saving Trimmed Images The size of the saved image varies depending on the zoom s...

Page 37: ...n disappears after about 3 seconds Multi frame playback cannot be used at the same time as playback zoom The displayed playback mode switches each time you press the DISP button Press the DISP button...

Page 38: ...he MENU OK button to display the menu screen on the monitor Select FRAME in the ERASE menu and press the MENU OK button See P 81 for more information on Erasing all frames and Formating Multi frame pl...

Page 39: ...played To cancel single frame erase press the BACK button to return to the menu To exit the menu screen press the BACK button again If is displayed the image protection must be removed to erase the im...

Page 40: ...et on the camera Plug the other end of the cable into the video input socket on the TV Then switch the camera and TV on and take pictures or play back images as you would normally If there is a power...

Page 41: ...Photography P 62 i 7 L O O O O O P Flash P 66 E White barance P 66 I Photometry P 69 R Sensitivity P 70 Auto bracketing P 70 S Sharpness P 72 A Multi exp P 72 External Flash P 74 0 AUTO MULTI 100 OFF...

Page 42: ...a wide range of situations In 4 Scene Position mode you can select 5 types of shot r t w y o Turn the command dial to select the setting 5 Auto 4 Scene Position This mode provides photography settings...

Page 43: ...w Synchro only Use this mode for shots of people Portrait mode provides soft tone images with natural skin colors When using the flash Auto Flash Red Eye Reduction Forced Flash Slow Synchro w Sports U...

Page 44: ...and aperture for you but still allows you to select the other camera settings Like the Shutter priority and Aperture priority modes this mode is relatively simple to use Program Shift 9 Programed Auto...

Page 45: ...binations without changing the exposure setting In Program Shift mode the shutter speed and aperture settings are displayed in yellow Program Shift is cancelled when you switch modes or switch the cam...

Page 46: ...llows you to set any shutter speed or aperture setting Shutter speed setting 1 steps 1 3 EV ISO 100 3 sec to 1 1000 sec ISO 200 3 sec to 1 1000 sec ISO 400 1 6 sec to 1 1000 sec Aperture setting F2 8...

Page 47: ...d turning the Command dial Use the exposure indicator on the monitor as a guide to setting the exposure Moving the indicator towards plus gives an overexposed image plus displayed in yellow while movi...

Page 48: ...112 320 240 pixels 10 frames per second Without sound 8 Movie Available recording time SmartMedia standard shooting time The numbers of available shots are shown for formatted SmartMedia SmartMedia C...

Page 49: ...and out When you use the zoom a Zoom bar appears on the screen Digital zoom focal distance Approx 35 mm to 70 mm 1 4 in to 2 8 in Approx 2 You do not need to hold down the shutter button The focus is...

Page 50: ...ng only 3 seconds of movie is recorded onto the SmartMedia If you press the shutter button during shooting shooting ends and the movie is recorded on the SmartMedia 6 Once the remaining time runs out...

Page 51: ...the photography mode is 5 use the Auto Flash mode When you pop the flash up the image shown on the screen may disappear and the screen may go dark This is because the flash is charging In this event...

Page 52: ...ake the actual picture The red eye reduction flash in 5 or 4 mode fires automatically when required by the conditions Red Eye Effect When you use the flash to photograph people in low light conditions...

Page 53: ...ses a slow shutter speed This allows you to take pictures of people at night that clearly show both your subjects and the nighttime backdrop Slow Synchro The image may be overexposed when you shoot br...

Page 54: ...sed Flash mode Use this mode for photography using indoor lighting for shots taken through glass and for photography in venues such as theaters or at indoor sporting events where the distance is too g...

Page 55: ...th is equivalent to that of a 35 mm 80 mm optical zoom on a 35 mm camera The digital zoom can also be used P 60 Select the appropriate Flash mode for the conditions P 51 Note that the effective flash...

Page 56: ...een and then press the AE L button The icon appears on the screen and the exposure is locked while you hold down the AE L button With the AE L button held down press the shutter button down halfway to...

Page 57: ...cene photographed is dark Exposure indicator moved towards plus Copying of printed text black characters on white paper 4 steps 1 3 EV Backlit portraits 2 to 4 steps 0 7 to 1 3 EV Very bright scenes s...

Page 58: ...the subject in the AF frame A focusing indicator mark appears on the screen Adjust the focus until appears The shot is focused The camera is focused too close Turn the focusing ring to the right The...

Page 59: ...d When you press the Focus Check button the central portion of the image is shown enlarged and you can focus using the enlarged image Pressing the button again returns you to the normal view One touch...

Page 60: ...ital zoom the video image on the monitor no longer changes smoothly The optical zoom is equivalent to approximately 35 mm 210 mm on a 35 mm camera See P 97 for information on changing the file size se...

Page 61: ...ous shooting is selected Press the e button again to cancel continuous shooting When you take a series of shots the resulting shots are displayed shown in order from left to right and automatically sa...

Page 62: ...aphy modes except u Each time you press the s button the setting moves one step in the sequence 2 SEC 10 SEC OFF You can also use the AF AE lock P 30 Take care not to stand in front of the lens when y...

Page 63: ...isplayed on the screen indicating the time remaining until the picture is taken Self timer mode is automatically cancelled after each shot To stop the self timer once it has started running press the...

Page 64: ...cannot recall the current photography settings you can check them by holding down the INFO button The photography information is not displayed in 5 4 or u mode You can only use this function to check...

Page 65: ...the menu Use d and c to select the menu item and a and b to change the setting Press the MENU OK button to confirm the setting 2 You cannot access the menu settings in 5 4 or u mode See P 41 for deta...

Page 66: ...information on EVs This mode can be selected in the 9 0 3 photography modes Change the white balance setting when you want to take a picture with the white balance fixed for the surroundings and ligh...

Page 67: ...amps n Shooting in incandescent light The white balance setting unless it is a Custom White Balance setting is ignored when you use the flash To achieve the desired effect in your shot press the flash...

Page 68: ...To use the white balance set previously press the MENU OK button without pressing the button The white balance setting does not affect the image shown on the screen After you take the picture you sho...

Page 69: ...selects the optimum exposure AVERAGE The advantage of this mode is that the exposure tends not to change for different compositions or subjects This mode is particularly effective for shots of people...

Page 70: ...tings are 1 3 2 3 and 1 EV See P 112 for more information on EVs This mode can be selected in the 9 0 3 photography modes Use this setting when you want to take bright pictures indoors without using a...

Page 71: ...ng The photographed images are displayed even when OFF is selected as the IMAGE DISPLAY setting P 98 It takes about 12 seconds to record the image data NORMAL G If you want to select the shots to be r...

Page 72: ...optical zoom can be used for multi exposure shots The digital zoom P 60 does not function This mode is automatically cancelled when you switch the camera off A MULTI EXP PHOTOGRAPHY MENU This mode can...

Page 73: ...button 3 A preview image is always shown regardless of the IMAGE DISPLAY setting However note that the Preview Zoom function cannot be used P 98 There is no limit on the number of multiple exposures...

Page 74: ...al flash on the camera s hot shoe Built in and external flash units cannot be used at the same time Compatible Flash Units Flash units that can be used with this camera must meet the following 3 condi...

Page 75: ...refer to the user s manual for the flash and specify the settings as described below Match the settings to the camera aperture setting In 9 or 0 mode match the settings to the aperture measured by the...

Page 76: ...white paper so that it fills the entire screen Then press the button to fire the flash and set the white balance 2 1 After you take the picture you should check the Color White Balance setting for th...

Page 77: ...e the AC Power Adapter AC 5VS AC 5VH sold separately to avoid any loss of power during still image or movie playback P 18 Playback mode menu ERASING SINGLE ALL FRAMES FORMATTING P 38 81 PLAYBACK AUTOM...

Page 78: ...ping upwards to the right Underexposed The number of shadow pixels is high with the distribution sloping upwards to the left The shape of the graph will vary depending on the subject 78 PLAYBACK INFOR...

Page 79: ...mal playback Movies are displayed somewhat smaller than still images Press b to play the movie The monitor shows the playback time and a playback progress bar If the subject of the movie is very brigh...

Page 80: ...e automatically stops when playback ends Playback Control Description Pauses the movie during playback Press this button again when the movie is paused to resume playback Pause Resume Stops playback S...

Page 81: ...ft dry cloth and then reload the SmartMedia If this does not resolve the problem format the card Press the BACK button to exit the menu If you press the MENU OK button the menu screen will appear on t...

Page 82: ...press the MENU OK button to proceed If you are erasing one frame use the d and c buttons to select the frame and then press the MENU OK button To cancel ERASE press the BACK button If the message is...

Page 83: ...hen playback ends the camera advances to the next frame Press d or c to select PLAYBACK Press the MENU OK button The image frames are automatically advanced and played back If you press the DISP butto...

Page 84: ...MENU OK Multi frame playback is an easy way to select images to be protected P 37 Protection A setting that prevents images from being inadvertently erased P 81 Press the MENU OK button to display the...

Page 85: ...e image is protected and the j icon appears on the screen To remove the protection press the MENU OK button again If you do not want to protect any images press the BACK button to return to the menu T...

Page 86: ...ay the menu on the monitor Use d or c to select O Press a or b to select PROTECT ALL or UNPROTECT ALL Press MENU OK Formatting erases all images including protected images P 81 O SETTING AND REMOVING...

Page 87: ...A confirmation screen will appear to proceed press the MENU OK button If you do not want to protect any images press the BACK button to return to the menu To exit the menu screen press the BACK button...

Page 88: ...FinePix6900 ZOOM Note that some printers do not support date and time imprinting or specification of the number of prints Note that the warnings shown below may be displayed while you are specifying t...

Page 89: ...y the menu on the monitor Press c to select F Use b to select kDATE OFF Press d or c to select DATE ON or DATE OFF This setting remains valid until you change the setting or switch the camera off Befo...

Page 90: ...specified Use a or b to specify the number of prints The F icon and the number of prints is displayed for the frames for which settings have been confirmed If the date has been set the k icon is also...

Page 91: ...the Settings When you have finished specifying the DPOF settings always press the MENU OK button to confirm the settings The total number of prints appears on the monitor and the menu screen reappears...

Page 92: ...ber of prints has been specified allowing you to check the settings for each frame Multi frame playback is an easy way to select images P 37 If you do not want to check or delete the DPOF settings pre...

Page 93: ...e print setting display the image for which the setting is to be deleted and then press the MENU OK button When the print setting has been deleted the next image appears with the message displayed Use...

Page 94: ...94 3 A confirmation screen appears To proceed press the MENU OK button A confirmation screen will appear to protect all images Press the MENU OK button F DPOF RESET ALL PLAYBACK MENU 2...

Page 95: ...switched to low power mode and then automatically switched off when the camera controls are not being used See P 100 112 for details Sets the volume of the tone emitted when the camera is used Sets th...

Page 96: ...setting Use d or c to change the settings Always switch the camera off when you are replacing the batteries If you open the battery cover or disconnect the AC power adapter without switching the came...

Page 97: ...ality and BASIC to increase the number of available shots In most cases the NORMAL setting provides more than adequate image quality Quality compression ratio When the mode switch is set to 1 excludin...

Page 98: ...view zoom and recorded images Press MENU OK to record the image Press BACK to discard the image You can enlarge the preview to check the image details Use a or b to zoom in or out Press the DISP butto...

Page 99: ...ting modes However preview zoom cannot be used Use d and c to select the images you do not want to record Press b to add or remove the C Mark Place an C mark under all the images you do not want to re...

Page 100: ...y When the camera is in sleep mode pressing the shutter button down halfway brings the camera back to full operational mode This is a useful feature as it allows you to take pictures more quickly than...

Page 101: ...les with file numbers higher than the highest file number on the last SmartMedia images are stored beginning from the highest file number on the current SmartMedia When you change the SmartMedia alway...

Page 102: ...You can only adjust the brightness when the Mode switch is set to either 1 or 2 Press d or c to adjust the brightness of the monitor Press the MENU OK button to confirm the setting To exit this proced...

Page 103: ...ormation to the Exif information for photographed images Camera Customization Refer to the Software Quick Start Guide booklet for information on installing the software You must be registered as a Fin...

Page 104: ...Mode dial to 2 Plug one end of the special USB cable supplied into the digital USB socket on the camera and then plug the other end into your computer The AC power adapter should be used for this oper...

Page 105: ...over or use any of the other camera controls while the camera is communicating with the computer The Auto Power Save function does not operate when the camera is connected to a computer See P 106 for...

Page 106: ...er Select the correct procedure below for the operating system used on your computer Then proceed to step on the right side of this page Windows 98 Check that the indicator lamp is green Windows Me 20...

Page 107: ...he data to the SmartMedia Disconnect the camera from the computer and unplug the special USB cable P 106 When you switch the camera on the customized screen appears Press c to check the details Press...

Page 108: ...ystem Expansion Options PC CARD ADAPTER FinePix6900 ZOOM Digital Camera Video output PC card slot Personal Computer commercially available Floppy disk drive USB IEEE 1394 USB USB SmartMedia PC Card Ad...

Page 109: ...gether The adapter ring is required for using commercially available filters Adapter ring specifications Compatible filters 55 mm diameter commercial filters Dimensions 39 mm 1 54 in 58 mm 2 28 in dia...

Page 110: ...e the accessories refer to the instructions provided with the accessory used SmartMedia These are separately available SmartMedia cards Use the following SmartMedia MG 4S 4MB 3 3V MG 8S 8MB 3 3V MG 16...

Page 111: ...l or iMac and models that support USB as standard DM R1 Image Memory Card Reader This device provides a simple way to transfer image data in either direction between your computer and an image memory...

Page 112: ...speed of the film or CCD The number is larger for bright subjects and smaller for dark subjects As the brightness of the subject changes a digital camera maintains the amount of light hitting the CCD...

Page 113: ...camera Condensation may also form on the SmartMedia card In this event remove the SmartMedia and wait a short time before using it again When the Camera is Unused for Long Periods If you do not intend...

Page 114: ...nother warm place to heat it and then loading it into the camera just before you take a picture If you are using a heating pad take care not to place the battery directly against the pad The camera ma...

Page 115: ...the battery to touch other metal objects Do not bring the battery close to a flame or throw it into a fire Do not attempt to disassemble or modify the battery Notes on storage To avoid damaging the ba...

Page 116: ...Do not drop or subject this device to strong shocks This device may emit a humming noise but this is normal If used near a radio this device may cause static so play the radio in a distant place Very...

Page 117: ...ata When the SmartMedia is used incorrectly by the owner or a third party When the SmartMedia is exposed to static electricity or electrical noise When the SmartMedia cover is opened or the SmartMedia...

Page 118: ...l onto the designated area of the card Do not use third party labels as this can lead to problems when the card is inserted or removed When you attach the label take care that it does not cover any of...

Page 119: ...als are soiled The SmartMedia is damaged The SmartMedia format is incorrect Wipe the contact area on the SmartMedia with a soft dry cloth It may be necessary to format the SmartMedia If the error mess...

Page 120: ...ing Displayed Explanation Remedy When you erase the image the DPOF settings for that image are deleted at the same time There is a print order specified for image you attempted to erase Aperture Shutt...

Page 121: ...resolve the problem contact an authorized FUJIFILM service center Prints were specified for more than 1000 frames in the DPOF frame settings The maximum number of frames for which prints can be specif...

Page 122: ...place to heat it and then load it into the camera just before you take a picture Wipe the battery terminals with a clean dry cloth Load a new battery No photograph is taken when the shutter button is...

Page 123: ...uto Red Eye Reduction or Forced Flash mode Load a new fully charged battery The playback image is too dark even though I used the flash The subject is too far away The flash was covered by your finger...

Page 124: ...ed Remove the battery re insert and try again Set the Mode switch and Mode dial to the correct setting Load a new fully charged battery There is no picture on the TV The camera and TV are connected in...

Page 125: ...able Custom white balance selectable 2 positions Focal range Normal Wide Approx 50 cm 1 6 ft to infinity Normal Tele Approx 90 cm 3 0 ft to infinity Macro Approx 10 cm 0 3 ft to 80 cm 2 6 ft Shutter 5...

Page 126: ...ons for use Temperature 0 C to 40 C 32 F to 104 F 80 humidity or less no condensation Camera dimensions W H D 110 mm 78 5 mm 93 5 mm 4 3 in 3 1 in 3 7 in not including accessories and attachments Came...

Page 127: ...ese Safety Notes and your Owner s Manual carefully beforehand After reading these Safety Notes store them in a safe place About the Icons The icons shown below are used in this document to indicate th...

Page 128: ...from the lightning discharge Do not modify heat or unduly twist or pull the connection cord and do not place heavy objects on the connection cord These actions could damage the cord and cause a fire...

Page 129: ...vehicle or in direct sunlight This can cause a fire Keep out of the reach of small children This product could cause injury in the hands of a child Do not place heavy objects on the camera This can ca...

Page 130: ...ra for an extended period remove the battery and disconnect and unplug the AC power adapter Failure to do so can cause a fire or electric shock Using a flash too close to a person s eyes may temporari...

Page 131: ...iazabu 2 chome Minato ku Tokyo 106 8620 Japan is in conformity with the following Standards Safety EN60065 EMC EN55022 1998 Classe B EN55024 1998 EN61000 3 2 1995 A1 1998 A2 1998 following the provisi...

Page 132: ...Printed in Japan FGS 103105 FG Printed on recycled paper 26 30 Nishiazabu 2 chome Minato ku Tokyo 106 8620 Japan...

Reviews: